


php editor Baicao introduces you 4 methods to remove the password protection of Word documents. In our daily work, sometimes we may encounter situations such as forgetting passwords or needing to share documents. At this time, it becomes particularly important to remove password protection. Through the following methods, you can easily solve this problem, restore free access to documents, and improve work efficiency.
When a document has a permission password set, it can be opened directly but cannot be edited, such as typing, copying, pasting, and deleting. This documentation protects against unauthorized modification or copying.
Another method is that when opening, a prompt will appear. Only the password can be edited, otherwise it will be opened in "read-only mode".
Let’s talk about how to remove the password that restricts editing and read-only mode in Word.
Method 1 (cancel restrictions on editing, convenient and quick if you know the original password)
1. Open the Word document, select [Review]-[Restrict Editing] on the upper toolbar 】.

Or select [File]-[Protect Document]-[Restrict Editing],

2. The above two methods will eventually pop up the [Restrict Editing] module, which will prompt that this document is protected. Click [Stop Protection] below, in the new dialog box, enter the originally set permission password, and then click [OK].
After closing the document and reopening it, the original permission protection has been cleared and the document can be freely edited.

Method two (cancel restrictions on editing, if you don’t remember the original password, it is convenient but there is a risk of loss)
Method one is to remove restrictions when you know the original password, because Only by entering the password can you proceed to the next step.
If you don’t remember the original password, we can solve it by changing the file format. Save Word as txt plain text format. After opening the txt text, the restricted password will no longer exist.
1. First, open the Word document, click [Save As] under the [File] option, and select the new path to save the changes on the right.

2. After the [Save As] dialog box pops up, under [Save as type], select "TXT plain text format", and then click [Save].

3. Subsequently, a risk warning dialog box will appear. Because the file is saved in plain text format, the original formats, tables, pictures, etc. will be lost. After clicking [OK], the text saved in txt format will have no editing restrictions.
So this method is only suitable for word documents that are pure text and do not pay attention to format. After all, although you can edit freely after conversion, it is still quite troublesome to rearrange the format and pictures.

Method three (Cancel the read-only mode, you can operate it even if you know the password, convenient and fast)
Word has set the read-only mode, and it will prompt when you open it, and you can only enter the password to Edit otherwise only in "read-only mode".

We can first select [Read-only], enter the Word document, select [File]-[Save As], and then select the new path to save the changes on the right.
In the pop-up dialog box, modify the file name, save it as a new file, and then click [OK].
After the newly saved file is opened, there will no longer be a read-only mode prompt, and it can be edited directly.

Method 4 (Use tools, convenient, fast, and safe)
This method is mainly used for those who want to remove the restricted password of Word, but do not remember the password, and do not want to use method 2 The person who caused the formatting or diagrams to be lost.
If you meet the above requirements, using tools is the easiest way. For example, Pepsi Niu Word Password Recovery Tool does not require a password. It just removes the restricted password of the Word document. After opening, it will still be the original file, and there will be no any changes.
Select the [Unrestriction] module in the tool, and then import the Word document.
Tool link: Pepsi Niu Word Password Recovery Tool

The Word file after the restriction is lifted will be saved in a new folder and the original file will not be overwritten. Click [Go to View] to open the folder where the Word document is located.

The above is the detailed content of 4 ways to remove password protection from Word documents. For more information, please follow other related articles on the PHP Chinese website!

 How to make a histogram in ExcelApr 22, 2025 am 10:33 AM
This tutorial explores three distinct methods for creating histograms in Excel: leveraging the Analysis ToolPak's Histogram tool, employing the FREQUENCY or COUNTIFS functions, and utilizing PivotCharts. While creating basic charts in Excel is strai
 Outlook signature: how to make, add and changeApr 22, 2025 am 09:54 AM
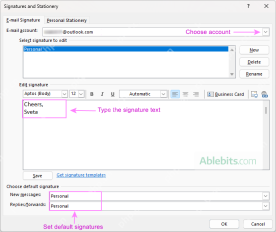
This comprehensive guide provides step-by-step instructions for creating and managing professional email signatures in Microsoft Outlook. Learn how to craft compelling signatures with images, clickable links, and more, across all Outlook versions (i
 Excel SUM formula to total a column, rows or only visible cellsApr 22, 2025 am 09:17 AM
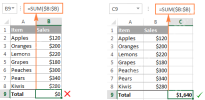
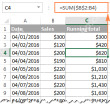
This tutorial demonstrates how to calculate sums in Excel using the AutoSum feature and custom SUM formulas for columns, rows, and selected ranges. It also covers summing only visible cells, calculating running totals, summing across multiple sheets
 How to AutoSum in ExcelApr 22, 2025 am 09:05 AM
This concise guide explains Excel's AutoSum feature and its efficient uses. Learn to quickly sum columns, rows, or visible cells, and troubleshoot common AutoSum issues. Excel's SUM function is incredibly popular, prompting Microsoft to include a ded
 Excel Switch function – the compact form of nested IF statementApr 22, 2025 am 09:04 AM
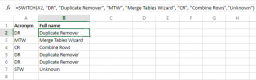
This article introduces the Excel SWITCH function, explaining its syntax and demonstrating its use in simplifying complex nested IF statements. If you've struggled with lengthy nested IF formulas, the SWITCH function offers a significant time-saving
 How to do a running total in Excel (Cumulative Sum formula)Apr 21, 2025 am 11:16 AM
This concise guide demonstrates how to efficiently calculate running totals (cumulative sums) in Excel using a SUM formula with strategically placed absolute and relative cell references. A running total displays the accumulated sum of a dataset as
 Excel LEN function: count characters in cellApr 21, 2025 am 10:10 AM
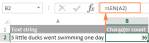
Are you looking for an Excel formula to count characters in a cell? If so, then you have certainly landed up on the right page. This short tutorial will teach you how you can use the LEN function to count characters in Excel, with or with
 How to count words in Excel - formula examplesApr 21, 2025 am 09:59 AM
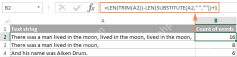
This tutorial demonstrates how to count words in Excel using a combination of the LEN, SUBSTITUTE, and TRIM functions. It offers both case-sensitive and case-insensitive formulas for counting total words or specific words/text within a cell or range


Hot AI Tools

Undresser.AI Undress
AI-powered app for creating realistic nude photos

AI Clothes Remover
Online AI tool for removing clothes from photos.

Undress AI Tool
Undress images for free

Clothoff.io
AI clothes remover

Video Face Swap
Swap faces in any video effortlessly with our completely free AI face swap tool!

Hot Article
Hot Tools

Atom editor mac version download
The most popular open source editor

SublimeText3 Linux new version
SublimeText3 Linux latest version

mPDF
mPDF is a PHP library that can generate PDF files from UTF-8 encoded HTML. The original author, Ian Back, wrote mPDF to output PDF files "on the fly" from his website and handle different languages. It is slower than original scripts like HTML2FPDF and produces larger files when using Unicode fonts, but supports CSS styles etc. and has a lot of enhancements. Supports almost all languages, including RTL (Arabic and Hebrew) and CJK (Chinese, Japanese and Korean). Supports nested block-level elements (such as P, DIV),

Zend Studio 13.0.1
Powerful PHP integrated development environment

SecLists
SecLists is the ultimate security tester's companion. It is a collection of various types of lists that are frequently used during security assessments, all in one place. SecLists helps make security testing more efficient and productive by conveniently providing all the lists a security tester might need. List types include usernames, passwords, URLs, fuzzing payloads, sensitive data patterns, web shells, and more. The tester can simply pull this repository onto a new test machine and he will have access to every type of list he needs.

