


How to connect the water block on the h610m-a motherboard?

php editor Apple introduces to you the wiring method of the water block of the h610m-a motherboard. The h610m-a motherboard is a high-performance motherboard that supports the installation of water blocks. When wiring, you first need to determine the interface type of the water block, and then plug it into the corresponding interface on the motherboard. Generally speaking, the water block will have two interfaces, one is CPU_FAN, which is used to connect to the CPU fan interface of the motherboard; the other is PUMP_FAN, which is used to connect to the water pump interface of the motherboard. After inserting, make sure that the interface plug and the interface socket are completely fitted, and then fix the wiring, and you can use the water block normally. Please note that the specific wiring methods may vary depending on the motherboard model. It is recommended to read the motherboard manual carefully or consult relevant technical support before installation.

How to wire the water block on the h610m-a motherboard?
If you want to connect the water block to the H610M-A motherboard, here are some basic steps:
1. Open the computer host and find the CPU fan interface on the motherboard. This connector is usually located centrally above the motherboard and is labeled "CPU_FAN" or similar.
2. Plug the power connector of the water block, usually a 4-pin connector, into the CPU fan connector. Make sure the plug and socket correspond correctly, otherwise the motherboard or water block may be damaged.
3. Plug the other connector of the water block into the AIO_PUMP or W_PUMP interface on the motherboard. If your motherboard doesn't have these markings, it can be plugged into any 3 or 4-pin fan connector.
4. Start the computer, enter the motherboard BIOS setting interface, and confirm the normal working status of the water block. In the BIOS setting interface, you can check the water block's speed, temperature, voltage and other parameters.
Notes:
1. Before connecting the water block power supply, make sure you have installed the CPU and radiator and use thermal paste correctly.
2. When inserting or unplugging the cable connector, be sure to insert and unplug gently, and do not use excessive force to prevent damage to the motherboard or water block.
3. If you are not sure how to connect the water block correctly, it is recommended that you check the user manual of the motherboard and water block or contact relevant technical support.
How to connect water cooling to Gigabyte b760 Xiaodiao motherboard?
Hello, 1. First, you need to prepare a water cooling system, including water pump, water tank, radiator, cold head, water pipes and other accessories.
2. Find the CPU slot on the Gigabyte B760 Xiaodiao motherboard and install the CPU.
3. Find the heat sink mounting hole next to the CPU socket on the motherboard and install the water cooling radiator on it.
4. Install the water pump and water tank at the appropriate location, connect the water pipes, and pay attention to the length and bending angle of the water pipes to ensure smooth water flow.
5. Connect the water pipe to the CPU cold head and radiator, paying attention to the connection position and direction.
6. After ensuring that the water cooling system is installed, start the computer, enter the BIOS setting interface, select the water cooling mode, and adjust the fan speed and water flow of the water cooling system.
7. After completing the above steps, you can enjoy a more efficient and low-noise water cooling effect.
Where is the water block 3pin connected to the motherboard?
Insert the power supply cable of the integrated water-cooled water pump in the following way: Find the 3-pin motherboard fan interface. These fan ports are usually on the edge of the motherboard, but do not plug it into the CPU fan. The fan must be inserted into the CPU fan port. Just plug in the fan of the water cooling tank.
Install the buckle of the water-cooling radiator on the back of the motherboard, and install the special fixing screws on the corresponding screw holes according to the CPU slot type (775775, 1150, 1156). After installation, the motherboard It can be installed inside the chassis.
One is the water inlet and the other is the water outlet. On the CPU, the water-cooled radiator has a water inlet and a water outlet. There are multiple water channels inside the radiator, so that the advantages of water cooling can be fully utilized and more water can be taken away. Much heat. This is the basic principle of water cooling radiator.
How do you know the motherboard supports water cooling?
See if there are CPU_OPT and AIO_PUMP interfaces.
These two interfaces are used to connect the water-cooling pump. Different motherboards have different names. Some motherboards will be marked CPU_OPT, some will be marked AIO_PUMP, and some motherboards will have both at the same time. Label. There are two NZXT dedicated RGB interfaces in the upper right corner of the motherboard.
Water cooling means installing a corresponding type of water-cooling head on the CPU or graphics card, as well as a water-cooling pump. You need to get a water-cooling radiator, install a fan on the water-cooling radiator, and connect them with the corresponding type of duct at the joint. You also need to make a pagoda head or quickly twist it, and then inject the water cooling liquid... It is much more troublesome than air cooling, and it also requires a lot of space inside the chassis (the integrated CPU water cooling is quite space-saving.
Air cooling , that is, you can see several fans in the main chassis, relying on the fans to cool down.
How to turn off the water cooling light on Gigabyte motherboard?
The water-cooled lighting on Gigabyte motherboards can be turned off through BIOS settings and software control. In the BIOS settings, you can find the LED Lighting item under the Advanced menu and select Off to turn off the water-cooled lighting. In addition, if you have installed the RGB Fusion software, you can find the option to control the motherboard lighting in the software. It is usually a light bulb icon or similar icon. After clicking it, select "Off" or set the brightness of the light to the lowest, which can also be turned off. The effect of water-cooled lighting. If you encounter any operational problems, it is recommended to refer to the motherboard or RGB Fusion software manual, or contact GIGABYTE customer service for help.
How to connect water cooling to ASUS b760m-ayw?
Asus B760M-AYW motherboard does not have a dedicated water-cooling pump interface, but you can use CPU_FAN, SYS_FAN, CHA_FAN, CPU_OPT and other interfaces to connect the water-cooling fan.
Among them, the CPU_FAN interface can be used to connect the water-cooling fan, the SYS_FAN interface can be used to connect the system fan, the CHA_FAN interface can be used to connect the chassis fan, and the CPU_OPT interface can be used to connect the water pump of the CPU radiator.
The motherboard only has cpu fan and sys fan. How can I connect it to water cooling?
Unable to connect to the water cooling system. Because the water cooling system needs to connect components such as water pumps and water tanks, the motherboard only provides two fan interfaces, CPU fan and sys fan. The wiring of the water-cooling system is very complicated, and you need to understand the circuit structure relationship between the motherboard and the water-cooling system. If not handled professionally or the wiring is incorrect, it will cause computer failure and damage. Therefore, if your motherboard only has CPU fan and sys fan, it cannot be connected to the water cooling system. If you want to use a water cooling system, you need to buy a motherboard with water cooling system accessories, or use an external water cooling system, which can avoid the above tedious problems.
How to insert water cooling into MSI b660m-g motherboard?
MSI B660M-G motherboard supports the installation of water cooling system. The following are general steps for reference:
1. Determine the applicable cooler: First, confirm that the water-cooling radiator you purchased is suitable for the MSI B660M-G motherboard. Depending on the type and specifications of the cooler, you'll need to determine if it's compatible with that motherboard's CPU socket and will fit into the motherboard's mounting holes.
2. Install the CPU: Before installing the water cooling system, make sure that the CPU has been correctly installed on the motherboard's CPU socket and that appropriate thermal paste has been applied.
3. Install the bracket: Install the bracket that comes with the cooler around the CPU socket on the motherboard. These brackets usually come in different shapes and hole locations and need to be installed correctly based on the cooler's requirements.
4. Install the cooler: Install the cooler to the bracket. The exact installation method may vary from cooler to cooler, but usually involves aligning the base of the cooler with the bracket and securing it with screws or snaps. Make sure the cooler is securely mounted on the motherboard.
5. Connect the power supply: Connect the fan and pump on the cooler to the corresponding slots or power connectors on the motherboard. Make sure the connection is correct and secure.
6. Complete the installation: After completing the installation of the water-cooling radiator, confirm again that all connections are secure, and then proceed with further setup and configuration according to the cooler's instructions.
Please note that the above steps are for reference only and the specific installation process may vary depending on the model and manufacturer of the cooler. Before installation, it is recommended to read the instruction manual of the purchased cooler carefully and follow the manufacturer's instructions. If necessary, you can also seek further guidance and advice from the manufacturer or relevant technical support.
Can ASUS h610m-e motherboard be water-cooled?
1. Can be equipped with water cooling 2. Because the ASUS h610m-e motherboard is designed with an interface and heat dissipation design adapted to the water cooling system, it can effectively reduce the temperature of the CPU and improve the heat dissipation effect. 3. Using a water cooling system can better maintain the stable operating temperature of the CPU and improve the performance and stability of the computer. In addition, the water cooling system can also reduce noise and provide better heat dissipation effect, which is suitable for users with higher heat dissipation requirements.
The above is the detailed content of How to connect the water block on the h610m-a motherboard?. For more information, please follow other related articles on the PHP Chinese website!

 Understanding Data Loss Risks of SSD Drives & How to PreventMay 15, 2025 pm 08:06 PM
Despite their impressive speed and reliability, SSDs are not immune to failures. This article from MiniTool delves into the most common data loss risks associated with SSD drives and provides effective strategies to minimize the risk of file loss.Qui
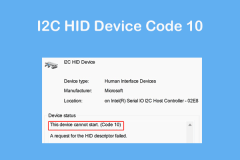 I2C HID Device Code 10 Happens on Win11/10? 8 Proven TipsMay 15, 2025 pm 08:05 PM
Have you encountered problems with I2C HID device code 10 on your Windows 11/10 computer? Learn how to fix code 10 errors with some proven solutions. Here, MiniTool will provide you with detailed guidance to help you solve your problem. Quick navigation: - I2C HID device cannot start code 10 - Fix 1: Disable and enable I2C HID devices - Fix 2: Change the power management settings - Fix 3: Uninstalling I2C HID device drivers - Fix 4: Uninstall and reinstall HID-compliant mouse driver - Fix 5: Update I2C HID device driver - Fix 6: Change BIOS settings - Fixed
 Laptop Shuts Down Without Low Battery Notification? Fix ItMay 15, 2025 pm 08:04 PM
If your laptop shuts down directly without warning when it is low, this may affect your work. To solve this problem, you can refer to the guide provided by MiniTool. Quick navigation: - No low battery notifications in Windows 11/10 - Method 1. Turn on Windows Notifications - Method 2. Run the power supply troubleshooting tool - Method 3. Change the battery power saving settings - Method 4. Check the power option settings - Method 5. Restore the default power plan - at last There is no low battery notification in Windows 11/10 When the battery is low, the desktop displays a warning message so that you can save your current work or plug in the charger. Usually, when the battery is low,
 A Complete Guide to Fix TeamViewer Protocol Negotiation FailedMay 15, 2025 pm 08:03 PM
TeamViewer enables users to remotely control another computer, share files, and engage in real-time communication. However, issues like "TeamViewer protocol negotiation failed" can arise, disrupting the connection. This article from MiniToo
 Windows 11 KB5058411 Not Installing? Try These MethodsMay 15, 2025 pm 08:02 PM
Microsoft has rolled out the KB5058411 update for Windows 11 version 24H2 users. If you're curious about the new features, how to download and install it, or what to do if KB5058411 fails to install, this MiniTool article has you covered.Quick Naviga
 How to fix Microsoft Office error code 0-2048 in Windows?May 15, 2025 pm 08:00 PM
Microsoft Office is a cornerstone Windows productivity software that enables applications like Word, Excel, and Outlook to execute document creation all the way
 Revenge of the Savage Planet Crashing/Not Launching: FixedMay 15, 2025 pm 06:01 PM
Nothing is more satisfying than having a problem with Survival: Revenge crashing or failing to start on PC. Don't worry, here are several fixes provided by MiniTool to solve these annoying problems. Quick navigation: - Fix 1. Run the game as administrator - Fix 2. Disable overlay - Fix 3. Update GPU drivers - Fix 4. Verify the integrity of the game file - in conclusion Survival of the Wild: Revenge is an exciting new adventure game where players travel between different planets, collecting resources and finding ways to return to Earth. Although the game isn't hardware-required, if you have problems with your download or your PC isn't fully updated, you may encounter Survival of the Wild: Revenge
 Top 5 Proven Fixes for VPN Not Working on ChromeMay 14, 2025 pm 08:02 PM
Are you experiencing issues with websites not loading on Google Chrome while using a VPN, yet other browsers function normally? This guide from MiniTool will help you understand the causes and provide solutions to fix VPN issues on Chrome.Quick Navig


Hot AI Tools

Undresser.AI Undress
AI-powered app for creating realistic nude photos

AI Clothes Remover
Online AI tool for removing clothes from photos.

Undress AI Tool
Undress images for free

Clothoff.io
AI clothes remover

Video Face Swap
Swap faces in any video effortlessly with our completely free AI face swap tool!

Hot Article
Hot Tools

SecLists
SecLists is the ultimate security tester's companion. It is a collection of various types of lists that are frequently used during security assessments, all in one place. SecLists helps make security testing more efficient and productive by conveniently providing all the lists a security tester might need. List types include usernames, passwords, URLs, fuzzing payloads, sensitive data patterns, web shells, and more. The tester can simply pull this repository onto a new test machine and he will have access to every type of list he needs.

PhpStorm Mac version
The latest (2018.2.1) professional PHP integrated development tool

SublimeText3 Mac version
God-level code editing software (SublimeText3)

Notepad++7.3.1
Easy-to-use and free code editor

MantisBT
Mantis is an easy-to-deploy web-based defect tracking tool designed to aid in product defect tracking. It requires PHP, MySQL and a web server. Check out our demo and hosting services.

