

How to easily configure multi-language support in Ubuntu Linux system

For users using non-English languages on Ubuntu Linux systems, you may encounter some display and input issues. However, this doesn't mean you have to rely entirely on the English system interface. In fact, configuring multi-language support for Ubuntu is very simple, just follow the steps described in this article.
This is a quick tutorial showing the steps to change language from the command line on Ubuntu and other Linux distributions.

In fact, I’ve been writing in Spanish. If you haven’t accessed it and/or you’re a Spanish speaker, visit It’s FOSS en Español and check out all Linux content in Spanish.
You may be wondering why I’m sharing this with you, and it’s because this post uses this new page as an example.
During a new installation of your favorite Linux distribution, you'll be asked to choose a primary language. Some people, like me, later consider changing the language to a new one, although this is not frequent.
You see, I had to take screenshots in both Spanish and English. This becomes a problem since I only have one computer and changing users is not a quick solution for me.
That's why I want to share this quick trick with you, where I'll show you how to change your main system language with two simple lines of text in the terminal.
let's start!
Changing the Linux system language from the terminal
Let's say you want to change your primary language from English to Spanish.
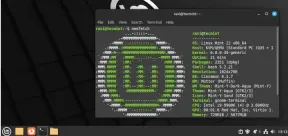
Confirm which language you have set as the default language (primary language). To do this, let's use the locale command.
locale
You should see something like this:
team@itsfoss:~$ locale
LANG=en_US.UTF-8
LANGUAGE=
LC_CTYPE="en_US.UTF-8"
LC_NUMERIC="en_US.UTF-8"
LC_TIME="en_US.UTF-8"
LC_COLLATE="en_US.UTF-8"
LC_MONETARY="en_US.UTF-8"
LC_MESSAGES="en_US.UTF-8"
LC_PAPER="en_US.UTF-8"
LC_NAME="en_US.UTF-8"
LC_ADDRESS="en_US.UTF-8"
LC_TELEPHONE="en_US.UTF-8"
LC_MEASUREMENT="en_US.UTF-8"
LC_IDENTIFICATION="en_US.UTF-8"
LC_ALL=
Here you can see that the main language is English. Now to change it, use the dpkg command as follows:
sudo dpkg-reconfigure locales
When you run the previous command, you should see the following page in the terminal: 
sudo dpkg reconfigure locales
Here you should use the up and down arrows to move until you reach the desired language. In my case I want Spanish, more specifically Mexican Spanish since I'm Mexican.
Not all languages have this option, but if yours does, choose UTF-8.
Once you find your language, press the space bar to mark it and press Enter. 
Selecting your language
Finally, in the last window, select the new language as your default language by using the arrow keys to move to it and pressing the Enter key. 
Setting new language as default
Once completed, you should see a message like this in your terminal:
Generating locales (this might take a while)...
en_US.UTF-8... done
es_MX.UTF-8... done
Generation complete.
That’s it! Now you can change your default language as many times as you want directly from the terminal.
In general, configuring multi-language support in Ubuntu Linux systems is very simple and convenient. Whether you want to make it easier to use your English system environment, or you need to make the display and input of other languages more fluid, the steps described in this article will help you. We strongly recommend that you try multi-language configuration and enjoy the more convenient and smoother experience that the Ubuntu Linux system brings to you!
The above is the detailed content of How to easily configure multi-language support in Ubuntu Linux system. For more information, please follow other related articles on the PHP Chinese website!

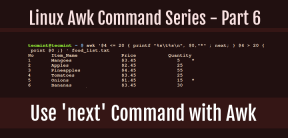 How to Use 'next' Command with Awk in Linux - Part 6May 15, 2025 am 10:43 AM
In this sixth installment of our Awk series, we will explore the next command, which is instrumental in enhancing the efficiency of your script executions by skipping redundant processing steps.What is the next Command?The next command in awk instruc
 How to Efficiently Transfer Files in LinuxMay 15, 2025 am 10:42 AM
Transferring files in Linux systems is a common task that every system administrator should master, especially when it comes to network transmission between local or remote systems. Linux provides two commonly used tools to accomplish this task: SCP (Secure Replication) and Rsync. Both provide a safe and convenient way to transfer files between local or remote machines. This article will explain in detail how to use SCP and Rsync commands to transfer files, including local and remote file transfers. Understand the scp (Secure Copy Protocol) in Linux scp command is a command line program used to securely copy files and directories between two hosts via SSH (Secure Shell), which means that when files are transferred over the Internet, the number of
 10 Most Popular Linux Desktop Environments of All TimeMay 15, 2025 am 10:35 AM
One fascinating feature of Linux, in contrast to Windows and Mac OS X, is its support for a variety of desktop environments. This allows desktop users to select the most suitable and fitting desktop environment based on their computing requirements.A
 How to Install LibreOffice 24.8 in Linux DesktopMay 15, 2025 am 10:15 AM
LibreOffice stands out as a robust and open-source office suite, tailored for Linux, Windows, and Mac platforms. It boasts an array of advanced features for handling word documents, spreadsheets, presentations, drawings, calculations, and mathematica
 How to Work with PDF Files Using ONLYOFFICE Docs in LinuxMay 15, 2025 am 09:58 AM
Linux users who manage PDF files have a wide array of programs at their disposal. Specifically, there are numerous specialized PDF tools designed for various functions.For instance, you might opt to install a PDF viewer for reading files or a PDF edi
 How to Filter Command Output Using Awk and STDINMay 15, 2025 am 09:53 AM
In the earlier segments of the Awk command series, our focus was primarily on reading input from files. However, what if you need to read input from STDIN?In Part 7 of the Awk series, we will explore several examples where you can use the output of o
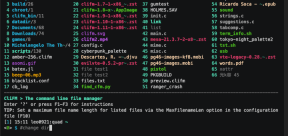 Clifm - Lightning-Fast Terminal File Manager for LinuxMay 15, 2025 am 09:45 AM
Clifm stands out as a distinctive and incredibly swift command-line file manager, designed on the foundation of a shell-like interface. This means that users can engage with their file system using commands they are already familiar with.The choice o
 How to Upgrade from Linux Mint 21.3 to Linux Mint 22May 15, 2025 am 09:44 AM
If you prefer not to perform a new installation of Linux Mint 22 Wilma, you have the option to upgrade from a previous version.In this guide, we will detail the process to upgrade from Linux Mint 21.3 (the most recent minor release of the 21.x series


Hot AI Tools

Undresser.AI Undress
AI-powered app for creating realistic nude photos

AI Clothes Remover
Online AI tool for removing clothes from photos.

Undress AI Tool
Undress images for free

Clothoff.io
AI clothes remover

Video Face Swap
Swap faces in any video effortlessly with our completely free AI face swap tool!

Hot Article
Hot Tools

Dreamweaver Mac version
Visual web development tools

SublimeText3 Mac version
God-level code editing software (SublimeText3)

WebStorm Mac version
Useful JavaScript development tools

Atom editor mac version download
The most popular open source editor

DVWA
Damn Vulnerable Web App (DVWA) is a PHP/MySQL web application that is very vulnerable. Its main goals are to be an aid for security professionals to test their skills and tools in a legal environment, to help web developers better understand the process of securing web applications, and to help teachers/students teach/learn in a classroom environment Web application security. The goal of DVWA is to practice some of the most common web vulnerabilities through a simple and straightforward interface, with varying degrees of difficulty. Please note that this software

