Home >System Tutorial >Windows Series >How to create a broadband connection in Win7 system? How to create a broadband connection in Win7?
How to create a broadband connection in Win7 system? How to create a broadband connection in Win7?
- 王林forward
- 2024-02-15 09:18:151174browse
php editor Xigua will introduce to you how to create a broadband connection in Win7 system. In Windows 7, creating a broadband connection is very simple and can be completed in just a few simple steps. First, find the network icon in the lower right corner of the desktop, right-click it and select "Open Network and Sharing Center". Then, in the left panel, click "Change adapter settings." Next, right-click on "Local Area Connection" or "Ethernet" and select "Properties." In the pop-up window, click the "Sharing" tab and check the "Allow other network users to connect to or share the Internet through this computer's Internet connection" option. Finally, click the "OK" button to successfully create a broadband connection.
How to create a broadband connection in Win7 system?
1. Steps to manually create a Windows 7 broadband connection:
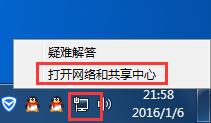
1. First, right-click the network icon in the lower right corner of the Win7 desktop, and then click "Open Network and Sharing Center" in the right-click menu. ", as shown in the figure.
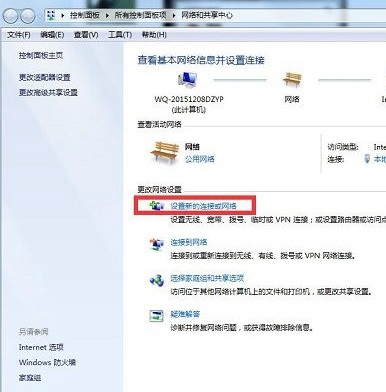
#2. In the "Change Adapter Settings" in the opened Network Sharing Center, click "Set up a new connection network" as shown in the figure.
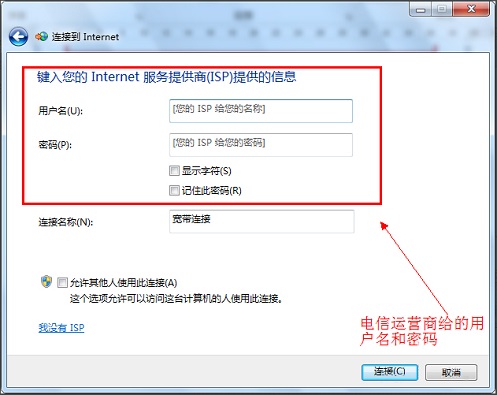
#3. In the pop-up setting interface, first click to select "Connect to the Internet". For the following steps, please refer to the key sequence in the red box in the picture, as shown in the picture .
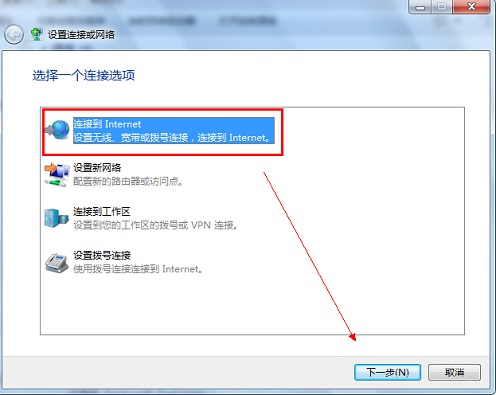
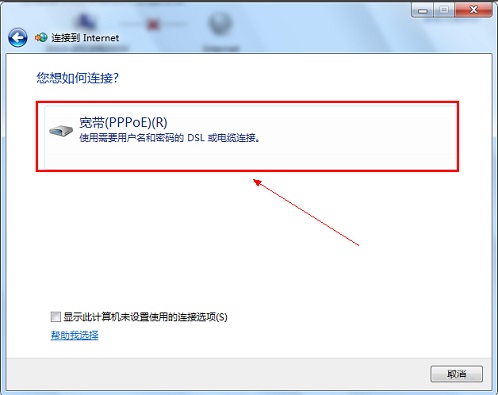
4. At this step, you need to fill in the Internet account number, which is the Internet account password provided to you by the broadband operator. Be sure to The certification must be filled in correctly, otherwise you will not be able to access the Internet normally. Fill in the broadband account and click "Connect" to complete the creation of the Win7 broadband connection.
2. Steps to set Win7 Broadband Connection as a desktop shortcut:
Since every time the computer restarts, you need to click Broadband Connection to connect to the network. It is troublesome to go to the Network Sharing Center to perform broadband connection operations every time. Let’s teach you how to add the broadband connection shortcut to the desktop so that it can be quickly found on the desktop every time you start the computer. Continue reading below for the method.
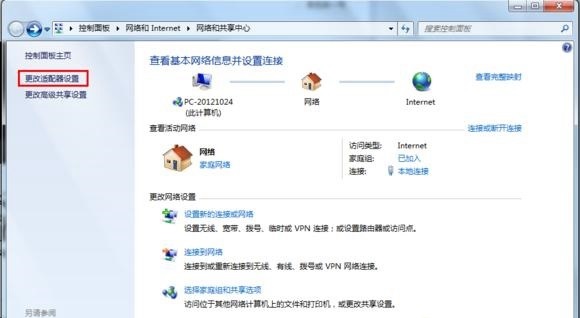
1. In the Network and Sharing Center, click "Change Adapter Settings" on the left, as shown in the figure.
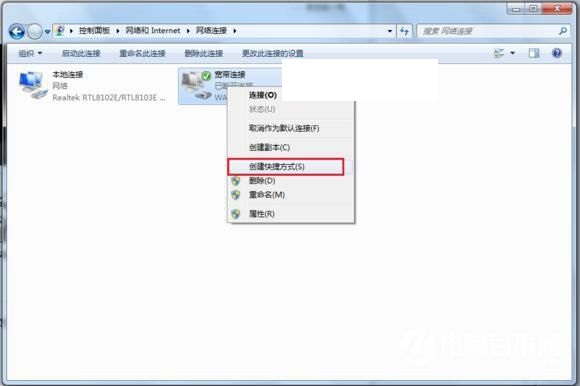
#2. Then right-click on the broadband connection that has been created, and in the pop-up options, click "Create Shortcut", as shown in the figure below.
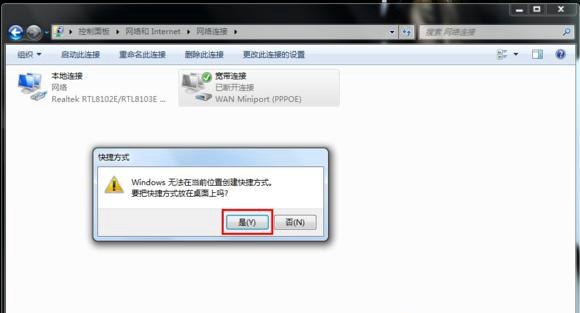
Finally follow the prompts to complete the creation of the broadband connection desktop shortcut. Finally, you can find the broadband connection shortcut on the Win7 desktop. .
The above is the detailed content of How to create a broadband connection in Win7 system? How to create a broadband connection in Win7?. For more information, please follow other related articles on the PHP Chinese website!
Related articles
See more- How to change win7 system from win10
- What is the reason why Win7 system keeps spinning in circles when shutting down (cannot shut down)?
- What should I do if there is no print option on the right click of win7 system?
- How to solve the problem of 'Check the solution online and close the program' in win7 system
- What should I do if the mouse and keyboard does not respond after installing win7?

