


php editor Youzi will introduce to you how to set up USB boot for Onda motherboard. During the computer startup process, USB boot can help us quickly enter the system, solve some computer failures or perform system installation and other problems. First, we need to prepare a bootable USB flash drive and insert it into the USB port of the computer. Then, enter the BIOS setting interface of the Onda motherboard, find the boot option, and set the USB drive as the first boot device. After saving the settings, restart the computer to enter the USB boot interface and complete the corresponding operations. With a few simple steps, we can easily implement the USB boot function of Onda motherboard.

How to set up USB boot on Onda motherboard?
To set up Onda motherboard USB boot, you first need to enter the BIOS interface. When booting, press the Del key or F2 key to enter the BIOS setup interface, select the Boot tab, set Removable Devices or USB devices as the first startup item, save the settings and then restart the computer.
When restarting, insert the USB flash drive and make sure the USB flash drive has been formatted as a boot disk. The computer will automatically boot the operating system from the USB flash drive.
After the settings are completed, you can modify the order of startup items or turn off the USB boot at any time through the BIOS interface.
How to set up U disk boot in Onda motherboard bios?
1. Start the hotkey, insert the U disk, and keep pressing the F11 key during the startup process to open the startup menu;
2. In the startup menu, DVD means CD and USB means U disk, P0 is usually a hard disk, select the U disk option and press Enter;
3. BIOS settings U disk boot, insert the U disk, restart the computer and press the Del key to enter the BIOS settings, in the Advanced interface, select Recognize U disk item, press Enter, select USB or Hard Disk, press Enter;
4. Go to the Boot interface, select Hard Drive BBS Priorities, press Enter, and set Boot Option #1 to U disk.
How to set up U disk boot on Onda motherboard?
To set up the Onda motherboard to boot the USB flash drive, you can follow the steps below: 1. Enter the BIOS settings. Usually, you can enter the BIOS setting interface by pressing the "Delete" or "F2" key when booting. The specific buttons may vary depending on the motherboard model. You can check the prompt information at the bottom of the screen when the computer is turned on to find the correct button. 2. In the BIOS setup interface, find the "Boot" or "Startup" option. You can usually switch between different options using the up and down arrow keys. 3. Find the boot order option. This option is usually a list showing all boot devices. 4. Place the USB flash drive at the top of the boot order list. You can use the " " or "-" keys to move the device position up or down to confirm that the USB flash drive is at the top of the list. 5. Save and exit BIOS settings. Follow the prompts and choose to save changes and exit the BIOS setup interface. 6. Restart the computer. During the restart process, make sure the USB flash drive is inserted into the computer and your computer will boot from the USB flash drive. Note: The above steps are for reference only, as different models of Onda motherboards may be different. Please refer to your motherboard manual or the support documentation on the Onda official website for more detailed and accurate setup guidance.
How to set up U disk boot on Onda motherboard?
Onda motherboard settings U disk boot need to follow the following steps:
1. Enter the BIOS settings: Press the "Delete" or "F2" key when booting to enter the BIOS settings.
2. Find the startup tab: Find the startup tab in the BIOS settings.
3. Set the U disk as the first boot item: In the startup tab, find the "Boot Priority" or "Boot Sequence" option, set the U disk as the first boot item, that is, rank it next to others before starting the device.
4. Save and exit: After the settings are completed, press the "F10" key to save the settings and exit the BIOS.
5. Insert the U disk and restart: Insert the prepared U disk into the computer and restart the computer. At this time, the computer will automatically boot from the U disk.
It should be noted that the prerequisite for U disk booting is that there must be bootable operating system or tools and other files in the U disk. If there is no bootable file in the USB flash drive, the computer cannot boot from the USB flash drive.
How to set up U disk boot on Onda motherboard?
The method for setting up U disk boot for Onda motherboard is as follows: 1. Enter the BIOS setting interface of the computer. Usually, you can enter the BIOS setting interface by pressing the Del key, F2 key or F10 key when turning on the computer. The specific key positions may vary depending on the motherboard model. 2. In the BIOS setup interface, use the arrow keys to select the "Boot" option and press the Enter key to enter. 3. In the boot options, find the "Boot Priority" or "Boot Sequence" option and press Enter to enter. 4. In the boot priority or boot order options, find the "Removable Devices" or "USB" option and move it to the first place. After this setting, the computer will first try to boot from the USB flash drive. 5. Save the settings and exit the BIOS interface. Usually press the F10 key to save settings and exit, or follow the on-screen prompts. 6. Insert the prepared USB flash drive into the computer and restart the computer. 7. The computer will boot from the USB flash drive and perform corresponding operations according to the operating system or tools in the USB flash drive. Setting up a USB drive to boot can help us quickly install or repair the operating system when needed, or run some specific tools. Before setting up a USB flash drive to boot, you need to ensure that the required operating system or tools have been correctly installed in the USB flash drive. At the same time, in the BIOS setting interface, you can also make other settings, such as setting the hard disk startup sequence, enabling or disabling other devices, etc. Different motherboard manufacturers and models may have different BIOS setting interfaces and options, so during specific operations, you can refer to the motherboard manual or search for relevant tutorials.
How to set up U disk boot on Onda motherboard?
First, you need to enter the BIOS setting interface of the computer and press the key prompted when booting (usually the F2, F10 or Delete key) to enter the BIOS interface. Find the Boot tab in the BIOS interface, set the USB disk as the first boot item, save the settings and exit the BIOS interface. Then insert the USB flash drive with the operating system installation files and restart the computer to start the installation system from the USB flash drive. If the USB flash drive is not detected, you may need to enable the USB flash drive boot option in the BIOS.
How to adjust the U disk boot of Onda motherboard?
Onda motherboard U disk boot needs to be adjusted in the BIOS settings. First, press the corresponding key to enter the BIOS setting interface when turning on the computer, find the startup tab, set the USB disk as the first startup item, save the settings and restart the computer.
If the U disk fails to boot, you may need to check whether the U disk is made correctly, or try to replace another U disk or remake the U disk boot disk.
When adjusting the startup sequence, be careful not to accidentally delete or modify other important settings, so as not to affect the normal operation of the system.
How to set the U disk boot in Onda motherboard BIOS?
The method for setting U disk boot in Onda motherboard BIOS is as follows: The method to set U disk boot on Onda motherboard is to configure through BIOS. BIOS is the first software loaded when the computer starts. It is responsible for initializing hardware devices and loading the operating system. By setting the BIOS, we can specify the computer to boot from the USB flash drive to facilitate system installation, repair or other operations. The specific setting steps are as follows: 1. Press the Del key or F2 key when booting to enter the BIOS setting interface (different motherboards may have different keys). 2. In the BIOS setting interface, find the startup option or Boot option. 3. In the startup options, find related options such as Boot Device Priority or Boot Order. 4. Move the U disk device to the first position, that is, set it as the first boot device. 5. Save the settings and exit the BIOS interface. The computer will restart according to the new startup sequence. It should be noted that different Onda motherboards may have different option names and locations in the BIOS setup interface, but they generally have similar startup options. If you cannot find the relevant options, it is recommended to consult the Onda motherboard user manual or contact Onda customer service for specific setup steps.
How to set up U disk boot on Onda b450 motherboard?
To set up U disk boot on Onda B450 motherboard, you need to follow the following steps:
1. Enter the BIOS settings: restart the computer and press the key specified by the motherboard during startup (usually DEL, F2 or F10) to enter the BIOS setup interface. You can find the correct buttons on the startup screen or in the motherboard manual.
2. Look for the boot option: In the BIOS setup interface, look for the "Boot" or "Start" option. This is usually a menu or tab that configures the order and priority of boot devices.
3. Set the USB flash drive as the boot device: In the boot options, find "Boot Priority" or similar options. Select and move the USB drive to first on the list to ensure it is the preferred boot device. The specific operation method may vary depending on different motherboards. You can use the arrow keys or mouse to select and move the position of the device.
4. Save and exit: Once you set the USB drive as your preferred boot device, make sure to save the changes. Usually, you can press the corresponding shortcut key (such as F10) to save and exit the BIOS setup interface.
5. Insert the U disk and restart: Insert the prepared boot U disk into the computer and restart. The computer should boot from the USB flash drive and enter the operating system or installation program in the USB flash drive.
Please note that the specific steps and menu options may vary depending on different BIOS versions and motherboard models. If you encounter difficulties or are unsure during the setup process, it is recommended to refer to the Onda B450 motherboard user manual or contact Onda technical support for accurate guidance.
The above is the detailed content of How to set up USB boot on Onda motherboard?. For more information, please follow other related articles on the PHP Chinese website!

 Understanding Data Loss Risks of SSD Drives & How to PreventMay 15, 2025 pm 08:06 PM
Despite their impressive speed and reliability, SSDs are not immune to failures. This article from MiniTool delves into the most common data loss risks associated with SSD drives and provides effective strategies to minimize the risk of file loss.Qui
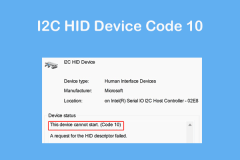 I2C HID Device Code 10 Happens on Win11/10? 8 Proven TipsMay 15, 2025 pm 08:05 PM
Have you encountered problems with I2C HID device code 10 on your Windows 11/10 computer? Learn how to fix code 10 errors with some proven solutions. Here, MiniTool will provide you with detailed guidance to help you solve your problem. Quick navigation: - I2C HID device cannot start code 10 - Fix 1: Disable and enable I2C HID devices - Fix 2: Change the power management settings - Fix 3: Uninstalling I2C HID device drivers - Fix 4: Uninstall and reinstall HID-compliant mouse driver - Fix 5: Update I2C HID device driver - Fix 6: Change BIOS settings - Fixed
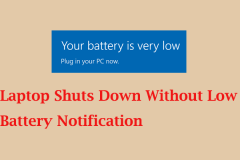 Laptop Shuts Down Without Low Battery Notification? Fix ItMay 15, 2025 pm 08:04 PM
If your laptop shuts down directly without warning when it is low, this may affect your work. To solve this problem, you can refer to the guide provided by MiniTool. Quick navigation: - No low battery notifications in Windows 11/10 - Method 1. Turn on Windows Notifications - Method 2. Run the power supply troubleshooting tool - Method 3. Change the battery power saving settings - Method 4. Check the power option settings - Method 5. Restore the default power plan - at last There is no low battery notification in Windows 11/10 When the battery is low, the desktop displays a warning message so that you can save your current work or plug in the charger. Usually, when the battery is low,
 A Complete Guide to Fix TeamViewer Protocol Negotiation FailedMay 15, 2025 pm 08:03 PM
TeamViewer enables users to remotely control another computer, share files, and engage in real-time communication. However, issues like "TeamViewer protocol negotiation failed" can arise, disrupting the connection. This article from MiniToo
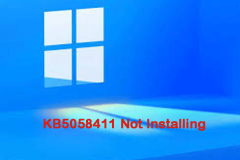 Windows 11 KB5058411 Not Installing? Try These MethodsMay 15, 2025 pm 08:02 PM
Microsoft has rolled out the KB5058411 update for Windows 11 version 24H2 users. If you're curious about the new features, how to download and install it, or what to do if KB5058411 fails to install, this MiniTool article has you covered.Quick Naviga
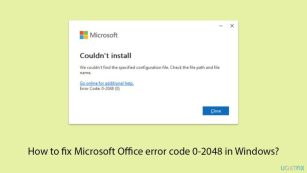 How to fix Microsoft Office error code 0-2048 in Windows?May 15, 2025 pm 08:00 PM
Microsoft Office is a cornerstone Windows productivity software that enables applications like Word, Excel, and Outlook to execute document creation all the way
 Revenge of the Savage Planet Crashing/Not Launching: FixedMay 15, 2025 pm 06:01 PM
Nothing is more satisfying than having a problem with Survival: Revenge crashing or failing to start on PC. Don't worry, here are several fixes provided by MiniTool to solve these annoying problems. Quick navigation: - Fix 1. Run the game as administrator - Fix 2. Disable overlay - Fix 3. Update GPU drivers - Fix 4. Verify the integrity of the game file - in conclusion Survival of the Wild: Revenge is an exciting new adventure game where players travel between different planets, collecting resources and finding ways to return to Earth. Although the game isn't hardware-required, if you have problems with your download or your PC isn't fully updated, you may encounter Survival of the Wild: Revenge
 Top 5 Proven Fixes for VPN Not Working on ChromeMay 14, 2025 pm 08:02 PM
Are you experiencing issues with websites not loading on Google Chrome while using a VPN, yet other browsers function normally? This guide from MiniTool will help you understand the causes and provide solutions to fix VPN issues on Chrome.Quick Navig


Hot AI Tools

Undresser.AI Undress
AI-powered app for creating realistic nude photos

AI Clothes Remover
Online AI tool for removing clothes from photos.

Undress AI Tool
Undress images for free

Clothoff.io
AI clothes remover

Video Face Swap
Swap faces in any video effortlessly with our completely free AI face swap tool!

Hot Article
Hot Tools

MinGW - Minimalist GNU for Windows
This project is in the process of being migrated to osdn.net/projects/mingw, you can continue to follow us there. MinGW: A native Windows port of the GNU Compiler Collection (GCC), freely distributable import libraries and header files for building native Windows applications; includes extensions to the MSVC runtime to support C99 functionality. All MinGW software can run on 64-bit Windows platforms.

SublimeText3 Mac version
God-level code editing software (SublimeText3)

SublimeText3 Linux new version
SublimeText3 Linux latest version

EditPlus Chinese cracked version
Small size, syntax highlighting, does not support code prompt function

DVWA
Damn Vulnerable Web App (DVWA) is a PHP/MySQL web application that is very vulnerable. Its main goals are to be an aid for security professionals to test their skills and tools in a legal environment, to help web developers better understand the process of securing web applications, and to help teachers/students teach/learn in a classroom environment Web application security. The goal of DVWA is to practice some of the most common web vulnerabilities through a simple and straightforward interface, with varying degrees of difficulty. Please note that this software

