Home >System Tutorial >LINUX >Linux Intermediate - 'Driver' Low-level knowledge that must be learned to control hardware
Linux Intermediate - 'Driver' Low-level knowledge that must be learned to control hardware
- WBOYWBOYWBOYWBOYWBOYWBOYWBOYWBOYWBOYWBOYWBOYWBOYWBforward
- 2024-02-12 15:21:131465browse

Driven Cognition
1. What is a driver
The driver encapsulates the operations of the underlying hardware device and provides function interfaces to the upper layer.
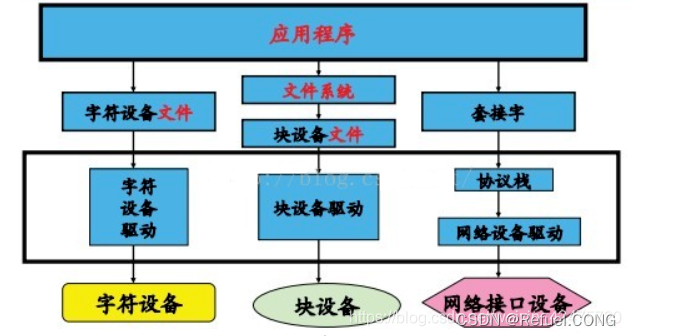
Device classification: The Linux system divides devices into three categories: Character devices, block devices, and network devices.
- Character device: refers to a device that can only read and write byte by byte. Certain data in the device memory cannot be read randomly. Data needs to be read in order. Character devices are stream-oriented devices. Common character devices include mice, keyboards, serial ports, consoles, and LED devices. Character device drivers usually must implement at least the system calls of open, close, read, and write , Character terminal (/dev/console) and serial port (/dev/ttyS0 and similar devices) are two character devices, which can well illustrate the abstract concept of "stream".
- Block device: refers to a device that can read data of a certain length from any location on the device. Block devices include hard drives, disks, USB flash drives, SD cards, etc.
-
Network device: A network device can be a hardware device, such as a network card; but it can also be a pure software device, such as a loopback interface (lo). A network interface is responsible for sending and receiving data packets.

Let’s give an example to talk about the overall calling process
-
In the upper layer we call the c language open function
open("/dev/pin4",O_RDWR);Call pin4 under /dev to open it in a readable and writable manner, **== For the upper layer open call to A soft interrupt will occur in the kernel. The interrupt number is 0X80, entering from user space to kernel space ==** -
open will call
system_call(kernel function), and system_call will find out the device number you want based on the /dev/pin4 device name. -
Then transfer to the virtual file VFS (In order to unify the upper layer to call the exact hardware), call
sys_openin VFS, sys_open will find the driver in In the linked list , find the open function in pin 4 based on the major device number and the minor device number . Our open in pin 4 is a register operation
Insert image description here
“
We write the driver is nothing more than Add the driver:What does adding the driver do?
- Equipment name
- Device No
- Device driver function (operating register to drive IO port)
”
==In summary==If you want to open the pin4 pin below dev, the process is: User mode calls open ("/de/pin4", O_RDWR), for the kernel, calling the open function from the upper layer will trigger a soft interrupt (special for system calls, the interrupt number is 0x80, 0x80 represents a system event) call), the system enters the kernel state, and goes to system_call. This can be considered as the entrance to the interrupt service program of this soft interrupt, and then determines the corresponding call based on the passed system call number. The system call service program (in this case, sys_open in VFS is called). sys_open will find the relevant driver function in the kernel driver list based on the device name and device number (Each driver function is a node), **= =The driver function contains code that controls the IO port through registers, which can then control the IO port to implement related functions==**.
2. Detailed explanation of each state
“
User mode:
”
-
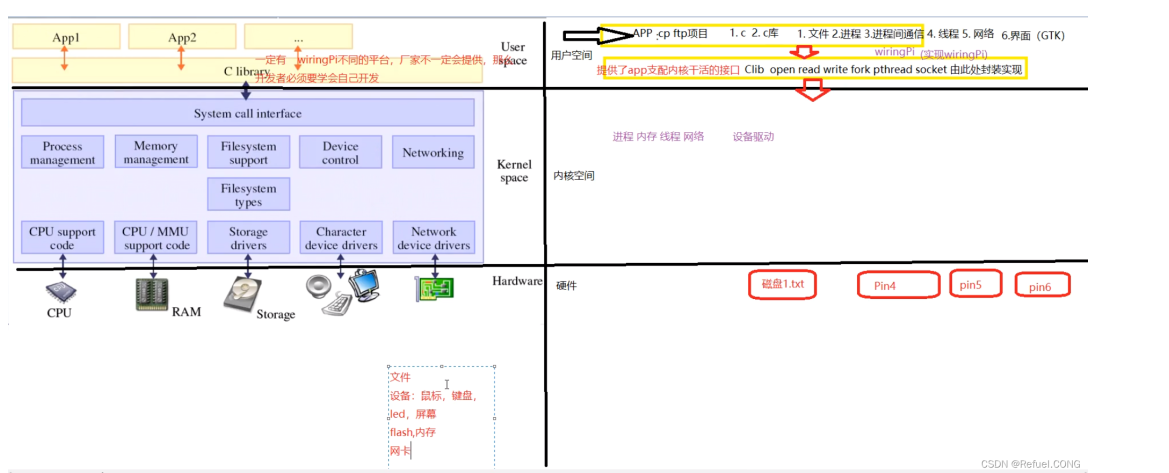
It refers to the level at which users write programs and run programs. User mode requires the foundation of C and the C library during development. The C library talks about files, processes, inter-process communication, threads, networks, and interfaces (GTk) . C library (must be included in the Linux standard library): It is Clibary, which provides an interface for programs to control the work of the kernel. The
open, read, write, fork, pthread, and socketare called by The implementation is encapsulated here and called by the written application. The various APIs in the C library call the kernel state and control the kernel work.
“
Kernel state:
”
-
When users want to use a certain hardware device, they need Kernel mode device driver, to drive the hardware to work, such as what was mentioned in the previous article
wiringPi library, provides an interface for users to control hardware devices. If there is no wiringPi library, you need to implement the functions of the wiringPi library yourself, that is, write the device driver yourself. In this way, when we get another type of board, we can also complete the development. -
Everything in Linux is a file. All kinds of files and devices (such as mouse, keyboard, screen, flash, memory, network card, as shown in the figure below) are all files, thenSince it is a file, you can use the file operation function to operate these devices.

-
One question is, how do file operation functions such as open and read know which hardware device the open file is? ①Enter the corresponding file name in the open function to control the corresponding device. ②Pass ==device number (major device number and minor device number)==. In addition, we also need to understand the location of these drivers and how to implement these drivers. Each hardware device corresponds to a different driver (these drivers are implemented by ourselves).
-
Linux device management is closely integrated with the file system, Various devices are stored in the /dev directory in the form of files, called ==devices File==*. Applications can open, close, read and write these device files, and complete operations on the device just like operating ordinary data files. **In order to manage these devices, the system numbers the devices**, *Each device number is divided into ==major device number== and ==minor device number==* (as shown in the figure below) Show:). **
 ***Major device number** is used to distinguish different types of devices , and the first device number is used to distinguish multiple devices of the same type. For commonly used devices, Linux has conventional numbers. For example, the major device number of a hard disk is 3. ****A character device or block device has a major device number and a minor device number . ==The major device number and the minor device number are collectively referred to as the device number==**.
 “
Major device number is used to represent a specific driver.
Minor device number is used to represent each device using this driver.”
For example, an embedded system has two LED indicators, and the LED lights need to be turned on or off independently. Then, you can write a character device driver for an LED light, and register its primary device number as device No. 5, and the secondary device numbers are 1 and 2## respectively. #. Here, the secondary device numbers represent two LED lights respectively.
==Driver linked list==
“
Manage the drivers of all devices, add or find
Addingoccurs after we finish writing the driver and load it into the kernel.Searchis calling the driver, and the application layer user space uses the open function to search.The order in which the driver is inserted into the linked list is retrieved by the device number, that is to say, the major device number and the minor device number can not only distinguish different types of devices and different types of devices, but also serve to distinguish the driver The program is loaded into a certain position in the linked list. The development of the driver code introduced below is nothing more thanadding the driver (adding the device number, device name and device driver function) andcalling the driver .
”
- How does the system_call function find the detailed system call service routine? Find the system call table sys_call_table through the system call number! When the soft interrupt instruction INT 0x80 is running, the system call number will be placed in the eax register . The system_call function can read the eax register to obtain it, then multiply it by 4 to generate the offset address, and then Take sys_call_table as the base address. By adding the base address to the offset address, you can get the address of the detailed system call service routine! Then it comes to the system call service routine.
Replenish:
- Each system call corresponds to a system call number, and the system call number corresponds to the corresponding processing function in the kernel.
- All system calls are triggered via interrupt 0x80.
- When using a system call, the system call number is passed to the kernel through the eax register, and the input parameters of the system call are passed to the kernel through ebx, ecx...
- Like functions, the return value of the system call is stored in eax, and all needs to be taken out from eax
3. Working principle of character device driver
Character device driver working principle In the Linux world, everything is a file, and all hardware device operations will be abstracted into file operations at the application layer. We know that if the application layer wants to access a hardware device, it must call the driver corresponding to the hardware. There are so many drivers in the Linux kernel. How can an application accurately call the underlying driver?
==Must-know knowledge:==
-
In the Linux file system, each file is described by a
struct inodestructure. This structure records all the information of the file, such as file type, access Permissions etc.
In the Linux operating system, each driver will have a corresponding file in the - /dev
directory of the application layer or other directories such as/sys.
In the Linux operating system, - Each driver has a device number. In the Linux operating system, every time a file is opened, the Linux operating system
- allocates a ****struct file
structure at the VFS layer to describe the open file.
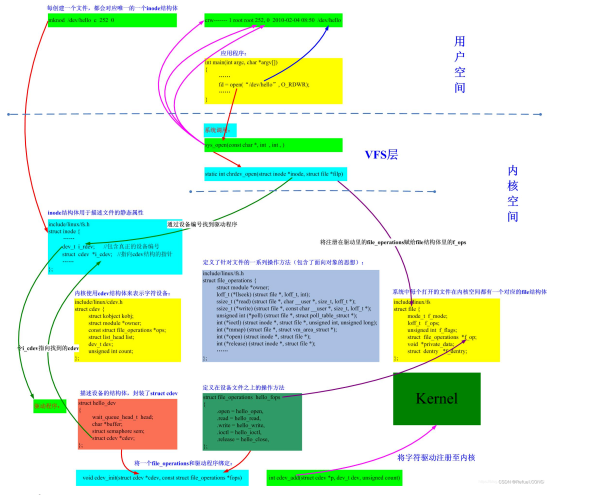
 (1) When the open function opens a device file, you can know the type of device to be operated next (character device or block device) based on the information described by the struct inode structure corresponding to the device file. , a struct file structure will also be allocated.
 (2) According to the device number recorded in the struct inode structure, the corresponding driver can be found. Here we take character devices as an example. In the Linux operating system, each character device has a struct cdev structure. This structure describes all the information of the character device, the most important of which is the operating function interface of the character device.
(3) After finding the struct cdev structure, the Linux kernel will record the first address of the memory space where the struct cdev structure is located in the i_cdev member of the struct inode structure, and use the function operation interface recorded in the struct cdev structure The address is recorded in the f_ops member of the struct file structure.
(4) When the task is completed, the VFS layer will return a file descriptor (fd) to the application. This fd corresponds to the struct file structure. Next, the upper-layer application can find the struct file through fd, and then find the function interface file_operation for operating character devices in the struct file.
Among them, cdev_init and cdev_add have been called in the driver's entry function to complete the binding of the character device and the file_operation function operation interface, and to register the character driver to the kernel respectively.
Write driver code based on the framework:
-
Upper-layer calling code: Operation-driven upper-layer code (pin4test.c):
#include
#include
#include
#include

void main()
{
        int fd,data;
        fd = open("/dev/pin4",O_RDWR);
        if(fdprintf("open fail\n");
                perror("reson:");
        }
        else{
                printf("open successful\n");
        }
        fd=write(fd,'1',1);
}
-Kernel driver **==The simplest character device driver framework==**:
Character device driver framework code
#include    //file_operations声明
#include     //module_init  module_exit声明
#include       //__init  __exit 宏定义声明
#include   //class  devise声明
#include    //copy_from_user 的头文件
#include      //设备号  dev_t 类型声明
#include           //ioremap iounmap的头文件

static struct class *pin4_class;
static struct device *pin4_class_dev;

static dev_t devno;                //设备号,devno是用来接收创建设备号函数的返回值,销毁的时候需要传这个参数
static int major =231;       //主设备号
static int minor =0;      //次设备号
static char *module_name="pin4";   //模块名

//led_open函数
static int pin4_open(struct inode *inode,struct file *file)
{
    printk("pin4_open\n");  //内核的打印函数和printf类似
    return 0;
}

//led_write函数
static ssize_t pin4_write(struct file *file,const char __user *buf,size_t count, loff_t *ppos)
{

 printk("pin4_write\n");  //内核的打印函数和printf类似
    return 0;
}
//将上面的函数赋值给一个结构体中,方便下面加载到到驱动链表中去
static struct file_operations pin4_fops = {
//static防止其他文件也有同名pin4_fops
//static限定这个结构体的作用,仅仅只在这个文件。
    .owner = THIS_MODULE,
    .open  = pin4_open,
    .write = pin4_write,
};
/*
上面的代码等同于以下代码(但是在单片机keil的编译环境里面不允许以上写法):
里面的每个pin4_fops结构体成员单独赋值
static struct file_operations pin4_fops;
    pin4_fops.owner = THIS_MODULE;
    pin4_fops.open  = pin4_open;
    pin4_fops.write = pin4_write;
*/
//static限定这个结构体的作用,仅仅只在这个文件。


int __init pin4_drv_init(void)   //真实的驱动入口
{

    int ret;
    devno = MKDEV(major,minor);  //2. 创建设备号
    ret   = register_chrdev(major, module_name,&pin4_fops);
    //3. 注册驱动  告诉内核,把这个驱动加入到内核驱动的链表中

    pin4_class=class_create(THIS_MODULE,"myfirstdemo");//由代码在dev下自动生成设备,创建一个类
    pin4_class_dev =device_create(pin4_class,NULL,devno,NULL,module_name);
     //创建设备文件,先有上面那一行代码,创建一个类然后这行代码,类下面再创建一个设备。


    return 0;
}

void __exit pin4_drv_exit(void)
{

    device_destroy(pin4_class,devno);//先销毁设备
    class_destroy(pin4_class);//再销毁类
    unregister_chrdev(major, module_name);  //卸载驱动

}

module_init(pin4_drv_init);  //入口,内核加载驱动的时候,这个宏(不是函数)会被调用,去调用pin4_drv_init这个函数
module_exit(pin4_drv_exit);
MODULE_LICENSE("GPL v2");
Manually create device name
-
The character device driver code above contains to allow the code to automatically generate the device under dev . In addition, we can also manually create the device name. Instructions used:
sudo mknod device name device type (c represents character device driver) major device number minor device numberb: create a block (buffered) special file. c, u: create a character (unbuffered) special file. p: create a FIFO, Just delete the manually created device name and just rm. As shown below:
Driver framework execution process:
-
Open a device through the upper-layer program . If there is no driver, an error will be reported when executing. In the kernel driver, the upper-layer system calls open and wirte
functions will triggersys_call, sys_call will callsys_open,andsys_write, sys_open, and sys_write passmajor device number in the kernel's driver linked list Find the device driver and execute the open and write inside. In order for the whole process to proceed smoothly, we must first prepare the driver (device driver file). Device driver files have fixed frames:
-
-
module_init(pin4_drv_init);//Entrance to callpin4_drv_initfunction -
int __init pin4_drv_init(void)//Real driver entry -
Driver entry
devno = MKDEV(major,minor);// Create device number -
register_chrdev(major, module_name,&pin4_fops);//Register driver tells the kernel to add the structure prepared above to the kernel driver’s linked list -
pin4_class=class_create(THIS_MODULE,"myfirstdemo");//The device is automatically generated by the code under dev and a class is created -
pin4_class_dev =device_create(pin4_class,NULL,devno,NULL,module_name);//Create device file. -
The main thing is to make
/devhave an extra file for our upper layer to open -
If not, you can also create the device manually
sudo mknod device name device type (c represents character device driver) major device number minor device number
-
Driver module code compilation
Driver module code compilation
Driver module code compilation (module compilation requires configured kernel source code. The suffix of the kernel module generated after compilation and connection is **.ko. The compilation process will first In the kernel source code directory, read the top-level Makefile file, and then return to the directory where the module source code is located.): **
- 使用下面的的代码:(就是上面的驱动架构代码)
#include             //file_operations声明
#include     //module_init  module_exit声明
#include       //__init  __exit 宏定义声明
#include         //class  devise声明
#include    //copy_from_user 的头文件
#include      //设备号  dev_t 类型声明
#include           //ioremap iounmap的头文件


static struct class *pin4_class;
static struct device *pin4_class_dev;

static dev_t devno;                //设备号
static int major =231;                     //主设备号
static int minor =0;                       //次设备号
static char *module_name="pin4";   //模块名

//led_open函数
static int pin4_open(struct inode *inode,struct file *file)
{
        printk("pin4_open\n");  //内核的打印函数和printf类似

        return 0;
}
//read函数
static int pin4_read(struct file *file,char __user *buf,size_t count,loff_t *ppos)
{
        printk("pin4_read\n");  //内核的打印函数和printf类似

        return 0;
}

//led_write函数
static ssize_t pin4_write(struct file *file,const char __user *buf,size_t count, loff_t *ppos)
{

        printk("pin4_write\n");  //内核的打印函数和printf类似
        return 0;
}

static struct file_operations pin4_fops = {

        .owner = THIS_MODULE,
        .open  = pin4_open,
        .write = pin4_write,
        .read  = pin4_read,
};
//static限定这个结构体的作用,仅仅只在这个文件。
int __init pin4_drv_init(void)   //真实的驱动入口
{

        int ret;
        devno = MKDEV(major,minor);  //创建设备号
  ret   = register_chrdev(major, module_name,&pin4_fops);  //注册驱动  告诉内核,把这个驱动加入到内核驱动的链表中

        pin4_class=class_create(THIS_MODULE,"myfirstdemo");//让代码在dev下自动>生成设备
        pin4_class_dev =device_create(pin4_class,NULL,devno,NULL,module_name);  //创建设备文件


        return 0;
}

void __exit pin4_drv_exit(void)
{

        device_destroy(pin4_class,devno);
        class_destroy(pin4_class);
        unregister_chrdev(major, module_name);  //卸载驱动
}
module_init(pin4_drv_init);  //入口,内核加载驱动的时候,这个宏会被调用,去调用pin4_drv_init这个函数
module_exit(pin4_drv_exit);
MODULE_LICENSE("GPL v2");
-
在导入虚拟机的内核代码中找到字符设备驱动的那一个文件夹:
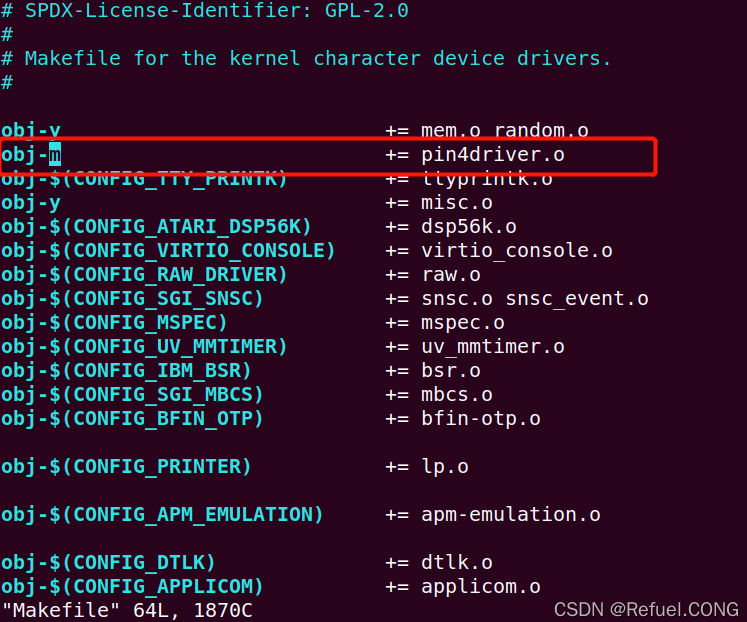
/SYSTEM/linux-rpi-4.19.y/drivers/char将以上代码复制到一个文件中,然后下一步要做的是就是:将上面的驱动代码编译生成模块,再修改Makefile。(你放那个文件下,就改哪个文件下的Makefile) -
文件内容如下图所示:(-y表示编译进内核,-m表示生成驱动模块,CONFIG_表示是根据config生成的) 所以只需要将
obj-m += pin4drive.o添加到Makefile中即可。下图:Makefile文件图
-
编译生成驱动模块,将生成的**
.ko文件发送给树莓派**然后回/SYSTEM/linux-rpi-4.19.y下使用指令:ARCH=arm CROSS_COMPILE=arm-linux-gnueabihf- KERNEL=kernel7 make modules进行编译生成驱动模块。然后将生成的.ko文件发送给树莓派:scp drivers/char/pin4driver.ko pi@192.168.0.104:/home/pi编译生成驱动模块会生成以下几个文件:
-
.o的文件是object文件,.ko是kernel object,与.o的区别在于其多了一些sections,比如.modinfo。.modinfo section是由kernel source里的modpost工具生成的, 包括MODULE_AUTHOR, MODULE_DESCRIPTION, MODULE_LICENSE, device ID table以及模块依赖关系等等。depmod 工具根据.modinfo section生成modules.dep, modules.*map等文件,以便modprobe更方便的加载模块。
“
- During the compilation process, we went through the following steps:
- First enter the directory where the Linux kernel is located and compile the pin4drive.o file
- Running MODPOST will generate a temporary pin4drive.mod.c file, and then compile pin4drive.mod.o based on this file,
- Then connect the pin4drive.o and pin4drive.mod.o files to get the module target file pin4drive.ko,
- Finally leave the directory where the Linux kernel is located.
”
After cross-compiling pin4test.c (upper layer calling code) and sending it to the Raspberry Pi, you can see that the sent .ko exists in the pi directory The two files, file and pin4test, are as shown below: 
Load kernel driver
Then use the command: sudo insmod pin4drive.koLoad the kernel driver (equivalent to calling the module_init macro through insmod, and then load the entire structure into the driver linked list) After the loading is completed, you can dev Below we see the device driver named pin4 (this is related to the line of code static char *module_name=”pin4″; //module name in the driver code), and the device number is also related to It's relevant in the code.
lsmodYou can check that the driver has been installed.
-
Let’s execute ./pin4test again to execute the upper-level code The following error occurs when executing the upper-level code: indicating no permission
 Use the command:
 sudo chmod 666 /dev/pin4Give permissions to pin4, let Everyone can open successfully.
Then execute againpin4testOn the surface, there is no information output. In fact, there is printing information in the kernel, but it is not visible to the upper layer.If you want to view the information printed by the kernel, you can Use the command: dmesg |grep pin4. As shown in the figure below: Indicates that the driver call is successful

After installing the driver, you can use the command: sudo rmmod driver name (no need to write ko) to uninstall the driver.
Why generating the driver module needs to be generated on the virtual machine
-
Why does generating a driver module need to be generated on a virtual machine? Doesn’t the Raspberry Pi work?
Generating the driver module requires a compilation environment (Linux source code and compilation, you need to download the Linux kernel source code that is the same as the system version). It can also be compiled on the Raspberry Pi, but it will be more efficient if compiled on the Raspberry Pi. Very low, it will take a very long time. This article talks about local compilation of Raspberry Pi driver.
The above is the detailed content of Linux Intermediate - 'Driver' Low-level knowledge that must be learned to control hardware. For more information, please follow other related articles on the PHP Chinese website!


 ***Major device number** is used to distinguish different types of devices , and the first device number is used to distinguish multiple devices of the same type. For commonly used devices, Linux has conventional numbers. For example, the major device number of a hard disk is 3. ****A character device or block device has a major device number and a minor device number . ==The major device number and the minor device number are collectively referred to as the device number==**.

 Use the command: