
 Computer TutorialsComputer KnowledgeHow to set the first driver for Gigabyte motherboard USB disk
How to set the first driver for Gigabyte motherboard USB disk

php Editor Banana will introduce you to the method of setting the U disk as the first driver for Gigabyte motherboard. When the computer starts, the hard disk is usually selected as the first drive by default, but sometimes we need to boot the system or install the operating system through a USB flash drive. To set the USB flash drive as the first drive, you can enter the BIOS setup interface of the Gigabyte motherboard, find the startup options, set the USB flash drive as the first boot device, and save the settings. In this way, the computer will give priority to booting from the USB flash drive to meet your needs. Below, let us learn more about the specific setup steps!

Because this can make the system installation faster and requires a computer that can be used normally and has access to the Internet
We have prepared the system and required files, and now we can jump Go to the installation steps.
The next step is to prepare the software tools. We need to use two software. The first is the win10 system image and the second is the pe tool.

The pe tool we demonstrate here is Lao Baicai. This pe tool does not have any bundled rogue software
Open the official website, select at the top of the official website, especially scroll down to find the address to download the software and open this local link
In this case, the two software After the download is completed, a download pop-up window will also pop up. Using training download can speed up the download speed.
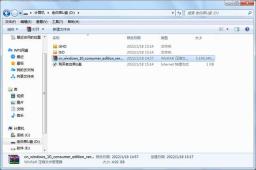
Unzip the downloaded system software, open the folder and then open the program, then insert the USB disk into the computer and click New Create

It should be noted here that if it is a blank USB disk, you can ignore if u If there is important information in the disk, you must save it
The PE tool will delete all contents in the U disk. After confirmation, wait for the progress bar to complete. The appearance of this interface indicates that the USB flash drive is successfully created. Copy the downloaded Win10 system files to the USB flash drive.
Theoretically we can install the system directly, but there are some special motherboards that will have no network card driver after installing the system
So it is best to choose your own motherboard model Download the network card driver from the official website and copy it to the USB flash drive to ensure that you will not be embarrassed when such a problem occurs. Install the system and officially start inserting the USB flash drive into the computer where you need to install the system. You need to pay attention to inserting the USB flash drive as much as possible because it is b3 0. The interface is blue
or the red interface will be faster. I have found a hotkey startup case for major motherboards. You can refer to it.
I will give it here. Let's demonstrate the startup methods of Gigabyte, ASUS, and MSI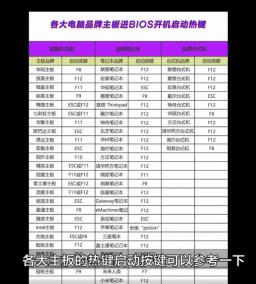
The first Gigabyte motherboard is powered on, and continuous clicks on the F12 button on the keyboard
This is the startup interface. The second ASUS motherboard is powered on, and continuous clicks on the keyboard are The f8 button above is the startup image of the ASUS motherboard. When the third MSI motherboard is turned on, click the f141 button on the keyboard continuously. This is the startup image of the MSI motherboard.
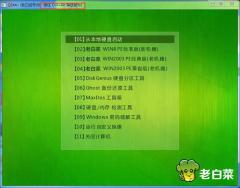
  There may be many choices. We only need to select the characters in the front with u e f i. The letters in the middle represent the brand name of the U disk.
with a number 2 in the suffix is the U disk we need to select. Then click Enter. At this time, we need to wait for the progress. Enter the U disk tool

This process may take 1-2 minutes. There are two things to note after only the U disk. First, if it is a new computer installation For the system, you need to partition the hard disk first
, which is what we often call the c d e f disk, and then you can install the system. Secondly, if you install the system on an old computer, partitioning is generally not required.
If you want Partitions will be used only after deleting all the things in the hard disk, so students in some districts can skip this step
Partition Open the desktop low-level hard disk partition tool, select the hard disk that needs to be partitioned, open the quick partition Here you need to pay attention
winten system partition list type is selected as g u id format. The number of installments below is allocated according to your own hard disk size and preferences. Select the partition and set the system disk size.
Generally set to about 100-150g and then the following Select 4096 for the partition and confirm
Close the software in the blocked area and start installing the system. Open the red icon on the desktop e Uncheck the option to call the universal driver and click OK


Wait for 1-3 minutes and then click Restart the computer after the recovery is complete. When the computer screen goes black, remove the USB disk from the computer
The above is the detailed content of How to set the first driver for Gigabyte motherboard USB disk. For more information, please follow other related articles on the PHP Chinese website!

 Windows 11 Education Download ISO and Install It on PC - MiniToolApr 26, 2025 am 12:50 AM
What is Windows 11 Education? If you want to install this system on your PC, how can you do this work? This post from php.cn gives a detailed guide on Windows 11 Education download ISO and how to install it from the ISO file.
 How to Fix Outlook Emails Not Showing Up in Inbox - MiniToolApr 26, 2025 am 12:49 AM
Are your Outlook emails not showing up in Inbox, but showing in search? What steps can you do when Outlook not showing all emails? Now in this post given by php.cn Solution, we will introduce several useful methods to help you address the issue and g
 Must-Know Fixes: Windows Stuck on Shutting Down ScreenApr 26, 2025 am 12:48 AM
If you are trying to power off your computer but encountering the Windows stuck on shutting down screen issue, you can find several helpful fixes from this php.cn guide. Just keep reading to see the details.
![[Complete Guide] How to Fix Microsoft Teams Error CAA50021? - MiniTool](https://img.php.cn/upload/article/001/242/473/174559963580964.png?x-oss-process=image/resize,p_40) [Complete Guide] How to Fix Microsoft Teams Error CAA50021? - MiniToolApr 26, 2025 am 12:47 AM
[Complete Guide] How to Fix Microsoft Teams Error CAA50021? - MiniToolApr 26, 2025 am 12:47 AMIf you are looking for effective solutions to the Microsoft Teams error code CAA50021, this post is worth reading. In this post, php.cn introduces how to get rid of this error in detail. Simply follow it to solve your problem.
 Make Windows 11/10 Look Like Windows XP Using WindowBlinds 11 - MiniToolApr 26, 2025 am 12:46 AM
Do you want to make Windows 11 or Windows 10 look like Windows XP? Do you know how to do this on your device? You can try the WindowBlinds 11 Beta version now. In this post, php.cn Software will tell you how to download WindowBlinds 11 and introduce
 Pro Fixes: Not All of the Updates Were Successfully UninstalledApr 26, 2025 am 12:45 AM
If you can’t use the universal way to uninstall Windows updates due to An error has occurred, Not all of the updates were successfully uninstalled, you can try the methods mentioned in the php.cn post to solve the issue.
 Fix the System Error – Wacom_tablet.exe Can't End Process - MiniToolApr 26, 2025 am 12:44 AM
What is wacom_tablet.exe? Is the Windows process safe to run? Some people find wacom_tablet.exe can't end process and when this Windows system error happens, you may be overwhelmed and don’t know where to start. On php.cn, this article will resolve y
 3 Ways for We've Detected Suspicious Behavior on ChatGPT - MiniToolApr 26, 2025 am 12:43 AM
ChatGPT errors are various and we’ve detected suspicious behavior is a common one. If you are trapped in this issue, what should you do? Go on reading this post from php.cn and you can find some useful fixes to help you get rid of trouble.


Hot AI Tools

Undresser.AI Undress
AI-powered app for creating realistic nude photos

AI Clothes Remover
Online AI tool for removing clothes from photos.

Undress AI Tool
Undress images for free

Clothoff.io
AI clothes remover

Video Face Swap
Swap faces in any video effortlessly with our completely free AI face swap tool!

Hot Article
Hot Tools

SAP NetWeaver Server Adapter for Eclipse
Integrate Eclipse with SAP NetWeaver application server.

Atom editor mac version download
The most popular open source editor

EditPlus Chinese cracked version
Small size, syntax highlighting, does not support code prompt function

SublimeText3 English version
Recommended: Win version, supports code prompts!

MantisBT
Mantis is an easy-to-deploy web-based defect tracking tool designed to aid in product defect tracking. It requires PHP, MySQL and a web server. Check out our demo and hosting services.

