
 Software TutorialMobile ApplicationIllustrated installation steps of an electric fan 'A must-see for beginners: How to disassemble and assemble an electric fan'
Illustrated installation steps of an electric fan 'A must-see for beginners: How to disassemble and assemble an electric fan'

php editor Banana brings you an illustrated article on the installation steps of an electric fan. For novices, the disassembly and assembly of electric fans may be a little confusing. This article explains the installation steps of the electric fan in detail through pictures and texts, so that novices can easily master it. Whether you need to replace your electric fan or perform cleaning and repairs, this article provides detailed instructions and precautions. If you are new to electric fans, you may wish to read this article and learn the correct disassembly and assembly techniques of electric fans!
The disassembly and assembly operation of the electric fan can be carried out according to the actual maintenance needs. The following takes the Midea FTS35-M2 electric fan as an example to introduce the disassembly and assembly method of the electric fan.
1. Disassembly of the electric fan grille and fan blades
The electric fan grille and fan blades are important components on the top of the electric fan. If you suspect that the fan blades are faulty, you need to remove the grille first and then the fan blades.
The grille and fan blades of electric fans are usually fixed by screws. When disassembling, find the screws on the grille, unscrew and remove the grille, and further disassemble the fan blades.

Remove the electric fan grille and fan blades. The specific operation is as shown in the figure:


2. Disassembly of the electric fan motor shell
The motor is fixed in the casing of the electric fan by fixing screws. When it is suspected that the motor in the electric fan is faulty, the casing of the motor should be disassembled first. When disassembling the casing of the motor, you should first observe how the casing of the electric fan is fixed, and then fix the fan casing. After unscrewing the screws, you can find the motor that needs to be repaired, as shown in the figure below:

The disassembly method of the electric fan motor casing is as shown below Shown:

3. Removal of the electric fan base and baffle
Electric fan base and baffle It is mostly used to fix the entire electric fan unit to achieve the purpose of stabilizing the electric fan. When disassembling the base and baffle, you should first observe the way the electric fan base and baffle are fixed, and then use a screwdriver of appropriate specifications to disassemble, as shown in the figure below:

The removal method of the electric fan base and baffle is as shown in the figure:


After the electric fan cleaning and repair operation is completed, the disassembled parts need to be reassembled, that is, the functional parts that have been repaired or replaced are put back into the electric fan. In the original installation position of the fan.
During the reassembly operation, please note that the reassembled components should be firmly installed in the electric fan, and ensure that the components are tightly and correctly connected to related components, connecting cables, etc. After ensuring that the reassembly is correct, connect the electric fan's network Just put the cover back on the electric fan and restore the mechanical properties of the electric fan.
This article ends here. I hope it can help everyone. I have carefully read the illustration of the installation steps of the electric fan "A must-read for newbies: How to disassemble and assemble the electric fan". I feel that I have gained something. There are many, please remember to give us a thumbs up!
The above is the detailed content of Illustrated installation steps of an electric fan 'A must-see for beginners: How to disassemble and assemble an electric fan'. For more information, please follow other related articles on the PHP Chinese website!

 WhatsApp Now Lets You Block People From Exporting ChatsMay 08, 2025 am 10:40 AM
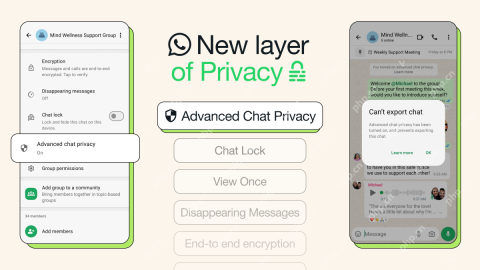
WhatsApp enhances user privacy with its new "Advanced Chat Privacy" feature, rolling out globally. This update restricts others from exporting chats, automatically downloading media, and utilizing your messages for AI functionalities. How t
 Instagram Just Launched Its Version of CapCutApr 30, 2025 am 10:25 AM
Instagram officially launched the Edits video editing app to seize the mobile video editing market. The release has been three months since Instagram first announced the app, and two months after the original release date of Edits in February. Instagram challenges TikTok Instagram’s self-built video editor is of great significance. Instagram is no longer just an app to view photos and videos posted by individuals and companies: Instagram Reels is now its core feature. Short videos are popular all over the world (even LinkedIn has launched short video features), and Instagram is no exception
 Chess Lessons Are Coming to DuolingoApr 24, 2025 am 10:41 AM
Duolingo, renowned for its language-learning platform, is expanding its offerings! Later this month, iOS users will gain access to new chess lessons integrated seamlessly into the familiar Duolingo interface. The lessons, designed for beginners, wi
 Blue Check Verification Is Coming to BlueskyApr 24, 2025 am 10:17 AM
Bluesky Echoes Twitter's Past: Introducing Official Verification Bluesky, the decentralized social media platform, is mirroring Twitter's past by introducing an official verification process. This will supplement the existing self-verification optio
 Google Photos Now Lets You Convert Standard Photos to Ultra HDRApr 24, 2025 am 10:15 AM
Ultra HDR: Google Photos' New Image Enhancement Ultra HDR is a cutting-edge image format offering superior visual quality. Like standard HDR, it packs more data, resulting in brighter highlights, deeper shadows, and richer colors. The key differenc
 You Should Try Instagram's New 'Blend' Feature for a Custom Reels FeedApr 23, 2025 am 11:35 AM
Instagram and Spotify now offer personalized "Blend" features to enhance social sharing. Instagram's Blend, accessible only through the mobile app, creates custom daily Reels feeds for individual or group chats. Spotify's Blend mirrors th
 Instagram Is Using AI to Automatically Enroll Minors Into 'Teen Accounts'Apr 23, 2025 am 10:00 AM
Meta is cracking down on underage Instagram users. Following the introduction of "Teen Accounts" last year, featuring restrictions for users under 18, Meta has expanded these restrictions to Facebook and Messenger, and is now enhancing its
 Should I Use an Agent for Taobao?Apr 22, 2025 pm 12:04 PM
Navigating Taobao: Why a Taobao Agent Like BuckyDrop Is Essential for Global Shoppers The popularity of Taobao, a massive Chinese e-commerce platform, presents a challenge for non-Chinese speakers or those outside China. Language barriers, payment c


Hot AI Tools

Undresser.AI Undress
AI-powered app for creating realistic nude photos

AI Clothes Remover
Online AI tool for removing clothes from photos.

Undress AI Tool
Undress images for free

Clothoff.io
AI clothes remover

Video Face Swap
Swap faces in any video effortlessly with our completely free AI face swap tool!

Hot Article
Hot Tools

SublimeText3 Mac version
God-level code editing software (SublimeText3)

Dreamweaver CS6
Visual web development tools

WebStorm Mac version
Useful JavaScript development tools

PhpStorm Mac version
The latest (2018.2.1) professional PHP integrated development tool

mPDF
mPDF is a PHP library that can generate PDF files from UTF-8 encoded HTML. The original author, Ian Back, wrote mPDF to output PDF files "on the fly" from his website and handle different languages. It is slower than original scripts like HTML2FPDF and produces larger files when using Unicode fonts, but supports CSS styles etc. and has a lot of enhancements. Supports almost all languages, including RTL (Arabic and Hebrew) and CJK (Chinese, Japanese and Korean). Supports nested block-level elements (such as P, DIV),

