Home >Computer Tutorials >Computer Knowledge >There is a partition on the bootable USB disk that cannot be seen
There is a partition on the bootable USB disk that cannot be seen
- PHPzforward
- 2024-02-05 19:33:391998browse
When php editor Yuzai starts the U disk, sometimes he encounters the problem that a partition cannot be seen. This may be caused by an incompatible partition format or a damaged partition. In this case, we can try some methods to solve the problem. First, we can try to re-insert the USB flash drive, or try to insert the USB flash drive on a different computer. If the problem persists, we can try to use disk management tools to repartition or repair the partition. In addition, some third-party U disk repair tools can also help us solve this problem. In short, when the partition cannot be seen in the boot USB flash drive, we can use some simple methods to solve the problem to ensure that the USB flash drive can be used normally.
At this time, there are two solutions. The first is to use PE, and the second is to use the command line to repair.
Method 1:
You can use the PE tool to repair the boot partition. There are many PE tools available on the market, among which micro-PE is a good choice. It's relatively pure and ad-free. You can go to the official website of Weipe to download and try to use it.
After making the PE boot disk, insert the USB flash drive into the computer, then restart the computer, enter the BIOS, select the PE boot disk as the first boot disk in BOOT, and then save.
After entering PE, just select the repair tool to repair and boot. Here are four softwares.

Three tools
These three tools are all available. If your computer uses UEFI GPT, use "uefi boot repair", and BIOS MBR can use the first two.
Of course you can also use DISM to repair it, as shown in the figure below.
The boot partition of BIOS MBR is usually on the c drive. The ESP partition of UEFI GPT needs to be distinguished by itself. It is generally only a dozen megabytes in size, and some are hundreds of megabytes in size, which is easy to distinguish.

dism Select repair boot

Select the corresponding boot partition to repair
Method 2:
Command line repair, here you also need to have a USB boot disk. After entering the system installation interface, press the shortcut key to enter the command line (what shortcut key to press, please Baidu yourself). My computer is FN shift F10, but it does not have Reference.

If your original system disk is the C drive without any changes, please ignore the first 7 steps and go directly to step 8.
Enter the command line in sequence:
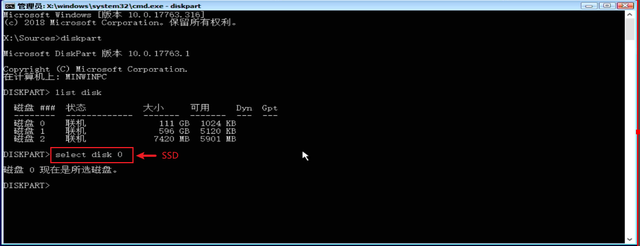
1, diskpart (enter the disk manager)

2, list disk (display the disk list, how many hard disks you have, Just show a few)

3. Select dist X (X is the number on the disk list, the first disk is 0, the second disk is 1, and so on, usually select dist 0 )

4. list partition (display the partition list, how many partitions your hard disk has will be listed)

5. select partition x (select the boot partition partition)

6, assign letter=c (Set the drive letter of the current partition, BIOS MBR is usually assign letter=c; UEFI GPT can set the last few letters as p drive letter , such as assign letter=s)

7. exit exit

8. Repair boot partition
A. BIOS MBR system installation method: (Note The blank space in the command line is a space, only one space is needed)
In the command prompt window, enter bcdboot C:\Windows /l zh-cn
That is: from the system disk C:\ Copy the startup files in the Windows system directory to repair the system startup environment.
B. UEFI GPT system installation method:
Use the command line to mount the ESP partition as disk S (use steps 1-7 above to set it), or mount it as other disk Z.
In the command prompt window, enter bcdboot C:\Windows /s S: /f uefi /l zh-cn (for example: the EXP partition is the Z drive, enter bcdboot C:\Windows /s Z: / f uefi /l zh-cn )
That is: copy the UEFI format startup file from the system disk C:\Windows directory to the ESP partition to repair the system startup environment.
Considering the difficulty level, it is recommended to use method one
The above is the detailed content of There is a partition on the bootable USB disk that cannot be seen. For more information, please follow other related articles on the PHP Chinese website!
Related articles
See more- Windows detects that the efi system partition is ntfs
- What is the name of the interface for plugging in a USB flash drive?
- What should I do if win10 cannot find the boot partition?
- What does formatting the cache partition mean?
- How to delete the Win10 system installation package? How to delete the installation package of Win10 system

