


Apple has launched the highly anticipated Journal app in iOS 17.2. With this new app, you may be wondering how to use it, but don't worry. In this guide, I’ll introduce you to the Journal app for iOS 17 and how to use it on your iPhone.
What is the Diary app in iOS 17?
In iOS 17.2, the Diary app allows users to create and edit diary entries, including text, photos, music, recordings, and more. Compared to other journaling apps, Journal is more than just a place to record your thoughts.

Additionally, Journal integrates with iPhone’s on-device learning feature to provide personalized recommendations for the best journaling experience. Additionally, the Diary app supports Face ID or Touch ID, which means you don’t have to worry about someone peeking at your diary entries.
The iOS 17 Journal app offers a variety of features, here’s a quick overview of them:
You’ll receive writing prompts to choose from based on your daily activities, photos, music, and more , provides a good start for your writing. Journal allows you to bookmark certain entries to quickly find them later. You can save suggested moments or add them from different apps (like music, podcasts, websites, news articles, etc.) via the share sheet to write later. You set a schedule to remind you to journal, such as at the beginning or end of the day. This will help create consistent habits.The Journal app is currently available on iPhone running iOS 17.2 Beta 1, with public beta and launch should take place in the coming weeks. Additionally, Apple has released a Diary Suggestions API for third-party developers to enable diary suggestions in their apps.
Now that you know everything there is to know about the Journal app on iOS 17, you can start creating entries. Follow the instructions below to create an entry in the Journal app.
How to enter entries in the Journal app on iPhone
Open the Journal app on iPhone. Click the plus ( ) button at the bottom. Choose from recommended moments or select the "New Entry" option. A new writing page will open where you can start writing your entry. You can also insert photos from your gallery/camera, add voice notes and locations to your entries. Once written, click "Done" to save your entry.
Edit, bookmark, or delete an entry
After saving, you will see your entry on the diary app's homepage. You can press and hold or tap the three-dot icon next to an entry to edit, bookmark, or delete it.
How to Lock the Journal App on iPhone
Once you start making entries in the Journal app on iPhone, you probably don't want anyone to see your private entries. Luckily, Apple gives us the option to lock Journal using Face ID or Touch ID.
Open the Settings app on your iPhone. Select a journal. Click on the Lock Diary option → enter your password when prompted. Enable lock option → If prompted, enter your password again.Once completed, Face ID or Touch ID will be enabled on your iPhone. Additionally, you will see the "Require Password" option, which allows you to set a duration after which the diary app will lock itself.
Start journaling with the diary app now!
Keeping a journal is a great habit that allows you to revisit memories of your daily life. Apple’s iOS 17 Journal app is a step in the right direction and can get people into good habits. If you don't want to run the iOS 17.2 beta but still want to journal, you can choose one from our list of the best journaling apps for iPhone.
I hope you used this guide to understand how the iOS 17 Journal app works and how to enter and lock the app. However, I haven't discovered the full capabilities of the Journal app yet, so keep an eye on this guide as I update it.
The above is the detailed content of How to use the iOS17 Diary app on your iPhone. For more information, please follow other related articles on the PHP Chinese website!

 Word on iPhone Can Turn Your Voice Notes Into DocumentsApr 22, 2025 am 03:02 AM
Microsoft Word for iOS now transforms your voice notes into fully formatted documents using Copilot AI. This latest enhancement simplifies document creation on mobile devices. To access this feature, tap the "New" button ( ), select "U
 Apple News Food Made Love Cooking Again (and Turned Me Into a Subscriber)Apr 18, 2025 am 06:11 AM
Apple News Food: Start my cooking journey Apple News' new food section (iOS 18.4 and above) conquered me with its simplicity and elegant design and ease of use. It brings together recipes from many well-known food publishers and presents each step of cooking steps clearly. Saying goodbye to the ad-filled recipe website, Apple News Food provides clear step-by-step instructions, ingredient lists, pictures, videos, etc., and more importantly, it cleverly uses interactive functions to assist in cooking, making the whole process smooth. The well-designed food section made me activate the month-long free trial of Apple News without hesitation, which was unimaginable before me
 The Best iPads of 2025Apr 18, 2025 am 01:01 AM
Choosing the Right iPad: A Comprehensive Guide Apple's iPad lineup offers a tablet for every need, but selecting the perfect one can be overwhelming. This guide simplifies the process, helping you choose the ideal iPad based on your specific requirem
 The Apple Watch Is 10 Years Old. Here's Why I Never Bought OneApr 15, 2025 am 06:09 AM
The Apple Watch: Still Not Convinced After a Decade Despite over 200 million units sold since 2015, the Apple Watch remains absent from my wrist. While its health and fitness features are impressive, they don't appeal to someone like me who doesn't
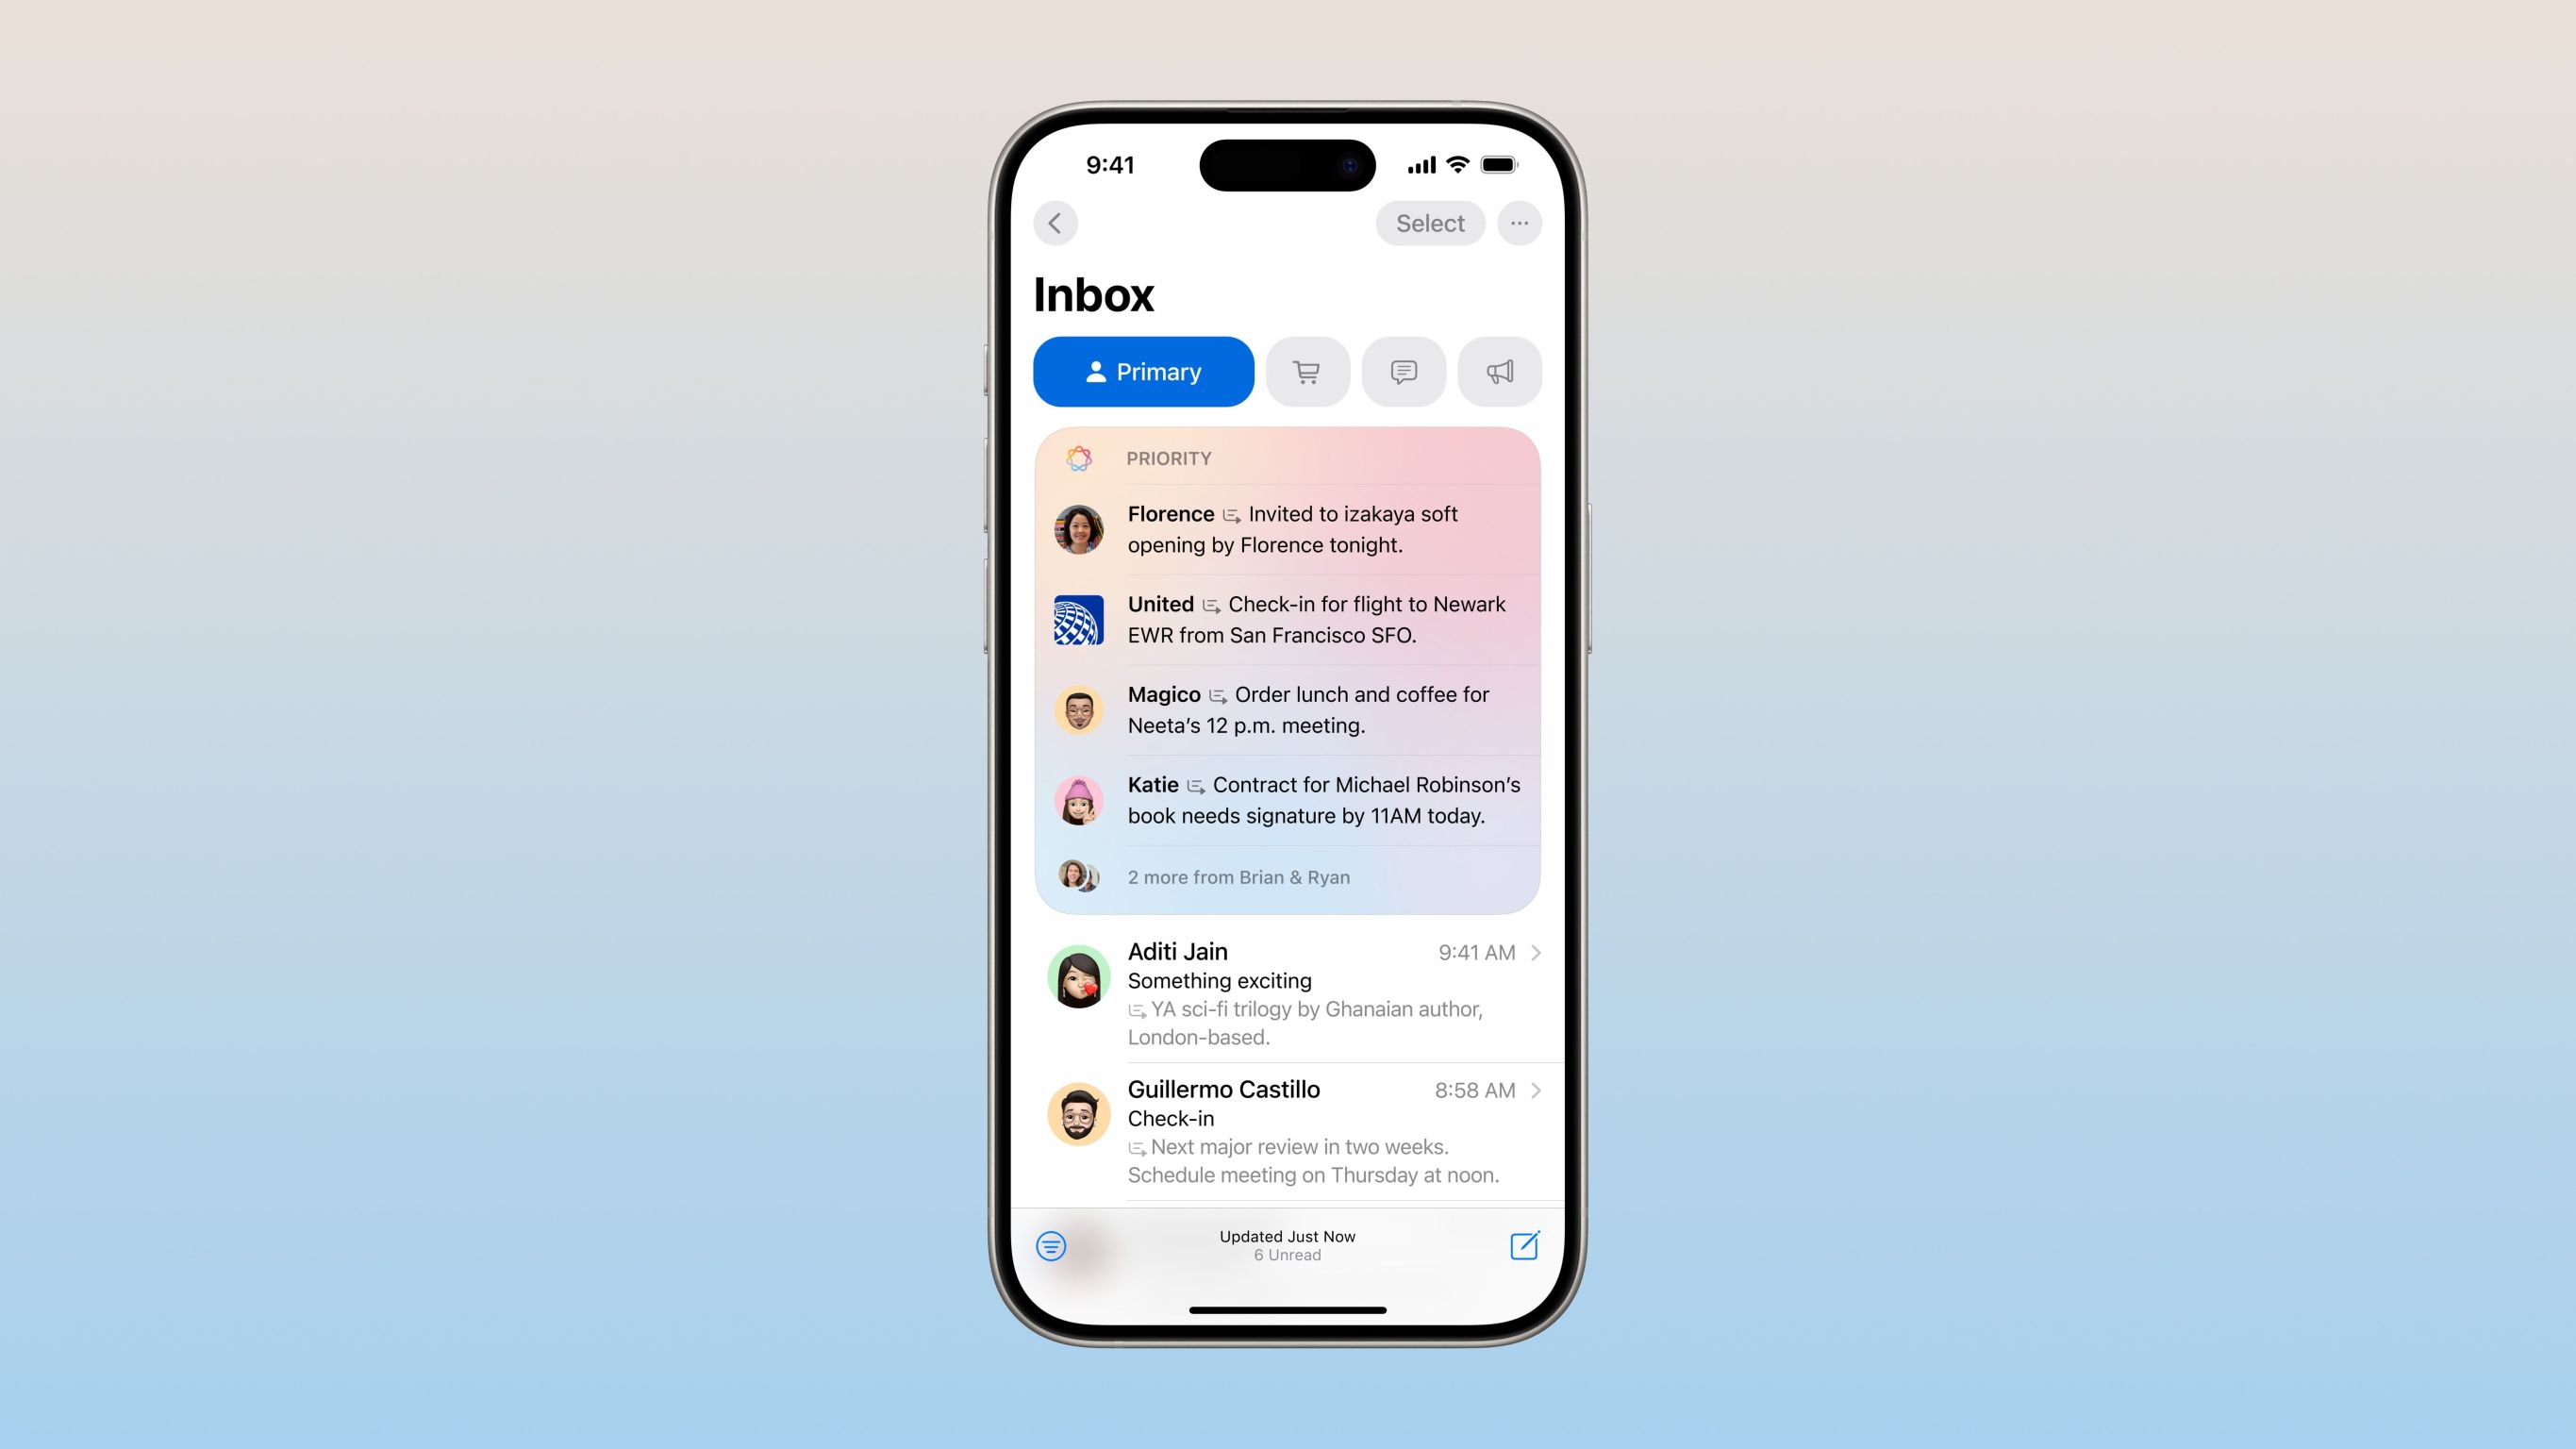 Don't Like the Latest Apple Mail Changes? Here's How to Get Rid of ThemApr 14, 2025 am 12:54 AM
New features of Apple Mail app: Categories, Summary, and Contact Photos The Apple Mail app recently updated its iPhone, iPad and Mac versions, adding features like Gmail-like email classification, notifications and email summary, and contact photos in your inbox. But not everyone likes these new changes. Fortunately, you can disable these new features and restore to a simpler way to use them. Here's how to do it: Disable Apple Mail Classification The email classification feature is designed to sort your inboxes to make it easier to process incoming messages. This feature is suitable for any device running iOS or iPadOS 18.2 and Mac computers with macOS 15.4 installed. Categories include: Main: Mail thinks the most
 We Don't Need Slimmer Phones, But You Might Want One AnywayApr 13, 2025 am 03:01 AM
Ultra-thin phones: Amazing design or risky? Samsung and Apple are about to release ultra-thin flagship phones Samsung Galaxy S25 Edge and Apple iPhone 17 Air are about to be released, and its ultra-thin design has sparked heated discussions. While many fans are concerned about their design compromises, ultra-thin phones still have some attractive advantages. Ultra-thin design: how much does it cost? First of all, these devices are expensive. Ultra-thin design requires custom parts and improved manufacturing processes, greatly increasing costs and ultimately passing them on to consumers. While prices may change at any time, reliable news shows that the iPhone 17 Air may be priced the same as the $899 iPhone Plus, or even likely to completely replace the latter; while the S25 Edge
 I Regret Ignoring This Apple Watch Running FeatureApr 13, 2025 am 12:58 AM
Take advantage of the Apple Watch running features: From default training to custom planning I've been using default running training I finally found the pacemaker and custom training Easy way to create custom Apple Watch training Make the most of your Apple Watch I'm currently training for a half marathon, which means I'm running three times a week, one to two hours a day, making the most of my Apple Watch. I've been running 142 miles this year, but I've just discovered a game-changing Apple Watch running feature. Related ###### I ran a half marathon with AirPods 4, how effective I'm curious about the new AirPod
 8 Tech Features I Wish Existed in Real LifeApr 12, 2025 am 12:59 AM
Life Hacks We Wish Were Real: Tech Features We Crave in Real Life Modern technology offers incredible conveniences, so much so that we often take them for granted. Pausing live TV, undoing computer errors, or voice-commanding music – these are ever


Hot AI Tools

Undresser.AI Undress
AI-powered app for creating realistic nude photos

AI Clothes Remover
Online AI tool for removing clothes from photos.

Undress AI Tool
Undress images for free

Clothoff.io
AI clothes remover

Video Face Swap
Swap faces in any video effortlessly with our completely free AI face swap tool!

Hot Article
Hot Tools

Atom editor mac version download
The most popular open source editor

SublimeText3 Linux new version
SublimeText3 Linux latest version

mPDF
mPDF is a PHP library that can generate PDF files from UTF-8 encoded HTML. The original author, Ian Back, wrote mPDF to output PDF files "on the fly" from his website and handle different languages. It is slower than original scripts like HTML2FPDF and produces larger files when using Unicode fonts, but supports CSS styles etc. and has a lot of enhancements. Supports almost all languages, including RTL (Arabic and Hebrew) and CJK (Chinese, Japanese and Korean). Supports nested block-level elements (such as P, DIV),

Zend Studio 13.0.1
Powerful PHP integrated development environment

SecLists
SecLists is the ultimate security tester's companion. It is a collection of various types of lists that are frequently used during security assessments, all in one place. SecLists helps make security testing more efficient and productive by conveniently providing all the lists a security tester might need. List types include usernames, passwords, URLs, fuzzing payloads, sensitive data patterns, web shells, and more. The tester can simply pull this repository onto a new test machine and he will have access to every type of list he needs.

