


When you store photos on your Mac, there may be some you want to keep private. To make sure they aren't visible to others, you can lock those photos on your Mac so they're protected from prying eyes. This article will guide you on how to lock photos on your Mac so you can view them when you need them.
How to Lock Photos on Mac [2 Methods]
You can lock photos on Mac in two ways – using the Photos app or the Disk Utility app.
Method 1: Using the Photos app
If you store your photos in this app, you can use the Photos app to lock them. If the photos are stored elsewhere, they need to be moved to the Photos app to lock them.
Step 1: Add pictures to the Photos app
If you store pictures in your Mac’s storage, you can add them to the Photos app.
- Open the Finder app and find the picture you want to lock.

- Once you find these images, hold down the Command (⌘) key and click on the image you want to select.
- Once selected, right-click or Control-click any of the selected files and go to Share >Add to Photos from the menu that appears.


The selected picture will now be sent to the Photos app.
Step 2: Hide pictures on Photos
- To lock pictures, open Photos on Mac from the Finder, Launchpad, or Spotlight "App."
- In Photos, click the Library tab on the left sidebar.
- Now you will see all the pictures you have ever added to the Photos app. To select a photo to lock, hold down the Command (⌘) key on your keyboard and click the picture you want to select.
- Once selected, right-click or Control-click any selected picture and select Hide
Photos, where n is the number of photos selected. - To confirm your action, click Hide in the prompt that appears.


#The pictures you selected will now be locked in the Hidden folder on the Photos app. Anyone who opens the Photos app won't be able to access the photos because they will be hidden.
Method 2: Use the Disk Utility application
If you have a bunch of pictures scattered in different folders on your Mac, then you can use the Disk Utility application to lock it with a password they. Until then, you can compile all the pictures you want to lock into separate folders on your Mac.
Step 1: Create the folder containing the pictures you want to lock
- First, open the Finder app and navigate to the location where you want to place the "Locked" folder.
- Within this location, click the File tab in the top menu bar and select New Folder.
- After creating the new folder, type the name of the folder and press the Return key on your keyboard when finished.
- When finished, move the pictures from your Mac to this newly created folder before locking them. To do this, you can use the following keyboard shortcuts to accomplish it: To select multiple files: Hold down Command (⌘) and click on the files you want to select.
To cut selected files: Use the Command (⌘) X shortcut on your keyboard.
To paste selected files: Use the Command (⌘) V shortcut key on your keyboard.
After you have moved all the pictures you want to hide, you can now lock them using the next step. -


- To lock the folder with a password, open it from the Finder Open the Disk Utility app in , Launchpad or Spotlight.
-
When the Disk Utility application opens, click the File tab in the top menu bar and go to New from Folder > Disk Image.
-
In the Finder window that appears on the screen, navigate to the folder you created in step #1, select it, and click Select.
-
You will now see the "New Image from Folder" menu on your screen. To lock the selected folder, click the "Encrypt" drop-down box.
-
In the menu that appears, select 128-bit AES encryption (recommended).
-
Now you will see a prompt asking you to create a password to lock the selected folder. Carefully type your preferred password in the Password and Verification boxes and click Select.
-
You will now return to the "New Images in Folder" menu. Here you can edit the locked image's name, where to save it, and add tags to it. When finished, click Save in the lower right corner.
-
The Disk Utility application will now start creating a disk image of the locked folder.
-
When ready, you will see the following message. To continue, click Finish.
-
The selected folder will now be locked and saved as a DMG file in your preferred location. You can open it to check if everything is there and then delete the original folder from your Mac.
-


- Open the Photos app on your Mac.
- With the Photos app open, click the View tab on the top menu bar and select Show Hidden Albums.
- Now you will see a new tab inside the Photos app. To open a locked photo, click the "Hide" tab on the left sidebar.
- Here you will see all the pictures you locked using method #1 above.
- To hide these pictures again, click the View tab in the menu bar and select Hide Hidden Albums.


Method 2: If you locked the picture using Disk Utility
- If you locked the picture on your Mac using Method 2 above, you can View them by opening the Finder application and navigating to the location where the folder lock image was created.
- Once you find the disk image you created, double-click it to access its contents.
- Now you will see a prompt on the screen asking you to enter your password. Type the password you added to the folder in Method #2 and click OK.
- The contents of the locked folder will now appear in the disk image folder in a new window. You can open, copy, or share pictures just like in any folder.
- The disk image will also appear on the desktop with a gray drive icon.
- After you have accessed the image, right-click or Control-click the disk image and select Eject
.


If you leave the disk image as injected, you can access it from the desktop and other users who open it may not need to enter the necessary password. Therefore, pop up after you are done with the locked folder Disk images are very important.
How to Disable Photos from Other Apps on Mac
Lock pictures have many uses, but if you want to prevent other apps on your Mac from accessing Photos stored in " pictures in the Photos app, you need to disable this access from macOS settings.
- Open the System Preferences app from the Dock, Launchpad, or Spotlight on your Mac. You can also open it by clicking the Apple () icon in the menu bar and selecting System Preferences from the menu.
- In System Preferences, click Security & Privacy.
- On the next screen, select the Privacy tab at the top.
- Here, click on the Photos tab in the left pane.
- Now you will see a list of apps that can access pictures and videos from the Photos app. The selected apps are the apps that currently have permission to view your content in Photos. To disable this access from an app, uncheck the checkbox to the left of the app you want to remove permission from.
- When you uncheck this box, any content in the Photos app will not be accessible on the selected app.


You can repeat this for other apps that you want to block access to Photos.
The above is the detailed content of 2 Ways to Lock Photos on Mac. For more information, please follow other related articles on the PHP Chinese website!

 How to Install iOS 18 Public Beta on iPhoneMay 16, 2025 am 10:18 AM
With iOS 18 now available in public beta, adventurous iPhone users who are not developers might want to try out the new operating system on their devices. The iOS 18 public beta provides early access to exciting new features such as dark mode icons a
 How to Install iPadOS 18 Public BetaMay 16, 2025 am 09:41 AM
With the iPadOS 18 public beta now accessible, any interested iPad user can install this beta version on a compatible device.Testing iPadOS 18 public beta allows users to explore new features and the updated operating system ahead of its official rel
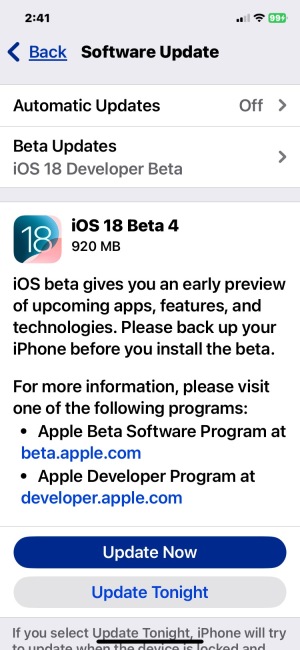 iOS 18 Beta 4 & iPadOS 18 Beta 4 Available to DownloadMay 16, 2025 am 09:40 AM
Apple has launched iOS 18 beta 4 and iPadOS 18 beta 4 for iPhone and iPad users participating in the developer beta testing program. A corresponding public beta version is expected to be released shortly after.The developer beta program is designed f
 How to Switch from iOS 18 Public Beta to Developer Beta, or Vice VersaMay 16, 2025 am 09:38 AM
Want to transition from the iOS 18 public beta to the iOS 18 developer beta? You can easily make this switch on your iPhone or iPad if you desire.The primary advantage of opting for the iOS 18 developer beta is that you generally receive beta updates
 How to Generate Text, Images, and Insights with Apple Intelligence's Built-in ChatGPT Integration May 16, 2025 am 09:29 AM
Siri has traditionally used sources like Google and Wikipedia for answers, but with the release of iOS 18.2 and iPadOS 18.2, Apple has enhanced its virtual assistant by integrating ChatGPT. This upgrade allows users to leverage ChatGPT for generating
 Generate Professional Drawings in Seconds Using Image Wand on iOS 18.2 or iPadOS 18.2 May 16, 2025 am 09:13 AM
Creating professional-quality visuals with Apple's Image Wand in iOS 18.2 and iPadOS 18.2 can be a game-changer, even for those lacking in artistic skills. This feature, an extension of Apple Intelligence's Image Playground, allows users to generate
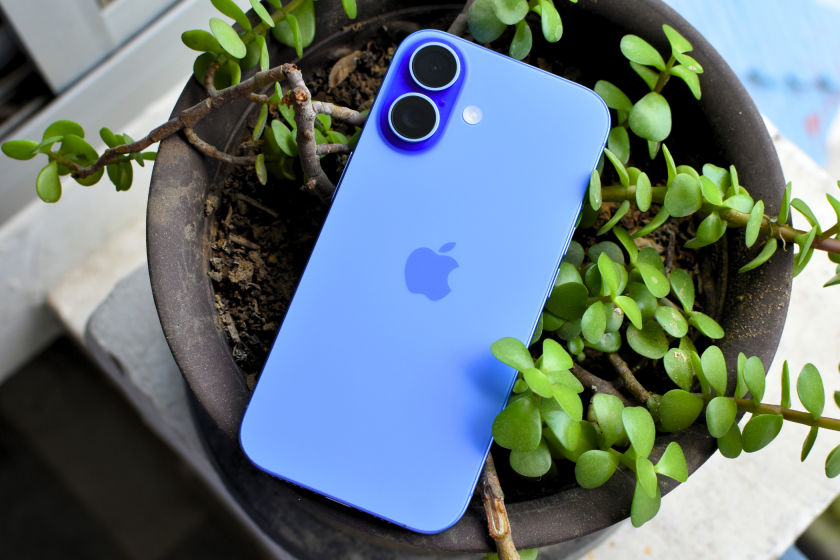
 iPhone 16 & iPhone 16 Pro Announced with Faster Chips & Apple Intelligence SupportMay 16, 2025 am 09:11 AM
Apple has unveiled the new iPhone 16 lineup, featuring the iPhone 16, iPhone 16 Plus, iPhone 16 Pro, and iPhone 16 Pro Max. All models in the series are equipped with Apple Intelligence, an upcoming AI feature set slated for release in October.As par
 These Free iPhone Apps Are Basically Digital Fidget ToysMay 16, 2025 am 05:38 AM
Your smartphone might be the most distracting device you possess. It constantly seeks your attention and is always available when you feel the urge to scroll endlessly. It's easy to spend hours each day playing with your phone.But what if this time c


Hot AI Tools

Undresser.AI Undress
AI-powered app for creating realistic nude photos

AI Clothes Remover
Online AI tool for removing clothes from photos.

Undress AI Tool
Undress images for free

Clothoff.io
AI clothes remover

Video Face Swap
Swap faces in any video effortlessly with our completely free AI face swap tool!

Hot Article
Hot Tools

Zend Studio 13.0.1
Powerful PHP integrated development environment

WebStorm Mac version
Useful JavaScript development tools

SublimeText3 English version
Recommended: Win version, supports code prompts!

SublimeText3 Chinese version
Chinese version, very easy to use

PhpStorm Mac version
The latest (2018.2.1) professional PHP integrated development tool

