


How to insert background music background image in Word
word 2007 method: Page layout - page color - fill effect - picture - select picture: find the picture stored in your computer - insert - OK. If you just want to write on the picture, you can do this: 1. Open the word document and enter the text you want to write; 2. Insert the picture below the text; 3. Click on the text wrapping in the picture toolbar-----click on Lining Below the text; 4. Drag the picture size so that the text is placed above the picture. At this point, you can design the size, color, and position of the characters according to your own needs, and continue editing the text. ================================================== ============================Insert music: Add an mp3 background music to the word document, and you can hear the singing as soon as you open the document. But it does not affect any normal editing. 1. Header and footer - under the view menu (must be set in the header and footer. Otherwise you will not hear the background music)
To open the file in a Word document that needs to add mp3 background music. Then click the "Header and Footer" option in the "View" menu to enter the footer editing area. Next, click the "Object" option in the "Insert" menu, select "Windows Media Player", and click "OK" to insert the WMP object. Finally, open the Properties dialog box and make sure your answer does not exceed 119 words.
Right-click the WMP object, select "Properties", click "Customize" in the "Properties" dialog box, and then click the three-dot button that appears - (note where the three-dot button is, please see for yourself). A dialog box will pop up, enter the corresponding mp3 path in "File name or URL", select "invisible" in "Selection mode", set "Play count" to "999", and click the "OK" button. Exit design mode and exit the footer editing area. In this way, you can hear mp3 music every time you open the document. 4. I wish everyone good luck! ================================================== ============================= "Put words on the background image":
1. Menu bar-Picture-Self File-After selecting the picture-OK;
2. Select the picture - right click - set the picture format - layout - line below the text;
3. Menu bar - Insert - Text box (insert graphic box, rectangular box, etc.) - Enter text;
4. Click the text box - menu bar - format - borders and shading (you can also right-click the text box to enter format) - color and lines: select "no fill color" and "no line color" - -Sure;
5. Move the text box on top of the image - right click - stacking order - bring to top;
6. Press Shift, select the text box and picture - right click - Group - Group;
(The above text is pasted and combined on the picture)
7. Cut the picture;
8. Menu bar - View - Header and Footer - Click Header - Paste;
(The picture will become the background at this point) - You can also zoom, move or rotate 9. Finally, close the "Header and Footer" toolbar
Word How to set background music in two ways
word Method 1 of setting background music:
Step 1: Click "Insert" in the word document menu bar and select the "Object" option.
Step 2: Open the "Object" dialog box.
Step 3: In the dialog box that opens the object, select the object type as the Windows Media Player object, and then click "OK". A "Control Toolbox" dialog box and the "Windows Media Player" control will appear
Step 4: Select the "Windows Media Player" control, and then click the "Properties" button in the control toolbox to open the properties window
Step 5: Select "Customize" in the second row and click . After customizing the table on the right, a "..." button will be displayed. Clicking the button will open the "Windows Media Play Properties" window.
Step 6: Click the "Browse" button after "File Name or URL", select the local background music file directory that needs to be played, and select the "Invisible" option from the drop-down list after "Select Mode"
Step 7: You can set the playback count in the playback options (if you want to repeat the playback 5 times, change the number 5, or change it to 99, and it will play in a loop), then adjust the volume and balance, and click "OK" ” to complete the setting.
Step 8: Return to the word document and hide the previously opened properties window and the Windows Media Play control in the worksheet. Click the "Design Mode" button in the Control Toolbox to end the settings, and the background music will automatically play.
word Method 2 of setting background music:
Step 1: First, open your word. In the open word, click "Insert"--"Object"
Step 2: The "Object" window will open. In this window, select "Windows Media Player" and click "OK"
Step 3: At this time, an object will be inserted into the document. Right-click on this object and select "Properties"
Step 4: At this time, you will exit the "Properties" window. In this window, click "Customize", and then click the "..." button behind it
Step 5: The interface shown below will appear. First, click "Browse" to select the music you want to insert. The second step is to select the "Invisible" option in the "Selection Mode" in "Control Layout", and finally click "OK"
Step 6: At this time, an icon as shown below will appear in your document. Click the button pointed by the arrow to exit. You will now hear the music in your document.
How to add background music to Word document
1. Header and footer - under the view menu (must be set in the header and footer. Otherwise you will not hear the background music)
Open the word document that needs to add mp3 background music, click the "Header and Footer" item in the "View" menu to enter the footer editing area
2. Insert——Object
Click "Object" in the "Insert" menu, select "windows media player", click "OK" and insert the WMP object.
3. "Properties" dialog box
right
Click the WMP object, select "Properties", click "Custom" in the "Properties" dialog box, and then click the three-dot button that appears - (note where the three-dot button is, please see for yourself). A dialog box pops up, in "File name
or URL", enter the corresponding mp3 path, select "invisible" in "Select Mode", set "Play Count" to "999", click the "OK" button. Exit design mode and exit the page
Foot editing area. In this way, you can hear mp3 music every time you open the document.
How to insert background music into a word document
How to operate in Word 2003:
Step 1: Open the Word document where you need to add background music, and select "Header and Footer" from the "View" menu. The "Header and Footer" toolbar will be automatically activated. You can use this tool Drag the bar to the appropriate location and click the mouse. Switch from the default header state to the footer editing area. Open the "Object" dialog box from the "Insert" menu and drag the slider here to find the "Windows Media Player" object. After confirmation, insert it into the footer editing area. At this time, you will see a black control window in the footer editing area.
Step 2: Right-click the control window and open the "Properties" dialog box from the shortcut menu. Click the "(Custom)" button and click the "..." button that appears on the far right edge. At this time, the "Windows Media Player Properties" dialog box will pop up. Manually enter the corresponding music file name at "File or URL". Click the "Browse" button at the back to import the file.
Step 3: Since we want to be able to play background music every time we open the Word document, we need to check the "Autoplay" checkbox here, and the "Play Count" also needs to be appropriately increased, because the default play count it's 1". This means that the background music will only be played when the document is opened for the first time. This is not our intention. It is recommended to set it to "999". Here you also need to change the "Selection Mode" to "Invisible". We will see the name of the song we just added successfully in the "URL" of the "Properties" dialog box. Close this dialog box and return to the main window of Word to save it. In the future, every time we open the document, we can hear pleasant songs, and the mini play box will not be displayed in the footer. If we need to delete the background music in the Word document, we can enter the footer editing area again. to delete.
Add background music in Word 2007
Now more and more people are trying to use Word 2007, but if you try to add background music according to the method of Word 2003, then switch to the "Insert" tab. When opening the Object dialog box. We will not find the "Windows Media Player" object here. Have Microsoft developers canceled this function? In fact, this is because the user interface and operating style of Word 2007 have undergone major changes compared with previous versions, so the functions we were used to in the past have been relocated. If you really need to add background music to a specific document under Word 2007, then please follow the steps below:
Step 1: Click the "Office Button" in the upper left corner of the Word window. Select "Word Options" from the drop-down menu. The "Word Options" dialog box will open and switch to the "Common" option page. In the right pane, select the "Show Developer tab in the ribbon" checkbox. After confirmation, the "Development Tools" tab can be displayed in the Ribbon of Word 2007.
Step 2: Switch to the "Insert" tab, click the "Footer" button in the "Header and Footer" function group, select the "Edit Footer" command from the pop-up menu, and you will enter the page Foot edit status.
Step 3: Click the "Old Tools" button in the lower right corner of the "Controls" functional group of the "Development Tools" tab in the ribbon, then click the "Other Controls" button in the lower right corner of the pop-up list, and then In the other control list dialog box that opens, find "Windows Media Player" and click the "OK" button in the lower right corner. Then a black control window will be inserted in the footer editing area, and you will also see that the "Design Mode" button in the "Controls" functional group of the "Developer Tools" tab in the ribbon is already pressed.
Step 4: Right-click the dotted box. Select the "Properties" command from the shortcut menu. The "Properties" dialog box will open. Enter the file name of the background music in the input box after "URL". Please use the absolute path here. Then click the "Customize" item, and then click the "..." button on the far right. The "Windows MediaPlayer Properties" dialog box will open for settings. In fact, the next steps are exactly the same as adding background music in Word2003. After completing the above settings, close each dialog box and click the "Design Mode" button under the "Controls" functional group on the ribbon. Exit the footer editing state, and we can hear beautiful background music every time we open the document. The deletion method is very simple. Double-click the footer area and delete it directly after activating it. You can try it.
The above is the detailed content of How to insert background music and background images in Word. For more information, please follow other related articles on the PHP Chinese website!

 How to Make Your Excel Spreadsheet Accessible to AllApr 18, 2025 am 01:06 AM
Improve the accessibility of Excel tables: A practical guide When creating a Microsoft Excel workbook, be sure to take the necessary steps to make sure everyone has access to it, especially if you plan to share the workbook with others. This guide will share some practical tips to help you achieve this. Use a descriptive worksheet name One way to improve accessibility of Excel workbooks is to change the name of the worksheet. By default, Excel worksheets are named Sheet1, Sheet2, Sheet3, etc. This non-descriptive numbering system will continue when you click " " to add a new worksheet. There are multiple benefits to changing the worksheet name to make it more accurate to describe the worksheet content: carry
 Excel Paste Special: shortcuts to copy values, comments, column width, etc.Apr 17, 2025 am 11:54 AM
This tutorial unlocks the power of Excel's Paste Special feature, showing you how to significantly boost your efficiency with paste special shortcuts. Learn to paste values, formulas, comments, formats, column widths, and more, all while avoiding co
 How to add, copy and delete multiple checkboxes in ExcelApr 17, 2025 am 11:01 AM
This tutorial shows you how to efficiently add, modify, and delete multiple checkboxes in Excel. Last week, we explored using checkboxes for checklists, conditional formatting, interactive reports, and dynamic charts. This week, we'll focus on the
 How to insert a tick symbol (checkmark) in ExcelApr 17, 2025 am 09:53 AM
This tutorial explores six methods for inserting checkmarks in Excel, along with formatting and counting techniques. Excel offers two checkmark types: interactive checkboxes and tick symbols. Checkboxes allow selection/deselection via mouse clicks
 How to calculate age in Excel from birthdayApr 17, 2025 am 09:47 AM
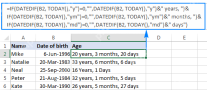
The tutorial shows different ways to get age from birthday in Excel. You will learn a handful of formulas to calculate age as a number of complete years, get exact age in years, months and days at today's date or a particular date. There
 How to insert calendar in Excel (Date Picker & printable calendar template)Apr 17, 2025 am 09:07 AM
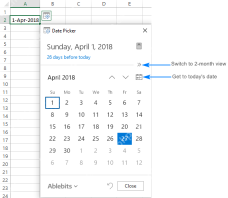
This tutorial demonstrates how to add a drop-down calendar (date picker) to Excel and link it to a cell. It also shows how to quickly create a printable calendar using an Excel template. Data integrity is a major concern in large or shared spreadshe
 Why You Should Always Rename Worksheets in ExcelApr 17, 2025 am 12:56 AM
Improve Excel’s productivity: A guide to efficient naming worksheets This article will guide you on how to effectively name Excel worksheets, improve productivity and enhance accessibility. Clear worksheet names significantly improve navigation, organization, and cross-table references. Why rename Excel worksheets? Using the default "Sheet1", "Sheet2" and other names is inefficient, especially in files containing multiple worksheets. Clearer names like “Dashboard,” “Sales,” and “Forecasts,” give you and others a clear picture of the workbook content and quickly find the worksheets you need. Use descriptive names (such as "Dashboard", "Sales", "Forecast")
 How to archive in Outlook automatically or manuallyApr 16, 2025 am 11:48 AM
This comprehensive guide explains how to effectively manage your Outlook email storage by archiving emails, tasks, and other items across various Outlook versions (365, 2021, 2019, 2016, 2013, and earlier). Learn to configure automatic archiving, pe


Hot AI Tools

Undresser.AI Undress
AI-powered app for creating realistic nude photos

AI Clothes Remover
Online AI tool for removing clothes from photos.

Undress AI Tool
Undress images for free

Clothoff.io
AI clothes remover

AI Hentai Generator
Generate AI Hentai for free.

Hot Article
Hot Tools

Dreamweaver CS6
Visual web development tools

Atom editor mac version download
The most popular open source editor

Zend Studio 13.0.1
Powerful PHP integrated development environment

SublimeText3 Mac version
God-level code editing software (SublimeText3)

DVWA
Damn Vulnerable Web App (DVWA) is a PHP/MySQL web application that is very vulnerable. Its main goals are to be an aid for security professionals to test their skills and tools in a legal environment, to help web developers better understand the process of securing web applications, and to help teachers/students teach/learn in a classroom environment Web application security. The goal of DVWA is to practice some of the most common web vulnerabilities through a simple and straightforward interface, with varying degrees of difficulty. Please note that this software

