Home >Software Tutorial >Mobile Application >How to solve the problem of lightning simulator running stuck?
How to solve the problem of lightning simulator running stuck?
- WBOYWBOYWBOYWBOYWBOYWBOYWBOYWBOYWBOYWBOYWBOYWBOYWBforward
- 2024-01-14 19:09:093794browse
Recently, many users have reported that opening the APP using a computer simulator is very laggy and easy to crash. This is actually not a problem with our APP. It is more likely to be a problem with computer settings or some software facilities, so the editor Here we will give you a detailed summary of the solutions to the lag and crash problems that almost occur. Let’s take a look at how to solve the lag in the lightning simulator. I hope it will be helpful to users!

Introduction to the solution to the stuck operation of the lightning simulator
1. Turn on VT (can solve 90% of the problems)
View simulation In the upper right corner of the device, if the word VT is not displayed, it means that VT has been turned on, and there is no problem with the VT. If the word VT is displayed, you can refer to the VT setting entrance provided below. Just follow the steps to easily turn on the computer. VT.
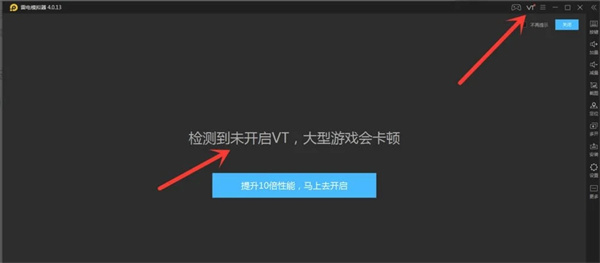
Turn on vt, the emulator can improve 90% performance; after turning on vt, the emulator can set a higher cpu, otherwise the cpu can only be set to 1.
The computer starts VT process
The first step is to restart the computer and follow the prompts to enter the BIOS. When the screen lights up, press Del quickly and continuously several times (different brands of computers have different keys to enter Bios mode) to enter the BIOS page.
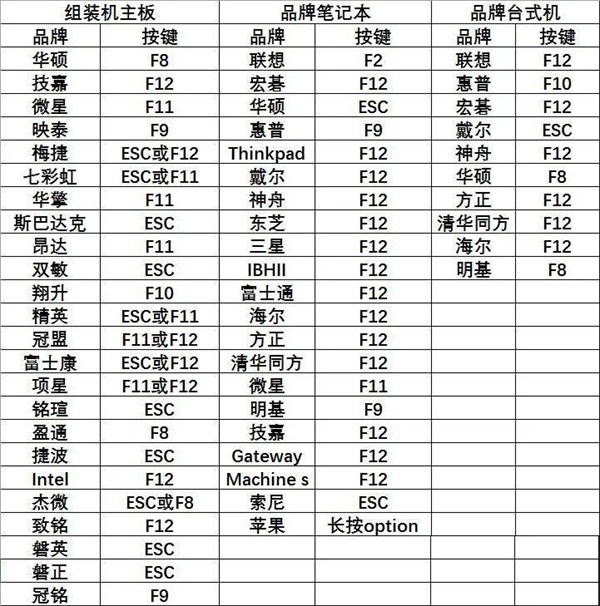
The second step is to find the VT option in the menu and turn it on. Since the "BIOS interface" and "VT name" of different computer motherboards are different, here are three possible situations. Just find something that suits your situation.
【Case 1】
1) After entering the BIOS, you need to press the "F7" key to enter "Advanced Mode" (or advanced mode).
2) As shown below, after entering Advanced Mode (or Advanced Mode), follow the following path to find "Advanced" (or Advanced) - "CPU Configuration" (or Processor Settings) - Scroll down Go to the bottom of the page, "Intel (VMX) Virtual Technology" (or virtualization technology), and then change "Disabled" (or disabled) to "Enabled" (or enabled).
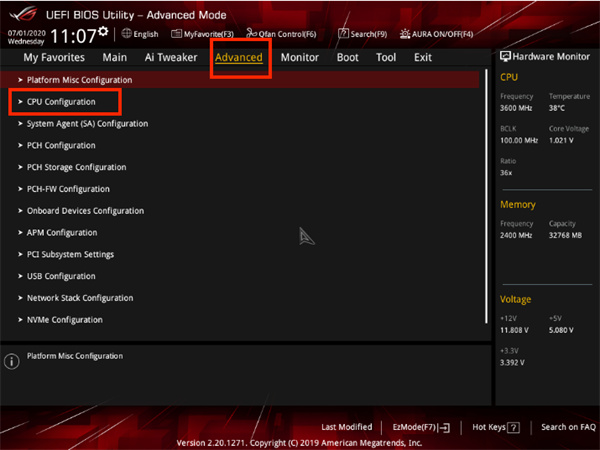
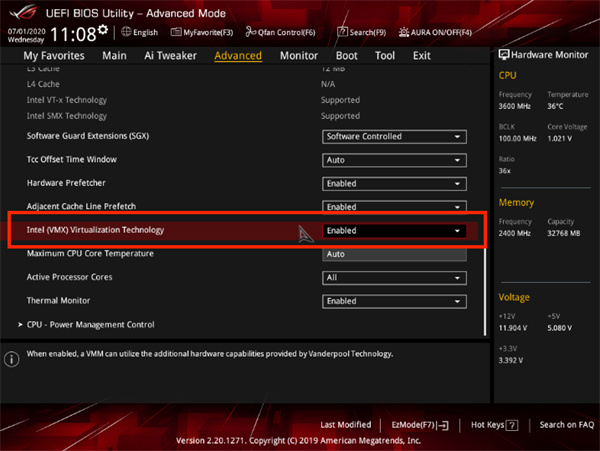
3) Press the "F10" key to save and exit, and you will successfully open VT!
【Case 2】
1) After entering the BIOS, you need to press the "F7" key to enter "Advanced Mode" (or advanced mode).
2) As shown below, after entering Advanced Mode (or Advanced Mode), follow the following path to find "Advanced" (or Advanced) - "CPU Configuration" (or Processor Settings) - " SVM", and then change "Disabled" (or closed) to "Enabled" (or turned on).
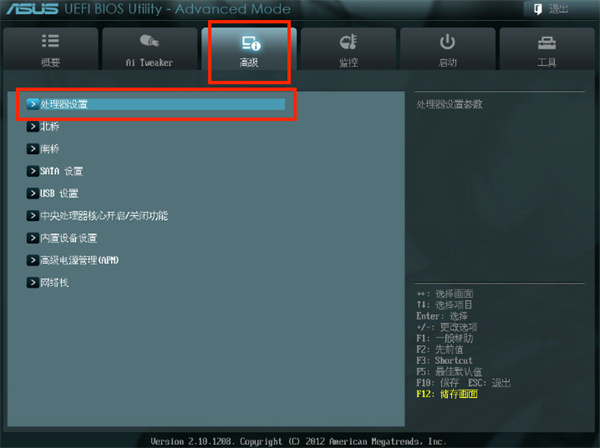
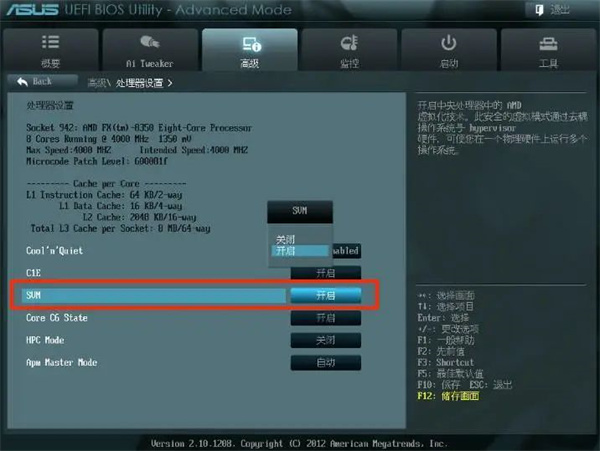
3) Press the "F10" key to save and exit, and you will successfully open VT!
【Case 3】
1) After entering the BIOS, you need to press the "F7" key to enter "Advanced Mode".
2) As shown below, follow the path below to find "Advanced" - "CPU Configuration" - "Secure Virtual Machine" (or SVM Mode), and then change "Disabled" to "Enabled".
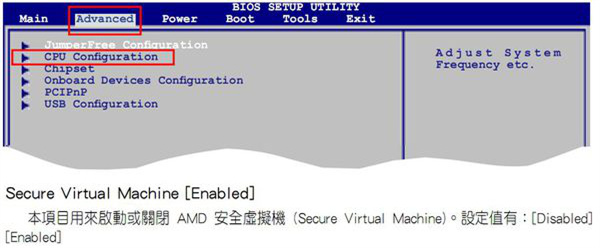
3) Press the "F10" key to save and exit, and you will successfully open VT!
Finally, special emphasis! If you can't find VT according to the tutorial, you can open different menus in the BIOS and search carefully by pressing the following keywords.
1) VT options are usually secretly hidden in the following menus. Click on them when you see them!
Chinese: Advanced/Processor
English: Advanced/BIOS Features/CPU Configuration/Security
2) The VT option is generally aliased as one of the following, you can Take a closer look!
Chinese: Intel Virtualization/Virtualization Technology
English: Virtual / Virtualization / VT-x / VMX / SVM / Secure Virtual Machine / Intel Virtualization Technology
2. Turn off 360 Crystal Core Protection
Open 360 Security Guard, find the protection center in the lower left corner and click to enter. Core Crystal Protection is in the upper right corner of the protection center; click again to turn off the Core Crystal Protection function.



It should be noted that it is useless to exit 360 directly. You must turn off the nuclear crystal protection settings. Of course, if you don’t have 360 installed, you can skip this step directly!
After turning off nuclear protection, remember to restart the computer!
3. Increase the CPU and memory of the simulator
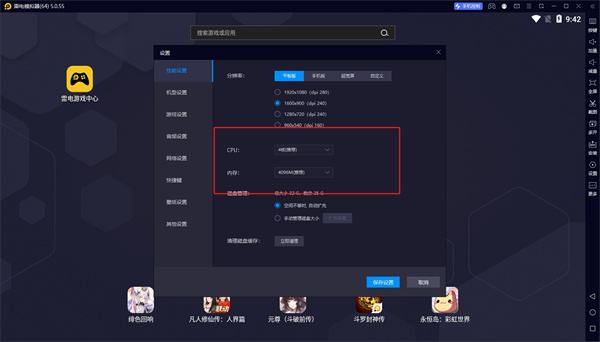
Open the thunder and lightning simulator, find the software settings in the upper right corner, or open the settings button in the right column, and click on the performance settings panel Adjust the CPU and memory items to CPU4 core, memory 4096M, and click Save. If the computer configuration is poor (E5 series or above is generally recommended), after setting to 4CPU and 4096M memory, the computer's overall CPU and memory usage exceeds 85%, you need to appropriately reduce the emulator's CPU and memory.

4. Upgrade the graphics card driver
Here the editor takes "Drive Life" as an example, through the computer browser After downloading, follow the steps to install and run "Driver Life". After entering the main driver interface, click to experience it now. Select stable mode and update or reinstall the drivers you need. If the stable mode driver version still cannot solve the problem, use the latest mode driver version.

If Driver Life cannot install the driver, it is recommended to download and install the driver from the graphics card official website.
Note: Remember to restart the computer after upgrading the graphics card driver!
5. Check the CPU usage and memory usage of the computer
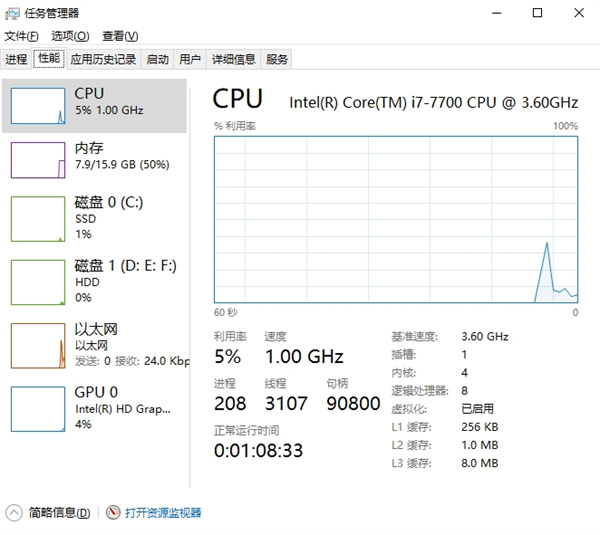
Right-click on the taskbar at the bottom of the computer desktop, find the Task Manager and click to enter, check the CPU and memory usage in the performance panel of the Task Manager Memory usage. If it is full, the computer configuration is too low. When starting the simulator, you need to exit all other software to reduce CPU and memory usage.
6. Switch to independent graphics card
Some users’ computers have dual graphics cards. At this time, they need to switch to independent graphics to run the emulator. Relatively speaking, running the simulator with a dedicated graphics card will be very smooth, and problems such as lags, crashes, and frame drops will be easily solved. By default, the simulator automatically uses the independent graphics card to run, but there may be some special circumstances that cause the program not to use the independent graphics card. You can switch by following the steps below.
The method to switch the independent graphics card for A card is as follows:
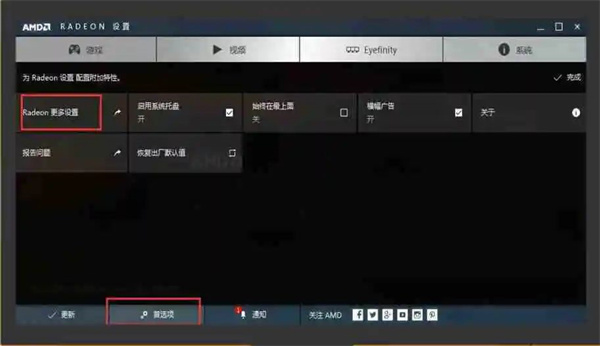
Right-click a blank space on the desktop and select Configure Swapable Graphics Card. After entering the Radeon settings interface, find Radeon More in the preferences at the bottom Click Settings to enter, find the switchable display card application settings in the power item, and pull down to see it.
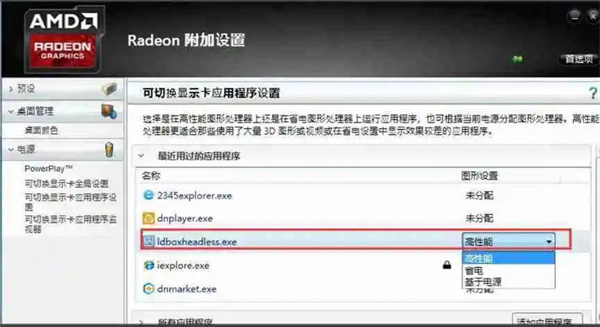
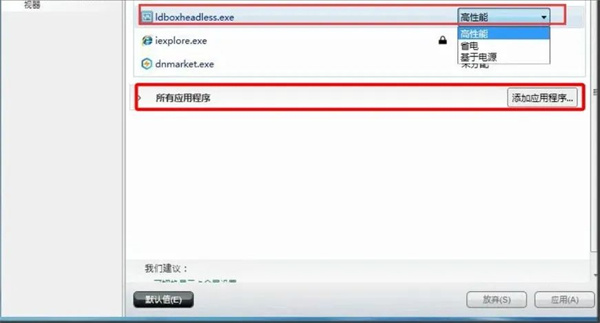
If you have used the emulator recently, you can search for it in recently used applications and change the graphics settings to high performance; if you have not used it recently, set it in all Add and change High Performance in the application, and finally click Apply in the lower right corner.
The method of switching independent graphics card with N card is as follows:
Similarly, right-click a blank space on the desktop and click NVIDIA Control Panel, enter the control panel and then manage 3D settings in 3D settings. In the program settings on the right, add the simulator main process.
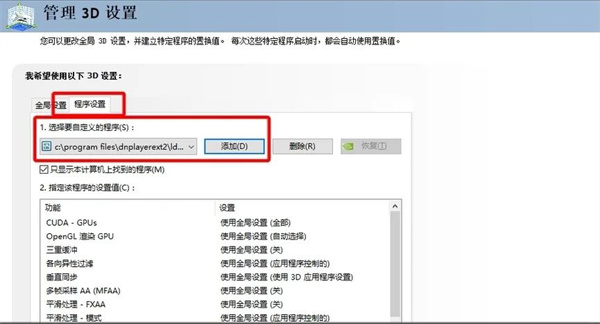
It should be noted that the path of this process is in the Program Files/dnplayerext2 folder on the C drive, not the installation path of the simulator.
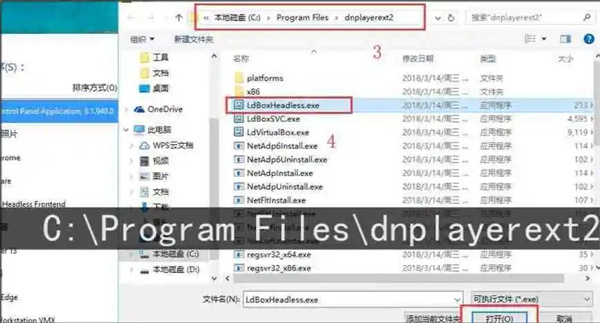
After the addition is completed, click the apply button in the lower right corner to exit.
7. Windows 10 system patch causes lag
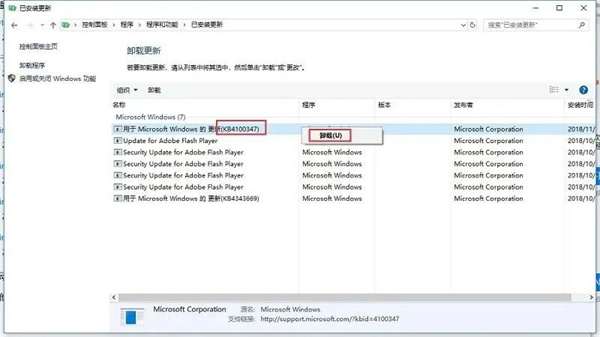
Uninstall the system patch (KB4100347) to improve CPU performance by 10%. Some users' win10 system update (KB4100347) patch has caused the emulator to become increasingly stuck. The following editor explains in detail how to uninstall this patch so that the emulator can run more smoothly.
The first method:
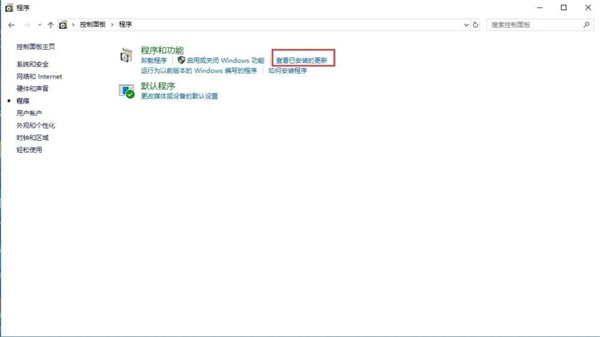
1. Right-click the computer-[Properties], select [Control Panel]-Programs-Programs and Features in the pop-up window, and select [Check for installed updates] ].
2. Click the update you want to uninstall (as shown in the picture), [Security Update for Microsoft Windows (KB4100347)], and select [Uninstall].
The second method:
1. Select the [Start] button, then select [Settings] >[Update & Security]> [Windows Update]>[windows Update]>[History Update Record]>[Uninstall Updates].
2. Select the update you want to uninstall, right-click the mouse and select [Uninstall].
Note: Uninstalling system patches may involve unknown risks. Please decide whether to uninstall it yourself!
The above is the detailed content of How to solve the problem of lightning simulator running stuck?. For more information, please follow other related articles on the PHP Chinese website!
Related articles
See more- How to allow multiple users to use Youku membership? Detailed explanation on how to use multiple members of Youku!
- How to bind bank card and check balance using WeChat mobile phone operation guide
- Share how to export national karaoke accompaniment and teach you how to extract song accompaniment
- A simple guide to batch transfer photos from iPhone to computer
- Share the iQiyi member login method: how to let others scan the code to log in, so that two people can share a VIP account

