


Unity3d2021 is of great use in many fields and can help users easily develop applications that can run on more than 20 different operating systems, including personal computers, game consoles, mobile devices, Internet applications, etc. Now Most commercial games and virtual reality products are developed using this engine. But it will be a little difficult for newcomers to use. For this reason, the editor has brought you an introductory tutorial on unity2021. Friends who don’t know yet can take a look.
unity2021 Getting Started Tutorial
1. This part is the key for you to start Unity. Here we will explain Unity's interface, menu items, using resources, creating scenes, and publishing. When you fully read this section, you will be able to understand how Unity works, how to make it work more efficiently, and how to put simple games together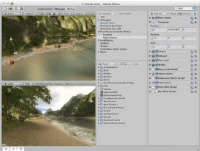
2. Now we Start learning Unity. If you haven't opened Unity yet, you can run it by double-clicking the Unity icon located in the Application->Unity folder. When it runs for the first time, you will see the following scene: Unity runtime deficiencies Save the scene. If you have opened any instance, your screen will be different from the picture above. There is a lot to learn. Let us spend some time observing and understanding the above interface. We will introduce each interface element. Summary Each part of the main window is called a view. There are many types of views in Unity, however, you don't need to see them all at the same time. Different layout modes contain different views. Choose a different layout by clicking the Layout drop-down control, located in the upper right corner of the window. Layout mode selection drop-down list Now click on the layout selection and click Animation to switch to Animation layout. You can also select Window->Layouts->Animation from the menu to switch. The animated layout contains all views, which is the best way to introduce them
3. You can quickly identify these views by the names in the upper left corner of the view. These views are: Scene View - used to place objects Game View - represents the appearance of the game at runtime Hierarchy - a list of game objects in the current scene Project View - displays Inspector view (Instpector) of all available objects and resources in the currently opened project - displays the details and attributes of the currently selected object Timeline (Timeline) - used to create a basic timeline animation scene view (Scene View) for the currently selected object
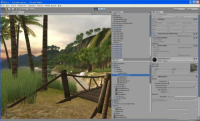
4. Scene View is an interactive sandbox. You will use it to select and position all GameObjects in the scene, including players, cameras, enemies, etc. Manipulating and modifying objects in the scene view is a very important feature of Unity. This is the best way to view the scene from the perspective of the designer rather than the player. You can move and manipulate objects at will in the scene view, but you should know some basic commands to use the scene view effectively. The first command you should know is the FrameSelected command. This command will center the currently selected object. You can click on any object in the Hierarchy, then move your mouse over the scene view and press the F key. The scene view moves to center the currently selected object. This command is very useful and you will use it often when editing scenes.
Operating in the scene view There is a toolbar containing layout mode selection above the scene view

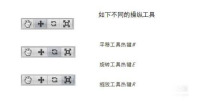
5. Although the current toolbar is not attached to the scene view window, it is located on the left The four buttons are used to navigate and manipulate objects in the scene view, and the two middle ones control how the selected object's axis is displayed. The first View Tool on the left will be explained later. The latter tools are Manipulation Tools, and the two middle ones are Handle Position Tools. Selecting any of the Manipulation Tools allows you to move, rotate, or scale objects while interacting. When you have a tool selected you can click on any object in the scene view to select it. Now press the F key to center the object.
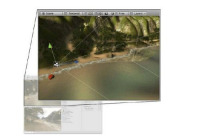
6. When an object is selected, you will see the Gizmo coordinates. Each tool has a different Gizmo coordinate form,
Translation
Rotation and scaling

7. Click and drag any coordinate axis of the current Gizmo coordinates to translate, rotate or scale the Transform component of the currently selected object. You can also manipulate the object in multiple axes by clicking and dragging the center of the gizmo coordinates. If you have a three-button mouse, you can adjust the last adjusted axis by clicking the middle button without clicking it directly.

8. Refer to the Transform Component section for more information. The HandlePositionTool is used to control how and where the axis of an object or a group of selected objects is displayed. Selecting Center means using the common axis of all currently selected objects. Selecting Pivot means using the actual axis handle position of each object to be set to the center, and using the object's common axis handle position to Axis, use the actual object axis
9. Navigating in the scene view There are many different ways to navigate in the scene view depending on the mouse used. Use a three-button mouse by holding down the Option button and dragging the left mouse button. You can use Orbit mode by holding down the Option button and dragging the middle mouse button. You can use Drag mode by holding down the Option button and dragging the right mouse button. Zoom mode can be used. You can also use the scroll wheel to zoom (omitted) View tool mode Drag mode shortcut key Q

10. In drag mode (Drag Mode), click and drag in the scene view Move the mouse to move the view up, down, left, and right. Orbit and Zoom Modes are also the most commonly used viewing tools. Keep the View tool selected and hold down the Option key to enter rotation mode. Click and drag the mouse to see how the view rotates. Also note that the view tool button changes from a hand to an eye

11. You can enter zoom mode by pressing the
Command
button. In this mode, clicking and dragging the mouse will zoom your view back and forth. Note that the zoom mode icon is a magnifying glass.

The above is the detailed content of Learn the basic tutorials of 'unity2021'. For more information, please follow other related articles on the PHP Chinese website!

 Chess Lessons Are Coming to DuolingoApr 24, 2025 am 10:41 AM
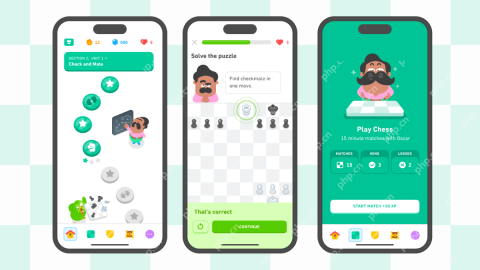
Duolingo, renowned for its language-learning platform, is expanding its offerings! Later this month, iOS users will gain access to new chess lessons integrated seamlessly into the familiar Duolingo interface. The lessons, designed for beginners, wi
 Blue Check Verification Is Coming to BlueskyApr 24, 2025 am 10:17 AM
Bluesky Echoes Twitter's Past: Introducing Official Verification Bluesky, the decentralized social media platform, is mirroring Twitter's past by introducing an official verification process. This will supplement the existing self-verification optio
 Google Photos Now Lets You Convert Standard Photos to Ultra HDRApr 24, 2025 am 10:15 AM
Ultra HDR: Google Photos' New Image Enhancement Ultra HDR is a cutting-edge image format offering superior visual quality. Like standard HDR, it packs more data, resulting in brighter highlights, deeper shadows, and richer colors. The key differenc
 You Should Try Instagram's New 'Blend' Feature for a Custom Reels FeedApr 23, 2025 am 11:35 AM
Instagram and Spotify now offer personalized "Blend" features to enhance social sharing. Instagram's Blend, accessible only through the mobile app, creates custom daily Reels feeds for individual or group chats. Spotify's Blend mirrors th
 Instagram Is Using AI to Automatically Enroll Minors Into 'Teen Accounts'Apr 23, 2025 am 10:00 AM
Meta is cracking down on underage Instagram users. Following the introduction of "Teen Accounts" last year, featuring restrictions for users under 18, Meta has expanded these restrictions to Facebook and Messenger, and is now enhancing its
 Should I Use an Agent for Taobao?Apr 22, 2025 pm 12:04 PM
Navigating Taobao: Why a Taobao Agent Like BuckyDrop Is Essential for Global Shoppers The popularity of Taobao, a massive Chinese e-commerce platform, presents a challenge for non-Chinese speakers or those outside China. Language barriers, payment c
 How Can I Avoid Buying Fake Products On Taobao?Apr 22, 2025 pm 12:03 PM
Navigating the vast marketplace of Taobao requires vigilance against counterfeit goods. This article provides practical tips to help you identify and avoid fake products, ensuring a safe and satisfying shopping experience. Scrutinize Seller Feedbac
 How to Buy from Taobao in the US?Apr 22, 2025 pm 12:00 PM
Navigating Taobao: A Guide for US B2B Buyers Taobao, China's massive eCommerce platform, offers US businesses access to a vast selection of products at competitive prices. However, language barriers, payment complexities, and shipping challenges can


Hot AI Tools

Undresser.AI Undress
AI-powered app for creating realistic nude photos

AI Clothes Remover
Online AI tool for removing clothes from photos.

Undress AI Tool
Undress images for free

Clothoff.io
AI clothes remover

Video Face Swap
Swap faces in any video effortlessly with our completely free AI face swap tool!

Hot Article
Hot Tools

SublimeText3 English version
Recommended: Win version, supports code prompts!

ZendStudio 13.5.1 Mac
Powerful PHP integrated development environment

Safe Exam Browser
Safe Exam Browser is a secure browser environment for taking online exams securely. This software turns any computer into a secure workstation. It controls access to any utility and prevents students from using unauthorized resources.

SublimeText3 Chinese version
Chinese version, very easy to use

EditPlus Chinese cracked version
Small size, syntax highlighting, does not support code prompt function

