


SQL Server 2019 now has the ability to run on Linux and in containers, and connects to the PolyBase technology of big data storage systems. Users can also move all big data workloads to SQL Server. It also provides support for the SQL Server database engine, SQL Server Analysis Services, SQL Server machine learning service, SQL Server and SQL Server Master Data Services on Linux provide additional functions and improvements. Because the software is more troublesome to install, many friends may not know it. For this reason, the editor brings you the sql server2019 installation tutorial. , let’s take a look together!
sql server2019 installation tutorial
1. First, you need to download and unzip the file on this site, get the official sql server 2019 download compressed package, and open the [sql_server_2019] folder.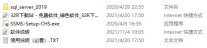
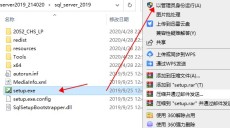
2. Right-click [setup.exe] to install the program and select [Run as administrator]
3. In the welcome installation interface of the software, directly Click Install on the left side of the interface, and then click directly to select [New SQL Server independent installation or add features to an existing installation]

4. Directly click to check [Specify available versions], and then Then click [Next] directly

5. In the software license agreement interface, click to check [I accept the license terms], and then click [Next] directly

6. Click [Next]

7. In the software installation function selection interface, users are asked to directly check the corresponding functions according to their own needs (not all necessary Check), in this case only the necessary functions are checked. After the installation is completed, you can still add functions

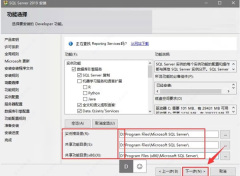
8. In the interface shown in the figure below, you need to change the installation path and shared directory of the software. In this case, we choose to install to the D drive, so just replace C in the original path with D, and then directly click [Next]
9. In the interface shown in the figure below, directly click again Click [Next]

10. In the interface shown below, click [Next] directly again

11. In the database engine configuration interface, Click directly to check [Mixed Mode], then enter the password you want to set, then click directly to add the current user, and finally click [Next] directly

12. Wait until completed After the above operations, in the interface shown below, click [Install] directly

13 and wait for the software to be installed.

14. After the software installation is completed, directly click [Close] in the interface shown below to exit the software installation program.

15. After completing the above operations, in the interface shown below, directly click the upper right corner of the interface to close the interface.

16. Then return to the folder you decompressed at the beginning, find and select the [SSMS-Setup-CHS.exe] executable file, right-click the mouse and select [Run as administrator]

17. In the software installation path selection interface, click Change directly to change the software installation directory. It is recommended to install it on other disks besides C drive. You can install it on D drive or other disks. Create a new SSMS 18 folder in a drive letter with more remaining capacity, and then click [Install] directly

18 and wait for the software to be installed.

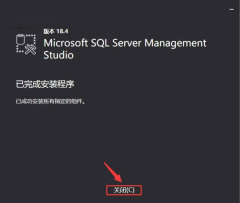
19. After the software installation is completed, directly click [Close] in the interface shown below to exit the software installation program.
20. Then return to the desktop, open the start menu, find the software icon in the start menu, and drag it to the desktop to create a desktop shortcut.

21. Then return to the desktop and double-click to open the software icon on the desktop.

22. In the interface shown below, the server name will be automatically selected. If not, expand the drop-down box to select and click [Connect] directly
Warm reminder: The server name and The computer names are the same.

23. After the software installation is completed, you can start using it normally.
The above is the detailed content of How to install SQL Server 2019. For more information, please follow other related articles on the PHP Chinese website!

 Chess Lessons Are Coming to DuolingoApr 24, 2025 am 10:41 AM
Duolingo, renowned for its language-learning platform, is expanding its offerings! Later this month, iOS users will gain access to new chess lessons integrated seamlessly into the familiar Duolingo interface. The lessons, designed for beginners, wi
 Blue Check Verification Is Coming to BlueskyApr 24, 2025 am 10:17 AM
Bluesky Echoes Twitter's Past: Introducing Official Verification Bluesky, the decentralized social media platform, is mirroring Twitter's past by introducing an official verification process. This will supplement the existing self-verification optio
 Google Photos Now Lets You Convert Standard Photos to Ultra HDRApr 24, 2025 am 10:15 AM
Ultra HDR: Google Photos' New Image Enhancement Ultra HDR is a cutting-edge image format offering superior visual quality. Like standard HDR, it packs more data, resulting in brighter highlights, deeper shadows, and richer colors. The key differenc
 You Should Try Instagram's New 'Blend' Feature for a Custom Reels FeedApr 23, 2025 am 11:35 AM
Instagram and Spotify now offer personalized "Blend" features to enhance social sharing. Instagram's Blend, accessible only through the mobile app, creates custom daily Reels feeds for individual or group chats. Spotify's Blend mirrors th
 Instagram Is Using AI to Automatically Enroll Minors Into 'Teen Accounts'Apr 23, 2025 am 10:00 AM
Meta is cracking down on underage Instagram users. Following the introduction of "Teen Accounts" last year, featuring restrictions for users under 18, Meta has expanded these restrictions to Facebook and Messenger, and is now enhancing its
 Should I Use an Agent for Taobao?Apr 22, 2025 pm 12:04 PM
Navigating Taobao: Why a Taobao Agent Like BuckyDrop Is Essential for Global Shoppers The popularity of Taobao, a massive Chinese e-commerce platform, presents a challenge for non-Chinese speakers or those outside China. Language barriers, payment c
 How Can I Avoid Buying Fake Products On Taobao?Apr 22, 2025 pm 12:03 PM
Navigating the vast marketplace of Taobao requires vigilance against counterfeit goods. This article provides practical tips to help you identify and avoid fake products, ensuring a safe and satisfying shopping experience. Scrutinize Seller Feedbac
 How to Buy from Taobao in the US?Apr 22, 2025 pm 12:00 PM
Navigating Taobao: A Guide for US B2B Buyers Taobao, China's massive eCommerce platform, offers US businesses access to a vast selection of products at competitive prices. However, language barriers, payment complexities, and shipping challenges can


Hot AI Tools

Undresser.AI Undress
AI-powered app for creating realistic nude photos

AI Clothes Remover
Online AI tool for removing clothes from photos.

Undress AI Tool
Undress images for free

Clothoff.io
AI clothes remover

Video Face Swap
Swap faces in any video effortlessly with our completely free AI face swap tool!

Hot Article
Hot Tools

MantisBT
Mantis is an easy-to-deploy web-based defect tracking tool designed to aid in product defect tracking. It requires PHP, MySQL and a web server. Check out our demo and hosting services.

EditPlus Chinese cracked version
Small size, syntax highlighting, does not support code prompt function

SublimeText3 Chinese version
Chinese version, very easy to use

ZendStudio 13.5.1 Mac
Powerful PHP integrated development environment

SecLists
SecLists is the ultimate security tester's companion. It is a collection of various types of lists that are frequently used during security assessments, all in one place. SecLists helps make security testing more efficient and productive by conveniently providing all the lists a security tester might need. List types include usernames, passwords, URLs, fuzzing payloads, sensitive data patterns, web shells, and more. The tester can simply pull this repository onto a new test machine and he will have access to every type of list he needs.

