


originpro8 is a graphic visualization and data analysis software developed by Origin Lab in the United States. The software focuses on data analysis and drawing. Data analysis mainly includes various complete mathematical analysis functions such as statistics, signal processing, image processing, peak analysis and curve fitting. It is very It is powerful, but many novice friends may not know how originpro8 fits curves, so if you don’t know, let’s take a look!
How to fit the curve with originpro8
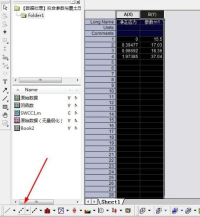
1. Select the data and click on the icon pointed by the arrow in the figure to generate a scatter plot.Note: You must select the data first before you can generate a graph!
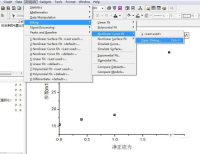
2. Select the points in the scatter plot and click Analysis - Fitting - Nonlinear Curve Fit - Open Dialog on the toolbar to open the curve fitting dialog box.
Note: Be sure to select the points in the scatter plot first, and then click on the toolbar!
3. In the dialog box, select "User Defined" for the Category option, and then click the button pointed by the arrow to open the dialog box for creating a new equation.
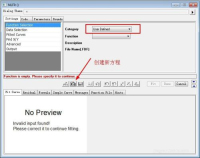
In the dialog box: the Function Name column allows you to name the equation (English only), this time it is named "NewFunction123"; in the Function Type column, select the second "Equations", and then click next to proceed to the next step.

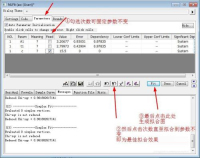
4. Enter the parameter settings. The first and second lines are the independent variable x and the dependent variable y. The third line is the equation parameters you need to set. Take the quadratic equation of one variable as an example. Set Parameters a, b, c (letters and punctuation marks must be in English input method), then click next to proceed to the next step.

5. Enter the equation input, as shown in the figure, enter the quadratic equation in the red line box. (Letters and symbols must be in English input method).
The basic settings have been completed here, just keep clicking next, and finally click finish!

6. Return to the initial curve fitting dialog box, and you will find that the created equation NewFunction123 has been created in the drop-down menu of the Function column.

7. Then click the "Parameters" tab and check Fixed to fix the parameters; then click the button in step 2 of the figure to perform fitting until the parameters remain unchanged and the desired value is reached. to achieve the best results; finally click Fit to generate the fitting results.
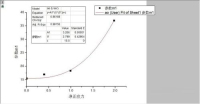
8. The final generated graph is as shown below. The correlation coefficient, goodness-of-fit determination coefficient R-square and the values of each parameter will be displayed in the table.
The above is the detailed content of Learn how to use OriginPro8 for curve fitting. For more information, please follow other related articles on the PHP Chinese website!

 Trump Just Delayed the TikTok Ban (Again)Apr 11, 2025 am 10:48 AM
TikTok's US ban is again delayed, this time until June 18th. President Trump announced on Truth Social a new executive order extending the deadline by 75 days, allowing more time for ByteDance to find a US buyer. This marks the second delay of the P
 Can you get paid to take pictures for Google Maps?Apr 10, 2025 am 09:36 AM
You can make money taking photos for GoogleMaps. Accumulate points by joining the GoogleMaps Local Wizard Program to upload high-quality photos and comments, which can be redeemed for GooglePlay points and other rewards.
 Why is Google Maps full of ads?Apr 09, 2025 am 12:18 AM
The reason why GoogleMaps is full of advertising is that its business model needs to cover operational costs through advertising. 1) Google maintains free services by embedding various forms of ads in -maps. 2) Users can manage ads by identifying results with “sponsored” or “advertising” tags. 3) Tips to improve the user experience include using offline maps and "Explore" functions.
 What do Google Maps drivers get paid?Apr 08, 2025 am 12:14 AM
Google Maps drivers earn money including base salary and bonuses calculated by kilometers. Their salary structure is based on a contract system, with a base salary of about $3,000 per month, a bonus of $0.1 per kilometer, and additional bonuses can be obtained when driving at night.
 What are Google local ads?Apr 07, 2025 am 12:14 AM
Google Local Ads helps businesses increase local market exposure and attract potential customers through bidding, quality scores and geolocation data. 1. To create a local advertising campaign, you need to set up a bidding strategy and budget. 2. Advanced usage can dynamically adjust bidding according to time period. 3. Optimization strategies include keywords, advertising copy, bidding and geolocation optimization to improve exposure and conversion rates.
 How much does the Google Maps guy get paid?Apr 06, 2025 am 12:03 AM
GoogleMapsGuy's average annual salary ranges from $50,000 to $70,000. Their job includes driving or hiking to take street scene images and uploading them to Google servers, with salaries varying by region, experience and responsibilities.
 The Four Best Alternatives to ZelleApr 05, 2025 am 10:29 AM
Zelle's standalone app is gone, but its peer-to-peer payment functionality lives on within many banking apps. Check if your bank supports Zelle using their search tool; over 2,200 banks already have it integrated. If not, consider these top Zelle a
 Can you do ads on Google Maps?Apr 05, 2025 am 12:10 AM
GoogleMaps supports ad serving. 1) Create local ads through GoogleAds, 2) Set up ad campaigns, select the "local" type, 3) Optimize ad copywriting and bidding strategies, 4) Use ad extensions and smart bids to improve the effectiveness, 5) Regularly monitor and adjust advertising strategies to improve local customer appeal.


Hot AI Tools

Undresser.AI Undress
AI-powered app for creating realistic nude photos

AI Clothes Remover
Online AI tool for removing clothes from photos.

Undress AI Tool
Undress images for free

Clothoff.io
AI clothes remover

AI Hentai Generator
Generate AI Hentai for free.

Hot Article
Hot Tools

ZendStudio 13.5.1 Mac
Powerful PHP integrated development environment

SublimeText3 Mac version
God-level code editing software (SublimeText3)

Notepad++7.3.1
Easy-to-use and free code editor

SublimeText3 Linux new version
SublimeText3 Linux latest version

MantisBT
Mantis is an easy-to-deploy web-based defect tracking tool designed to aid in product defect tracking. It requires PHP, MySQL and a web server. Check out our demo and hosting services.

