


This article will talk about the knowledge points corresponding to reinstalling the macos system to a USB flash drive and starting the reinstallation system from the USB flash drive. I hope it will be helpful to you. Don’t forget to bookmark this site. Today I will share with you the knowledge of reinstalling the macos system to a USB flash drive. It will also explain the reinstallation of the system starting from the USB flash drive. If it happens to solve the problem you are facing now, don’t forget to follow this site and start now!
Tianrui Green Shield is installed on company computers. Will the copied files be discovered?
1. Then the files you copy will be discovered. If the company clearly stipulates that the information cannot be copied externally, it is recommended that you give up. Employees have a duty of confidentiality.
2. Even remote control, this has nothing to do with whether the green shield is installed or not. So it is possible to find your files. But you need to know your file path and file name, otherwise it will be like finding a needle in a haystack with so much data on the hard disk.
Under normal circumstances, copying computer files will not be recorded. If you're just copying files between your computer's internal or external storage devices, there usually won't be any records or logs.
Do I need to connect a network cable to log in to the company computer? If so, that means our operations are being monitored. In addition, did you install the operating system and software on the company computer yourself? If yes, then there is no problem.
There is a kind of network monitoring software that is installed in the company's network. It does not require a client. As long as you are connected to the network, you will be monitored.
Since your company is a formal enterprise, your administrator will definitely install a monitoring system. If you try to copy files to a USB drive, this action will be logged. Therefore, it is recommended that you do not try to do this.
How to install mac system with U disk | Steps to install macosx system from U disk
Required tools: 8G or above U disk appstore download osx system image Normally used mac computer to make maxosx startup U The steps are as follows: The OSXLion just downloaded from the appstore will be placed in the Dock at the bottom of the screen.
Required tools: 8G or above U disk appstore download macosx system image Normally used mac computer mac system production U disk system installation disk The steps are as follows. OSXLion downloaded from the appstore will be placed in the Dock at the bottom of the screen.
There are many ways to install macOS on Apple computers, one of which is to use a USB flash drive to install. The following are detailed steps: 1. Prepare a USB flash drive with at least 8G capacity. 2. Insert the USB flash drive into the USB port of the computer. 3. Open Finder, find the name of the USB flash drive, and click it. 4. Select the "Partition" option in the pop-up menu. 5. In the partition layout options, select "1 partition". The partition name can be suggested as the number "1". 6. Select "MacOS Extended (Journaled)" in the format options. 7. Click the "Options" button to enter more option settings. 8. In the pop-up options window, make sure "GUID Partition Map" and "Mac OS Extended (Journaled)" are selected. 9. Click the "Apply" button to save the settings. 10. Return to the partition window and click the "Partition" button to start the partitioning process. 11. After the partitioning is completed, the USB flash drive will be renamed "Install macOS". 12. Now you can download the macOS installer and save it to a USB drive. 13. Once completed, you can use this USB flash drive to boot your Apple computer and follow the on-screen instructions to install macOS. I hope the above steps are helpful to you and wish you a successful installation!
On your El Capitan-compatible Mac, open the downloaded disk image and run the installer named "InstallMacOSX.pkg" within it. An app called Install OS X El Capitan will be installed in your Applications folder.
How to make a macosx system U disk boot disk | Tutorial on making a macosx installation U disk
Required tools: 8G or above U disk appstore download macosx system image for normal use The steps for making a USB system installation disk on a mac computer are as follows. OSXLion downloaded from the appstore will be placed in the Dock at the bottom of the screen.
Required tools: U disk of 8G or above. Download the osx system image from appstore. Use a normal mac computer to make a maxosx boot U disk. The steps are as follows: The OSXLion just downloaded from the appstore will be placed in the Dock at the bottom of the screen.
Please replace the name of the macOS version you downloaded, such as Big Sur, with [version name]. The steps for formatting and reinstalling are as follows: First, insert the startup disk into your Mac and restart your computer. Then, hold down the "Option" key until the available boot options appear, and select the startup disk as the boot target.
For those who want to install a system on Apple computers but don’t know where to start, System X may be a good choice. Since Apple computers are positioned at a higher end, many people have less access to them, so many users may not know how to install the system.
mac formatting and reinstalling the system | mac installation system formatting tutorial
will re-display the first image, select the second "Reinstall macOS" and click continue. After selecting, you will be prompted "To set up and install macOS Sierra, please click Continue." The system may be different, but the steps are the same. Just click Continue.
First, we need to make sure the MacBook Air is turned off. Next, hold down the Command and R keys on your keyboard and don't let go. Then, press the switch key in the upper right corner simultaneously (remember to continue to hold down the Command and R keys while pressing the switch key). When you see a specific interface appear on the screen, you can release all the keys.
Back up your data: Before formatting your MacBook Air, you need to back up all important data to an external hard drive or other storage device to prevent data loss. Enter recovery mode: After shutting down, hold down the Command R key to turn on the power switch until the Apple logo appears.
After formatting the disk, close Disk Utility, return to the reinstall system interface, select to reinstall OS X, and click Continue. Select the disk where the system is installed. I only have one disk here. Select the corresponding disk and click "Continue". Next, the Mac starts to download the system files; after the download is completed, the system will automatically complete the installation.
Does the U disk installation of macos system have to be the factory version?
1. The MacBook Air I just bought, with the native 10 Yosemite system, cannot be downgraded to Mavericks, even if the hard drive is erased using the U disk A new installation will not work; unless it was the first new model purchased in 2015, which was originally a Mavericks system, and you upgraded to Yosemite yourself, you can downgrade it back now.
First of all, in order to successfully complete the task, we need to do some preparations. First, prepare a USB flash drive with a capacity of more than 8G, and make sure there are no files in the USB flash drive, because the USB flash drive will be formatted during the process of making the boot disk. Secondly, we need to download an Apple mac OS system. You can search and download it by yourself. The download address is not provided here. After preparing these two tasks, we can start making a USB boot disk. First, insert the U disk into the USB interface of the computer and open Disk Utility. In Disk Utility, select the USB flash drive and click the "Erase" option to format the USB flash drive into Mac OS extended (journaled) format. Then, select the "Restore" option and drag the downloaded Mac OS system image file into the source disk column, using the USB disk as the target disk. Click the "Restore" button and the system will start writing the image file to the USB flash drive. This process may take some time, please be patient. After making the USB boot disk, we can start installing the Apple mac OS system. First, make sure your computer is turned off, and then insert the USB flash drive into the computer's USB port. Press the power button and hold down the Option key until the boot selection screen appears. In the boot selection interface, select the USB disk as the boot medium, and then click to enter the installation interface. Follow the instructions on the installation interface to install the system. The installation process may require you to enter some information, such as user name, password, etc. Please fill it in according to your personal needs. After the installation is complete, the system will automatically restart. At this point, you can pull out the USB flash drive and follow the system prompts to perform some initial settings, such as selecting language, connecting to the network, etc. After completing these settings, you can start using the new Apple mac OS system! The above are the detailed steps for making a boot disk for Apple mac OS system. I hope it will be helpful to everyone. I wish everyone can successfully complete the production and enjoy the convenience and fun brought by Apple's mac OS system! If you encounter any problems during the production process, you can consult us at any time.
3. First, insert the U disk into the computer, open "Disk Utility", select "Erase", select macOS Extended Log Format, then rename the U disk to Mojave, as shown in the figure below, and then enter Next step. Second, download the macOS system installation image, and then download the version you want to install.
How to reinstall the system on an Apple laptop using a USB disk
1. On the Mac computer, open the "Utilities" folder in the "Applications Folder", and then open "Disk Utility" Tools" application. Select your USB drive and click the "Erase" tab. Make sure to select "Mac OS Extended (Journaled)" as the format and give the USB drive a name.
2. To download an Apple system file, the original system image is easy to find, including ISO and DMG. It is not recommended to use a black Apple system image with a modified kernel. Plug in the USB flash drive and use the system's built-in disk tool to format the USB flash drive. Select Mac OS extension as the format and name it as you wish.
In the top menu bar of the Apple system, click the icon located at the 10 million mark. Then select Utilities and click Disk Utility. In Disk Utility, find the partition option and select 2 partitions. According to the diagram, set one of the partitions to WINDOWS in the partition layout. After the settings are completed, click Apply to save the settings.
The method for booting a USB flash drive from an Apple all-in-one computer is very simple. First, insert the pre-made USB boot disk into the USB port of your Apple notebook. Next, press the shortcut hotkey "option" on your computer keyboard and turn on your computer. In this way, you can start the system software through the USB flash drive. Remember, during this process, make sure your USB flash drive has system software installed.
The steps to install the operating system in a USB flash drive are as follows: First, select the appropriate USB flash drive according to the required operating system and USB flash drive capacity. If it is a Windows 7 system, it is recommended to use a 4G capacity USB flash drive; if it is a Windows XP system, it is recommended to use a 2G capacity USB flash drive. Then, download and install the U-depth USB boot creation tool. After the installation is complete, start the software and follow the software's prompts to create a boot disk. Through the above steps, you can use the USB flash drive to install the operating system. Please note that the specific operation steps may vary slightly depending on the software version and operating system version. Please operate according to the actual situation.
6. Click quotEnd quotAfter the installation is completed. 1Then, we restart the system and enter the startup interface, which are Mac OS and Win7. 1Finally, open the Boot Camp control panel and set the default startup items to complete all operations of installing the win7 system on the Apple laptop.
How to reinstall the system on mac using a USB flash drive
1. Download and install; macOS Installer;, which is an official tool for creating a bootable USB flash drive. Once it opens, select the version of Mac OS you want to install and click "Continue." Select your USB drive as the target disk and click "Continue".
2. To download an Apple system file, the original system image is easy to find, including ISO and DMG. It is not recommended to use a black Apple system image with a modified kernel. Plug in the USB flash drive and use the system's built-in disk tool to format the USB flash drive. Select Mac OS extension as the format and name it as you wish.
The steps to create a macOS boot USB flash drive are as follows: 1. Prepare a USB flash drive of more than 8G. 2. Download the image file of the macOS system in the App Store. 3. Make sure you have a working Mac computer. 4. Insert the USB flash drive into the USB port of the Mac computer. 5. Open the Disk Utility application. 6. In Disk Utility, select your USB drive and click the "Erase" option. 7. Select "Mac OS Extended (Journaled)" as the file system and name the USB drive. 8. Click the "Erase" button and wait for the erasure process to complete. 9. In Disk Utility, select your USB drive and click on the "Restore" option. 10. In the "Source" field, select the macOS system image file you downloaded earlier. 11. In the "Destination" field, select your USB drive. 12. Click the "Restore" button and wait for the recovery process to complete. 13. After completion, your USB flash drive will become a macOS bootable USB flash drive. 14. You can start the Mac computer from the USB flash drive, install the macOS system or perform other operations. Please note that there are certain risks in creating a macOS bootable USB flash drive. Please operate with caution and back up important data.
How to install Windows 7 system on Mac using USB flash drive? The following are the steps to install the system using a USB flash drive: 1. Make a USB boot disk. It is recommended to use a USB boot disk creation tool, which can be easily found online. 2. Download the Windows 7 system image file. You can obtain the Windows 7 image file from the official Microsoft website or other trusted download sources. 3. Insert the USB flash drive and open the USB boot disk creation tool. Select the option to make a Windows 7 boot disk and select your USB drive as the target. 4. Select the downloaded Windows 7 system image file and import it into the USB boot disk creation tool. 5. Click the Start Production button and wait for the production process to complete. 6. Restart your Mac and hold down the Option (or Alt) key until the startup options appear. 7. Select the USB flash drive as the boot device and press the Enter key. 8. After entering the Windows 7 installation interface, follow the prompts to proceed with the installation process. Please note that using a USB flash drive to install Windows 7 may involve some risks, such as data loss or system damage. Before proceeding, be sure to back up important data and make sure you understand and are familiar with the entire installation process.
How to put the Apple system into the USB flash drive
After inserting the USB flash drive into the computer, we can use the system's own disk tool to format it. First, select the format option, then select Mac OS Extended format and assign a random name to the USB drive. After waiting for the formatting to be completed, we select the recovery option, use the system installation file as the source disk, and the just-formatted U disk partition as the destination disk. Just drag the destination disk into the recovery box to start the recovery operation.
2. Select your U disk and click "Partition", "First Partition" and set the partition to "1" and the format to "Mac OS Extended". Click "GUID Partition" in "Options" and click Confirm. Apply it and perform operations such as formatting your USB flash drive, and all the contents of your USB flash drive will be cleared.
3. Download and install; macOS Installer;, which is an official tool for creating bootable USB drives. After opening it, select the version of Mac OS you want to install and click "Continue." Select your USB drive as the target disk and click "Continue".
4. Click the logo on the computer where Mac needs to be installed. Then select Shut Down on the menu. After shutting down, insert the prepared boot disk into the computer USB. Then hold down option and press the power button to turn on the computer.
This is the end of the introduction to reinstalling the macos system to a USB flash drive and booting the system from a USB flash drive. Have you found the information you need? If you want to know more about this, remember to bookmark and follow this site. That’s it for the introduction of macos reinstallation system to USB flash drive. Thank you for taking the time to read the content of this website. For more information about reinstalling the system from the USB flash drive and macos reinstallation system to the USB flash drive, don’t forget to check this website. Search it.
The above is the detailed content of After Tianrui Green Shield is installed, will the copied files be detected?. For more information, please follow other related articles on the PHP Chinese website!

 Best MobaXterm alternative for Mac: Top 6 options to considerMar 06, 2025 pm 05:05 PM
MobaXterm is a go-to for remote connections with features like SSH, X11 forwarding, and an integrated terminal. But since there isn’t a version for macOS, Mac users have been searching for solid alternatives. If you’re on the lookout for somethi
![MacBooster Review: Is It Worth It? [Price, Features, Tools]](https://img.php.cn/upload/article/001/242/473/174122917236210.png?x-oss-process=image/resize,p_40) MacBooster Review: Is It Worth It? [Price, Features, Tools]Mar 06, 2025 am 10:46 AM
MacBooster Review: Is It Worth It? [Price, Features, Tools]Mar 06, 2025 am 10:46 AMIObit MacBooster: A Comprehensive Mac Optimization and Security Tool MacBooster is a multifaceted application designed to enhance your Mac's speed, security, and overall performance. It offers a suite of tools for cleaning junk files, providing anti
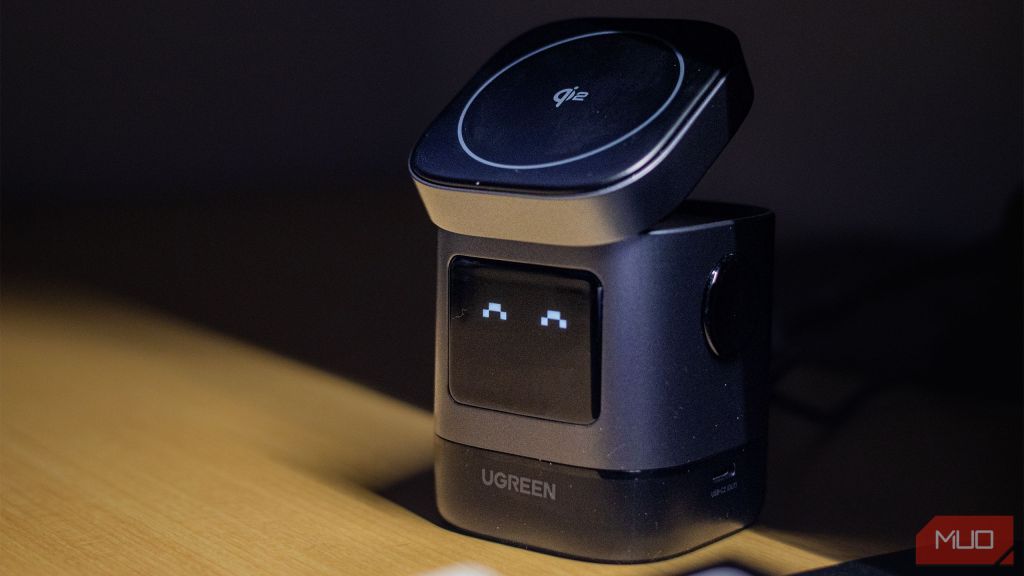 Ugreen Uno 2-in-1 Magnetic Wireless Charger Review: It Powers Nearly All Your Apple GearMar 12, 2025 pm 09:01 PM
Apple users rejoice! Wireless charging is convenient, but Apple's official chargers are expensive. This changes with the Ugreen Uno 2-in-1 Magnetic Wireless Charging Station. ##### Ugreen Uno 2-in-1 Magnetic Wireless Charger: A Comprehensive Review
 MacStealer Malware: What Is This & How Dangerous It Is for Your macOS?Mar 04, 2025 am 10:28 AM
Protecting your Mac from malicious attacks: A guide to preventing MacStealer and similar threats The belief that Macs are immune to malware is a dangerous misconception. With the rise of threats like MacStealer, a macOS malware targeting sensitive d
 Best Advanced IP Scanner alternative for Mac foundMar 06, 2025 pm 05:10 PM
Say goodbye to Wi-Fi troubles! Recommended best network scanning tools for Mac systems Last week, my home Wi-Fi suddenly became unusually slow, which made me fall into a tech panic. Is the router faulty? Is it a mysterious device that occupies bandwidth? Or is the neighbor secretly downloading the popular game "Stalker 2"? I need to find the answer quickly. At this time, I remembered the Advanced IP Scanner that was commonly used on Windows systems before. But unfortunately, the Mac system does not have Advanced IP Scanner. Fortunately, macOS offers many powerful alternatives that can help you monitor devices on your network, troubleshoot connectivity issues, and even optimize Wi-Fi performance. Let me
 Uninstall Office 365 on Mac: How to Completely Remove Microsoft 365Mar 05, 2025 am 11:40 AM
For many of us, Microsoft Office products are vital for work, study, and everyday life. Although you may use Office 365 often, you might have no clue how to remove it from your Mac. It may be that Word keeps crashing ev
 All iPad generations in order: From 2010 to 2025Mar 07, 2025 am 09:15 AM
Explore the Evolution of iPads: A Comprehensive Guide from 2010 to 2024 Embark on a journey through the history of Apple's iconic iPad, tracing its remarkable evolution from its 2010 debut to the latest models. This detailed guide provides a chronol
 Install Python on Mac: What Is the Best Way to Do This on MacOS?Mar 05, 2025 am 10:48 AM
Python has become one of the most popular programming languages in the world with its incredible versatility. Whether you plan to build a website or an application yourself in Python, or want to run software that requires Python, you may need to install Python on your Mac. This guide will discuss three of the most popular ways to get Python on your Mac and briefly introduce some alternatives. Does Mac system come with Python? Unfortunately, since macOS Catalina, Mac computers no longer have Python pre-installed, although it is included in older versions of the OS, including Mojave and earlier. if


Hot AI Tools

Undresser.AI Undress
AI-powered app for creating realistic nude photos

AI Clothes Remover
Online AI tool for removing clothes from photos.

Undress AI Tool
Undress images for free

Clothoff.io
AI clothes remover

AI Hentai Generator
Generate AI Hentai for free.

Hot Article
Hot Tools

EditPlus Chinese cracked version
Small size, syntax highlighting, does not support code prompt function

MantisBT
Mantis is an easy-to-deploy web-based defect tracking tool designed to aid in product defect tracking. It requires PHP, MySQL and a web server. Check out our demo and hosting services.

Safe Exam Browser
Safe Exam Browser is a secure browser environment for taking online exams securely. This software turns any computer into a secure workstation. It controls access to any utility and prevents students from using unauthorized resources.

Dreamweaver CS6
Visual web development tools

PhpStorm Mac version
The latest (2018.2.1) professional PHP integrated development tool

