


Python has become one of the most popular programming languages in the world with its incredible versatility. Whether you plan to build a website or an application yourself in Python, or want to run software that requires Python, you may need to install Python on your Mac.
This guide will discuss three of the most popular ways to get Python on your Mac and briefly introduce some alternatives.
Does the Mac system come with Python?
Unfortunately, since macOS Catalina, Mac computers no longer have Python pre-installed, although it is included in older versions of the OS, including Mojave and earlier. If you want to use Python on your Mac today, you need to set it up and manage it yourself.
Even if you are running an OSX version containing Python, it may be an old version now—especially if you are not deliberately manually updating it. Given this, it's better to make sure you're running the latest version before you start using it.
How to check if Python is installed on your Mac
There is an easy way to check if Python is installed on your Mac:
- Start Terminal from the Applications > Utility folder.
- Enter the command
python3and press Enter.


If you have Python installed on your Mac, you will see the version number. If not, you will receive an error message.
How to install Python on Mac
You can get Python on your Mac in a number of different ways, some of which are simpler than others, and all work on Apple silicon chips (M1, M2, M3, and M4 chips) and Intel machines.
The following are three common methods that do not require much effort:
- Install Python on Mac through the installer
- Install Python on macOS using Rye
- Install Python on MacBook using Homebrew
Choose the right installation method depends on your needs. If you only need Python to run programs and utilities that depend on it, an easy way to use the official Python installer should be great for you. However, if you are developing in Python in multiple environments, the Rye option is ideal.
Before proceeding, if you already have an older version installed, you may need to uninstall Python from your Mac. If you do not set up a virtual environment for each required version, installing a different version can lead to conflicts, which is actually only necessary for more complex Python projects.
1. Install Python on Mac through the installer
Installing Python on your Mac using the official installer is one of the fastest ways to get it up and running, and if you just want to run Python programs and tools, this may be all you need. Just follow the steps below:
- Download the latest version of Python from the official website
- Run the installer
- Verify installation
1.1 Download the latest version of Python from the official website
First of all, you need the official Python installer:
- Download Python 3 from the macOS section on python.org.
- Click on "Latest Python 3 Version" at the top of the page.
- Scroll down to the Files section and select macOS 64-bit Installer.
- When the system prompts you to continue, click "Allow".


1.2 Run the installer
After downloading of the Python installer is completed, you can run it:
- Open your Downloads folder in Finder and double-click the Python package to run it.
- When the "Install Python" window appears, click "Continue" and follow the steps on the screen.


1.3 Verify installation
After the Python installer is finished, a new Python folder will appear, containing the official IDE (integrated development environment) called IDLE, the Python launcher, and some text documents. This means that Python has been installed successfully, but you can verify the installation using the above steps.
2. Install Python on macOS using Rye
If you use Python for programming, you may need more advanced settings, especially if you plan to write more complex projects. A good option is to install Python using Rye, which allows you to install multiple "toolchains" simultaneously, which are essentially different versions of Python.
The following is how to install Python on your Mac using Rye:
- Installation Rye
- Set Rye's PATH
- Verify Rye Installation
- Verify Python installation
2.1 Install Rye
You can quickly download and install Rye using the curl command in the terminal. Please follow the steps below:
- Use the administrator account to open the terminal.
- Enter
curl -sSf https://rye.astral.sh/get | bashand press Enter. Press the y key to continue when prompted. - The system will ask you which package installer you want to use: uv or pip-tools. While UVs are updated and faster, pip offers better compatibility. It's also more friendly for beginners, as many tutorials mention pip. Use the arrow keys on the keyboard to select pip-tools and press Enter.
- Next, you will be asked which Python setting you want. Select Run Python installed and managed by Rye, and press Enter.
- Then, you need to select a version of Python you want to use as the default toolchain. Typically, it is recommended to use the latest version of Python, so unless you want another version, just press Enter.


2.2 Setting Rye's PATH
Rye After completing the Python installation, you will be asked if you want to add Rye to the PATH via .profile. This is usually best on Linux, but on macOS, it is best to set PATH in .zprofile. So let's set the PATH manually as follows:
- When asked if you want to add Rye to PATH via .profile, type n to reject.
- Now we need to open the
~/.zprofilefile for editing. In the terminal, typeopen -e ~/.zprofileand press Enter. - By default, the file will be opened in TextEdit, a built-in text editor for Mac. However, if you have changed the text editor to a Notepad alternative to Mac or a similar editor, the .zprofile file will open in it.
- In the last line of your .zprofile configuration file, enter
source "$HOME/.rye/env", and save and close the file. You need to close and reopen the terminal to start a new session for the changes to take effect.


When Rye's PATH is set, the Python or Python3 command will now use the Python version installed by Rye, which is exactly the expected result. To confirm that the PATH is correct, type the echo $PATH command into the terminal and press Enter. Your directory should have *.rye/shims at the beginning.

2.3 Verify Rye Installation
After completing the above steps, verify that Rye installation is simple:
- In the terminal, type
rye --version, and press Enter.

The version number should be displayed. If you see an error, check that you entered the correct command and that you followed the installation steps correctly.
2.4 Verify Python installation
Verify that Python installation is also easy, as shown below:
- In the terminal, type
python --versionand press Enter to display the Python version number.

If you see "zsh: command not found error", check that you have set PATH correctly by repeating the above steps.
3. Install Python on MacBook using Homebrew
If you want to build a simpler project with Python, it's quite easy to install Python using Homebrew, as shown below:
- Preinstalled Python
- Check Homebrew is ready
- Brew Installation
- Verify using brew list
- Brew pin
- Update Python with Homebrew
- Set $PATH of Homebrew Python
- Verify Python installation
3.1 Preinstalled Python
If you are a software developer, you may have installed Xcode on your Mac, including a Python version. It is important that you don't delete it. Instead, we will use Homebrew to install the latest version. However, for security reasons, Anaconda and other third-party tools can be uninstalled from your MacBook.
One of the fastest ways to uninstall older versions of Python and other unwanted applications on your Mac is to use MacKeeper's Smart Uninstaller. It recognizes all software installed on your Mac and allows you to delete multiple programs and their associated files in just a few clicks.
The following is how to use it:
- Select Smart Uninstaller in the MacKeeper sidebar and click "Start Scan".
- After the scan is complete, select all the applications, widgets, plugins, and other items you want to uninstall, and click "Delete Selected Projects" to delete them.


3.2 Check if Homebrew is ready
Before you can install Python with Homebrew, you need to make sure it is ready and updated:
- Open the terminal, type the
brew updatecommand, and press Enter. - After any updates are finished, verify that Homebrew is ready to install the package by typing
brew doctorand pressing Enter.


If Homebrew is not installed, you will see the "zsh: command not found" error. To install it, copy and paste /bin/bash -c "$(curl -fsSL https://raw.githubusercontent.com/Homebrew/install/HEAD/install.sh)" into the terminal, press Enter and follow the on-screen steps.

3.3 Brew installation
Homebrew is ready and updated, we can now install Python:
- Type
brew install pythoninto the terminal and press Enter.

3.4 Verify using brew list
After the installation process is completed, we can verify that Python is installed correctly:
- Type
brew list pythoninto the terminal and press Enter to view the list of installed files.

3.5 Brew pin
Homebrew will update Python as needed, but you may want to prevent this from happening – especially with some projects relying on a specific version of Python. You can use pin to prevent automatic updates:
- In the terminal, type
brew pin python, and press Enter. - You will not receive a response from the above command, but you can verify that it is valid by typing
brew info python. You should seepinnedat the end of your Python version number.


If you want to update or reinstall Python with Homebrew in the future, you can delete the pin by typing the brew unpin python command.
3.6 Upgrade Python with Homebrew
To upgrade Python with Homebrew, just type brew upgrade python into the terminal and press Enter. Note that we are using upgrade instead of update here, because the update command is used for Homebrew itself.

Remember that some of your projects and programs may require a specific version of Python to work properly. It is recommended that you check these dependencies before performing an update to avoid breaking anything you need.
3.7 Set $PATH of Homebrew Python
After installing Python with Homebrew, you need to manually set $PATH, which is normal in most installation methods. Here's how to do this:
- In the terminal, enter
open -e ~/.zprofileto open the configuration file in TextEdit. - On the last line of the file, enter
export PATH="$(brew --prefix python)/libexec/bin:$PATH", and save and close it. Your Homebrew version of Python will now take precedence over any other Python installation, but remember to close and restart the terminal for the changes to take effect.


3.8 Verify Python installation
To verify that Python is installed correctly using Homebrew, type which python into the terminal and press Enter. You should see the Python version number and the PATH you set above.

Other ways to install Python on Mac
Depending on how you want to use Python, other installation methods may be more appropriate. The methods we've covered in detail above are some of the most common methods that should suit most use cases, but if they don't meet your needs, you may want to consider installing Python with pyenv or Conda.
The best way to install Python on Mac
One of the big advantages of Python is that it is very flexible. No matter how you want to use it, you will find a setup method that perfectly matches your needs. For most Mac users, we recommend two options: the official Python installer for running Python applications, and for development using Rye.
If you need to remove Python programs and other unwanted software, check out MacKeeper's Smart Uninstaller. It can clear all unwanted applications and delete all associated files at once, while other uninstall methods usually leave these files behind.
The above is the detailed content of Install Python on Mac: What Is the Best Way to Do This on MacOS?. For more information, please follow other related articles on the PHP Chinese website!

 Second Release Candidate of MacOS Sequoia 15.4 Available for TestingApr 30, 2025 am 10:26 AM
Apple has released a second Release Candidate (RC) build of macOS Sequoia 15.4 for its beta testing program. This follows the initial release candidate builds of Sequoia 15.4, iOS 18.4, and iPadOS 18.4, released just days prior. Release Candidates a
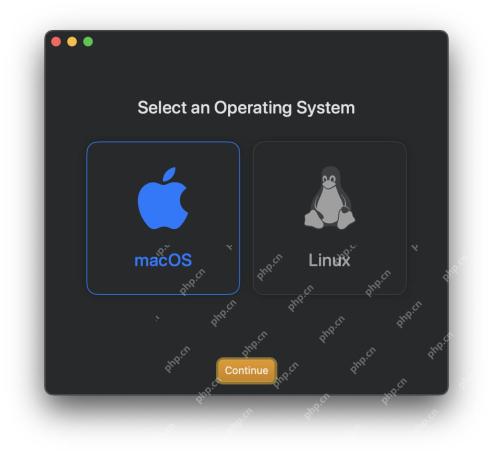 Easily Create MacOS Virtual Machines with VirtualBuddyApr 30, 2025 am 10:14 AM
VirtualBuddy: Easily virtualize macOS and Linux on Apple Silicon Mac VirtualBuddy provides a simple and fast way to virtualize macOS (and Linux) on any Apple Silicon Mac, providing developers, enthusiasts, and curious users with a way to easily run multiple instances of macOS. VirtualBuddy is fast, performs well, and it is free and open source, so you can easily explore the virtual machine world without any commitment, just prepare enough disk storage and bandwidth to set up a macOS or Linux virtual machine. Whether it is testing different versions
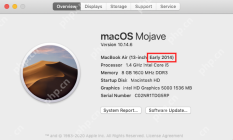 12 Things to Check Before Buying Second-hand MacBookApr 30, 2025 am 10:01 AM
Buying a used Mac on a budget? This guide ensures you avoid a lemon. We'll cover essential checks before you buy, including diagnostics you can perform on the spot. Remember to bring a bootable macOS USB drive and headphones. Step 1: Physical Insp
 How Long Does Updating MacOS Take? Why Is MacOS Update Taking So Long?Apr 30, 2025 am 09:53 AM
How long does it take to update the MacOS system software? Why does it take so long to update? Many Mac users will have this question when they see the software update of the new MacOS system. Both of these questions are very reasonable, and it is important to remember that the answers may vary. However, with modern MacOS, you can make a fairly accurate estimate of the time it takes to install updates to your MacOS system. Let's dive into this topic so you can better understand and prepare to install MacOS updates on your Mac. How long does it take for MacOS updates to be downloaded, installed and completed? MacOS updates can take between 15-20 minutes to several hours to complete, especially if you are considering downloading updates and installing updates to completion
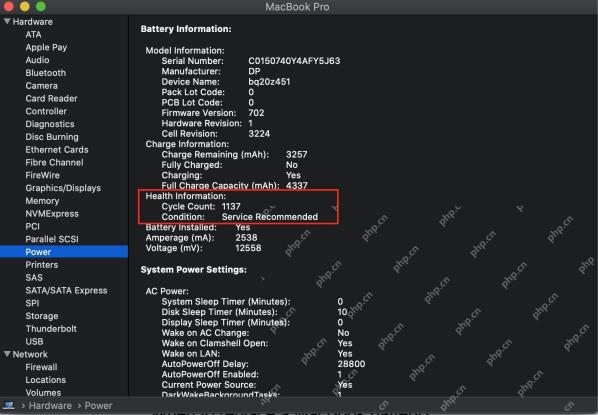 How Long Do MacBook Batteries Last? Here's How You Can Check ItApr 30, 2025 am 09:50 AM
Understanding MacBook Battery Life: Maximizing Your Mac's Power Concerned about your MacBook's battery performance, or planning a purchase? This guide clarifies MacBook battery lifespan and offers tips for extending it. Most Mac batteries endure appr
 Fixing Safari for Mac Error “This webpage was reloaded because a problem occurred”Apr 30, 2025 am 09:45 AM
Although the Safari browser under the Mac system is excellent, it is not perfect. Safari users occasionally encounter situations where the page refreshes and displays an error message "This page has reloaded because of a problem". You may also see variant information like "repeated problems". Since the error message is quite general, you may be wondering the root cause of the error in Safari and how to fix this on your Mac. Causes causing Safari for Mac to have a "This web page reloaded because a problem occurred" error Usually, if there is a memory problem, a website crash, or an incompatible with Safari, a software error, or other similar issues, you will see this error message in Safari on your Mac
 Get Googly Eyes in Your Mac Menu Bar to Follow Your Cursor AroundApr 30, 2025 am 09:42 AM
Nostalgic Mac users may remember an interesting application in the classic Mac OS system: it will place a pair of moving eyes in the Mac menu bar and move with your cursor. While classic Mac OS is long gone, you can still experience this fun on a modern Mac, just use an app called "Googly Eyes". Google Eyes resides in your Mac menu bar, and its pupils will follow your cursor like an older version of the app. When clicking on the mouse/trackpad, the little eyes will blink. Will this revolutionize your computing experience? Probably not. But is it interesting? Absolutely fun! Sometimes, just being fun is enough, right? So, enjoy it, in your Ma
 MacOS Sonoma 14.7.5 & MacOS Ventura 13.7.5 Security Updates ReleasedApr 30, 2025 am 09:40 AM
Apple has released macOS Sonoma 14.7.5 and macOS Ventura 13.7.5 security updates for Mac users running Sonoma and Ventura operating systems. These updates focus on security patches and do not include other new features available in the latest macOS Sequoia 15.4 update (sequoia 15.4 update is released simultaneously). Additionally, you'll find software updates for new and older iPhones and iPads, as well as updates for Apple TV, Apple Watch, and Apple Vision Pro


Hot AI Tools

Undresser.AI Undress
AI-powered app for creating realistic nude photos

AI Clothes Remover
Online AI tool for removing clothes from photos.

Undress AI Tool
Undress images for free

Clothoff.io
AI clothes remover

Video Face Swap
Swap faces in any video effortlessly with our completely free AI face swap tool!

Hot Article
Hot Tools

MantisBT
Mantis is an easy-to-deploy web-based defect tracking tool designed to aid in product defect tracking. It requires PHP, MySQL and a web server. Check out our demo and hosting services.

VSCode Windows 64-bit Download
A free and powerful IDE editor launched by Microsoft

WebStorm Mac version
Useful JavaScript development tools

mPDF
mPDF is a PHP library that can generate PDF files from UTF-8 encoded HTML. The original author, Ian Back, wrote mPDF to output PDF files "on the fly" from his website and handle different languages. It is slower than original scripts like HTML2FPDF and produces larger files when using Unicode fonts, but supports CSS styles etc. and has a lot of enhancements. Supports almost all languages, including RTL (Arabic and Hebrew) and CJK (Chinese, Japanese and Korean). Supports nested block-level elements (such as P, DIV),

SublimeText3 Linux new version
SublimeText3 Linux latest version

