


How to install the original win10 1803 using wepe. Many friends have downloaded the original win10 1803 system image, but they don’t know how to install it through pe. Today, the editor has brought a detailed tutorial. Let’s take a look.

wepe installation original win10 1803 tutorial
Installation instructions1. Most new computers can support uefi startup, so we mainly introduce the method of installing win10 64-bit system through UEFI GPT .
2. In UEFI boot mode, the hard disk partition table must be GPT; if installed in Legacy mode, the hard disk partition table must be MBR.
Installation preparation
1. U disk with 8GB or 16GB memory
2. Make wepe boot disk
3. Win10 1803 official version iso image Download
4. Win10 activation software
U disk startup setting
bios settings U disk startup.
Steps to install the original win10 system on micro PE
1. After making the micro PE toolbox, we need to copy the original 64-bit win10 1803 image to the USB flash drive.

2. Insert the USB flash drive into the computer. After starting, press the startup shortcut key to bring up the menu dialog box, select the recognized USB flash drive option, and press the Enter key.

3. Then, we need to select the resolution of the game pe system. Generally, the first one is selected by default and press the "enter" key.

4. On the pe system desktop, click "Partition Assistant (lossless)". If no partition is required, right-click the system disk to format it and perform step 9;
5. If the system The disk needs to be repartitioned. Right-click Disk 1 and select "Quick Partition". Pay attention to distinguishing between multiple system disks.

6. Click "Select Disk", you can select according to the size, set the number of partitions, the volume label is "System", it is recommended to be 50GB or more.
7. Select "GPT" as the disk type, align the partition to sector 2048 and sector 4096 as "4k alignment", and click "Start Execute".

8. If the system disk is occupied by a U disk, you can click on the occupied C disk and click "Change Drive Letter" to modify it. It is very simple.

9. Click "This Computer—Micro PE Toolbox—Win10 System ISO Image—Mount". If there is no loading, select "Open with—Resource Manager".

10. Win10PE can directly open the ISO image, enter the sources directory, and then double-click to open the "setup.exe" file.


11. Then run the "Installation Interface, Installation Language and Input Method" by default, and click "Next - I don't have a product key".

12. Click "Select the operating system to be installed". If the previous version is different from the selected version, the key needs to be reactivated.

13. Check "I accept the license terms", click "Next", and select "Custom" installation and "Installation location (select according to step 5)".

14. Click "Next", and then we wait for the system to install the win10 system. After that, the computer will automatically restart after 10 seconds.

15. If the user enters the interface below, it will need to be restarted multiple times. It will take a long time, so please wait patiently.

16. After the operation is completed, enter the configuration process. We can set it according to personal preferences, and finally click "Accept".

The above is the detailed content of Original win10 1803 installation wepe tutorial. For more information, please follow other related articles on the PHP Chinese website!

 How to Find the Product Key for Windows 10Mar 04, 2025 am 01:46 AM
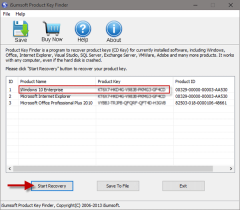
Retrieve lost Windows 10 product key: Two ways Have you lost your product key after installing genuine Windows 10? Don't worry, this article will introduce two ways to retrieve your keys so that you can reinstall the system in the future. Case 1: Windows 10 is installed but the key is lost Even if you get Windows 10 through a free upgrade or genuine installation, you can easily find the product key using the iSumsoft Product Key Finder as long as your computer works properly. Method 1: Use iSumsoft Product Key Finder Download and install: Download and install iSumsoft Product Key Finder to your computer. Find the product key: Start
 Acer PD163Q Dual Portable Monitor Review: I Really Wanted to Love ThisMar 18, 2025 am 03:04 AM
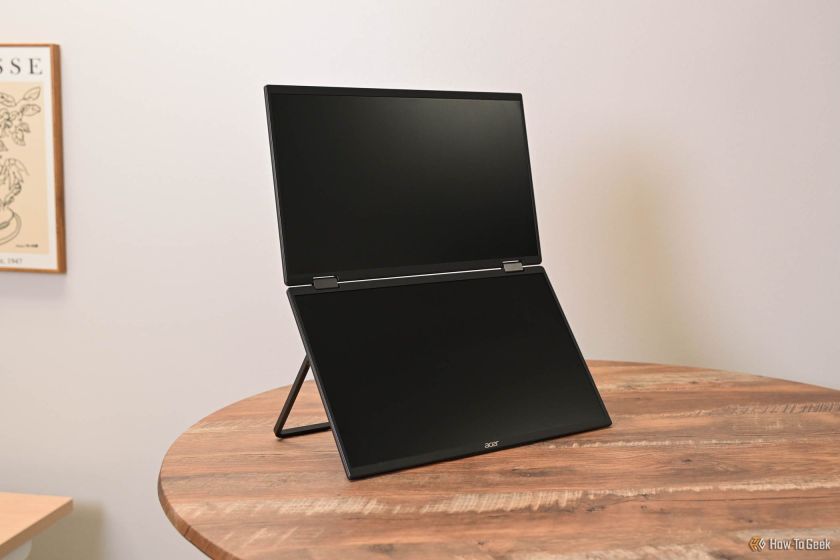
The Acer PD163Q Dual Portable Monitor: A Connectivity Nightmare I had high hopes for the Acer PD163Q. The concept of dual portable displays, conveniently connecting via a single cable, was incredibly appealing. Unfortunately, this alluring idea quic
 Top 3 Windows 11 Gaming Features That Outshine Windows 10Mar 16, 2025 am 12:17 AM
Upgrade to Windows 11: Enhance Your PC Gaming Experience Windows 11 offers exciting new gaming features that significantly improve your PC gaming experience. This upgrade is worth considering for any PC gamer moving from Windows 10. Auto HDR: Eleva
 Mozilla Thunderbird 136 Is Here, Switching to Monthly Updates by DefaultMar 07, 2025 am 01:19 AM
Firefox 136 and Thunderbird 136: Enhanced Security and Performance The latest releases of Firefox and Thunderbird bring significant improvements in video playback smoothness, browsing security, and overall user experience. Let's delve into the key u
 How to Create a Dynamic Table of Contents in ExcelMar 24, 2025 am 08:01 AM
A table of contents is a total game-changer when working with large files – it keeps everything organized and easy to navigate. Unfortunately, unlike Word, Microsoft Excel doesn’t have a simple “Table of Contents” button that adds t
 How to Change Windows SmartScreen Settings in Windows 10Mar 04, 2025 am 02:48 AM
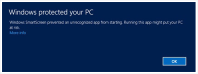
Windows SmartScreen: A shield that enhances computer security Windows SmartScreen helps you improve your computer security by issuing warnings before running unknown applications and files from the Internet. When you download an unknown file or open any potentially unsafe file, Windows displays a warning and confirms that you are aware of it before accessing the file. If an application or file is blocked by Windows SmartScreen, you can choose to unblock based on the level of trust. This article will introduce three ways to enable or disable Windows SmartScreen: Control Panel, Windows Security
 Why I Use Listary to Vastly Improve Windows SearchMar 05, 2025 am 03:01 AM
Listary: Supercharge Your Windows Workflow Listary is a powerful tool that significantly enhances Windows productivity by offering lightning-fast file searching, versatile system control, and seamless cross-application integration. Its intuitive des
 This Wild Ultra-Wide Alienware Monitor is $300 Off TodayMar 13, 2025 pm 12:21 PM
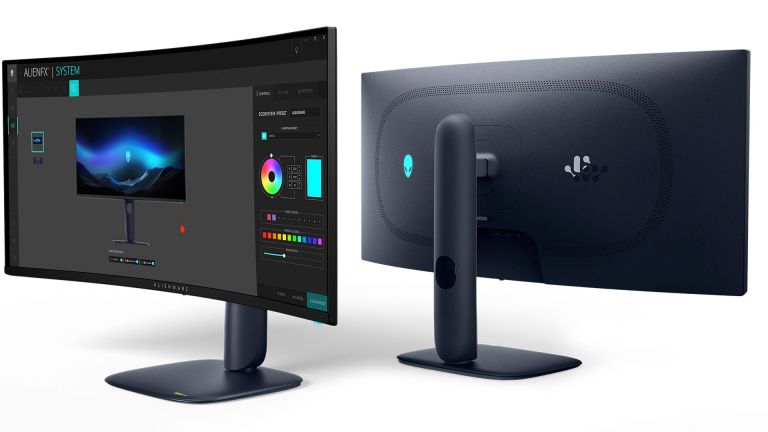
Alienware AW3225QF: The best curved 4K display, is it worth buying? The Alienware AW3225QF is known as the best curved 4K display, and its powerful performance is unquestionable. The fast response time, stunning HDR effects and unlimited contrast, coupled with excellent color performance, are the advantages of this monitor. Although it is mainly aimed at gamers, if you can accept the shortcomings of OLED, it is also suitable for office workers who pursue high efficiency. Widescreen monitors are not only loved by gamers, but also favored by users who value productivity improvement. They are great for work and enhance anyone’s desktop experience. This Alienware monitor is usually expensive, but is currently enjoying it


Hot AI Tools

Undresser.AI Undress
AI-powered app for creating realistic nude photos

AI Clothes Remover
Online AI tool for removing clothes from photos.

Undress AI Tool
Undress images for free

Clothoff.io
AI clothes remover

AI Hentai Generator
Generate AI Hentai for free.

Hot Article
Hot Tools

SublimeText3 Linux new version
SublimeText3 Linux latest version

MinGW - Minimalist GNU for Windows
This project is in the process of being migrated to osdn.net/projects/mingw, you can continue to follow us there. MinGW: A native Windows port of the GNU Compiler Collection (GCC), freely distributable import libraries and header files for building native Windows applications; includes extensions to the MSVC runtime to support C99 functionality. All MinGW software can run on 64-bit Windows platforms.

SAP NetWeaver Server Adapter for Eclipse
Integrate Eclipse with SAP NetWeaver application server.

VSCode Windows 64-bit Download
A free and powerful IDE editor launched by Microsoft

Notepad++7.3.1
Easy-to-use and free code editor

