Home >System Tutorial >Windows Series >Tutorial to cancel screen saver setting in win10
Tutorial to cancel screen saver setting in win10
- WBOYWBOYWBOYWBOYWBOYWBOYWBOYWBOYWBOYWBOYWBOYWBOYWBforward
- 2023-12-28 13:38:422326browse
The win10 system is an excellent system with a great user experience. Users can also change the win10 system through various settings so that they can get the best experience they want during use. However, in recent days, there are generally many Win10 system users have reported that they cannot cancel the screensaver they previously set. Today, the editor has brought you a detailed tutorial with pictures and text on how to cancel the screensaver and hibernate in Win10. Let's take a look.

Win10 screensaver cancellation tutorial:
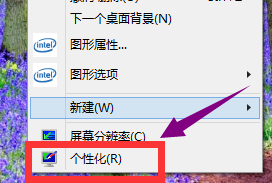
1. Right-click the blank area of the desktop and select Personalize.

2. In the pop-up personalization menu, find "Theme" in the left column and click the theme.

3. In the theme options, select "Theme Settings".

4. There is a ‘screen saver’ in the lower left corner of the window. Click the screen saver.

5. Select Change Power Settings.

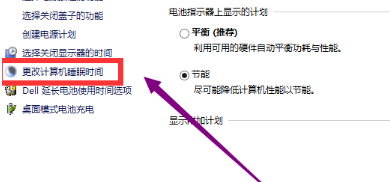
6. Choose to change the computer sleep time.

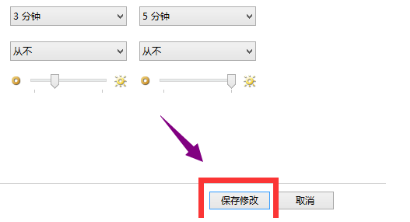
7. Choose Never for sleep time.

8. After the modification is completed, click the Confirm button.

The above is the detailed content of Tutorial to cancel screen saver setting in win10. For more information, please follow other related articles on the PHP Chinese website!

