Home >Web Front-end >JS Tutorial >Create a JavaScript-enabled HTML table with sorting capabilities
Create a JavaScript-enabled HTML table with sorting capabilities
- 王林Original
- 2023-09-09 13:37:011529browse
When displaying data on a website, it is important to provide features that make it easier for users to browse the data. One such feature is the ability to sort data.
Sorting data means arranging the data in ascending or descending order according to the specified value. We can manually handle data sorting on the client side of the website using JavaScript. This is especially useful if you are developing a static website or removing the burden of data sorting in the server.
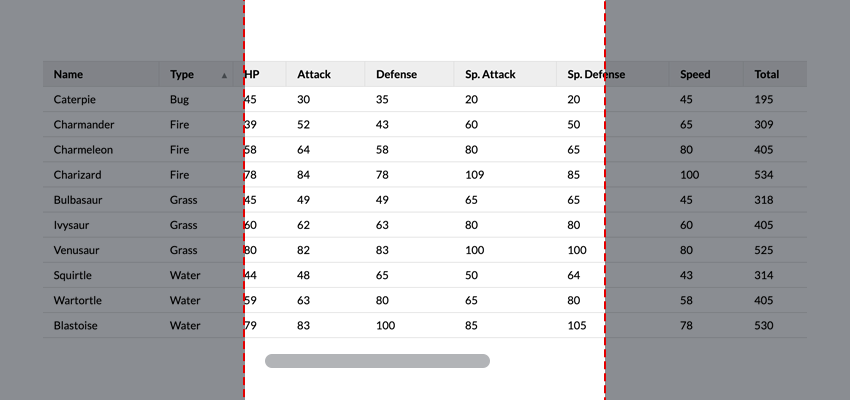
In this tutorial, we will use JavaScript to display data from a simulated JSON response into an HTML table. We will also include the ability to make tables sortable based on values in the table header.
This is the finished product. Click on any table header to sort the table accordingly.
1. Placing content using HTML
f5d188ed2c074f8b944552db028f98a1 tags are semantic HTML tags used to display data on a web page. We will place the f5d188ed2c074f8b944552db028f98a1 tag inside the table container div, which will allow us to include some responsive styling in the CSS.
<div class="table-container">
  <table class="data-table">
  </table>
</div>
Our table will contain a header, thead and table content, tbody tags. In the table header we will include buttons in each th cell which will be used to handle the sorting functionality. The cells for the table content will be added via JavaScript using data from our JSON response.
<div class="table-container">
  <table class="data-table">
    <thead>
      <tr>
        <th><button id="name">Name</button></th>
        <th><button id="type">Type</button></th>
        <th><button id="hp">HP</button></th>
        <th><button id="attack">Attack</button></th>
        <th><button id="defense">Defense</button></th>
        <th><button id="spAttack">Sp. Attack</button></th>
        <th><button id="spDefense">Sp. Defense</button></th>
        <th><button id="speed">Speed</button></th>
        <th><button id="total">Total</button></th>
      </tr>
    </thead>
    <tbody id="table-content"></tbody>
  </table>
</div>
2.Use CSS to create responsive tables
One of the more common problems with using HTML tables is a lack of responsiveness. The table may have overlapping cells or exceed the boundaries of the full page.
We can solve these problems by placing the table in a full page width table container with overflow scrolling property. This way the table is always only as wide as the full page and there is no need to shrink the cells due to scrollable overflow. We will also include a minimum width attribute in the table cells to avoid text wrapping.

This is the CSS needed to make our table scrollable:
.table-container {
  width: 100%;
  overflow: scroll;
}

table {
  width: 100%;
}
Then we can add the rest of the styles:
.table-container {
  margin: auto;
  max-width: 1200px;
  min-height: 100vh;
  overflow: scroll;
  width: 100%;
}

table {
  border-collapse: collapse;
  width: 100%;
}

thead tr {
  border-bottom: 1px solid #ddd;
  border-top: 1px solid #ddd;
  height: 1px;
}

th {
  font-weight: bold;
  height: inherit;
  padding: 0;
}

th:not(:first-of-type) {
  border-left: 1px solid #ddd;
}

th button {
  background-color: #eee;
  border: none;
  cursor: pointer;
  display: block;
  font: inherit;
  height: 100%;
  margin: 0;
  min-width: max-content;
  padding: 0.5rem 1rem;
  position: relative;
  text-align: left;
  width: 100%;
}

tbody tr {
  border-bottom: 1px solid #ddd;
}

td {
  padding: 0.5rem 1rem;
  text-align: left;
}
3. Put JSON data into HTML table
For this example, we will use a mock parsed JSON response. This is our data:
const response = {
   "pokedata": [
      {
         "name": "Bulbasaur",
         "type": "Grass",
         "hp": 45,
         "attack": 49,
         "defense": 49,
         "spAttack": 65,
         "spDefense": 65,
         "speed": 45,
         "total": 318
      },
      ...
   ]
}
We will put the data in a 0bf74e530db83faaf52a6e1c5b166355 tag so that we can target the element in JavaScript;
const tableContent = document.getElementById("table-content")
The row content will be based on each object in response.pokedata. Let's define a function to create new rows based on object data:
const createRow = (obj) => {
  const row = document.createElement("tr");
  const objKeys = Object.keys(obj);
  objKeys.map((key) => {
    const cell = document.createElement("td");
    cell.setAttribute("data-attr", key);
    cell.innerHTML = obj[key];
    row.appendChild(cell);
  });
  return row;
};
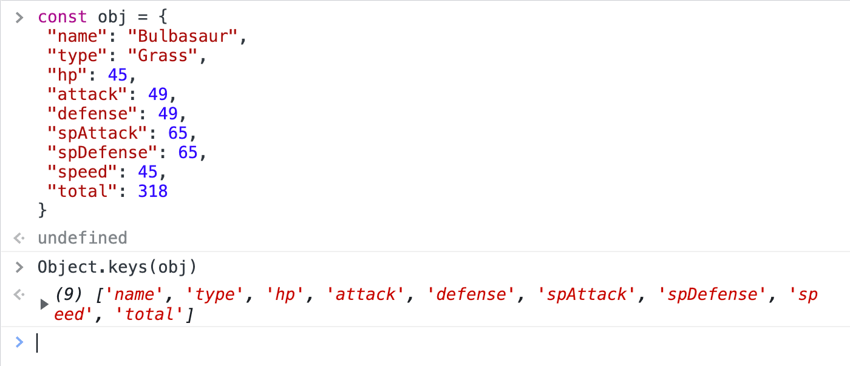
In this function, we use the Object.keys() method to get the object keys in the form of an array. The return value is as follows:

Once we have the array of object keys, we loop through each key using the .map() method. The map method executes the function we pass to it on each item in the array.
In this mapping function, we create a new cell for each item in the array and set the cell's innerHTML to the corresponding object key value.

Finally, we use the .appendChild() method to append the created cell to the row defined at the beginning of the function.
Now that we have the row creation function, we will define a function that loops through the response.pokedata array and appends each new row to our tableContent element.
const getTableContent = (data) => {
  data.map((obj) => {
    const row = createRow(obj);
    tableContent.appendChild(row);
  });
};
We will pass the getTableContent function into the event listener to add content to the table after the page loads.
window.addEventListener("load", () => {
  getTableContent(response.pokedata);
});
4. Using JavaScript to sort data
Now that we have created the table, let's add sorting functionality. In our HTML, we have buttons in the header cell that have object keys as their ids. Now let's locate these buttons:
const tableButtons = document.querySelectorAll("th button");
We want to sort the data based on the button clicked, and also include a feature to switch the sorting direction (ascending or descending) when the button is clicked.
We can use the .sort() method to handle the sorting of data in the response.pokedata array. The sort method accepts a function that compares two different parameters and sorts them based on the function response:
compareFunction(a, b) 返回值
|
排序顺序 |
|---|---|
| > 0 |
排序 a 之后 b
|
| < 0 | 将 a 排序在 b 之前 |
| === 0 | 保持 a 和 b 的原始顺序
|
来源:MDN
关于排序方法需要注意的另一件事是它会改变它所操作的原始数组。这意味着它改变了我们原始数组的值。

我们可以通过使用扩展语法来避免改变原始数组[...]

现在我们可以创建排序函数了。这就是我们的排序函数的逻辑:
- 清除tableContent元素中的内容
- 根据所选参数和方向对数据进行排序
- 使用
getTableContent函数将排序后的数据附加到我们的 tableContent
const sortData = (data, param, direction = "asc") => {
  tableContent.innerHTML = '';
  const sortedData =
    direction == "asc"
      ? [...data].sort(function (a, b) {
          if (a[param] < b[param]) {
            return -1;
          }
          if (a[param] > b[param]) {
            return 1;
          }
          return 0;
        })
      : [...data].sort(function (a, b) {
          if (b[param] < a[param]) {
            return -1;
          }
          if (b[param] > a[param]) {
            return 1;
          }
          return 0;
        });

  getTableContent(sortedData);
};
我们的排序函数需要三个参数:
-
data:待排序的数组 -
param:用于对数组进行排序的值 -
direction:按升序或降序对数组进行排序。默认参数值设置为“asc”。
我们通过将innerHTML 设置为空白字符串来清除tableContent 元素中的内容。然后,我们使用 .sort() 方法和 direction 参数来确定数据应如何排序。我们反转比较函数以便按降序排序。通过这种方式使用比较函数,我们可以对数据进行排序,而不管值的类型(字符串、整数、浮点数等)
最后,我们将 sortedData 作为表内容中的新值传递。
现在,我们将排序函数传递到表格按钮的单击事件侦听器中,并处理切换排序方向。
window.addEventListener("load", () => {
  getTableContent(response.pokedata);

  [...tableButtons].map((button) => {
    button.addEventListener("click", (e) => {

      if (e.target.getAttribute("data-dir") == "desc") {
        sortData(response.pokedata, e.target.id, "desc");
        e.target.setAttribute("data-dir", "asc");
      } else {
        sortData(response.pokedata, e.target.id, "asc");
        e.target.setAttribute("data-dir", "desc");
      }

    });
  });
});
在此函数中,我们通过在按钮上设置 data-dir 属性来处理切换以确定排序方向。我们还将更新 CSS 以根据排序方向在按钮旁边显示一个图标:
th button::after {
  position: absolute;
  right: 0.5rem;
}

th button[data-dir="asc"]::after {
  content: url("data:image/svg+xml,%3Csvg xmlns='https://www.w3.org/2000/svg' width='8' height='8'%3E%3Cpolygon points='0, 0 8,0 4,8 8' fill='%23818688'/%3E%3C/svg%3E");
}

th button[data-dir="desc"]::after {
  content: url("data:image/svg+xml,%3Csvg xmlns='http://www.w3.org/2000/svg' width='8' height='8'%3E%3Cpolygon points='4 0,8 8,0 8' fill='%23818688'/%3E%3C/svg%3E");
}
我们不想让图标显示在所有以前单击的按钮上,因此我们将定义一个 resetButtons 函数,该函数删除任何未单击的按钮上的 data-dir 属性。
const resetButtons = (event) => {
  [...tableButtons].map((button) => {
    if (button !== event.target) {
      button.removeAttribute("data-dir");
    }
  });
};
我们会将该函数传递到按钮事件侦听器中,以便在单击新按钮时重置以前的按钮
window.addEventListener("load", () => {
  getTableContent(response.pokedata);

  [...tableButtons].map((button) => {
    button.addEventListener("click", (e) => {

      resetButtons(e);

      if (e.target.getAttribute("data-dir") == "desc") {
        sortData(response.pokedata, e.target.id, "desc");
        e.target.setAttribute("data-dir", "asc");
      } else {
        sortData(response.pokedata, e.target.id, "asc");
        e.target.setAttribute("data-dir", "desc");
      }

    });
  });
});
结论
这样,我们就完成了!我们仅使用普通 JavaScript 创建了一个可排序的表格!
The above is the detailed content of Create a JavaScript-enabled HTML table with sorting capabilities. For more information, please follow other related articles on the PHP Chinese website!
Related articles
See more- An in-depth analysis of the Bootstrap list group component
- Detailed explanation of JavaScript function currying
- Complete example of JS password generation and strength detection (with demo source code download)
- Angularjs integrates WeChat UI (weui)
- How to quickly switch between Traditional Chinese and Simplified Chinese with JavaScript and the trick for websites to support switching between Simplified and Traditional Chinese_javascript skills

