Home >Web Front-end >HTML Tutorial >Design Twitter widgets using the latest Twitter API
Design Twitter widgets using the latest Twitter API
- PHPzOriginal
- 2023-09-04 16:13:01899browse
Twitter is making some changes as it rolls out version 1.1 of its API. One of the most significant changes is the introduction of authentication. That is, the application needs to be authenticated to send requests to the API.
Authentication is powered by OAuth - an open protocol that allows secure authorization through simple and standard methods, allowing user approval Apply to act on their behalf without sharing their password.
In this tutorial, we will learn how to interact with Twitter's API programmatically while developing a Twitter Timeline WordPress widget that displays a list of the latest tweets posted by Twitter users.
Here is a preview of the Twitter Timeline widget you will build at the end of this tutorial.

To successfully send a request to the Twitter API, you need to create a Apps with OAuth authorization because unauthorized requests are not rejected allow.
To create a Twitter application, you need to be logged in to Twitter Use the developer dashboard for your Twitter account. Points to create a The application simply gives yourself (and Twitter) a set of keys.
These include:
- Consumer Key
- Consumer Secrets
- Access Token
- Access Token Secret
Follow the steps below to create a Twitter application and generate a key.
- Log in to your Twitter Developer account using your Twitter account and navigate to the Application Management Console.
- Click the Create New App button to initiate Twitter application creation.
- Fill out the form and click the submit button to create the application.
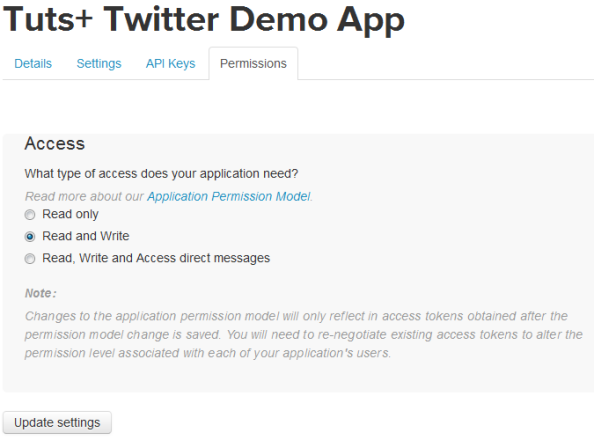
- Click on the app, navigate to the Permissions tab, and change the access level to Read and Write.
If you want to perform any operation to use this API correctly, you need to change If you are doing anything other than the following, set your settings to read and write Standard data retrieval using GET requests.

To obtain the application consumer key and secret, navigate to the API Keys tab.
API Key and API Secret are User Key and User Secret respectively.

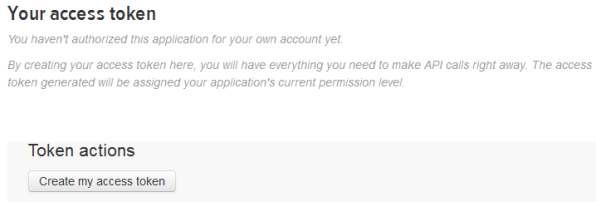
To obtain the Application Access Token and Access Token Secret, still in the API Keys strong> tab, scroll down and click Create My Access Token button to create an access token.

Refresh the page and you will see your application access token.

us Now have the consumer key and secret as well as the access token and secret key. These OAuth credentials are authenticated by Twitter when making requests to the API.
The widget settings for the Twitter timeline widget we are coding will contain form fields that will collect these OAuth credentials and save them to the database for reuse by the widget.
Let’s start coding the Twitter Timeline widget plugin.
Twitter Timeline Widget Development
The title is The first thing that goes into a plugin file is the plugin header.
<?php
/*
  Plugin Name: Twitter Tweets Widget
  Plugin URI: http://code.tutsplus.com
  Description: Displays latest tweets from Twitter.
  Author: Agbonghama Collins
  Author URI: http://tech4sky.com
 */
Create a class that extends the WP_Widget parent class.
class Twitter_Tweets_Widget extends WP_Widget {
// ...
Specify a name and description for the widget via the __construct() magic method.
function __construct() {
    parent::__construct(
        'twitter-tweets-widget',
        __( 'Twitter Tweets Widget', 'twitter_tweets_widget' ),
        array(
            'description' => __( 'Displays latest tweets from Twitter.', 'twitter_tweets_widget' )
        )
    );
}
The form() method below creates the widget settings form, which saves the OAuth credentials to the database for later reuse by the widget.
public function form( $instance ) {

    if ( empty( $instance ) ) {
        $twitter_username = '';
        $update_count = '';
        $oauth_access_token = '';
        $oauth_access_token_secret = '';
        $consumer_key = '';
        $consumer_secret = '';
        $title = '';
    } else {
        $twitter_username = $instance['twitter_username'];
        $update_count = isset( $instance['update_count'] ) ? $instance['update_count'] : 5;
        $oauth_access_token = $instance['oauth_access_token'];
        $oauth_access_token_secret = $instance['oauth_access_token_secret'];
        $consumer_key = $instance['consumer_key'];
        $consumer_secret = $instance['consumer_secret'];

        if ( isset( $instance['title'] ) ) {
            $title = $instance['title'];
        } else {
            $title = __( 'Twitter feed', 'twitter_tweets_widget' );
        }
    }

    ?>
    <p>
        <label for="<?php echo $this->get_field_id( 'title' ); ?>">
            <?php echo __( 'Title', 'twitter_tweets_widget' ) . ':'; ?>
        </label>
        <input class="widefat" id="<?php echo $this->get_field_id( 'title' ); ?>" name="<?php echo $this->get_field_name( 'title' ); ?>" type="text" value="<?php echo esc_attr( $title ); ?>" />
    </p>
    <p>
        <label for="<?php echo $this->get_field_id( 'twitter_username' ); ?>">
            <?php echo __( 'Twitter Username (without @)', 'twitter_tweets_widget' ) . ':'; ?>
        </label>
        <input class="widefat" id="<?php echo $this->get_field_id( 'twitter_username' ); ?>" name="<?php echo $this->get_field_name( 'twitter_username' ); ?>" type="text" value="<?php echo esc_attr( $twitter_username ); ?>" />
    </p>
    <p>
        <label for="<?php echo $this->get_field_id( 'update_count' ); ?>">
            <?php echo __( 'Number of Tweets to Display', 'twitter_tweets_widget' ) . ':'; ?>
        </label>
        <input class="widefat" id="<?php echo $this->get_field_id( 'update_count' ); ?>" name="<?php echo $this->get_field_name( 'update_count' ); ?>" type="number" value="<?php echo esc_attr( $update_count ); ?>" />
    </p>
    <p>
        <label for="<?php echo $this->get_field_id( 'oauth_access_token' ); ?>">
            <?php echo __( 'OAuth Access Token', 'twitter_tweets_widget' ) . ':'; ?>
        </label>
        <input class="widefat" id="<?php echo $this->get_field_id( 'oauth_access_token' ); ?>" name="<?php echo $this->get_field_name( 'oauth_access_token' ); ?>" type="text" value="<?php echo esc_attr( $oauth_access_token ); ?>" />
    </p>
    <p>
        <label for="<?php echo $this->get_field_id( 'oauth_access_token_secret' ); ?>">
            <?php echo __( 'OAuth Access Token Secret', 'twitter_tweets_widget' ) . ':'; ?>
        </label>
        <input class="widefat" id="<?php echo $this->get_field_id( 'oauth_access_token_secret' ); ?>" name="<?php echo $this->get_field_name( 'oauth_access_token_secret' ); ?>" type="text" value="<?php echo esc_attr( $oauth_access_token_secret ); ?>" />
    </p>
    <p>
        <label for="<?php echo $this->get_field_id( 'consumer_key' ); ?>">
            <?php echo __( 'Consumer Key', 'twitter_tweets_widget' ) . ':'; ?>
        </label>
        <input class="widefat" id="<?php echo $this->get_field_id( 'consumer_key' ); ?>" name="<?php echo $this->get_field_name( 'consumer_key' ); ?>" type="text" value="<?php echo esc_attr( $consumer_key ); ?>" />
    </p>
    <p>
        <label for="<?php echo $this->get_field_id( 'consumer_secret' ); ?>">
            <?php echo __( 'Consumer Secret', 'twitter_tweets_widget' ) . ':'; ?>
        </label>
        <input class="widefat" id="<?php echo $this->get_field_id( 'consumer_secret' ); ?>" name="<?php echo $this->get_field_name( 'consumer_secret' ); ?>" type="text" value="<?php echo esc_attr( $consumer_secret ); ?>" />
    </p>
    <?php

}
Below is a screenshot of the widget settings created by the form() method above.

When values are entered into the settings form fields, they need to be saved to the database. update() Method cleans widget form values by removing malicious data and then saves the cleaned data to the database.
public function update( $new_instance, $old_instance ) {
    $instance = array();

    $instance['title']                      = ( ! empty( $new_instance['title'] ) )                     ? strip_tags( $new_instance['title'] ) : '';
    $instance['title']                      = ( ! empty( $new_instance['title'] ) )                     ? strip_tags( $new_instance['title'] ) : '';
    $instance['twitter_username']           = ( ! empty( $new_instance['twitter_username'] ) )          ? strip_tags( $new_instance['twitter_username'] ) : '';
    $instance['update_count']               = ( ! empty( $new_instance['update_count'] ) )              ? strip_tags( $new_instance['update_count'] ) : '';
    $instance['oauth_access_token']         = ( ! empty( $new_instance['oauth_access_token'] ) )        ? strip_tags( $new_instance['oauth_access_token'] ) : '';
    $instance['oauth_access_token_secret']  = ( ! empty( $new_instance['oauth_access_token_secret'] ) ) ? strip_tags( $new_instance['oauth_access_token_secret'] ) : '';
    $instance['consumer_key']               = ( ! empty( $new_instance['consumer_key'] ) )              ? strip_tags( $new_instance['consumer_key'] ) : '';
    $instance['consumer_secret']            = ( ! empty( $new_instance['consumer_secret'] ) )           ? strip_tags( $new_instance['consumer_secret'] ) : '';

    return $instance;
}
I found a very useful simple PHP wrapper for the Twitter API that makes it easy to send requests and receive responses from the API, which our widget will use.
Download the PHP wrapper in the zip archive from the GitHub repository, extract and include the TwitterAPIExchange.php file that contains the wrapper class.
下面的 twitter_timeline() 方法接受以下参数作为其参数,这在向 Twitter API 发出请求时会派上用场。
-
$username:Twitter 用户名 -
$limit:小部件要显示的推文数量 -
$oauth_access_token:Twitter 应用程序 OAuth 访问令牌。 -
$oauth_access_token_secret:应用程序 OAuth 访问令牌 秘密。 -
$consumer_key:Twitter 应用程序消费者密钥。 -
$consumer_secret:应用程序消费者秘密。
public function twitter_timeline( $username, $limit, $oauth_access_token, $oauth_access_token_secret, $consumer_key, $consumer_secret ) {
    require_once 'TwitterAPIExchange.php';

    /** Set access tokens here - see: https://dev.twitter.com/apps/ */
    $settings = array(
        'oauth_access_token'        => $oauth_access_token,
        'oauth_access_token_secret' => $oauth_access_token_secret,
        'consumer_key'              => $consumer_key,
        'consumer_secret'           => $consumer_secret
    );

    $url = 'https://api.twitter.com/1.1/statuses/user_timeline.json';
    $getfield = '?screen_name=' . $username . '&count=' . $limit;
    $request_method = 'GET';

    $twitter_instance = new TwitterAPIExchange( $settings );

    $query = $twitter_instance
        ->setGetfield( $getfield )
        ->buildOauth( $url, $request_method )
        ->performRequest();

    $timeline = json_decode($query);

    return $timeline;
}
该方法使用 PHP Wrapper for Twitter API 向 Twitter API 发送请求,保存并返回响应(用户时间线的 JSON 数据)。
创建或制作推文的时间由 API 以英文文本日期时间保存。例如。 星期四 6 月 26 日 08:47:24 +0000 2014
为了使推文时间更加用户友好,我创建了方法 tweet_time(),它通过以下方式显示时间。
- 如果时间少于三秒,则返回现在。
- 不到一分钟,返回x秒前。
- 不到两分钟,返回大约 1 分钟前。
- 不到一小时,n 分钟前返回,依此类推。
这是 tweet_time() 方法的代码。
public function tweet_time( $time ) {
    // Get current timestamp.
    $now = strtotime( 'now' );

    // Get timestamp when tweet created.
    $created = strtotime( $time );

    // Get difference.
    $difference = $now - $created;

    // Calculate different time values.
    $minute = 60;
    $hour = $minute * 60;
    $day = $hour * 24;
    $week = $day * 7;

    if ( is_numeric( $difference ) && $difference > 0 ) {

        // If less than 3 seconds.
        if ( $difference < 3 ) {
            return __( 'right now', 'twitter_tweets_widget' );
        }

        // If less than minute.
        if ( $difference < $minute ) {
            return floor( $difference ) . ' ' . __( 'seconds ago', 'twitter_tweets_widget' );;
        }

        // If less than 2 minutes.
        if ( $difference < $minute * 2 ) {
            return __( 'about 1 minute ago', 'twitter_tweets_widget' );
        }

        // If less than hour.
        if ( $difference < $hour ) {
            return floor( $difference / $minute ) . ' ' . __( 'minutes ago', 'twitter_tweets_widget' );
        }

        // If less than 2 hours.
        if ( $difference < $hour * 2 ) {
            return __( 'about 1 hour ago', 'twitter_tweets_widget' );
        }

        // If less than day.
        if ( $difference < $day ) {
            return floor( $difference / $hour ) . ' ' . __( 'hours ago', 'twitter_tweets_widget' );
        }

        // If more than day, but less than 2 days.
        if ( $difference > $day && $difference < $day * 2 ) {
            return __( 'yesterday', 'twitter_tweets_widget' );;
        }

        // If less than year.
        if ( $difference < $day * 365 ) {
            return floor( $difference / $day ) . ' ' . __( 'days ago', 'twitter_tweets_widget' );
        }

        // Else return more than a year.
        return __( 'over a year ago', 'twitter_tweets_widget' );
    }
}
接下来是 widget() 方法,用于在 WordPress 前端显示 Twitter 时间线。
public function widget( $args, $instance ) {
    $title                     = apply_filters( 'widget_title', $instance['title'] );
    $username                  = $instance['twitter_username'];
    $limit                     = $instance['update_count'];
    $oauth_access_token        = $instance['oauth_access_token'];
    $oauth_access_token_secret = $instance['oauth_access_token_secret'];
    $consumer_key              = $instance['consumer_key'];
    $consumer_secret           = $instance['consumer_secret'];

    echo $args['before_widget'];

    if ( ! empty( $title ) ) {
        echo $args['before_title'] . $title . $args['after_title'];
    }

    // Get the tweets.
    $timelines = $this->twitter_timeline( $username, $limit, $oauth_access_token, $oauth_access_token_secret, $consumer_key, $consumer_secret );

    if ( $timelines ) {

        // Add links to URL and username mention in tweets.
        $patterns = array( '@(https?://([-\w\.]+)+(:\d+)?(/([\w/_\.]*(\?\S+)?)?)?)@', '/@([A-Za-z0-9_]{1,15})/' );
        $replace = array( '<a href="$1">$1</a>', '<a href="http://twitter.com/$1">@$1</a>' );

        foreach ( $timelines as $timeline ) {
            $result = preg_replace( $patterns, $replace, $timeline->text );

            echo '<div>';
                echo $result . '<br/>';
                echo $this->tweet_time( $timeline->created_at );
            echo '</div>';
            echo '<br/>';
        }

    } else {
        _e( 'Error fetching feeds. Please verify the Twitter settings in the widget.', 'twitter_tweets_widget' );
    }

    echo $args['after_widget'];
}
小部件类 Twitter_Tweets_Widget 最终使用 widgets_init 挂钩注册,因此 WordPress 可以识别它。使用结束语 } 结束您的课程,然后添加以下代码来初始化
function register_twitter_widget() {
    register_widget( 'Twitter_Tweets_Widget' );
}

add_action( 'widgets_init', 'register_twitter_widget' );
最后,我们完成了 Twitter 时间轴小部件的编码。
摘要
在本文中,我们学习了如何在实际项目中使用 Twitter API 来构建我们自己的 Twitter 时间线 WordPress 小部件。尽管本教程应该相对简单,但我们涵盖了 OAuth、密钥等主题,以及其他对于使用 API 的人员来说可能比较陌生的主题。
如果您有任何问题或代码改进建议,请在评论中告诉我。
The above is the detailed content of Design Twitter widgets using the latest Twitter API. For more information, please follow other related articles on the PHP Chinese website!

