


In all the Crafty tutorials so far, you have been using square or rectangular boxes to understand different concepts such as animation and keyboard or touch events. While this is a great way to quickly learn more about the library, you'll most likely prefer to use the images in your actual game.
In this tutorial you will learn how to load a sprite sheet to use different images in your game. Afterwards, you'll learn how to animate different characters using sprite animation.
Load sprite sheet
For those unfamiliar with sprite sheets, they are image files containing multiple smaller shapes arranged in a grid. Each of these smaller shapes or sprites can be used alone or with other images to animate different objects.
You cannot directly load a sprite sheet in Crafty and start using it. You also have to tell it the width and height of the different tiles or sprites in the sprite sheet. You can also give individual images specific names. For example, a sprite with a small stone could be named "small_stone" for easy reference. It's much easier to remember the tile names than the actual coordinates of the different images.
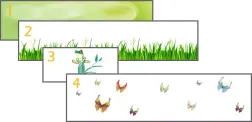
We will be using the following spritesheets provided by tokka in different demos of this tutorial.

It has many images that can be used while the player is walking, jumping, idle or being shot. In this example, most tiles have a width and height of 80 px and 94 px respectively. Some sprite sheets may also have extra padding around individual tiles or the entire sprite sheet. These can be specified using the paddingX, paddingY and paddingAroundBorder properties when loading the sprite sheet.
This is the code we need to load the above sprite sheet in the game:
var game_assets = {
  "sprites": {
    "hero_spritesheet.png": {
      tile: 80,
      tileh: 94,
      map: {
        hero_idle: [0, 0],
        hero_walking: [1, 1],
        hero_jumping: [2, 3],
        hero_sitting: [0, 4]
      }
    }
  }
};

Crafty.load(game_assets);
Use a pair of numbers to reference the tile. The first number determines the sprite's column, and the second number determines its row. These numbers are based on zero. For example, you can use [0, 0] to access the sprite in the first column and first row. Similarly, the sprites in the third column and fourth row can be accessed using [2, 3]. As mentioned before, you can give individual sprites different names for ease of use.
Rendering static sprites
After loading the sprite sheet, you can use the following code to render the image on the screen:
var idle_hero = Crafty.e("2D, Canvas, hero_idle")
  .attr({ x: 10, y: 10 });
The x and y properties determine the sprite's rendering position. You can also set the width and height of individual sprites using the w and h properties.
Because sprites have 2D components, you can apply all the properties and properties of the 2D components to these images. For example, you can use this.flip("X") to flip our hero horizontally so that it faces another direction. Likewise, you can rotate the sprite using the rotation property, or make it transparent using the alpha property.
var sitting_hero = Crafty.e("2D, Canvas, hero_sitting")
  .attr({ x: 440, y: 250 })
  .flip("X");
Suppose you only need to render part of a given sprite on the canvas. You can do this with the help of the .crop(Number x, Number y, Number w, Number h) method. The first two parameters determine the sprite's x and y offsets. The last two parameters determine the width and height of the clipping sprite. All values should be specified in pixels.
Animation Elf
So far, you have moved different entities by changing the x and y properties. This isn't a problem since most of the time you're just moving the rectangular box. However, moving our protagonist by swiping like this would look very unnatural. Adding animations to objects like coins that players can collect will also make the game more interesting.
All sprite-related animations require you to add the SpriteAnimation component to the entity. This component treats different images in the sprite as animation frames.
Information about the animation is stored in the reel object. The scroll object has five different properties:
- a
id, which is the name of the scroll - A
framesarray containing a list of animation frames in the format[xpos, ypos] - A
currentFrameattribute, returns the index of the current frame -
easingProperty that determines how the animation should advance -
durationProperty used to set animation duration (in milliseconds)
Elf animation can trigger four different events. these are:
- StartAnimation:当动画开始播放或从暂停状态恢复时触发此事件。
-
AnimationEnd:动画结束时触发此事件。
-
FrameChange:每次当前卷中的帧发生变化时都会触发此事件。
-
ReelChange:当卷轴本身发生变化时会触发此事件。
所有这些事件都接收 reel 对象作为参数。
除了 reel 对象之外,还有一个 .reel() 方法,用于定义精灵动画。您可以使用 .animate() 方法来播放任何定义的动画。
精灵动画的过程从在画布上创建静态精灵开始。
var walking_hero = Crafty.e('2D, Canvas, hero_walking, SpriteAnimation')
  .attr({
    x: 40,
    y: 20
  });
上例中的 hero_walking 图像是用户在动画之前看到的第一张图像。这些属性用于指定当前实体的位置。创建实体后,您可以使用 .reel() 方法来定义实际的动画。
walking_hero.reel("walking", 1000, [
  [0, 1],
  [1, 1],
  [2, 1],
  [3, 1],
  [4, 1],
  [5, 1]
]);
此方法接受三个参数。第一个参数是正在创建的动画的 Id。第二个参数用于设置动画的长度(以毫秒为单位),第三个参数是包含连续帧的列(x)和行(y)位置的数组。在本例中,该数组包含第二行中所有精灵的位置。
此方法的另一个版本需要五个参数。前两个参数是卷轴 Id 和动画长度。第三个和第四个参数用于设置精灵图上动画的起始 x 和 y 位置。最后一个参数设置动画中连续帧的数量。当设置为负值时,动画将向后播放。
上面的卷轴动画也可以使用以下代码创建:
walking_hero.reel("walking", 1000, 0, 1, 6);
虽然这个版本很简洁,但有一点限制。仅当您想要包含在动画中的所有精灵都位于一行中时,此方法才有用。此外,动画将按照这些图像在精灵表中出现的顺序显示这些图像。
定义动画后,您可以使用 .animate(reel_Id[,loopCount]) 方法来播放它。第一个参数是你要播放的动画,第二个参数决定你要播放这个动画的次数。动画默认播放一次。将 loopCount 设置为 -1 将无限期地播放动画。
在某些情况下,您可能希望根据事件仅播放一次动画。例如,当用户按下按钮使玩家跳跃时,应该播放跳跃动画。您可以在上面的演示中尝试一下。按向上箭头键将使第二个精灵跳跃。这是检测按键的代码:
jumping_hero.bind('KeyDown', function(evt) {
  if (evt.key == Crafty.keys.UP_ARROW) {
    jumping_hero.animate("jumping", 1);
  }
});
您还可以使用 .pauseAnimation() 和 .resumeAnimation() 方法中途暂停和恢复动画。
如果单个精灵附加了多个动画,您可以使用 .isPlaying([String reelId]) 方法确定当前是否正在播放特定动画。如果没有提供 Id ,它将检查是否有动画正在播放。
结论
完成本教程后,您应该能够在 Crafty 中加载您自己的精灵表,并使用它们来表示不同的游戏实体而不是各种矩形。您现在还可以根据不同的事件将不同的动画应用于实体。我应该提醒您,我在本教程中使用了 Crafty 版本 0.7.1,并且演示可能无法与该库的其他版本一起使用。
JavaScript 已成为事实上的网络工作语言之一。它并非没有学习曲线,而且还有大量的框架和库可以让您忙碌起来。如果您正在寻找其他资源来学习或在工作中使用,请查看我们在 Envato 市场中提供的资源。
在下一个教程中,您将学习如何在游戏中添加声音。
The above is the detailed content of Advanced skills: clever use of elves. For more information, please follow other related articles on the PHP Chinese website!

 Replace String Characters in JavaScriptMar 11, 2025 am 12:07 AM
Detailed explanation of JavaScript string replacement method and FAQ This article will explore two ways to replace string characters in JavaScript: internal JavaScript code and internal HTML for web pages. Replace string inside JavaScript code The most direct way is to use the replace() method: str = str.replace("find","replace"); This method replaces only the first match. To replace all matches, use a regular expression and add the global flag g: str = str.replace(/fi
 8 Stunning jQuery Page Layout PluginsMar 06, 2025 am 12:48 AM
Leverage jQuery for Effortless Web Page Layouts: 8 Essential Plugins jQuery simplifies web page layout significantly. This article highlights eight powerful jQuery plugins that streamline the process, particularly useful for manual website creation
 Build Your Own AJAX Web ApplicationsMar 09, 2025 am 12:11 AM
So here you are, ready to learn all about this thing called AJAX. But, what exactly is it? The term AJAX refers to a loose grouping of technologies that are used to create dynamic, interactive web content. The term AJAX, originally coined by Jesse J
 10 Mobile Cheat Sheets for Mobile DevelopmentMar 05, 2025 am 12:43 AM
This post compiles helpful cheat sheets, reference guides, quick recipes, and code snippets for Android, Blackberry, and iPhone app development. No developer should be without them! Touch Gesture Reference Guide (PDF) A valuable resource for desig
 Improve Your jQuery Knowledge with the Source ViewerMar 05, 2025 am 12:54 AM
jQuery is a great JavaScript framework. However, as with any library, sometimes it’s necessary to get under the hood to discover what’s going on. Perhaps it’s because you’re tracing a bug or are just curious about how jQuery achieves a particular UI
 10 jQuery Fun and Games PluginsMar 08, 2025 am 12:42 AM
10 fun jQuery game plugins to make your website more attractive and enhance user stickiness! While Flash is still the best software for developing casual web games, jQuery can also create surprising effects, and while not comparable to pure action Flash games, in some cases you can also have unexpected fun in your browser. jQuery tic toe game The "Hello world" of game programming now has a jQuery version. Source code jQuery Crazy Word Composition Game This is a fill-in-the-blank game, and it can produce some weird results due to not knowing the context of the word. Source code jQuery mine sweeping game
 How do I create and publish my own JavaScript libraries?Mar 18, 2025 pm 03:12 PM
Article discusses creating, publishing, and maintaining JavaScript libraries, focusing on planning, development, testing, documentation, and promotion strategies.
 jQuery Parallax Tutorial - Animated Header BackgroundMar 08, 2025 am 12:39 AM
This tutorial demonstrates how to create a captivating parallax background effect using jQuery. We'll build a header banner with layered images that create a stunning visual depth. The updated plugin works with jQuery 1.6.4 and later. Download the


Hot AI Tools

Undresser.AI Undress
AI-powered app for creating realistic nude photos

AI Clothes Remover
Online AI tool for removing clothes from photos.

Undress AI Tool
Undress images for free

Clothoff.io
AI clothes remover

AI Hentai Generator
Generate AI Hentai for free.

Hot Article
Hot Tools

Dreamweaver CS6
Visual web development tools

WebStorm Mac version
Useful JavaScript development tools

Notepad++7.3.1
Easy-to-use and free code editor

MinGW - Minimalist GNU for Windows
This project is in the process of being migrated to osdn.net/projects/mingw, you can continue to follow us there. MinGW: A native Windows port of the GNU Compiler Collection (GCC), freely distributable import libraries and header files for building native Windows applications; includes extensions to the MSVC runtime to support C99 functionality. All MinGW software can run on 64-bit Windows platforms.

Atom editor mac version download
The most popular open source editor

