


Let me start this tutorial with some theoretical terms. When we talk about image enhancement, it basically means that we want a new version of the image that is more suitable than the original image. For example, when you scan a document, the output image may be of lower quality than the original input image. Therefore, we need a way to improve the quality of the output images so that they are visually more expressive to the viewer, and this is where image enhancement comes into play. When we enhance an image, what we do is sharpen features of the image, such as contrast and edges.
It should be noted that image enhancement does not increase the information content of the image, but increases the dynamic range of the selected features, ultimately improving the quality of the image. So here we don't actually know what the output image will look like, but we should be able to tell (subjectively) if there are any improvements, such as observing more details in the output image.
Image enhancement is often used as a pre-processing step among the basic steps involved in digital image processing (i.e. segmentation, representation). There are many techniques for image enhancement, but I will introduce two techniques in this tutorial:
Image inverseand Power law transformation. We'll look at how to implement them in Python. let's start! Image inversion
As you might have guessed from the title of this section (which can also be called image inversion), the purpose of image inversion is to convert dark intensities in the input image into light intensities in the image. output image, and the light intensity in the input image to the dark intensity in the output image. In other words, dark areas become lighter and light areas become darker.
Assume
I(i,j) refers to the intensity value of the pixel located at (i,j). To clarify here, intensity values in grayscale images fall within the range [0,255], while (i,j) refers to row and column values, respectively. When we apply the image inverse operator to a grayscale image, the output pixel O(i,j) value is:
<pre class='brush:php;toolbar:false;'>O(i,j) = 255 - I(i,j)
</pre>
Now, most of our images are in color. These images contain three channels:
, green, and blue, and are called RGB images. In this case, contrary to the formula above, we need to subtract the intensity of each channel from 255. Therefore the output image is at pixel (i ,j):
O_R(i,j) = 255 - R(i,j)
O_G(i,j) = 255 - G(i,j)
O-B)i,j) = 255 - B(i,j)
After the introduction, let’s take a look at how to implement the image inverse operator in Python. I want to mention that for the sake of simplicity, I will be running this operator on a grayscale image. But I'll give you some ideas about applying this operator on color images, and I'll leave the complete program to you as an exercise.
For color images, the first thing you need to do is extract each pixel channel (i.e. RGB) intensity value. To do this, you can use the Python Imaging Library (PIL). Continue to download the sample baboon image from baboon.png. The size of the image is 500x500
. Suppose you want to extract the red, green, and blue intensity values at pixel location(325, 432). This can be done as follows:
from PIL import Image

im = Image.open('baboon.png')
print(im.getpixel((325,432)))
According to the documentation, the function of method getpixel() is:
Return the pixel value at the given location.
138! But where are the (RGB) intensity values for the three channels? The problem seems to be related to the
mode of the image being read. Check the pattern by running the following statement:
print(im.mode)
You will get the output P, which means the image was read in palette mode. One thing you can do is convert the image to RGB mode before returning the intensity values of the different channels. To do this, you can use the convert() method as follows:
rgb_im = im.convert('RGB')
In this case, you will get the following return value: (180, 168, 178). This means that the intensity values for the red, green, and blue channels are 180, 168, and 178 respectively.
Putting everything we've described so far together, a Python script that returns the RGB values of an image looks like this:
from PIL import Image

im = Image.open('baboon.png')
rgb_im = im.convert('RGB')
print(rgb_im.getpixel((325,432)))
There is one point left before continuing with the image inverse operator. The above example shows how to retrieve the RGB value of only one
pixel, but when performing the inverse operator, you need to do it forall pixels. To print all intensity values for different channels for each pixel, you can do the following:
from PIL import Image

im = Image.open('baboon.png')
rgb_im = im.convert('RGB')
width, height = im.size

for w in range(width):
    for h in range(height):
		print(rgb_im.getpixel((w,h)))
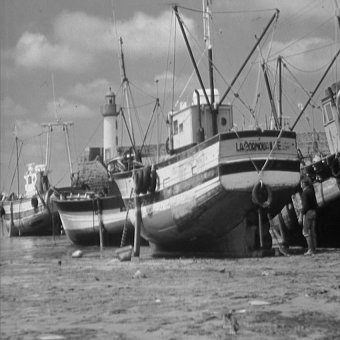
At this point, I'll leave this as an exercise for you to see how to apply the image inverse operator on all color image channels (i.e. RGB) for each pixel. Let’s look at an example of applying the image inverse operator on a grayscale image. Go ahead and download boat.png, which will serve as our test image in this section. It looks like this:
我将使用 numpy 库来完成此任务。在上面的图像上应用图像逆运算符的 Python 脚本应如下所示:
import cv2
import numpy as np
from PIL import Image
img = Image.open('boat.png')
array_img = np.array(img)
image_invert = np.invert(array_img)
cv2.imwrite('new_boat.jpg', image_invert)
Numpy 是一个用于使用 Python 进行科学计算的 Python 包。 OpenCV-Python 是一个旨在解决计算机视觉问题的库。 OpenCV-Python 与 numpy 捆绑在一起,因此如果先安装 OpenCV-Python,则无需安装 numpy。我们首先用 Pillow 打开图像,然后将其转换为 numpy 数组。
然后我们使用numpy的invert()函数将图像反转并保存新的反转图像。 invert() 函数会将白色转换为黑色,反之亦然。
下面左边是原始图像,右边是新反转的图像。
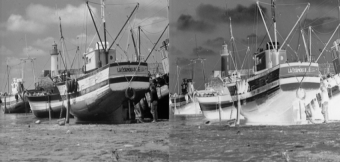
请注意,应用该运算符后,图像的某些特征变得更加清晰。例如,看看右侧图像中的云彩和灯塔。
幂律变换
这个算子,也称为伽马校正,是我们可以用来增强图像的另一个算子。让我们看看算子方程。在像素 (i,j) 处,运算符如下所示:
p(i,j) = kI(i,j)^gamma
I(i,j) 是图像位置处的强度值 (i,j); k 和 gamma 是正常数。我不会在这里讨论数学细节,但我相信您可以在图像处理书籍中找到该主题的详尽解释。但需要注意的是,在大多数情况下,k=1,所以我们主要是改变gamma的值。因此,上述方程可以简化为:
p(i,j) = I(i,j)^gamma
我将在这里使用 OpenCV 和 NumPy 库。如果您需要了解有关该库的更多信息,请查看我的教程 NumPy 简介。我们的测试图像将再次是boat.tiff(继续下载它)。
执行幂律变换运算符的 Python 脚本如下所示:
import cv2
import numpy as np

im = cv2.imread('boat.tiff')
im = im/255.0
im_power_law_transformation = cv2.pow(im,0.6)
cv2.imshow('Original Image',im)
cv2.imshow('Power Law Transformation',im_power_law_transformation)
cv2.waitKey(0)
请注意,我们选择的 gamma 值是 0.6。下图显示了原始图像以及对该图像应用幂律变换算子的结果(左图为原始图像,右图为应用幂律变换算子后的结果)。
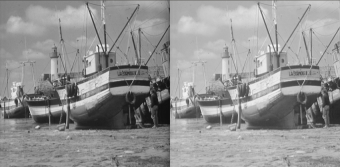
上面的结果是 gamma = 0.6 时的结果。让我们看看当我们将 gamma 增加到 1.5 时会发生什么,例如:
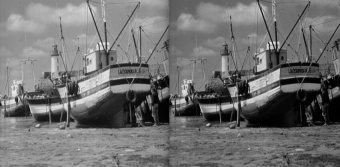
请注意,当我们增加伽马值时,图像会变得更暗,反之亦然。
您可能会问幂律变换有什么用处。事实上,用于图像采集、打印和显示的不同设备根据幂律变换算子进行响应。这是因为人脑使用伽马校正来处理图像。例如,当我们希望在计算机显示器或电视屏幕上正确显示图像(所有图像中显示最佳图像对比度)时,伽马校正就被认为很重要。
结论
在本教程中,您学习了如何使用 Python 增强图像。您已经了解了如何使用图像逆算子突出显示特征,以及如何将幂律变换视为在计算机显示器和电视屏幕上正确显示图像的关键算子。
The above is the detailed content of Python-based image enhancement technology. For more information, please follow other related articles on the PHP Chinese website!

 Python vs. C : Understanding the Key DifferencesApr 21, 2025 am 12:18 AM
Python and C each have their own advantages, and the choice should be based on project requirements. 1) Python is suitable for rapid development and data processing due to its concise syntax and dynamic typing. 2)C is suitable for high performance and system programming due to its static typing and manual memory management.
 Python vs. C : Which Language to Choose for Your Project?Apr 21, 2025 am 12:17 AM
Choosing Python or C depends on project requirements: 1) If you need rapid development, data processing and prototype design, choose Python; 2) If you need high performance, low latency and close hardware control, choose C.
 Reaching Your Python Goals: The Power of 2 Hours DailyApr 20, 2025 am 12:21 AM
By investing 2 hours of Python learning every day, you can effectively improve your programming skills. 1. Learn new knowledge: read documents or watch tutorials. 2. Practice: Write code and complete exercises. 3. Review: Consolidate the content you have learned. 4. Project practice: Apply what you have learned in actual projects. Such a structured learning plan can help you systematically master Python and achieve career goals.
 Maximizing 2 Hours: Effective Python Learning StrategiesApr 20, 2025 am 12:20 AM
Methods to learn Python efficiently within two hours include: 1. Review the basic knowledge and ensure that you are familiar with Python installation and basic syntax; 2. Understand the core concepts of Python, such as variables, lists, functions, etc.; 3. Master basic and advanced usage by using examples; 4. Learn common errors and debugging techniques; 5. Apply performance optimization and best practices, such as using list comprehensions and following the PEP8 style guide.
 Choosing Between Python and C : The Right Language for YouApr 20, 2025 am 12:20 AM
Python is suitable for beginners and data science, and C is suitable for system programming and game development. 1. Python is simple and easy to use, suitable for data science and web development. 2.C provides high performance and control, suitable for game development and system programming. The choice should be based on project needs and personal interests.
 Python vs. C : A Comparative Analysis of Programming LanguagesApr 20, 2025 am 12:14 AM
Python is more suitable for data science and rapid development, while C is more suitable for high performance and system programming. 1. Python syntax is concise and easy to learn, suitable for data processing and scientific computing. 2.C has complex syntax but excellent performance and is often used in game development and system programming.
 2 Hours a Day: The Potential of Python LearningApr 20, 2025 am 12:14 AM
It is feasible to invest two hours a day to learn Python. 1. Learn new knowledge: Learn new concepts in one hour, such as lists and dictionaries. 2. Practice and exercises: Use one hour to perform programming exercises, such as writing small programs. Through reasonable planning and perseverance, you can master the core concepts of Python in a short time.
 Python vs. C : Learning Curves and Ease of UseApr 19, 2025 am 12:20 AM
Python is easier to learn and use, while C is more powerful but complex. 1. Python syntax is concise and suitable for beginners. Dynamic typing and automatic memory management make it easy to use, but may cause runtime errors. 2.C provides low-level control and advanced features, suitable for high-performance applications, but has a high learning threshold and requires manual memory and type safety management.


Hot AI Tools

Undresser.AI Undress
AI-powered app for creating realistic nude photos

AI Clothes Remover
Online AI tool for removing clothes from photos.

Undress AI Tool
Undress images for free

Clothoff.io
AI clothes remover

Video Face Swap
Swap faces in any video effortlessly with our completely free AI face swap tool!

Hot Article
Hot Tools

Notepad++7.3.1
Easy-to-use and free code editor

Dreamweaver Mac version
Visual web development tools

ZendStudio 13.5.1 Mac
Powerful PHP integrated development environment

SAP NetWeaver Server Adapter for Eclipse
Integrate Eclipse with SAP NetWeaver application server.

DVWA
Damn Vulnerable Web App (DVWA) is a PHP/MySQL web application that is very vulnerable. Its main goals are to be an aid for security professionals to test their skills and tools in a legal environment, to help web developers better understand the process of securing web applications, and to help teachers/students teach/learn in a classroom environment Web application security. The goal of DVWA is to practice some of the most common web vulnerabilities through a simple and straightforward interface, with varying degrees of difficulty. Please note that this software

