
 Common ProblemHow to cancel windows10 pin code. Example tutorial of canceling windows10 pin code.
How to cancel windows10 pin code. Example tutorial of canceling windows10 pin code.

Some Windows 10 users have set a pin code to log in to their computers, but in fact, most computers are only used by themselves, and it is not necessary to set a pin code. How to cancel the Windows 10 pin code? You first open the settings control panel, click Account to enter, then click the login option on the left, then click "I forgot my PIN", enter the account password in the startup dialog box, and then enter the Set PIN dialog box, blank yourself and save the settings That's it.
How to cancel the Windows 10 pin code:
1. First use the keyboard shortcut "win I" to open Windows 10 settings, find "Account" and click on it.

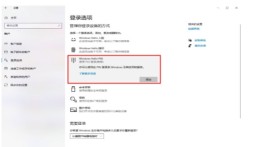
2. Find "Login Options" in the left dialog box, find the pin option in the right dialog box, and click "I forgot my PIN".

#3. The authentication dialog box will pop up, just enter your account and password clearly.

#4. Enter the Set PIN dialog box. Click Cancel immediately without entering a new PIN.

#5. When you return to the page for query, the PIN login password will be cancelled.
The above is the specific content of the tutorial on how to cancel the Windows 10 pin code. If you are the only one who has access to the computer, then there is no need to set a password.
The above is the detailed content of How to cancel windows10 pin code. Example tutorial of canceling windows10 pin code.. For more information, please follow other related articles on the PHP Chinese website!

Hot AI Tools

Undresser.AI Undress
AI-powered app for creating realistic nude photos

AI Clothes Remover
Online AI tool for removing clothes from photos.

Undress AI Tool
Undress images for free

Clothoff.io
AI clothes remover

Video Face Swap
Swap faces in any video effortlessly with our completely free AI face swap tool!

Hot Article
Hot Tools

MinGW - Minimalist GNU for Windows
This project is in the process of being migrated to osdn.net/projects/mingw, you can continue to follow us there. MinGW: A native Windows port of the GNU Compiler Collection (GCC), freely distributable import libraries and header files for building native Windows applications; includes extensions to the MSVC runtime to support C99 functionality. All MinGW software can run on 64-bit Windows platforms.

SAP NetWeaver Server Adapter for Eclipse
Integrate Eclipse with SAP NetWeaver application server.

Safe Exam Browser
Safe Exam Browser is a secure browser environment for taking online exams securely. This software turns any computer into a secure workstation. It controls access to any utility and prevents students from using unauthorized resources.

mPDF
mPDF is a PHP library that can generate PDF files from UTF-8 encoded HTML. The original author, Ian Back, wrote mPDF to output PDF files "on the fly" from his website and handle different languages. It is slower than original scripts like HTML2FPDF and produces larger files when using Unicode fonts, but supports CSS styles etc. and has a lot of enhancements. Supports almost all languages, including RTL (Arabic and Hebrew) and CJK (Chinese, Japanese and Korean). Supports nested block-level elements (such as P, DIV),

Dreamweaver CS6
Visual web development tools

