Home >Common Problem >How to delete the storage saved in Win10 How to delete the small space saved by the system software in Win10
How to delete the storage saved in Win10 How to delete the small space saved by the system software in Win10
- WBOYWBOYWBOYWBOYWBOYWBOYWBOYWBOYWBOYWBOYWBOYWBOYWBforward
- 2023-07-10 14:03:001646browse
How to delete the saved storage in Win10? Old users of the Win10 system know how to save some storage space with one click. Sometimes the system space is insufficient. We can delete this small space to alleviate the problem of insufficient storage space. So how to delete the small space saved by the system in Win10? As for indoor space, the method is very simple and not too difficult. The editor below will share with you how to delete the storage space saved in Win10.
How to delete the small space saved by the system in Win10?
Black dialog box specifically closes the program reserve area:
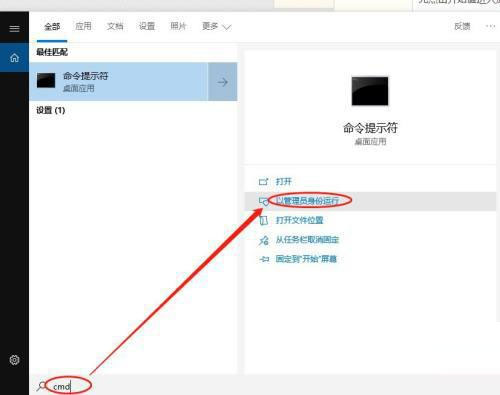
1. We click the start button, then search cmd and click the administrator identity operation in the lower right corner.
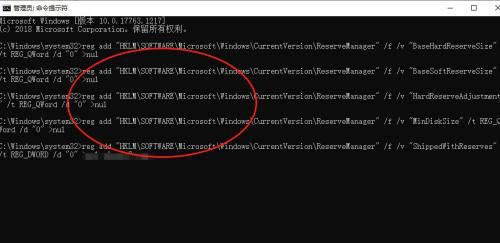
2. Then we successfully open the black dialog box, copy the Enter key and run the following command:
regadd "HKLMSOFTWAREMicrosoftWindowsCurrentVersionReserveManager"/f/v" BaseHardReserveSize”/tREG_QWord/d“0”》nul
regadd“HKLMSOFTWAREMicrosoftWindowsCurrentVersionReserveManager”/f/v“BaseSoftReserveSize”/tREG_QWord/d“0”》nulregadd“HKLMSOFTWAREMicrosoftWindowsCurrentVersionReserveManager”/f/v“HardReserveAdjustment”/tREG_Q Word/ d“0”》nulregadd“HKLMSOFTWAREMicrosoftWindowsCurrentVersionReserveManager”/f/v“MinDiskSize”/tREG_QWord/d“0”》nulregadd“HKLMSOFTWAREMicrosoftWindowsCurrentVersionReserveManager”/f/v“ShippedWithReserves”/tREG_DWORD/d“0”》nul copy and press Enter Just key.
Then clean up the system garbage area:
1. We use keyboard shortcuts to open the system configuration WIN I.
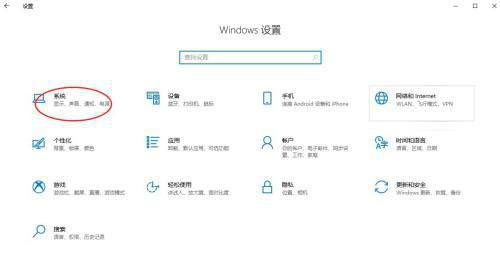
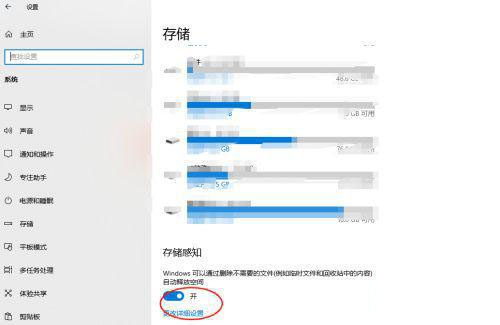
#2. Then click the system software, click Save on the homepage of the system control panel to enter the storage partition.
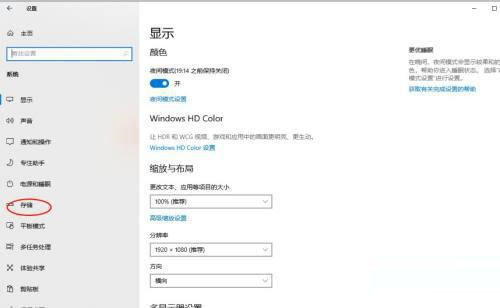
#3. Then click to open the storage knowledge.
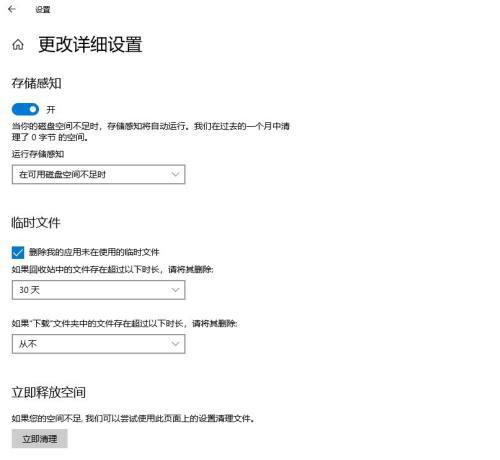
Change detailed settings
4. Then click Clear Now and wait for the clearing timeline to complete.
The above is the detailed content of How to delete the storage saved in Win10 How to delete the small space saved by the system software in Win10. For more information, please follow other related articles on the PHP Chinese website!

