Home >Java >javaTutorial >How to achieve load balancing with Nginx+SpringBoot
How to achieve load balancing with Nginx+SpringBoot
- WBOYWBOYWBOYWBOYWBOYWBOYWBOYWBOYWBOYWBOYWBOYWBOYWBforward
- 2023-05-29 17:28:061616browse
Introduction to load balancing
Before introducing the load balancing implementation of nginx, let’s briefly talk about the classification of load balancing, which is mainly divided into hardware load balancing and software load balancing. Hardware load balancing is a device that uses specialized software and hardware. Equipment vendors will provide complete and mature solutions, such as f5, which are very reliable in terms of data stability and security, but are more expensive than software. Expensive; software load balancing is mainly based on software such as nginx, which implements a message queue distribution mechanism.
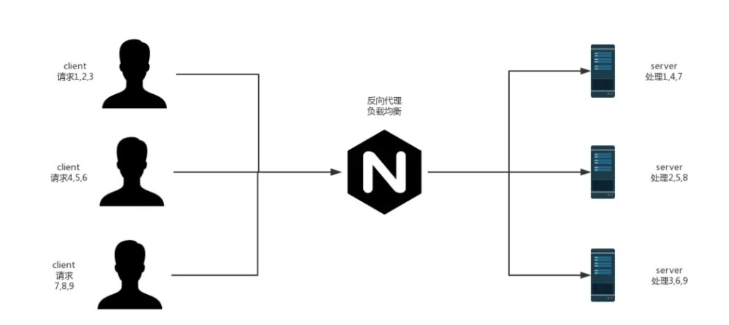
Simply put, the so-called load balancing is to divert many requests and assign them to different servers for processing. For example, I have 3 servers, namely a, b, and c, and then use nginx for load balancing and a polling strategy. If 9 requests are received at this time, the 9 requests will be evenly distributed to a and b. , cf server, each server handles 3 requests, so that we can use the characteristics of multiple machine clusters to reduce the pressure on a single server.
Example diagram of nginx implementing load balancing:

Load balancing strategy
nginx open source supports four types of load Balanced method, and nginx plus adds two more methods.
1.round robin:
Polling and sending requests for all requests, the default allocation method.
nginx.conf configuration example:
Note: The above domain name can also be replaced by ip.
2.least connections:
Send the request to the server with the least number of active connections, also taking into account server weight.
nginx.conf configuration example:
3.ip hash:
The server sending the request is determined by the client ip address. In this case, the hash value is calculated using the first three bytes of the ipv4 address or the entire ipv6 address. This method guarantees that requests from the same address reach the same server unless that server is unavailable.
4.generic hash:
The server to which the request is sent is determined by a user-defined key, which can be a text string, variable, or combination.
5.least time (nginx plus only)
For each request, nginx plus chooses the server with the lowest average latency and the lowest number of active connections, where the lowest average Latency is calculated based on the following parameters including the least_time directive:
header: Time to receive the first byte from the server.
last_byte: The time to receive the complete response from the server.
last_byte inflight: The time to receive the complete response from the server.
6.random:
Each request will be delivered to a randomly selected server. If two parameters are specified, first, nginx randomly selects two servers based on server weights, and then selects one of them using the specified method.
least_conn: The minimum number of active connections
least_time=header (nginx plus): The minimum average time to receive response headers from the server ( $upstream_header_time).
least_time=last_byte (nginx plus) : The shortest average time to receive a complete response from the server ($upstream_response_time).
nginx springboot implements load balancing
Environment preparation
Dependencies jdk1.8 or above version;
Depends on nginx environment;
The project here uses my previous one springboot project, springboot project address: https://github.com/xuwujing/springboot-study/tree/master/springboot-thymeleaf
First we download this project, enter: mvn clean package Package the project into a jar file, then put application.properties and this jar project in a folder, and then copy the folder (copied here for clarity, actually do not copy the changed port) Restarting is also OK), modify the port of the copied folder application.properties, for example, to 8086.
nginx configuration
We find the nginx configuration file nginx.conf, which is in the nginx/conf/nginx.conf directory, and then we modify it For this configuration, add the following configuration:
upstream pancm: Define a name, whatever you want;
server ip: port or domain name;
If you don’t want to use the round robin strategy, you can also change it to another one.
Then add/modify the following configuration on the server:
Configuration instructions:
server: The name of the virtual host. Multiple configurations can be configured in one http server;
listen: nginx default port;
server_name: The address of the nginx service, you can use domain names, multiple ones are separated by spaces.
proxy_pass: proxy path, generally configure the name after upstream to achieve load balancing, you can directly configure the ip for jump;
nginx.conf Complete configuration:
Load balancing test
After completing the nginx configuration, we start nginx.
linux input/usr/local/nginx/sbin/nginx -c /usr/local/nginx/conf/nginx.conf, if it has already been started, you can use /usr/local/nginx /sbin/nginx -s reload command to hot load the configuration file, windows directly click nginx.exe or cmd to run start nginx Start it. If it is started, you can still use nginx -s reload for hot loading.
After nginx is started, we start the springboot we just downloaded and copy the project to change the port. Enter: java -jar springboot-jsp-thymeleaf.jar to start.
After everything is started successfully, we can access it by entering the IP address of the service in the browser.
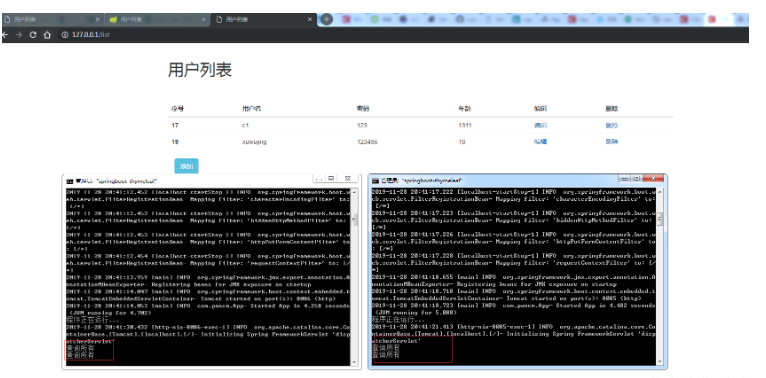
Example picture:

Note: Here I am using the windows system for testing, and the actual Linux is the same.
Then we proceed and view the console log!

From the above example diagram, we made 4 interface refresh requests, and finally distributed them evenly to the two services. From the above test results, we achieved load balancing .
Here I am talking about the precautions for using nginx. When learning and testing, there is generally no problem using the default port of nginx to achieve load balancing, but when we use it in a project, there are especially When you log in to the interface and the port is not 80, the login interface cannot be redirected. When debugging, an error like net::err_name_not_resolved will appear. The reason for this is because the default port of nginx is 80, so the default jump is This is also the case, so when this happens, you need to add the proxy_set_header host $host:port configuration under location. Just keep the port and listen port consistent.
The above is the detailed content of How to achieve load balancing with Nginx+SpringBoot. For more information, please follow other related articles on the PHP Chinese website!

