
Home >Web Front-end >Vue.js >How to implement vue3 container layout and navigation routing
How to implement vue3 container layout and navigation routing

- WBOYforward
- 2023-05-28 20:08:321264browse
Container layout
Comment or delete the HelloWorld related content in App.vue, then copy the layout provided by element-plus and place it in App.vue
The layout is Menu bar on the left, content area on the right, top right, typical management backend style
<template>
<!-- <img alt="Vue logo" src="./assets/logo.png"> -->
<div class="common-layout">
<el-container>
<el-aside width="200px">
<Menu></Menu>
</el-aside>
<el-container>
<el-header height="20px">Header</el-header>
<el-main>
<router-view></router-view>
</el-main>
</el-container>
</el-container>
</div>
<!--
<div>
<p>
<router-link to="/home">Go to Home</router-link>
<router-link to="/about">Go to about</router-link>
<router-view></router-view>
</p>
</div>
<HelloWorld msg="Welcome to Your Vue.js App"/> -->
</template>
<script>
// import HelloWorld from './components/HelloWorld.vue'
import Menu from './components/Menu.vue'
export default {
name: 'App',
components: {
// HelloWorld
Menu
}
}
</script>There is a Menu.vue component in the above code, which needs to be created, and content will be added later
Routing definition
Create a new routes.js file in the src directory and write the route list to facilitate the use of other components.
const routes = [
    { path: "/home", name: 'home', label: '首页', component: () => import('./components/home.vue'), },
    { path: "/about", name: 'about', label: '关于', component: () => import('./components/about.vue'), },
]
export default routes
The content has not changed. Just extract the routes in router.js and write them separately. A file
router.js is introduced and uses routes
import { createRouter, createWebHashHistory } from 'vue-router'
import routes from './routes'
const router = createRouter({
    history: createWebHashHistory(),
    routes: routes,
})
export default router
Left menu
Create a new Menu.vue page in the components directory, and then add it to the menu component in element-plus Side bar copied over.
<template>
<el-row class="tac">
<el-col :span="24">
<h6 class="mb-2">Default colors</h6>
<el-menu default-active="2" class="el-menu-vertical-demo" @open="handleOpen" @close="handleClose">
<el-sub-menu index="1">
<template #title>
<el-icon>
<location />
</el-icon>
<span>Navigator One</span>
</template>
<router-link v-for="(item, index) in routes" :to="{ name: item.name }" :key="item.name">
<el-menu-item :index="index">
<span v-text="item.label"></span>
</el-menu-item>
</router-link>
</el-sub-menu>
<el-menu-item index="2">
<el-icon>
<icon-menu />
</el-icon>
<span>Navigator Two</span>
</el-menu-item>
<el-menu-item index="3" disabled>
<el-icon>
<document />
</el-icon>
<span>Navigator Three</span>
</el-menu-item>
<el-menu-item index="4">
<el-icon>
<setting />
</el-icon>
<span>Navigator Four</span>
</el-menu-item>
</el-menu>
</el-col>
</el-row>
</template>
<script>
import {
Document,
Menu as IconMenu,
Location,
Setting,
} from '@element-plus/icons-vue'
import routes from '../routes'
export default {
name: 'Menu',
components: { Document, IconMenu,Location, Setting },
data() {
return {
routes: routes,
}
},
methods: {
handleOpen() {
console.log("111")
},
handleClose() {
console.log("222")
},
}
}
</script>@element-plus/icons-vue This package needs to be installed (npm install @element-plus/icons-vue)
The examples on the element-plus official website are all written in ts setup syntax Yes, here we change to js responsive syntax
Change the column width to:span="24" or a larger value. If the column width is too small, you will find a gray line in the middle of the font
Introducing definitions Route list routes.js, loop the content into router-link
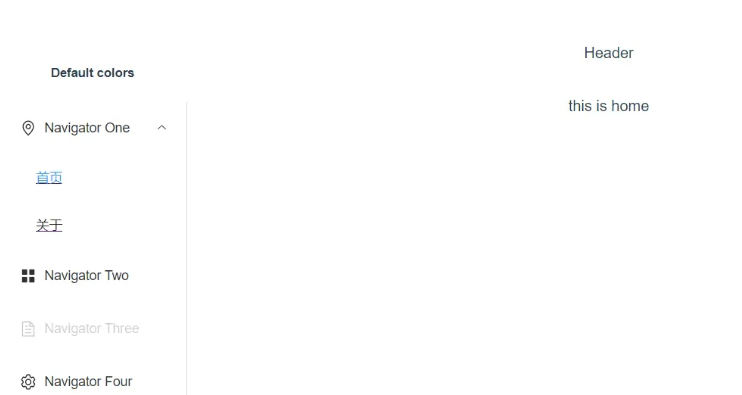
The operation effect is as follows
The above is the detailed content of How to implement vue3 container layout and navigation routing. For more information, please follow other related articles on the PHP Chinese website!
Related articles
See more- About vue using validator: VeeValidate3
- What are the differences between computed and method in Vue?
- Introduction to the method of turning off Eslint verification in the vue project
- Introduction to several methods of defining component templates in Vue.js
- Four places to implement AJAX in Vue applications