
Home >Web Front-end >Vue.js >Analysis of plug-ins and configuration examples in Vue3
Analysis of plug-ins and configuration examples in Vue3

- 王林forward
- 2023-05-21 13:25:232307browse
1. Vite
First of all, let me introduce Vite to you. Although this is not necessary in Vue3, considering that it is used in the front end of the TienChin project Let me tell you a few words about this.
Vite (French for "fast", pronounced /vit/, pronounced like "veet") is a new front-end building tool that significantly improves the front-end development experience. It mainly consists of two parts:
A development server, which provides rich built-in functions based on native ES modules, such as astonishingly fast Hot Module Update (HMR).
A set of build instructions that uses Rollup to package your code and is pre-configured to output highly optimized static resources for production environments.
Vite is intended to provide out-of-the-box configuration, while its plugin API and JavaScript API bring a high degree of extensibility and have complete type support.
If you are not familiar with it, you might as well recall the Webpack we introduced to you in vhr before. In fact, this Vite is equivalent to Webpack. The most notable feature of Vite is that it is much faster than the traditional tool Webpack.
Vite improves the development server startup time by dividing the modules in the application into dependencies and source code at the beginning, because dependencies change little and source code is what changes often.
I don’t know if my friends have thought that we have a similar thing in Java when seeing this, that is Spring Boot hot loading.
Spring Boot uses two class loaders in hot loading: one is the base classloader, which is specially used to load some third-party classes; the other is the restart classloader, which is specially used to load the classes we wrote ourselves. kind. Hot reloading can be achieved by simply reloading the class loader.
2. Automatically import common methods
In the TienChin project, friends have seen that many methods that originally need to be imported can be used without importing.
I created a project to demonstrate to you.
We use Vite to build a project.
If your npm version is 6.x, then execute the following command to create a Vue3 project:
npm create vite@latest my-vue-app --template vue
If your npm version is 7, then execute the following command to create a Vue3 project:
npm create vite@latest my-vue-app -- --template vue
After the Vue project is successfully created, there is no router or anything, and we need to install it ourselves. I won’t go into details about this routine operation.
2.1 Traditional writing method
Now let me give a simple example. For example, there is a button on the MyVue01 page. After clicking it, you can jump to the MyVue02 page. Then our click event It can be written as follows:
<script setup>
import {useRouter} from 'vue-router';
const router = useRouter();
function go() {
router.push("/my02");
}
</script>First we need to import the useRouter function from vue-router, then call this function to get the router object, and then call the push method in the router to complete the page jump. .
In the past, in Vue2, we usually obtained the router object through this.$router, and then used the router object to implement page navigation operations. But in Vue3, there is no this, but Vue3 provides a getCurrentInstance method to get the current Vue instance, so when the page jumps, we can also write it in the following way:
<script setup>
import {getCurrentInstance} from 'vue';
const {proxy} = getCurrentInstance();
function go() {
proxy.$router.push("/my02");
}
</script>The proxy here is Similar to this in previous Vue2.
Brother Song is taking router as an example to demonstrate to you. If it is Vuex/Pinia, there are similar writing methods, so I will not demonstrate them one by one.
Before using the above writing method, you must first import a function. However, although we have imports in the front-end code of the TienChin project, there are no imports in the two examples above. What's going on?
This is done with the help of an automatic import tool.
2.2 Automatic import
There is a tool plug-in on the front end called unplugin-auto-import. Through this plug-in, some methods can be automatically imported. The steps to use this method are as follows:
(1) Install the plug-in:
npm i unplugin-auto-import -D
Since this plug-in is just a development auxiliary tool, add the -D parameter when installing, and it will be installed In devDependencies.
(2) Configure the plug-in:
The plug-in configuration is configured in the vite.config.js file in the project root directory. The content is as follows:
import {defineConfig} from 'vite'
import vue from '@vitejs/plugin-vue'
import AutoImport from 'unplugin-auto-import/vite'

// https://vitejs.dev/config/
export default defineConfig({
    plugins: [vue(), AutoImport({
        // 可以自定义文件生成的位置,默认是根目录下,使用ts的建议放src目录下
        // dts: 'src/auto-imports.d.ts',
        imports: ['vue','vue-router']
    })]
})
small Friends, pay attention to the commented out code. After this plug-in is configured, start the project and by default a file will be generated at node_modules/unplugin-auto-import/auto-imports.d.ts. However, you can modify the generated file by configuring the dts attribute. Location.
imports refers to the methods that need to be automatically imported. Taking the two cases in our previous article as an example, useRouter is a method in vue-router, and the getCurrentInstance method is in vue, so I chose vue and vue-router to import here. Of course, my friends are still developing. If necessary, you can also import Vuex/Pinia, etc.
After configuring the plug-in, when we need to use the above methods again, we do not need to import them, just use them directly:
<script setup>

    const {proxy} = getCurrentInstance();

    function go() {
        proxy.$router.push("/my02");
    }
</script>
useRouter does not need to be imported.
<script setup>
    const router = useRouter();
    function go() {
        router.push("/my02");
    }
</script>
以后,凡是 vue 和 vue-router 中的方法都是不需要导入就可以使用了,其他组件中的方法则还是跟以前一样,必须导入之后才可以使用。
3. 组件去后缀
以前在 Vue2 中,我们导入组件的时候,可能都习惯省略 .vue 后缀,毕竟用 WebStorm 开发的时候,系统自动导入的时候也会帮我们省略掉这个后缀,写法类似下面这样:
import MyVue01 from "../views/MyVue01";
import MyVue02 from "../views/MyVue02";
但是现在在 Vite 中,如果还是这样写就会报错,类似下面这样:
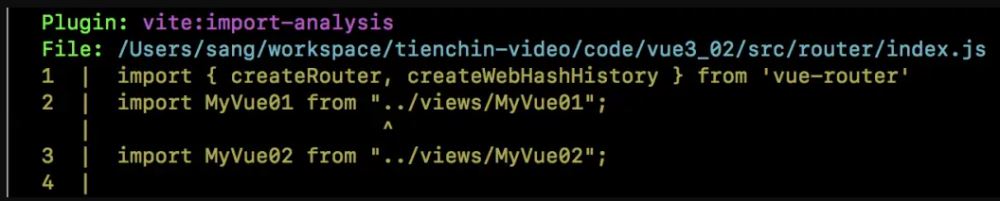
现在必须要写后缀了,但是有的人就是不习惯写后缀,那怎么办?我们可以在 vite.config.js 中添加如下配置,这样就可以不用写 .vue、.js 等后缀了。
import {defineConfig} from 'vite'
import vue from '@vitejs/plugin-vue'
import AutoImport from 'unplugin-auto-import/vite'
// https://vitejs.dev/config/
export default defineConfig({
    plugins: [vue(), AutoImport({
        // 可以自定义文件生成的位置,默认是根目录下,使用ts的建议放src目录下
        // dts: 'src/auto-imports.d.ts',
        imports: ['vue','vue-router']
    })],
    resolve: {
        extensions: ['.js', '.ts', '.jsx', '.tsx', '.json', '.vue']
    }
})
好了,现在大家明白了为什么 TienChin 项目前端都不写 .vue 了吧。
4. name 属性问题
以前在 Vue2 中,我们可以通过如下方式给一个 Vue 组件设置名称:
<script>
    export default {
        name: "MyVue03",
        mounted() {
            console.log("MyVue03")
        }
    }
</script>
在 Vue3 中,我们如果将 setup 写到 script 节点中的话,就没法定义 name 了,如果还需要使用 name 属性的话,那么可以再定义一个 script 节点,专门用来配置 name 属性,如下:
<script setup>
import {useRouter} from 'vue-router';
const router = useRouter();
function go() {
router.push("/my02");
}
</script>
<script>
export default {
name: "JavaboyVue"
}
</script>提示,我们在调试页面中,就可以看到自定义的组件名了:
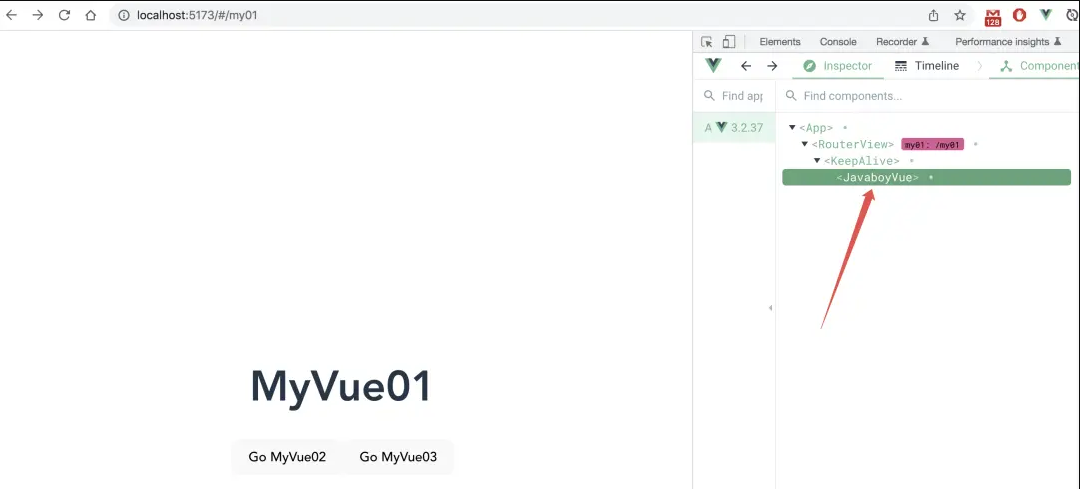
不过这种写法多多少还是有点费事。
通过 vite-plugin-vue-setup-extend 插件可以简化在 Vue3 中设置 name 属性,安装该插件之后,我们就可以直接在 script 节点中定义 name 属性的值了,安装方式如下:
npm install vite-plugin-vue-setup-extend -D
装好之后,在 vite.config.js 中再进行配置一下,如下:
import {defineConfig} from 'vite'
import vue from '@vitejs/plugin-vue'
import AutoImport from 'unplugin-auto-import/vite'
import VueSetupExtend from 'vite-plugin-vue-setup-extend'

// https://vitejs.dev/config/
export default defineConfig({
    plugins: [
        vue(),
        AutoImport({
            // 可以自定义文件生成的位置,默认是根目录下,使用ts的建议放src目录下
            // dts: 'src/auto-imports.d.ts',
            imports: ['vue', 'vue-router']
        }),
        VueSetupExtend()
    ],
    resolve: {
        extensions: ['.js', '.ts', '.jsx', '.tsx', '.json', '.vue']
    }
})
VueSetupExtend 就是 vite-plugin-vue-setup-extend 插件的配置。
配置完成后,我们就可以通过如下方式来定义 name 属性了:
<script setup name="JavaboyVue">
import {useRouter} from 'vue-router';
const router = useRouter();
function go() {
router.push("/my02");
}
</script>The above is the detailed content of Analysis of plug-ins and configuration examples in Vue3. For more information, please follow other related articles on the PHP Chinese website!
Related articles
See more- About vue using validator: VeeValidate3
- What are the differences between computed and method in Vue?
- Introduction to the method of turning off Eslint verification in the vue project
- Introduction to several methods of defining component templates in Vue.js
- Four places to implement AJAX in Vue applications