Home >Operation and Maintenance >Nginx >How to install nginx server and load balancing configuration in CentOS6.5 environment
How to install nginx server and load balancing configuration in CentOS6.5 environment
- 王林forward
- 2023-05-14 19:40:04931browse
1、下载pcre, 是一个用c语言编写的正则表达式函数库
[root@localhost pcre-8.36]# cd /tmp/download/
[root@localhost download]# wget http://nchc.dl.sourceforge.net/project/pcre/pcre/8.37/pcre-8.37.tar.gz
[root@localhost download]# tar zxvf pcre-8.36.tar.gz
2、下载zlib库
[root@localhost pcre-8.36]# cd /tmp/download/
[root@localhost download]# wget http://ncu.dl.sourceforge.net/project/libpng/zlib/1.2.8/zlib-1.2.8.tar.gz
[root@localhost download]# tar -zxvf zlib-1.2.8.tar.gz cd zlib-1.2.8
4、下载ssl
[root@localhost zlib-1.2.8]# cd ..
[root@localhost download]# wget http://www.openssl.org/source/openssl-1.0.1p.tar.gz
[root@localhost download]# cd openssl-1.0.1c
[root@localhost openssl-1.0.1c]# tar -zxvf openssl-1.0.1c.tar.gz
5、下载nginx
[root@localhost download]# wget http://nginx.org/download/nginx-1.2.8.tar.gz
[root@localhost download]# tar -zxvf nginx-1.2.8.tar.gz
6、安装
[root@localhost download]mv pcre-8.36 /usr/local/
[root@localhost download]mv zlib-1.2.8 /usr/local/
[root@localhost download]mv openssl-1.0.1c /usr/local/
[root@localhost download]mv nginx-1.2.8 /usr/local/
[root@localhost download]cd /usr/local/
[root@localhost local]# cd pcre-8.36
[root@localhost pcre-8.36]# ./configure&&make&&make install
[root@localhost pcre-8.36] cd ../zlib-1.2.8
[root@localhost zlib-1.2.8]# ./configure && make && make install
[root@localhost zlib-1.2.8]# cd ../openssl-1.0.1c
[root@localhost openssl-1.0.1c]# ./config && make && make install
[root@localhost openssl-1.0.1c]# cd ../nginx-1.2.8
[root@localhost nginx-1.2.8]# ./configure --prefix=/usr/local/nginx && make && make install
7、启动nginx
[root@localhost nginx]# /usr/local/nginx/sbin/nginx -c /usr/local/nginx/conf/nginx.conf
8、测试
在确保可以连接到服务器的电脑上,浏览器输入装了nginx的机器的ip地址,会看到welcome to nginx!的提示说明安装配配置成功了。

9、设置开机自动启动(shell脚本处理)
[root@localhost logs]# vi /etc/init.d/nginx
添加以下shell脚本。
#!/bin/bash
# nginx startup script for the nginx http server
# it is v.0.0.2 version.
# chkconfig: - 85 15
# description: nginx is a high-performance web and proxy server.
#       it has a lot of features, but it's not for everyone.
# processname: nginx
# pidfile: /var/run/nginx.pid
# config: /usr/local/nginx/conf/nginx.conf
nginxd=/usr/local/nginx/sbin/nginx
nginx_config=/usr/local/nginx/conf/nginx.conf
nginx_pid=/var/run/nginx.pid
retval=0
prog="nginx"
# source function library.
. /etc/rc.d/init.d/functions
# source networking configuration.
. /etc/sysconfig/network
# check that networking is up.
[ ${networking} = "no" ] && exit 0
[ -x $nginxd ] || exit 0
# start nginx daemons functions.
start() {
if [ -e $nginx_pid ];then
  echo "nginx already running...."
  exit 1
fi
  echo -n $"starting $prog: "
  daemon $nginxd -c ${nginx_config}
  retval=$?
  echo
  [ $retval = 0 ] && touch /var/lock/subsys/nginx
  return $retval
}
# stop nginx daemons functions.
stop() {
    echo -n $"stopping $prog: "
    killproc $nginxd
    retval=$?
    echo
    [ $retval = 0 ] && rm -f /var/lock/subsys/nginx /var/run/nginx.pid
}
# reload nginx service functions.
reload() {
  echo -n $"reloading $prog: "
  #kill -hup `cat ${nginx_pid}`
  killproc $nginxd -hup
  retval=$?
  echo
}
# see how we were called.
case "$1" in
start)
    start
    ;;
stop)
    stop
    ;;
reload)
    reload
    ;;
restart)
    stop
    start
    ;;
status)
    status $prog
    retval=$?
    ;;
*)
    echo $"usage: $prog {start|stop|restart|reload|status|help}"
    exit 1
esac
exit $retval
保存后,设置权限让所有人可以操作。
[root@localhost ~]# chmod a+x /etc/init.d/nginx
[root@localhost logs]# /etc/init.d/nginx status
nginx (pid 2417 2416) is running...
[root@localhost logs]# /etc/init.d/nginx stop
stopping nginx: [ ok ]
[root@localhost logs]# /etc/init.d/nginx start
starting nginx: [ ok ]
[root@localhost logs]# /etc/init.d/nginx status
nginx (pid 2454 2452) is running...
[root@localhost ~]# vi /etc/rc.local
添加:
/etc/init.d/nginx start
重启电脑就会生效。
注意:脚本里面关于启动目录的,如果你的安装地址不一样,要进行修改。
负载均衡配置:
现有两部服务器:
192.168.137.197 (按照以上操作安装有nginx,作为转发机,虚拟机)
192.168.137.33 (无安装nginx,运行有测试用的web工程,虚拟机)
10.10.33.59 (无安装nginx,运行有测试用的web工程,本地电脑地址)
,运行有测试用的web工程
127.0.0.1 web_app
[root@a conf]# vi /usr/local/nginx/conf/nginx.conf
配置如下展示:
worker_processes 8;
pid /usr/local/nginx/nginx.pid;
worker_rlimit_nofile 102400;
events
{
use epoll;
worker_connections 102400;
}
http
{
 include    mime.types;
 default_type application/octet-stream;
 fastcgi_intercept_errors on;
 charset utf-8;
 server_names_hash_bucket_size 128;
 client_header_buffer_size 4k;
 large_client_header_buffers 4 32k;
 client_max_body_size 300m;
 sendfile on;
 tcp_nopush   on;
 keepalive_timeout 60;
 tcp_nodelay on;
 client_body_buffer_size 512k;
 proxy_connect_timeout  5;
 proxy_read_timeout    60;
 proxy_send_timeout    5;
 proxy_buffer_size    16k;
 proxy_buffers      4 64k;
 proxy_busy_buffers_size 128k;
 proxy_temp_file_write_size 128k;
 gzip on;
 gzip_min_length 1k;
 gzip_buffers   4 16k;
 gzip_http_version 1.1;
 gzip_comp_level 2;
 gzip_types    text/plain application/x-javascript text/css application/xml;
 gzip_vary on;
###2012-12-19 change nginx logs
log_format main '$http_x_forwarded_for - $remote_user [$time_local] "$request" '
       '$status $body_bytes_sent "$http_referer" '
       '"$http_user_agent" $request_time $remote_addr';
upstream web_app {
server 192.168.137.197:8080 weight=1 max_fails=2 fail_timeout=30s;
server 192.168.137.33:8080 weight=1 max_fails=2 fail_timeout=30s;
server 10.10.33.59:8080 weight=1 max_fails=2 fail_timeout=30s;
}
####chinaapp.sinaapp.com
server {
  listen 80;
  server_name chinaapp.sinaapp.com;
  index index.jsp index.html index.htm;
  #发布目录/data/www
  root /data/www;
  location /
  {
  proxy_next_upstream http_502 http_504 error timeout invalid_header;
  proxy_set_header host $host;
  proxy_set_header x-real-ip $remote_addr;
  proxy_set_header x-forwarded-for $proxy_add_x_forwarded_for;
  proxy_pass http://web_app;
  expires   3d;
  }
 }
}
设置host:
[root@a conf]# vi /etc/hosts
添加hosts:
127.0.0.1 web_app
启动nginx
[root@localhost nginx]# /usr/local/nginx/sbin/nginx -c /usr/local/nginx/conf/nginx.conf
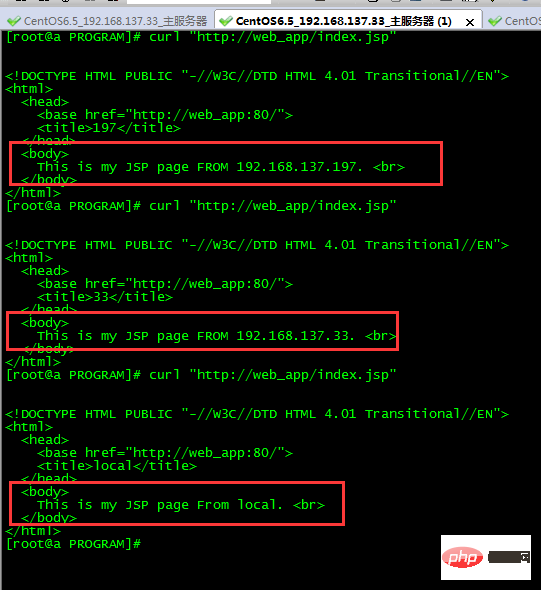
启动三部服务器的web应用:
在192.168.137.197执行指令:
[root@a program]# curl "http://web_app/index.jsp"
测试结果如下:

常见问题及解决办法:
1、安装pcre时提示configure: error: you need a c++ compiler for c++ support.
原因是没有安装c++编译器,采用下面的命令安装:
[root@localhost pcre-8.37]# yum install -y gcc gcc-c++
2、启动nginx失败
[root@localhost nginx]# /usr/local/nginx/sbin/nginx -c /usr/local/nginx/conf/nginx.conf
/usr/local/nginx/sbin/nginx: error while loading shared libraries: libpcre.so.1: cannot open shared object file: no such file or directory
原因是64bit的系统,但是默认取了/usr/local/lib里面的包
检查方法:
[root@localhost nginx]# cd /usr/local/
[root@localhost local]# ls /lib64/ |grep pcre
libpcre.so.0
libpcre.so.0.0.1
[root@localhost local]# ls /lib/ |grep pcre
说明缺失的包在lib64
设置软连接来解决:
[root@localhost local]# ln -s /lib64/libpcre.so.0.0.1 /lib64/libpcre.so.1
[root@localhost local]# cd nginx
[root@localhost nginx]# /usr/local/nginx/sbin/nginx -c /usr/local/nginx/conf/nginx.conf
3、启动报错:
报错:nginx: [emerg] bind() to 0.0.0.0:80 failed (98: address already in use)
解决办法:sudo fuser -k 80/tcp
端口被占用,关闭占用端口
The above is the detailed content of How to install nginx server and load balancing configuration in CentOS6.5 environment. For more information, please follow other related articles on the PHP Chinese website!

