Home >Java >javaTutorial >How to use Swagger in springboot project
How to use Swagger in springboot project
- 王林forward
- 2023-05-13 08:28:121896browse
1. What is Swagger
Swagger is a web service used to generate, describe and call RESTful interfaces. In layman's terms, Swagger is a service that displays all the interfaces in the project (that you want to expose) on the page and allows interface calling and testing.
2. What is Swagger used for?
Swagger has the following three important functions: display all interfaces in the project on the page, so that back-end programmers do not need to write special interface documents for front-end users; when the interface is updated, You only need to modify the Swagger description in the code to generate a new interface document in real time, thus avoiding the problem of the interface document being old and unusable; through the Swagger page, we can directly call the interface to facilitate our development.
3. How to introduce Swagger in springboot
1) Depend on
        <dependency>
            <groupId>io.springfox</groupId>
            <artifactId>springfox-swagger2</artifactId>
            <version>2.9.2</version>
        </dependency>

        <dependency>
            <groupId>io.springfox</groupId>
            <artifactId>springfox-swagger-ui</artifactId>
            <version>2.9.2</version>
        </dependency>
2) Create a controller class
import org.springframework.web.bind.annotation.PostMapping;
import org.springframework.web.bind.annotation.RestController;

@RestController
public class TestController {

    @PostMapping("/hello")
    public String hello(String str){
        return "hello,"+str;
    }
}
3) Create a Swagger Configuration class SwaggerConfig class
@Configuration
@EnableSwagger2//开始Swagger2
public class SwaggerConfig {


    //配置了Swagger 的Docket的bean实例
    @Bean
    public Docket docket(){

        ParameterBuilder ticketPar = new ParameterBuilder();
        List<Parameter> pars = new ArrayList<>();
        ticketPar.name("Authorization").description("token")//Token 以及Authorization 为自定义的参数,session保存的名字是哪个就可以写成那个
                .modelRef(new ModelRef("string")).parameterType("header")
                .required(false).build(); //header中的ticket参数非必填,传空也可以
        pars.add(ticketPar.build());    //根据每个方法名也知道当前方法在设置什么参数

        return new Docket(DocumentationType.SPRING_WEB)
                .apiInfo(apiInfo())
                .select()
                //RequestHandlerSelectors, 配置要扫描接口的方式
                //basePackage:指定要扫描的包
                //any():扫描全部
                //withClassAnnotation: 扫描类上的注解
                //withMethodAnnotation: 扫描方法上的注解
                .apis(RequestHandlerSelectors.basePackage("com.example.swagger.controller"))
                .build()
                .globalOperationParameters(pars);
    }

    //配置Swagger 信息=apiInfo
    private ApiInfo apiInfo(){
        return new ApiInfo(
                "Logistics Api",//文檔命名
                "test",//文檔描述
                "v1.0",//
                "http:127.0.0.1/",
                null,//contact
                "Apache 2.0",
                "http://www.apache.org/licenses/LICENSE-2.0",
                new ArrayList()
        );
    }
}
Attention!
Notice!
Notice!
Write the
"com.example.swagger.controller" path in apis(RequestHandlerSelectors.basePackage("com.example.swagger.controller")) as the path of your own controller package
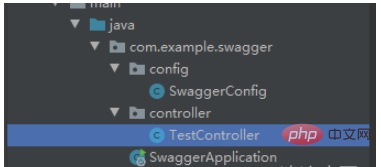
4. The overall structure of the project

#5. Access the webpage through the URL
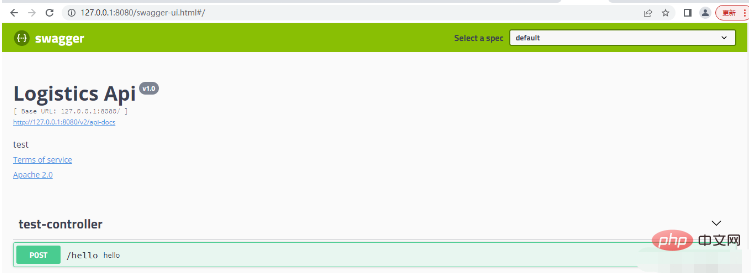
After completing the above steps, click Run and wait until the operation is completed. Then visit the following URL in the browser:
http://127.0.0.1:8080/swagger-ui.html#/
The port here should be changed to your own port.
The effect is as shown in the picture
 ##
##
The above is the detailed content of How to use Swagger in springboot project. For more information, please follow other related articles on the PHP Chinese website!

