Home >Common Problem >How to disable updates on Windows 11
How to disable updates on Windows 11
- 王林forward
- 2023-05-12 13:01:176482browse
Windows updates can be annoying with constant pop-ups and restarts. Additionally, if you are the one who bypasses Windows 11 requirements, then they may break your settings as well. For all these reasons and more, you may want to disable Windows Updates on your system. Here's how you can get started and all your options for disabling Windows Updates.
What happens when updates are disabled?
When you disable updates on Windows 11, depending on your settings, you will stop receiving updates for the following Windows and hardware components.
- Windows Security Updates
- Windows Feature Updates
- Windows Cumulative Updates
- System Driver Updates
- Hardware Specific Updates
- Updated universal drivers for USB and other peripherals
- OEM released updates (optional)
and more. While it’s recommended to keep updates enabled, here’s how to disable them on Windows 11.
How to disable updates on Windows 11
Follow the tutorial below to disable updates in Windows 11. We will first disable Windows updates and then disable updates for Microsoft products and Microsoft Store apps. let's start.
1. 7 Ways to Disable Windows Updates
Here’s how to disable Windows Updates on your system based on your preference. You can choose a temporary solution like pausing updates, or a more robust solution like using a GPO to disable Windows Updates. Use any of the following sections to help you through the process.
Method 1: Pause Updates
You can pause Windows Updates for a period of time from the Settings app. You can choose to pause updates for up to a week. Here's how you can get started with your system.
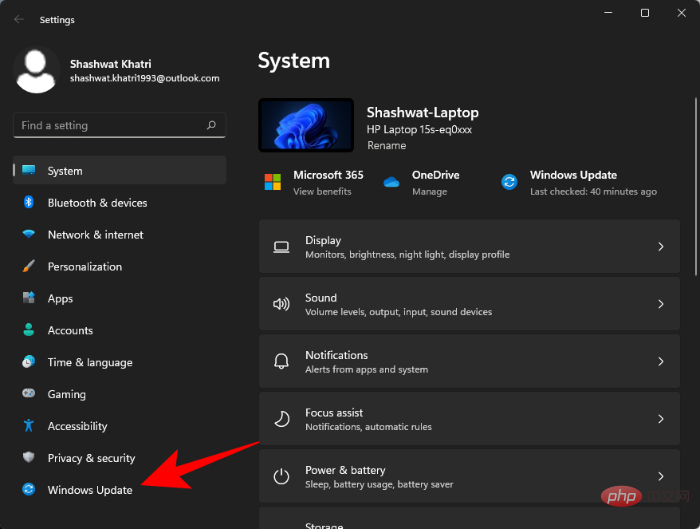
Press Windows ikeyboard and click Windows Update on the left.
Click Pause for 1 week.
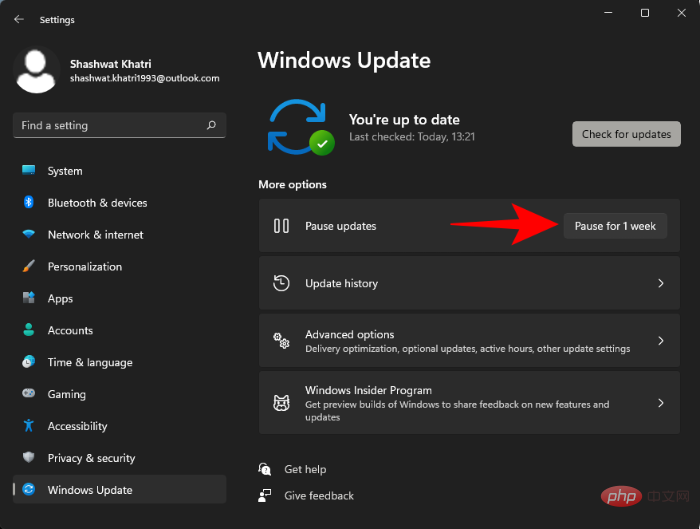
#Updates will now be paused on your system for one week.
Method 2: Disable the Windows Update Service
You can also disable the Windows Update Service on your system. This helps you circumvent time limits when using the Settings app to disable system updates. Use the tutorial below to help you through the process.
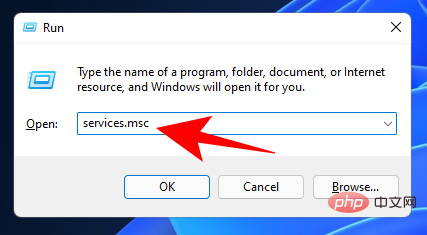
Press Windows R, enter the following, and then press Enter.
Run
Now, scroll down and double-click on Windows Update.
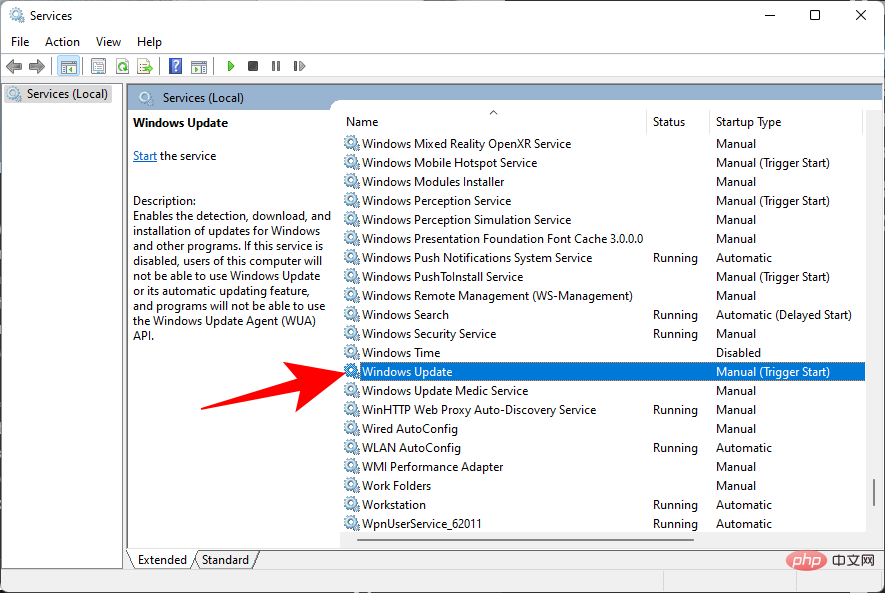
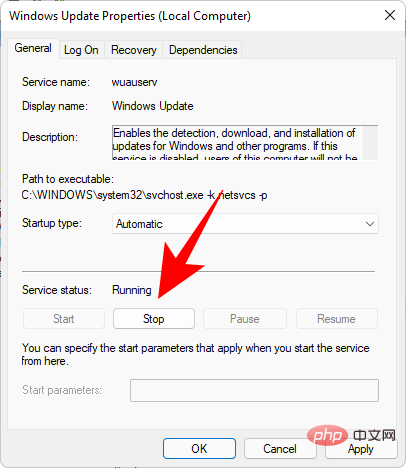
If it is running, click Stop.
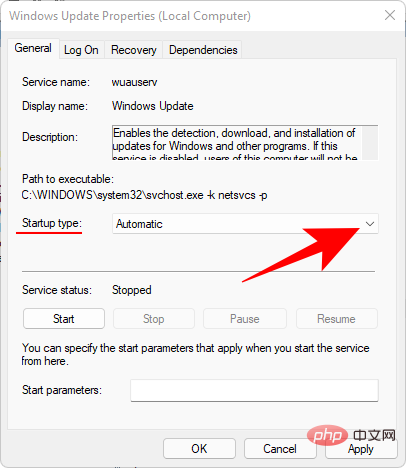
#Then click the drop-down menu next to Startup type.
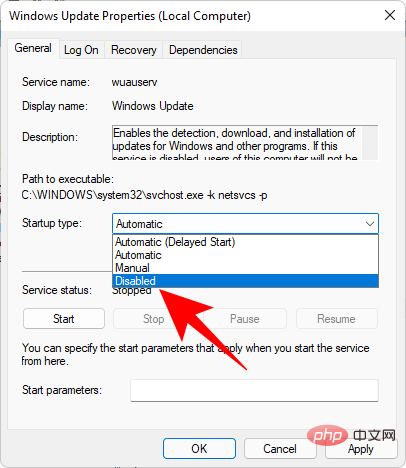
Select Disable.
Click OK.
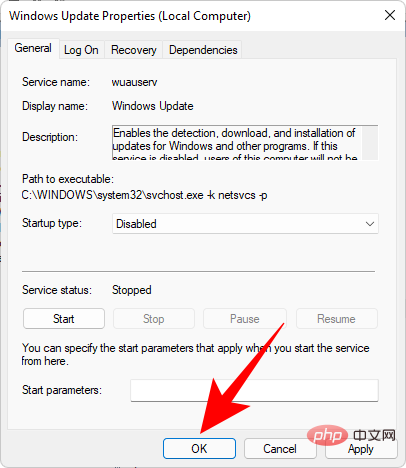
That's it! The Windows Update service will now be disabled on your system. We recommend that you restart your system and the changes should take effect after system startup.
Method 3: Use the Group Policy Editor (GPO)
If you are using Windows 11 Pro or later, you can use the Group Policy Editor or the GPO to disable the Windows updates. This is a very powerful enterprise-grade solution that even allows you to selectively receive updates on your system. Use the following tutorial to help you disable Windows Updates on your system using GPOs.
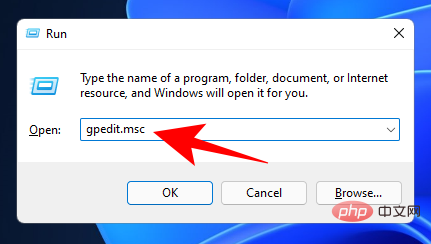
Press Windows R, enter the following, and then press Enter on the keyboard.
gpedit.msc
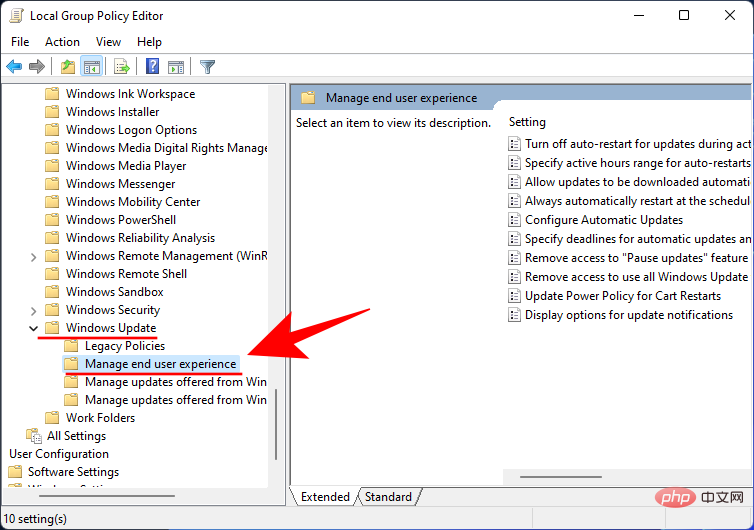
Use the left sidebar to navigate to the following path.
Computer Configuration > Administrative Templates > Windows Components > Windows Update > Manage end user experience
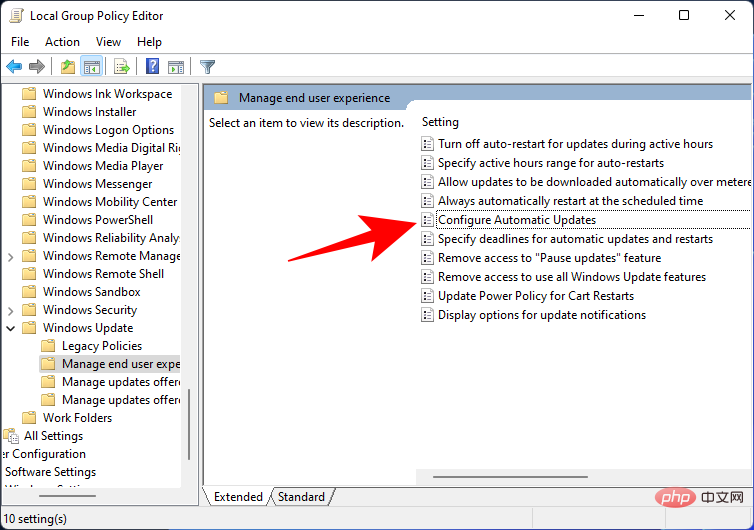
Configuring automatic updates.
To completely disable Windows Updates, select Disabled.
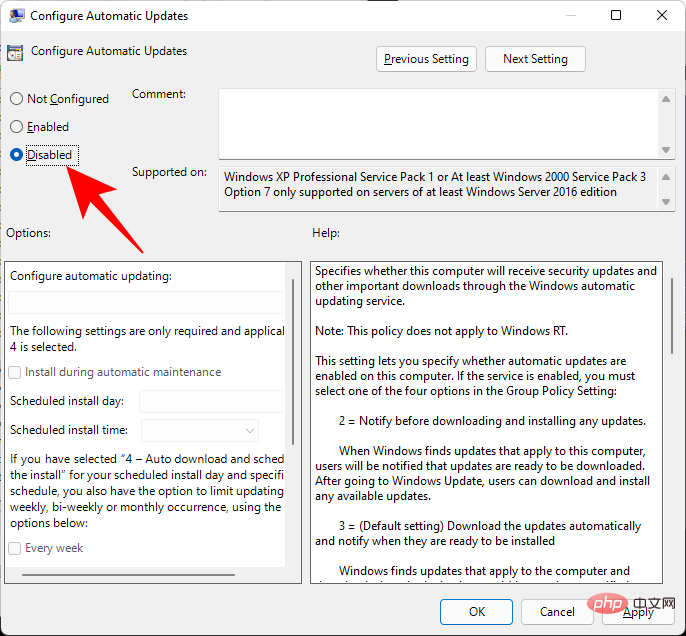
Then click OK.
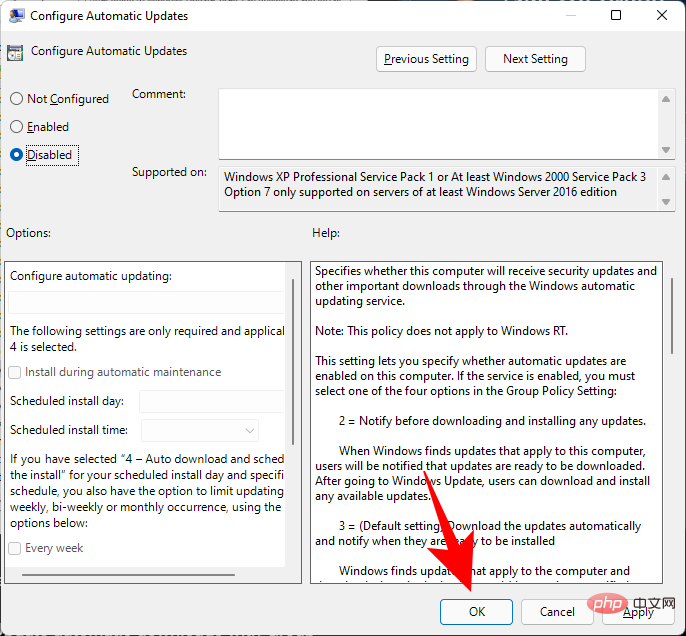
If you don’t want to completely disable Windows 11 updates, here’s how you can configure them.
Change to Configure automatic updates for Click Enable.
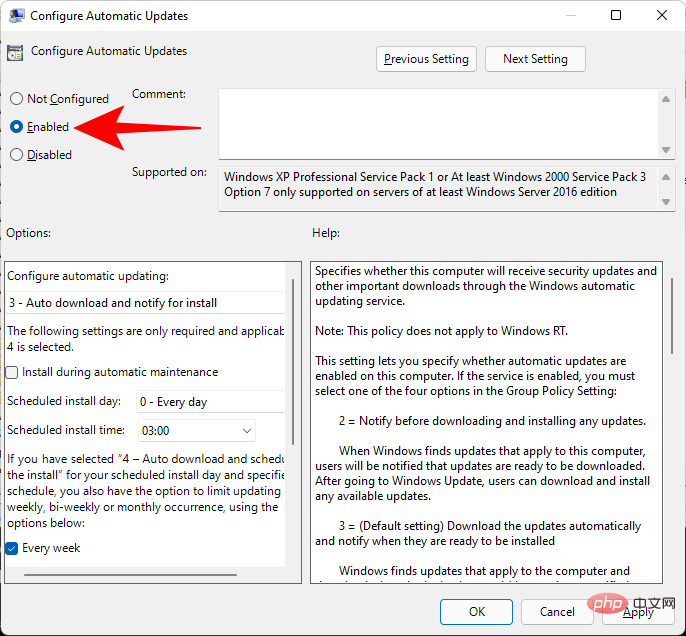
In the Options: section, click on the drop-down menu and select one of the following options as per your requirement.
- 2:Notification to download and automatic installation
- 3:Automatic download and notification to install
- 4: Automatically download and arrange installation
- 5:Allow local administrator to select settings
- 7:Allow download, notify installation, Notification to restart
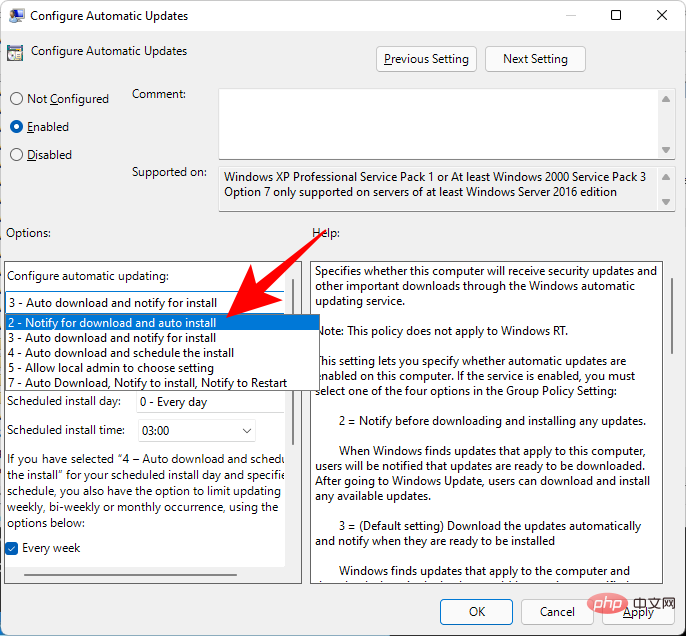
After selecting the Windows Update configuration, click OK.
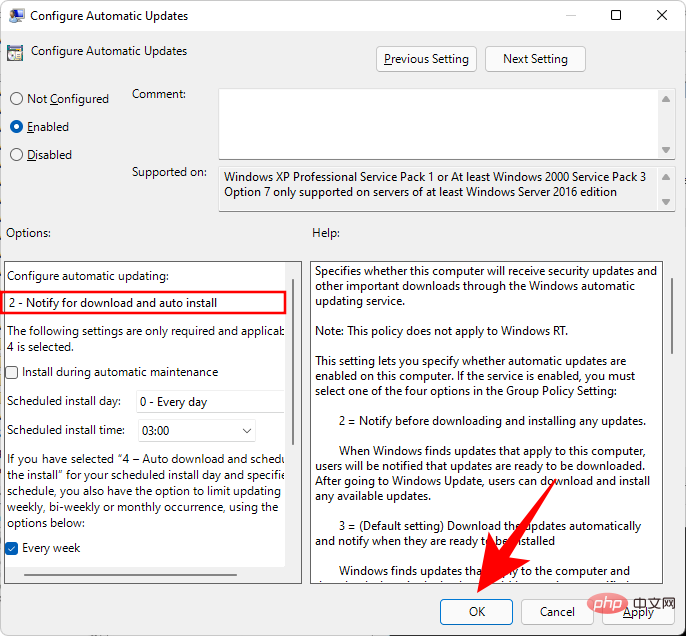
Restart your PC and the changes should now work as expected
Method 4: Use the Registry Editor
You can also Use Registry Editor to configure or disable Windows updates as per your requirement. This is an ideal solution for Windows 11 home users who currently don’t have access to the Group Policy Editor. Follow the following tutorial to help you configure Windows Update using Registry Editor.
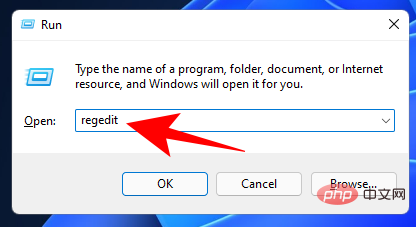
Press Windows R, enter the following, and then press Enter.
regedit
Navigate to the following key:
Computer\HKEY_LOCAL_MACHINE\SOFTWARE\Policies\ Microsoft\Windows
Alternatively, you can copy and paste the above into the address bar of Registry Editor and press Enter.

Right-click Windows and select New > Key.
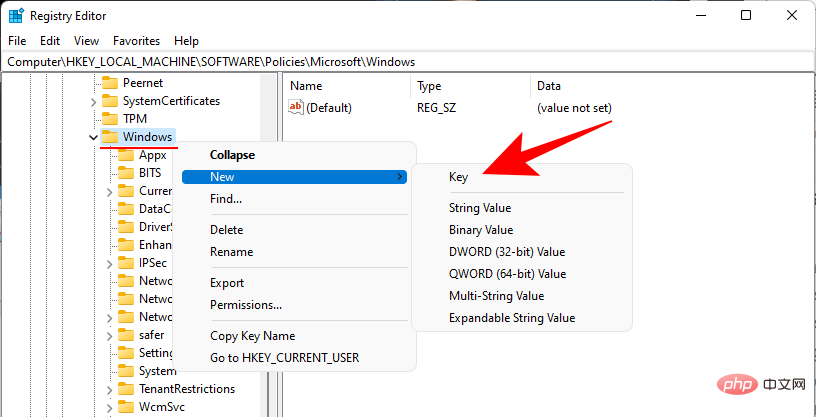
Name this key as WindowsUpdate and click Enter.
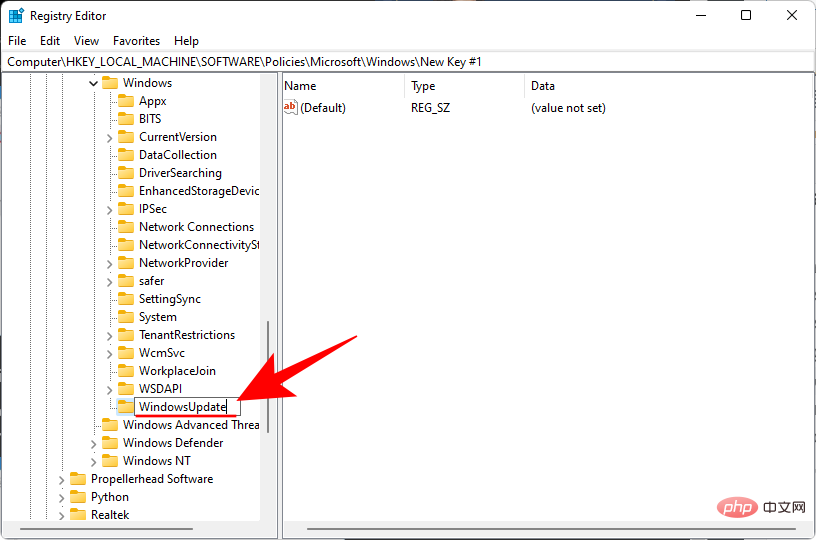
Now, right-click on the key and create a subkey via New > Key.
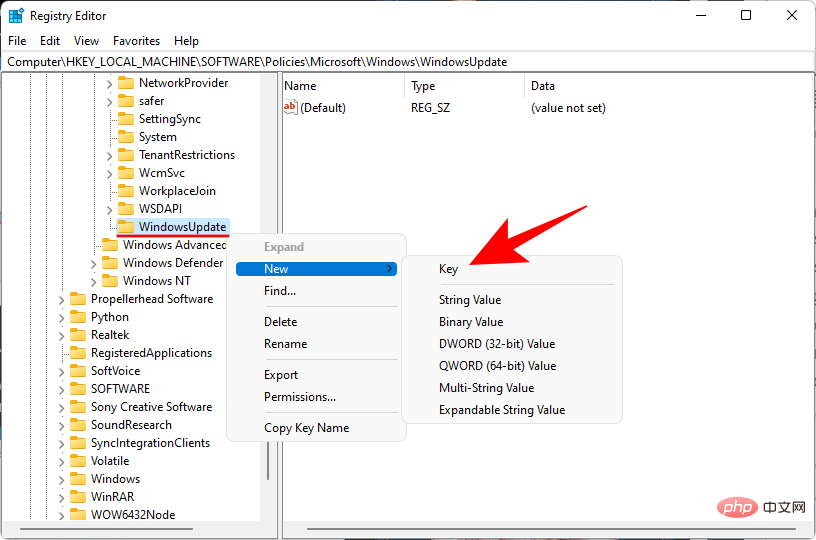
Name this key as AU.
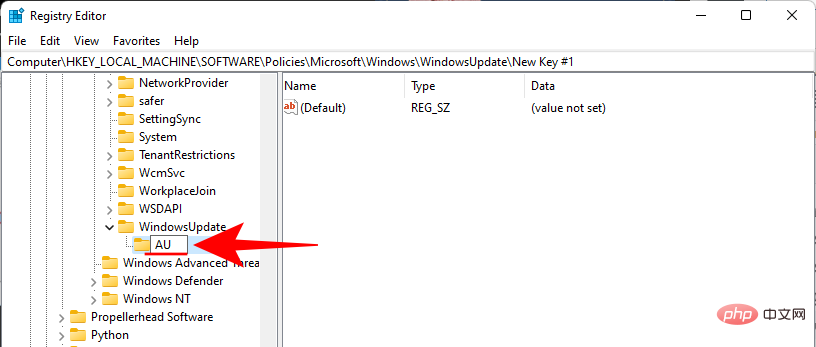
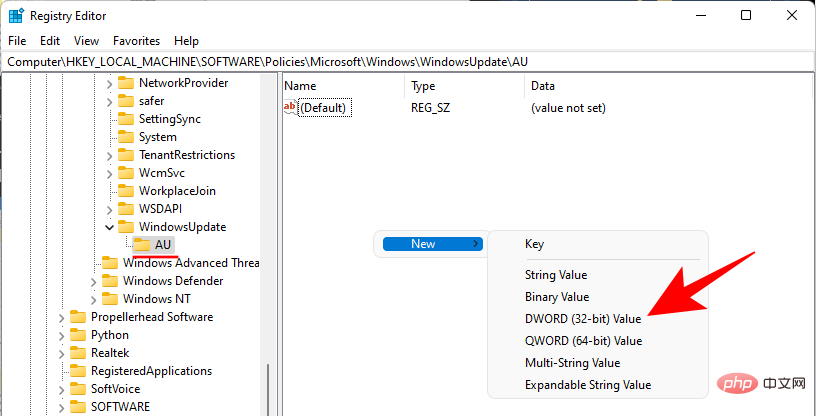
With the newly created AU key selected, right-click the space on the right and select New > DWORD (32-bit) Value.
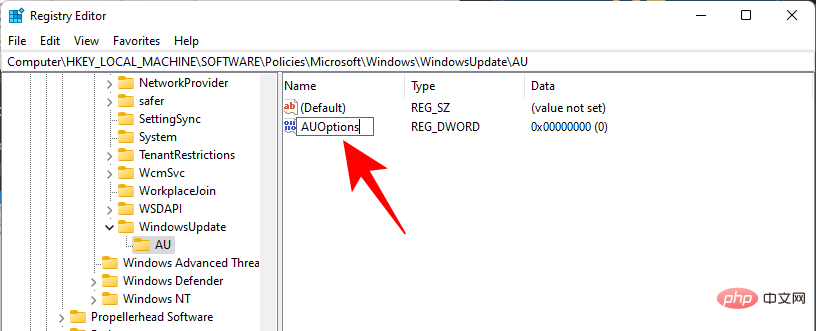
Name this key as AUOptions.
Double-click AUOptions and change its value to one of the following numbers, depending on your preferred configuration.
- 2:Notification to download and automatic installation
- 3:Automatic download and notification to install
- 4: Automatically download and arrange installation
- 5:Allow local administrator to select settings
- 7:Allow download, notify installation, Notification to restart
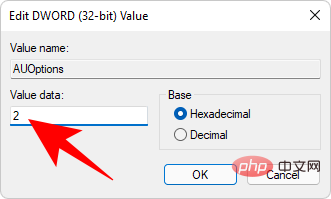
Click OK when completed. That's it! You will now use Registry Editor to disable Windows Updates.
Method 5: Use a metered connection
A metered connection will help limit Windows activity in the background. It also allows you to take advantage of Windows Update options and block updates indefinitely. Use the following tutorial to help you set it up on your PC.
Note: Due to their priority, Windows Security Updates are still allowed to be used on metered connections.
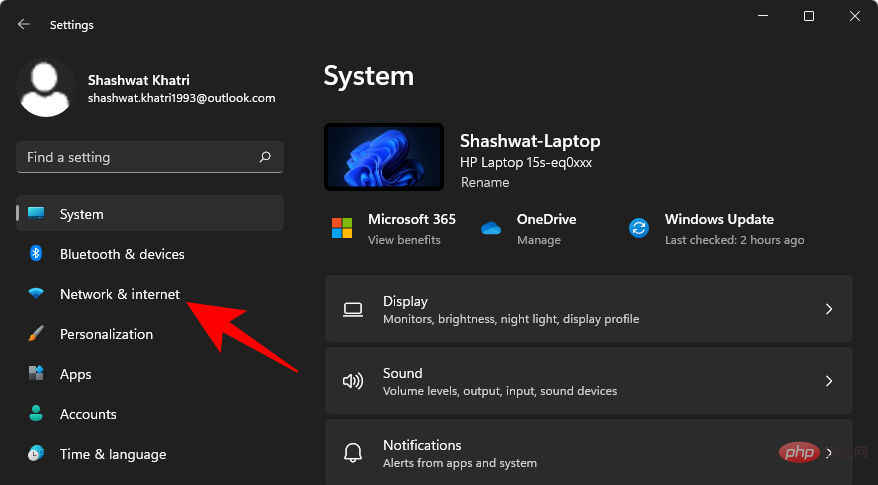
Press Windows i and click Network and Internet.
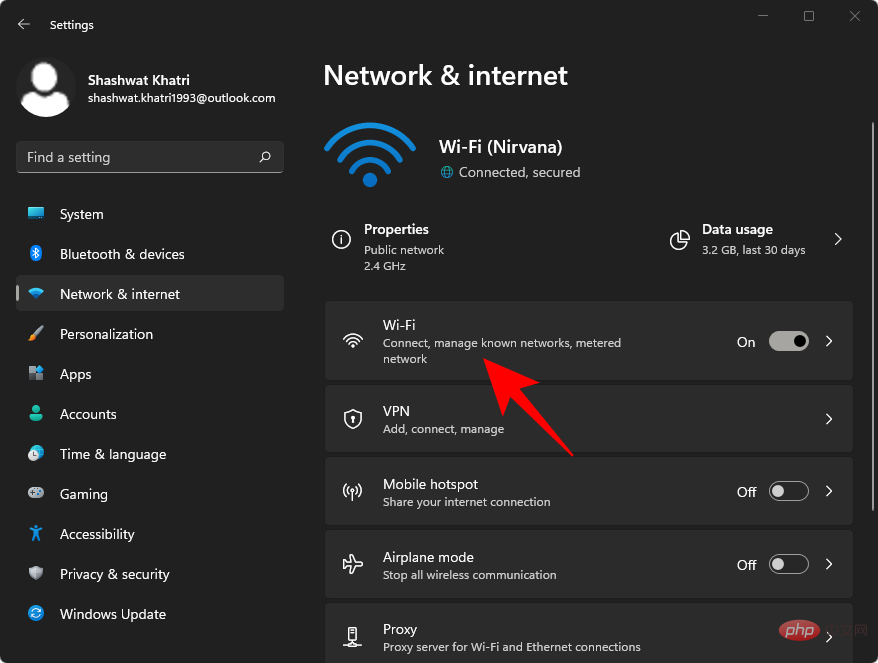
Click on Wireless Network.
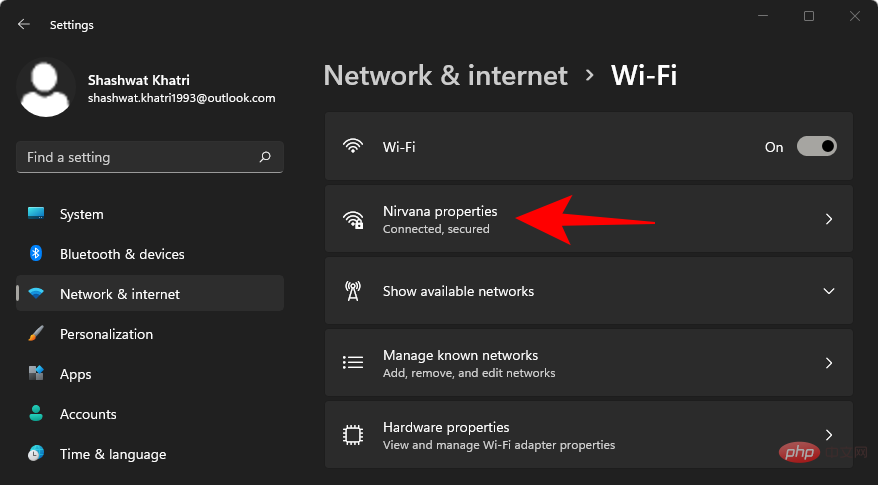
Select your Wi-Fi connection.
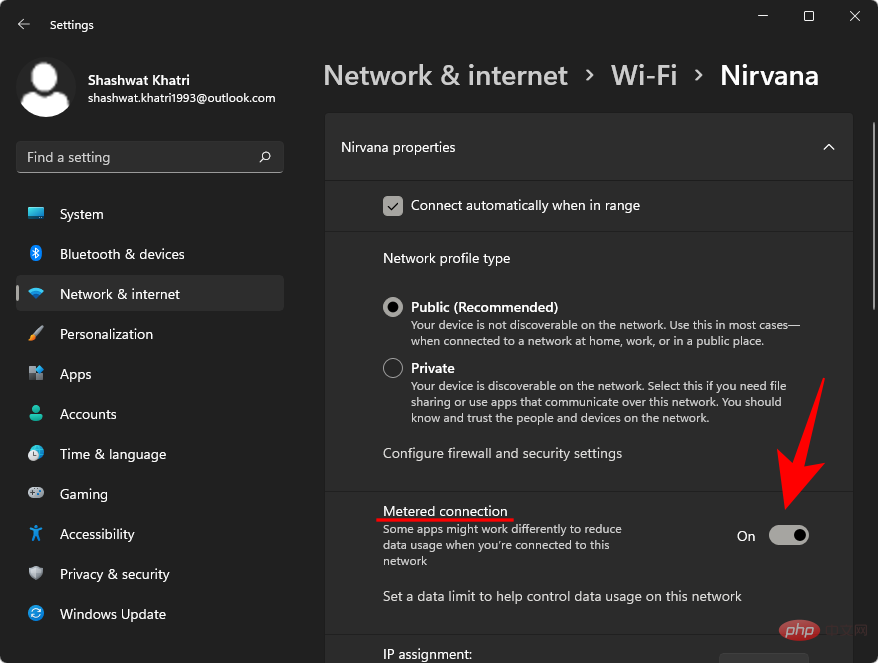
Turn on the switch of Metered connection.
Now click on Windows Update.
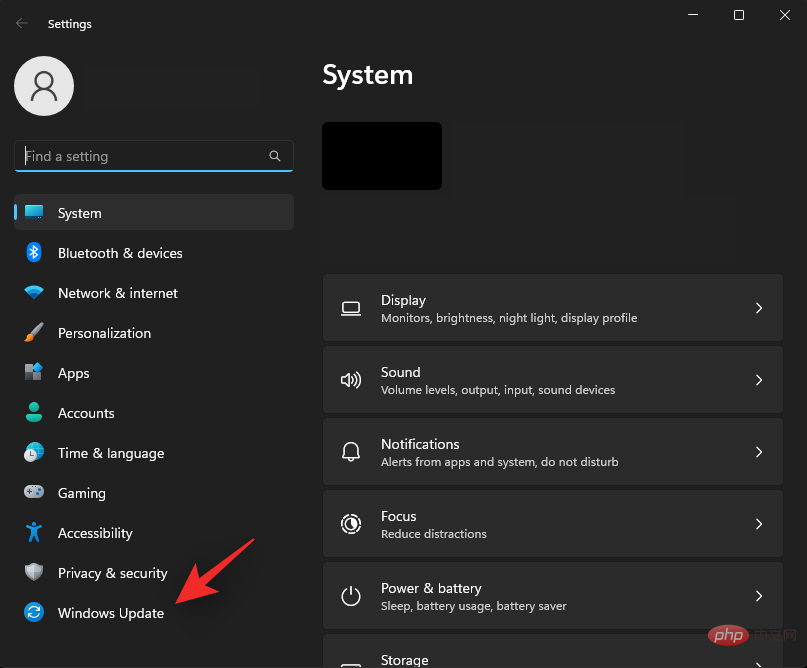
Click Advanced Options.
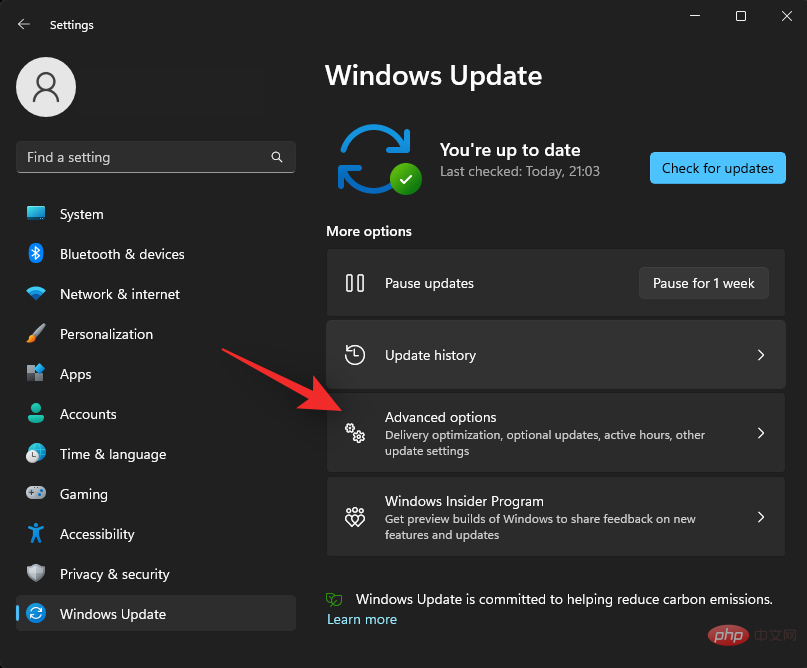
# Make sure to turn off the toggle for downloading updates over a metered connection.
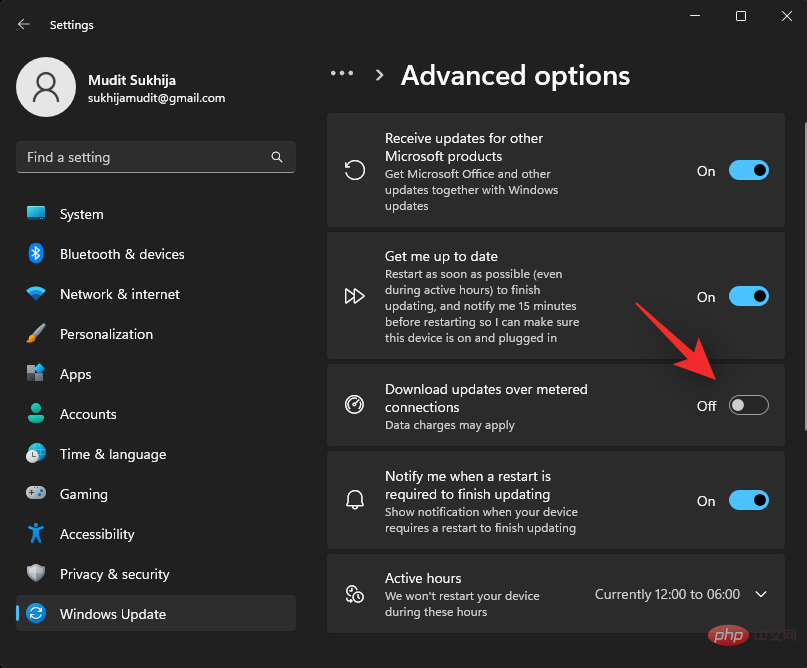
That's it! Windows will now respect your network settings and disable automatic updates on metered connections. Keep in mind that you will continue to receive updates over networks that are not yet set up as a metered connection on your PC.
Method 6: Hide updates
Microsoft has a Windows Update troubleshooting tool that lets you hide (or show) specific updates you don’t want installed while keeping everything else up to date.
This is the ideal solution if you are trying to avoid forced BIOS or driver updates issued by OEMs. You can also use this utility to periodically block future updates on your system to prevent them from updating. Please follow the steps below to help you through the process.
- Download wushowhide.diagcab
Download and run the tool linked above. Once opened, click Next.
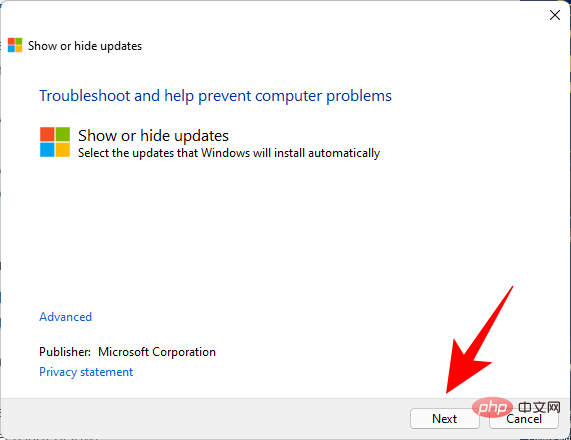
The tool will now find available and hidden updates for your system.
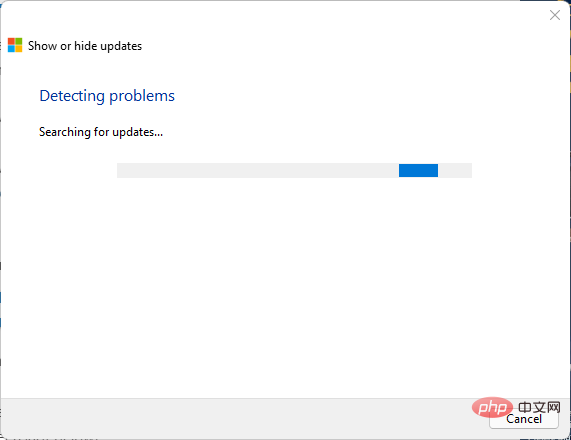
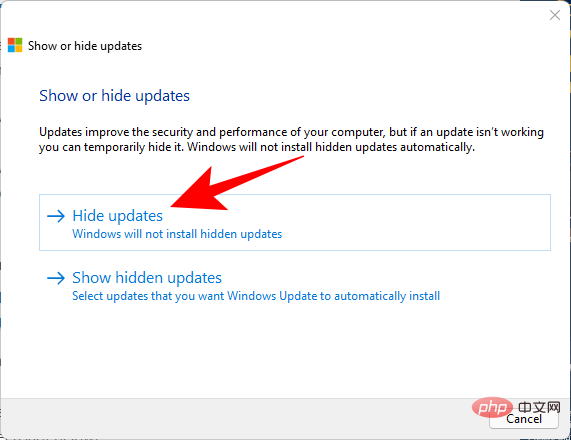
Click Hide updates.
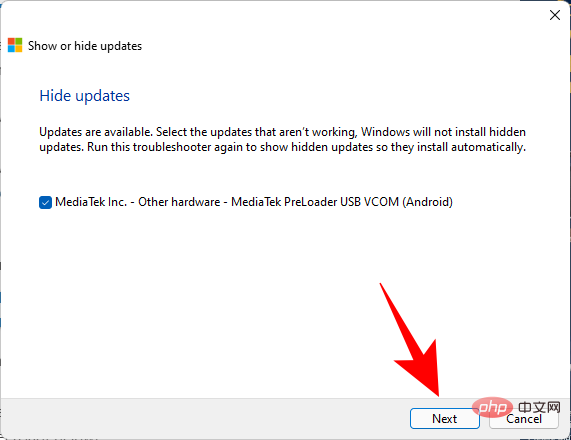
Now select the available updates you want to hide. These will be hidden and will not show up on your system unless you unhide them. Click Next.
After hiding the selected updates, click Close.
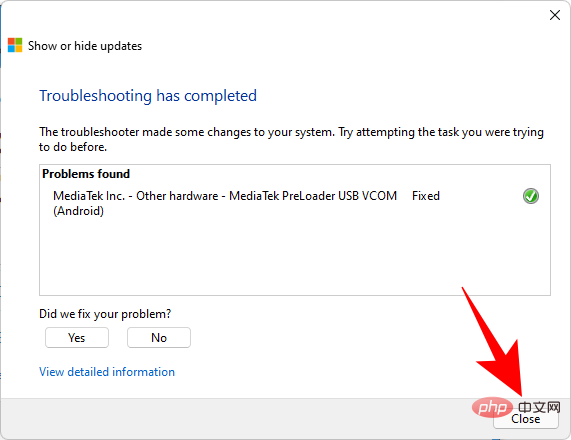
The selected updates will now be hidden from your system.
Method Seven: Use Third-Party Apps
There are plenty of apps that can help you disable Windows Updates on Windows 11. We recommend that you use Win Update Stop. Download the tool linked below and follow the next steps to help you through the process.
- Win Update Stop| Download Link
Run the application after downloading and click Disable.
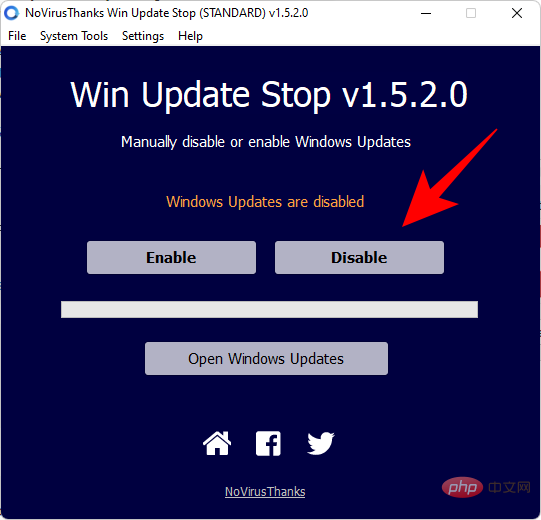
That's it! You will now use Win Update Stop to disable updates.
You can also choose a portable alternative such as Windows Update Blocker. Use the tutorial below to help you prevent identical updates from being used.
- Windows Update Blocker| Download Link
Download and extract the archive linked above. Run the included Windows Update Blocker application. Select to disable updates.
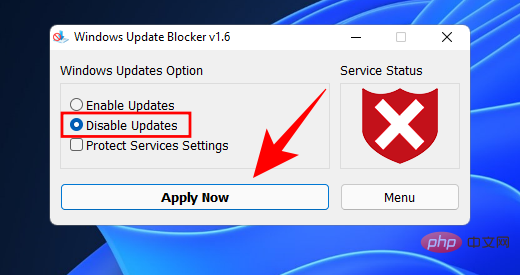
Click Apply now. That's it! Windows Update should now be disabled on your system.
2. Disable Microsoft Product Updates on Windows 11
Microsoft products such as Office, OneDrive, etc. receive updates through Windows Update. You can stop this behavior using the following tutorial.
Press Windows i and click Windows Update.
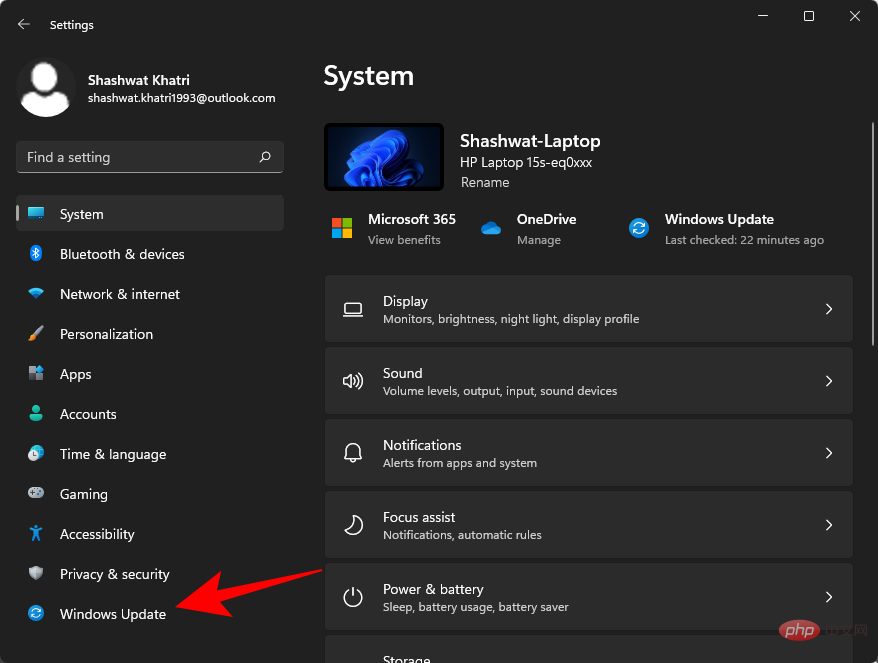
Click Advanced Options.
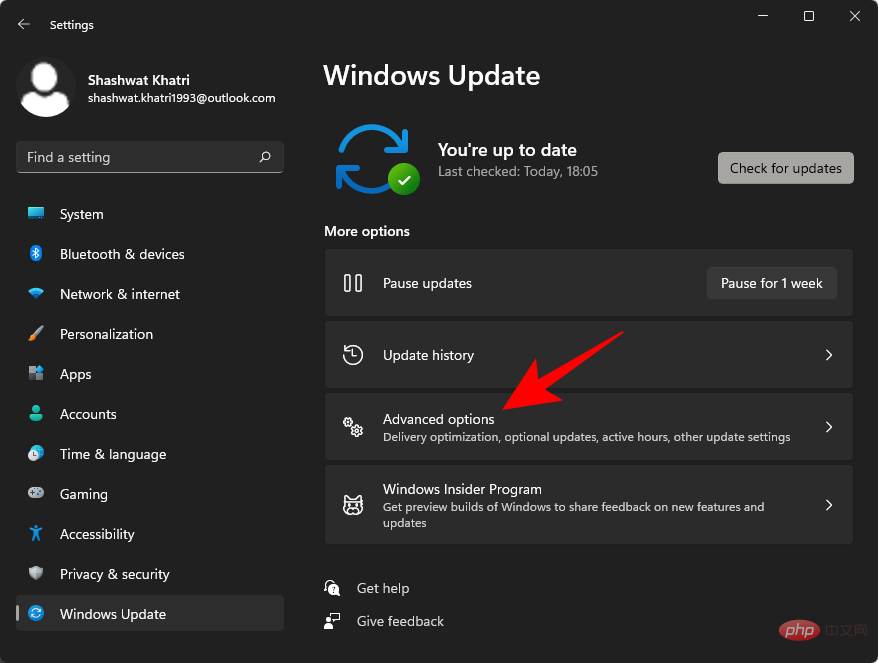
Turn off the toggle switch for Receive updates for other Microsoft products.
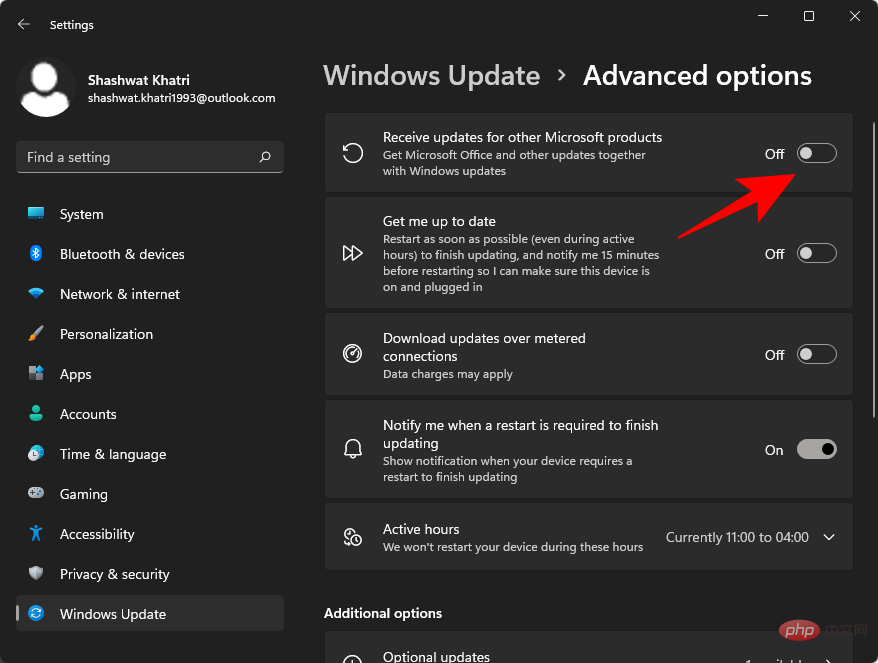
You will now disable updates for Microsoft products on your system.
3. Disable Microsoft Store Updates on Windows 11
Microsoft Store is another app that can automatically update all store apps in the background. This may cost you resources, power, and data, depending on your setup. You can disable the same functionality using the following tutorial.
Launch Microsoft Store on your system and click Profile Picture in the upper right corner.

Select Application Settings.
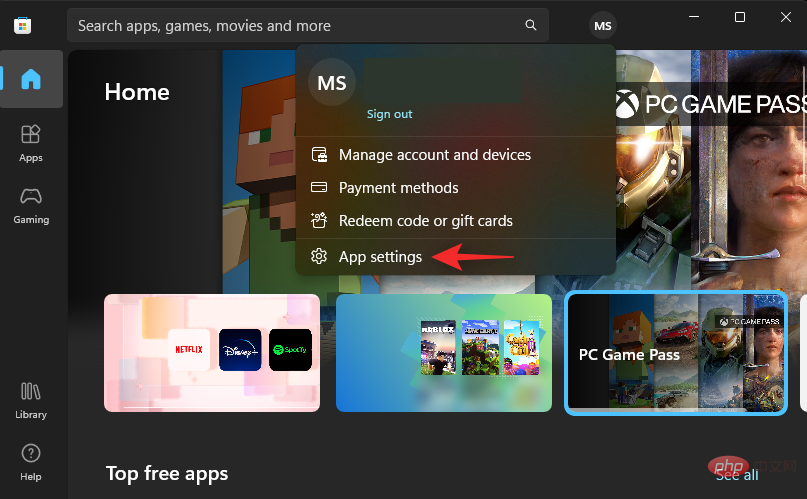
Close Toggle for application updates.
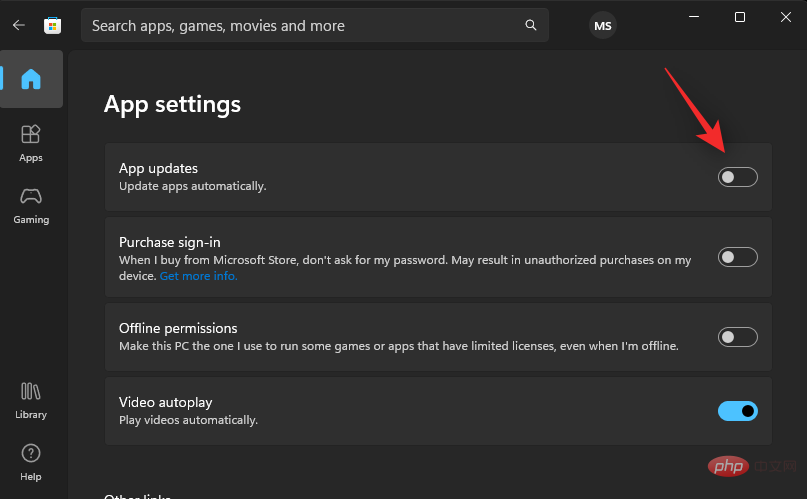
That's it! Store apps will no longer update in the background of the system.
Why you should disable updates on Windows 11
While it’s generally not recommended to turn off Windows Updates, there are certain situations where it’s necessary.
It’s not uncommon to receive updates that come with their own set of security vulnerabilities and bugs, and many people have suffered from them in the past.
Similarly, if you don't want Windows to automatically update your hardware drivers because, for example, the latest version is giving you trouble and you selected an older version, you might benefit from disabling Windows Update.
Some users also like to have more granular control over their updates and configure Windows Update to notify them before any updates are downloaded and installed so they can review them and decide which ones to let go through.
How to uninstall installed updates on Windows 11
Here’s how to uninstall Windows Updates on Windows 11. Please follow the steps below to help you through the process.
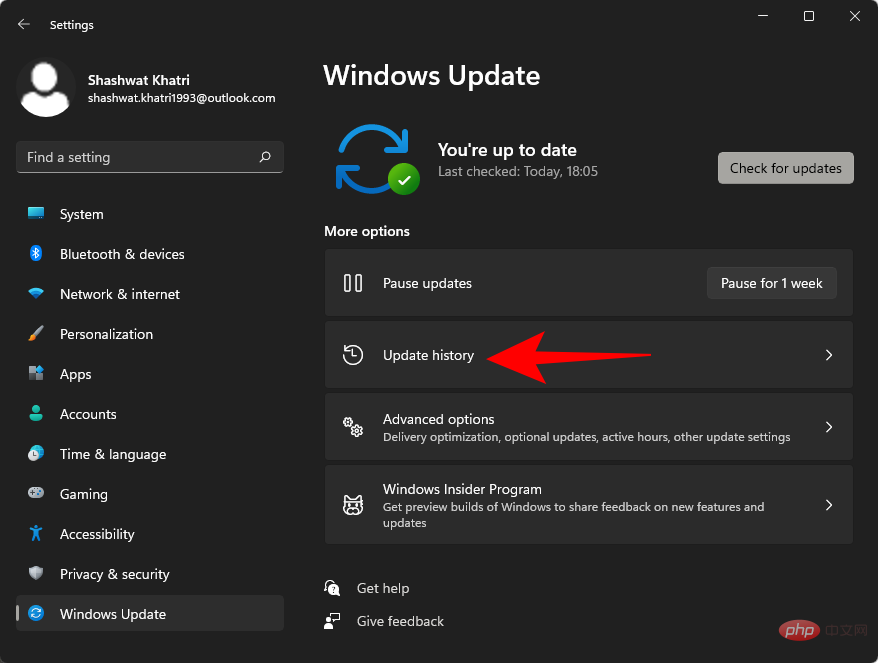
Press Windows i and click Windows Update.
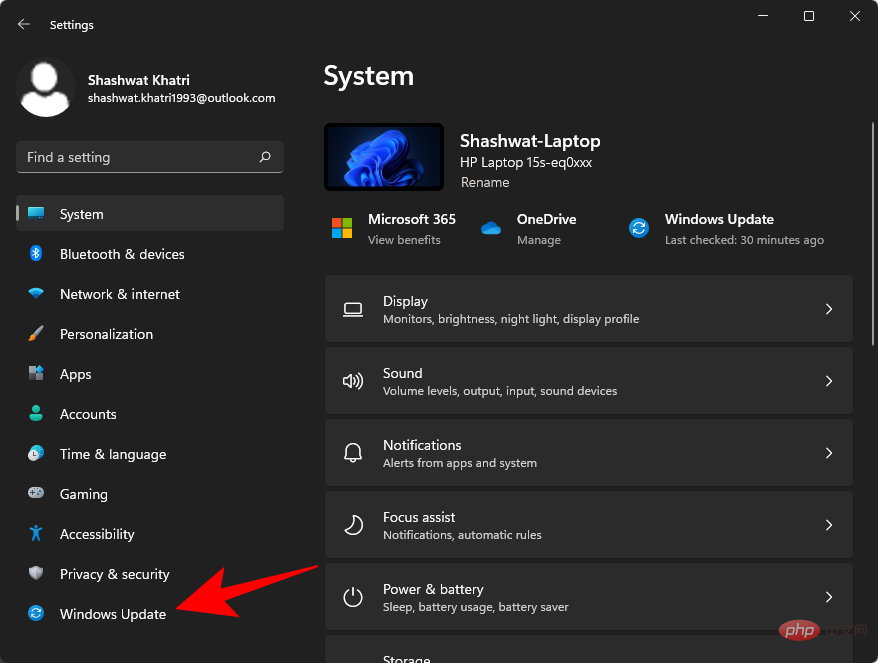
Click Update History.
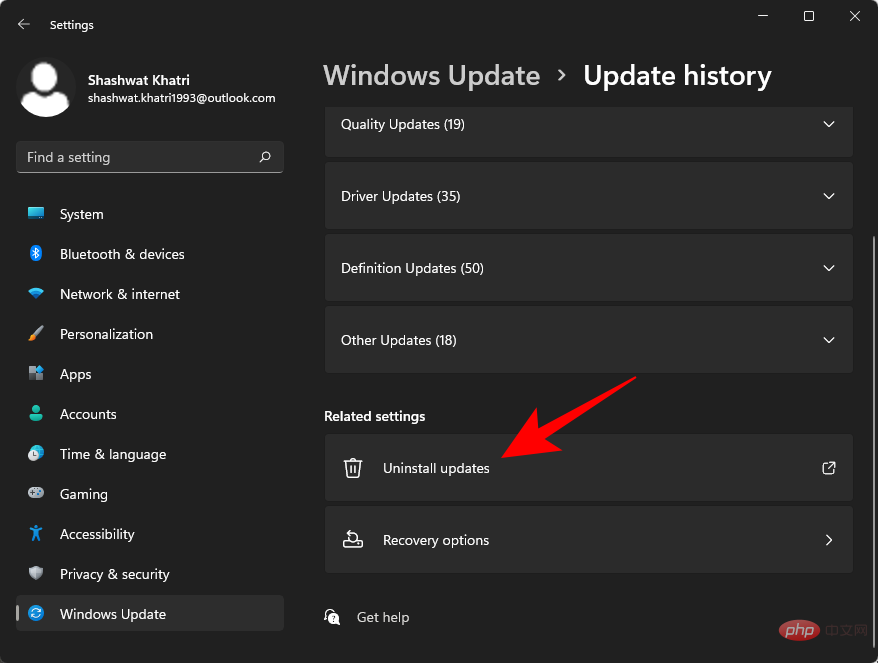
Scroll down and select Uninstall updates.
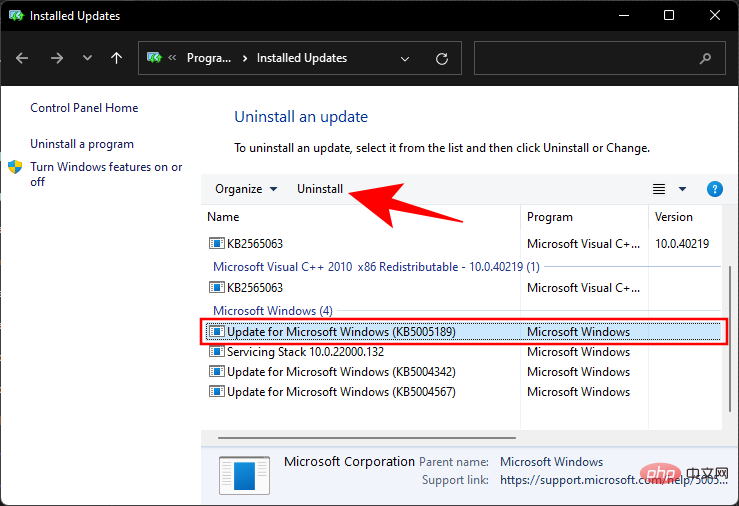
#Select the updates to remove by clicking and selecting Uninstall.
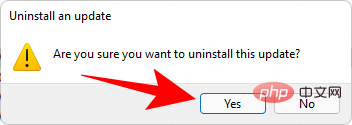
Click Yes to confirm.
NOTE: Some minor updates may not be in this list.
How to Unhide Hidden Updates on Windows 11
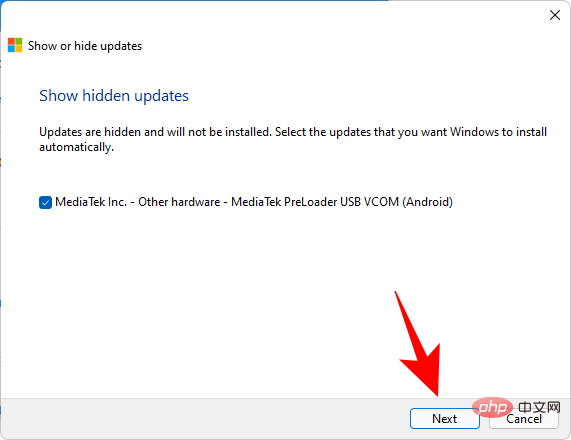
You can use the following tutorial to unhide hidden updates through the Windows Troubleshooting Tool.
Run the troubleshooter we downloaded earlier and click Next.
Select to show hidden updates.
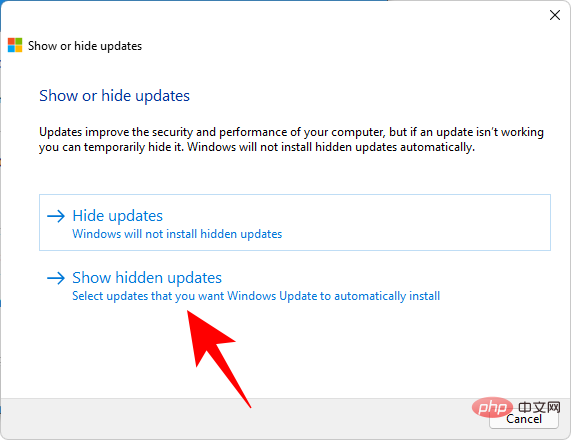
# Select the checkbox corresponding to the update you want to unhide. Click Next when finished.
Once the troubleshooting procedure is complete, you may be asked to reboot your system. If not, click to close.
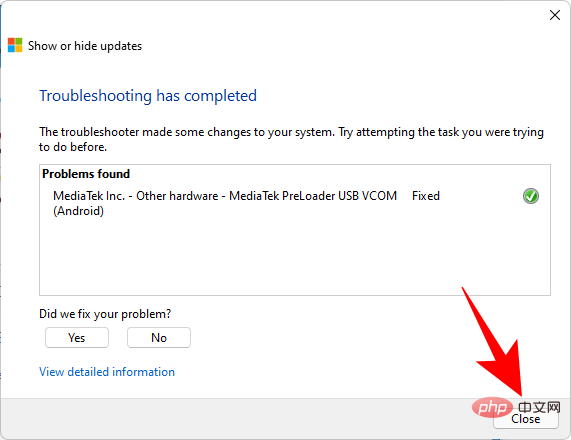
Windows updates should now be visible on your system and you can install the same using the Settings app.
FAQ
Here are some frequently asked questions about disabling Windows Updates on Windows 11.
Should I disable updates on Windows 11?
You should only disable Windows Update if you absolutely need it. If you are not experiencing any bug patches and all drivers are working fine, keep Windows updated.
While the updates you get are not always perfect, they are your only source of future security patches and cumulative updates that you will always need sooner or later.
Can I permanently disable updates on Windows 11?
Yes, you can disable updates permanently. Although Microsoft is very aggressive in forcing users to keep Windows updated, and for good reasons, the methods mentioned in this tutorial will help you prevent this from happening.
Do I need to disable updates again?
If you reset Windows, reinstall updates, or install a feature update, you may need to update your configuration again to disable Windows Updates. However, Windows should respect your settings when manually updating Microsoft Store and other products.
The above is the detailed content of How to disable updates on Windows 11. For more information, please follow other related articles on the PHP Chinese website!

