
Home >Web Front-end >JS Tutorial >JS implements the checkbox in the form to increase the border display effect_javascript skills
JS implements the checkbox in the form to increase the border display effect_javascript skills

- WBOYWBOYWBOYWBOYWBOYWBOYWBOYWBOYWBOYWBOYWBOYWBOYWBOriginal
- 2016-05-16 15:43:452007browse
The example in this article describes the JS implementation of adding a border display effect to the checkbox in the form. Share it with everyone for your reference. The details are as follows:
Here, JavaScript is used to realize the checkbox selection effect, the checkbox effect in the form, the checkmark effect simulation, and the beautification effect achieved by combining JS and HTML5. It seems to be a popular effect at the moment!
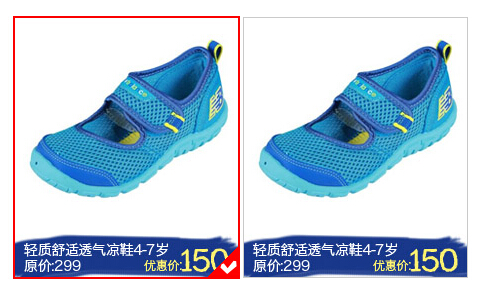
The screenshot of the running effect is as follows:
The online demo address is as follows:
http://demo.jb51.net/js/2015/js-table-checkbox-check-border-show-codes/
The specific code is as follows:
<!doctype html>
<html lang="en-US">
<head>
<meta http-equiv="Content-Type" content="text/html; chaRset=gb2312" />
<title>JS实现单个图片选中美化框</title>
<style type="text/css">
body, div, dl, dt, dd, ul, ol, li, h1, h2, h3, h4, h5, h6, pre, code, form, fieldset,
legend, input, button, textarea, blockquote, th, td, p { margin:0; padding:0 }
input, button, select, textarea { outline:none }
li { list-style:none }
img { vertical-align:top; border:none }
textarea { resize:none }
body { width:auto; height:auto; padding:0; margin:0; color: #666; background: #FFF; }
body, input, textarea { font-size:12px; font-family:Arial, Verdana, "Microsoft Yahei", Simsun }
a{cursor:pointer}
a:link{color:#37a;text-decoration:none}
a:visited{color:#669;text-decoration:none}
a:hover{color:#fff;text-decoration:none;background:#37a}
a:active{color:#fff;text-decoration:none;background:#f93}
.clear { clear:both }
.clearfix:after{ content:"."; display:block; font-size: 0; height:0; clear:both; visibility:hidden }
.clearfix{ zoom:1}
#radio_wrap{width: 916px; margin: 50px auto 0;font-size: 0;*word-spacing:-1px;}
@media screen and (-webkit-min-device-pixel-ratio:0){
#radio_wrap{letter-spacing:-4px;}}
#radio_wrap input{display: none;}
#radio_wrap li{position:relative; width: 223px; height: 259px; border: 1px solid #CCC; display:inline-block; *display:inline; *zoom:1; margin:0 2px;}
#radio_wrap li.checked{border:2px solid red;margin:-1px 1px;}
#radio_wrap li.checked i{width:30px; height:30px; position:absolute; right:0; bottom:0;_right:-1px; _bottom:-1px;background:url(images/checked.gif) no-repeat;}
</style>
</head>
<body>
<div id="radio_wrap">
 <ul>
 <li class="c checked">
  <input type="radio" id="radio_a_01" name="radio_a" />
  <label for="radio_a_01"><img src="images/taobao2.jpg" alt="" disabled/></label>
  <i></i>
 </li>
 <li class="c">
  <input type="radio" id="radio_a_02" name="radio_a" />
  <label for="radio_a_02"><img src="images/taobao2.jpg" alt="" disabled/></label>
  <i></i>
 </li>
 </ul>
</div>
<script type="text/javascript">
(function() {
 var radioWrap = document.getElementById("radio_wrap"),
 li = radioWrap.getElementsByTagName("li");
 for(var i = 0; i < li.length; i++){
 li[i].onclick = function() {
  for(var i = 0; i < li.length; i++){
  li[i].className = "";
  }
  this.className = "checked";
 }
 }
})();
</script>
<div style="text-align:center;clear:both"><br>
</div>
</body>
</html>
I hope this article will be helpful to everyone’s JavaScript programming design.
Related articles
See more- An in-depth analysis of the Bootstrap list group component
- Detailed explanation of JavaScript function currying
- Complete example of JS password generation and strength detection (with demo source code download)
- Angularjs integrates WeChat UI (weui)
- How to quickly switch between Traditional Chinese and Simplified Chinese with JavaScript and the trick for websites to support switching between Simplified and Traditional Chinese_javascript skills