


How to use the Shiro framework of SpringBoot security management

Shiro Introduction
Apache Shiro is an open source lightweight Java security framework that provides authentication, authorization, password management, session management and other functions. Compared with Spring Security, the Shiro framework is more intuitive and easier to use, while also providing robust security.
In the traditional SSM framework, there are still many configuration steps to manually integrate Shiro. For Spring Boot, Shiro officially provides shiro-spring-boot-web-starter to simplify Shiro in Spring Boot. configuration.
Integrate Shiro
1. Create a project
First create an ordinary Spring Boot Web project, add Shiro dependencies and page template dependencies
<dependency>
  <groupId>org.apache.shiro</groupId>
  <artifactId>shiro-spring-boot-web-starter</artifactId>
  <version>1.4.0</version>
</dependency>
<dependency>
  <groupId>org.springframework.boot</groupId>
  <artifactId>spring-boot-starter-thymeleaf</artifactId>
</dependency>
<dependency>
  <groupId>com.github.theborakompanioni</groupId>
  <artifactId>thymeleaf-extras-shiro</artifactId>
  <version>2.0.0</version>
</dependency>
Not here You need to add spring-boot-starter-web dependency, shiro-spring-boot-web-starter already depends on spring-boot-starter-web. At the same time, the Thymeleaf template is used here. In order to use the shiro tag in Thymeleaf, the thymeleaf-extras-shiro dependency is added.
2. Shiro basic configuration
Configure the basic information of Shiro in application.properties
# Enable Shiro configuration, the default is true
shiro.enabled =true
# Enable Shiro Web configuration, the default is true
shiro.web.enabled=true
# Configure the login address, the default is /login.jsp
shiro.loginUrl=/login
# Configure the address for successful login, the default is /
shiro.successUrl=/index
# Unauthorized default jump address
shiro.unauthorizedUrl=/unauthorized
# Whether to allow sessions through URL parameters Tracking, if the website supports cookies, you can turn off this option, the default is true
shiro.sessionManager.sessionIdUrlRewritingEnabled=true
# Whether to allow session tracking through cookies, the default is true
shiro.sessionManager.sessionIdCookieEnabled=true
Then configure Shiro in the Java code and provide the two most basic beans.
@Configuration
public class ShiroConfig {
    @Bean
    public Realm realm() {
        TextConfigurationRealm realm = new TextConfigurationRealm();
        realm.setUserDefinitions("sang=123,user\n admin=123,admin");
        realm.setRoleDefinitions("admin=read,write\n user=read");
        return realm;
    }
    @Bean
    public ShiroFilterChainDefinition shiroFilterChainDefinition() {
        DefaultShiroFilterChainDefinition chainDefinition =
                new DefaultShiroFilterChainDefinition();
        chainDefinition.addPathDefinition("/login", "anon");
        chainDefinition.addPathDefinition("/doLogin", "anon");
        chainDefinition.addPathDefinition("/logout", "logout");
        chainDefinition.addPathDefinition("/**", "authc");
        return chainDefinition;
    }
    @Bean
    public ShiroDialect shiroDialect() {
        return new ShiroDialect();
    }
}
Code explanation:
Provided here There are two key Beans, one is Realm and the other is ShiroFilterChainDefinition. As for ShiroDialect, it is to support the use of Shiro tags in Thymeleaf. If you do not use Shiro tags in Thymeleaf, you do not need to provide ShiroDialect
Realm can be a custom Realm or Shiro For the provided Realm, for the sake of simplicity, no database connection is configured here. Two users are directly configured: sang/123 and admin/123, corresponding to the roles user and admin respectively.
ShiroFilterChainDefinition Bean is configured with basic filtering rules. "/login" and "/doLogin" can be accessed anonymously. "/logout" is a logout request, and other requests are Authentication is required before access
Then configure the login interface and page access interface
@Controller
public class UserController {
    @PostMapping("/doLogin")
    public String doLogin(String username, String password, Model model) {
        UsernamePasswordToken token = new UsernamePasswordToken(username, password);
        Subject subject = SecurityUtils.getSubject();
        try {
            subject.login(token);
        } catch (AuthenticationException e) {
            model.addAttribute("error", "用户名或密码输入错误!");
            return "login";
        }
        return "redirect:/index";
    }
    @RequiresRoles("admin")
    @GetMapping("/admin")
    public String admin() {
        return "admin";
    }
    @RequiresRoles(value = {"admin", "user"}, logical = Logical.OR)
    @GetMapping("/user")
    public String user() {
        return "user";
    }
}
Code explanation:
In the doLogin method , first build a UsernamePasswordToken instance, then obtain a Subject object and call the login method in the object to perform the login operation. During the execution of the login operation, when an exception is thrown, it means that the login failed, and the error message is returned to the login view; When the login is successful, it is redirected to "/index"
Next exposes two interfaces "/admin" and "/user". For the "/admin" interface, you need to have Only the admin role can be accessed; for the "/user" interface, you can access it if you have either the admin role or the user role
For other interfaces that can be accessed without a role, directly in Just configure it in WebMvc
@Configuration
public class WebMvcConfig implements WebMvcConfigurer{
    @Override
    public void addViewControllers(ViewControllerRegistry registry) {
        registry.addViewController("/login").setViewName("login");
        registry.addViewController("/index").setViewName("index");
        registry.addViewController("/unauthorized").setViewName("unauthorized");
    }
}
Next, create a global exception handler for global exception handling. This is mainly to handle authorization exceptions
@ControllerAdvice
public class ExceptionController {
    @ExceptionHandler(AuthorizationException.class)
    public ModelAndView error(AuthorizationException e) {
        ModelAndView mv = new ModelAndView("unauthorized");
        mv.addObject("error", e.getMessage());
        return mv;
    }
}
When the user accesses unauthorized resources, jump to unauthorized view and carries an error message.
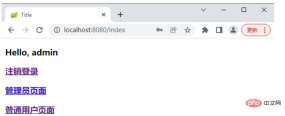
After the configuration is completed, finally create 5 HTML pages in the resources/templates directory for testing.
(1)index.html
<!DOCTYPE html>
<html lang="en" xmlns:shiro="http://www.pollix.at/thymeleaf/shiro">
<head>
    <meta charset="UTF-8">
    <title>Title</title>
</head>
<body>
<h4 id="Hello-nbsp-shiro-principal">Hello, <shiro:principal/></h4>
<h4 id="a-nbsp-href-logout-nbsp-rel-external-nbsp-nofollow-nbsp-注销登录-a"><a href="/logout" rel="external nofollow" >注销登录</a></h4>
<h4 id="a-nbsp-shiro-hasRole-admin-nbsp-href-admin-nbsp-rel-external-nbsp-nofollow-nbsp-管理员页面-a"><a shiro:hasRole="admin" href="/admin" rel="external nofollow" >管理员页面</a></h4>
<h4 id="a-nbsp-shiro-hasAnyRoles-admin-user-nbsp-href-user-nbsp-rel-external-nbsp-nofollow-nbsp-普通用户页面-a"><a shiro:hasAnyRoles="admin,user" href="/user" rel="external nofollow" >普通用户页面</a></h4>
</body>
</html>
(2)login.html
<!DOCTYPE html>
<html lang="en" xmlns:th="http://www.thymeleaf.org">
<head>
    <meta charset="UTF-8">
    <title>Title</title>
</head>
<body>
<div>
    <form action="/doLogin" method="post">
        <input type="text" name="username"><br>
        <input type="password" name="password"><br>
        <div th:text="${error}"></div>
        <input type="submit" value="登录">
    </form>
</div>
</body>
</html>
(3)user.html
<!DOCTYPE html>
<html lang="en">
<head>
    <meta charset="UTF-8">
    <title>Title</title>
</head>
<body>
<h2 id="普通用户页面">普通用户页面</h2>
</body>
</html>
(4)admin. html
<!DOCTYPE html>
<html lang="en">
<head>
    <meta charset="UTF-8">
    <title>Title</title>
</head>
<body>
<h2 id="管理员页面">管理员页面</h2>
</body>
</html>
(5) unauthorized.html
<!DOCTYPE html>
<html lang="en" xmlns:th="http://www.thymeleaf.org">
<head>
    <meta charset="UTF-8">
    <title>Title</title>
</head>
<body>
<div>
    <h4 id="未获授权-非法访问">未获授权,非法访问</h4>
    <h4 th:text="${error}"></h4>
</div>
</body>
</html>
3. Test
Start the project, visit the login page, and use sang/123 to log in

Note: Since the sang user does not have the admin role, the page after successful login does not have a hyperlink to the administrator page.
Then use admin/123 to log in.
If the user uses sang to log in and then accesses: http://localhost:8080/admin, it will jump to the unauthorized page

The above is the detailed content of How to use the Shiro framework of SpringBoot security management. For more information, please follow other related articles on the PHP Chinese website!

 How do I use Maven or Gradle for advanced Java project management, build automation, and dependency resolution?Mar 17, 2025 pm 05:46 PM
The article discusses using Maven and Gradle for Java project management, build automation, and dependency resolution, comparing their approaches and optimization strategies.
 How do I create and use custom Java libraries (JAR files) with proper versioning and dependency management?Mar 17, 2025 pm 05:45 PM
The article discusses creating and using custom Java libraries (JAR files) with proper versioning and dependency management, using tools like Maven and Gradle.
 How do I implement multi-level caching in Java applications using libraries like Caffeine or Guava Cache?Mar 17, 2025 pm 05:44 PM
The article discusses implementing multi-level caching in Java using Caffeine and Guava Cache to enhance application performance. It covers setup, integration, and performance benefits, along with configuration and eviction policy management best pra
 How can I use JPA (Java Persistence API) for object-relational mapping with advanced features like caching and lazy loading?Mar 17, 2025 pm 05:43 PM
The article discusses using JPA for object-relational mapping with advanced features like caching and lazy loading. It covers setup, entity mapping, and best practices for optimizing performance while highlighting potential pitfalls.[159 characters]
 How does Java's classloading mechanism work, including different classloaders and their delegation models?Mar 17, 2025 pm 05:35 PM
Java's classloading involves loading, linking, and initializing classes using a hierarchical system with Bootstrap, Extension, and Application classloaders. The parent delegation model ensures core classes are loaded first, affecting custom class loa
 How can I use Java's RMI (Remote Method Invocation) for distributed computing?Mar 11, 2025 pm 05:53 PM
This article explains Java's Remote Method Invocation (RMI) for building distributed applications. It details interface definition, implementation, registry setup, and client-side invocation, addressing challenges like network issues and security.
 How do I use Java's sockets API for network communication?Mar 11, 2025 pm 05:53 PM
This article details Java's socket API for network communication, covering client-server setup, data handling, and crucial considerations like resource management, error handling, and security. It also explores performance optimization techniques, i
 How can I create custom networking protocols in Java?Mar 11, 2025 pm 05:52 PM
This article details creating custom Java networking protocols. It covers protocol definition (data structure, framing, error handling, versioning), implementation (using sockets), data serialization, and best practices (efficiency, security, mainta


Hot AI Tools

Undresser.AI Undress
AI-powered app for creating realistic nude photos

AI Clothes Remover
Online AI tool for removing clothes from photos.

Undress AI Tool
Undress images for free

Clothoff.io
AI clothes remover

AI Hentai Generator
Generate AI Hentai for free.

Hot Article
Hot Tools

MantisBT
Mantis is an easy-to-deploy web-based defect tracking tool designed to aid in product defect tracking. It requires PHP, MySQL and a web server. Check out our demo and hosting services.

ZendStudio 13.5.1 Mac
Powerful PHP integrated development environment

SublimeText3 Chinese version
Chinese version, very easy to use

PhpStorm Mac version
The latest (2018.2.1) professional PHP integrated development tool

SecLists
SecLists is the ultimate security tester's companion. It is a collection of various types of lists that are frequently used during security assessments, all in one place. SecLists helps make security testing more efficient and productive by conveniently providing all the lists a security tester might need. List types include usernames, passwords, URLs, fuzzing payloads, sensitive data patterns, web shells, and more. The tester can simply pull this repository onto a new test machine and he will have access to every type of list he needs.

