


Apple's Photos app lets you easily edit photos in your camera roll, but if you want to stitch a bunch of photos into a single photo, there's no such tool in the app that lets you do that. However, there are other ways you can make collages on iPhone, and in this article, we’ll help you create collages in a variety of different ways using four apps – Shortcuts, Google Photos, Instagram’s Layouts and Canva.
Method #1: Use Shortcuts
Apple’s native Shortcuts app can be used to perform actions not built into iPhone, as well as automate tasks to complete tasks. One thing you can do with Shortcuts is make a collage following the pattern you want to create.
While there is a pre-existing photo grid shortcut in the gallery section of the app, it has a major flaw in that it can only combine pictures horizontally, so your pictures are stacked side by side. This is not a smart way to create a collage, because selecting a large number of pictures will only create a thin row of pictures that is difficult to view.
For better personalization, we'll be using community-made combo image shortcuts that you can add to your iPhone. When you visit this shortcut link on your iPhone, click the Add Shortcut button.
After you add this shortcut to your device, it should appear in the My's Shortcuts tab in the Shortcuts app. To create a collage using this shortcut, select the Combine Images shortcut.

#iOS will now open your iPhone library, showing you all the pictures you took or saved on your device. Here, select the pictures you want to make a collage from either the Photos tab or the Albums tab.
 After selecting the photo you like, click
 #The shortcut will prompt you with a dialog box asking you in what order you would like the pictures arranged. Select
or Reverse Chronological.
 #Next, enter the spacing you want between the images, that is, the spacing between the individual pictures in the collage. We recommend setting this space to "10", but you can set it to your own desired value. If you don't want the collage to have any white space between images, set this to "0". After setting the image spacing, click
.
 The shortcut will now ask you how you want your pictures arranged - horizontally, vertically or in grid. If you're confused about which one to choose, we'll help you understand which one suits your needs.

- If you have a bunch of portrait photos, up to 7, selecting this option will stack your photos one on top of the other. in one line.

- If you can only stack up to 3 photos, and they are all wide angle photos, you can select this option to combine the photos vertically Arranged in a single column.

- If you have 4 or more photos and you want the images to be symmetrically aligned in a grid, select This option, shortcut will output your collage in mxn format, depending on the number of photos you selected.
 After creating the collage, click
.
The shortcut will now ask you how you want to save the new collage. Select Save to Camera Roll to save the new collage and keep the original photo.

The collage will now be saved on your iPhone and can be accessed in the Photos app.
Method #2: Use Google Photos
Google Photos makes it easy to create a collage with minimal steps. Although the process of creating collages using it is simple, there are some limitations to using this application. One drawback of the Google Photos collage tool is that you can only select up to 9 photos to combine. Another limitation is that the Photos app will create a collage of the pictures you select, and once created, you can't manually reposition the photos in the grid or change the grid type directly. Therefore, no additional tools are needed to create a collage using Google Photos.
To create a collage, open the Google Photos app on iOS and click the Library tab in the lower right corner.

#In the Library, select Utilities from the top.

On the next screen, click Collage under New.

#You must now select the pictures you want to use to create the collage. You can choose from 2 to 9 photos to create your collage. After selecting the image, click in the upper right corner to create.

Google Photos will now create a collage from the photos you select, using a layout it thinks will work best. On this screen, you can share or make other modifications to the collage through the screen tools.

Method #3: Use Instagram’s layout
Since more of us use Instagram to upload our daily memories, you can use the app The program's native layout tools create collages from images stored on your iPhone, or snap one directly using the in-app camera.

But Instagram’s tool has two limitations – you can’t combine more than 6 images in a grid, and while you can reposition each image, The number of arrangement options available is limited to 6 grid types.
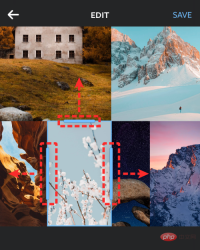
Add pictures to your collage
That’s why we’re going to use separate layouts in the Instagram app to make a more personalized collage. Once downloaded, open the Layout app on your iPhone and allow access to all photos on your iPhone.

In the Layout app, you will see all the pictures you have recently saved on your iPhone. If you want to choose a different folder or album to view and select pictures, please click the "Recent" tab in the lower left corner and select your preferred folder/album.

Now you will see all the pictures stored in the selected location. From here, select the pictures you want to make your collage from. When creating a collage, you can choose from 2 to 9 photos.

#Once you have selected all your images, you will be able to see your images arranged in different grids at the top of the screen.

Depending on the image you select, you will see a different number of layouts, and you will get different layout types to choose from.

To browse different layouts, just swipe from right to left on the layout row at the top.

#When you find a layout you like from here, click on it to modify it further.

Edit your collage
You will now see the editing screen of the application, which you can mirror/ Flip pictures, replace pictures, and add borders to collages.

To reposition a photo in the collage, tap and hold it and move it to where you want it in the collage to place it there.

#To resize the photos in the layout, select an image and drag any of its edges to the size you like. You should remember that when you resize images within a layout, adjacent images or images in the same row/column will also be resized accordingly.
#To mirror an image vertically, click on the image in the grid and select Mirror.

#To mirror an image horizontally, click on the image in the grid and select Flip.

#To replace an image, select it from the layout and click Replace.

Next, select the image you want to use as a replacement and click Done. The new picture will replace the selected picture in the collage.

To add a border between photos and around the collage, click at the bottom of the Border Collage.

#After you have made all changes to your collage, click in the upper right corner to save.

The collage is automatically saved to your iPhone's library, and you'll get more options to share it on Instagram, Facebook, or other apps.

Method #4: Using Canva
If you use Canva like us to design headers, presentations, and posters on Canva, you should also know that The app can also be used to create collages from pictures on your iPhone. If you want to customize your collage with your own text and other effects, Canva is very convenient as there are many templates to choose from so you can start using it right away.
Before creating a collage, download the Canva app from the App Store and create an account using your Google/Apple account or email address if you don't have an existing account on the service. Once completed, open the Canva app and you will be taken to the "Recommended for You" screen.

Swipe left on the "Recommended for you" tab at the top and select the "More"tab .

In More, select Photo Collage from the list of design options.
 ##
##
Now you will see a bunch of collage templates to choose from. Scroll down and select the template you would like to use for your collage by clicking on it.

Note: Before choosing a template, you should know the number of pictures you want to create a collage and whether the template has the space required to paste all the photos. Some templates will arrange pictures into a grid, and some will include text, stickers, and frames; so choose the one you think will work best for your collage.
The template will now load on the screen, and Canva will prompt you asking if you want to add photos from your gallery to create a collage. Here, click to select more photos.

Next, select the pictures you want to make a collage from your iPhone library and tap Done.

After this, you should see the template of your choice.

Here you can add your own photos from your iPhone by clicking on the image in the template and selecting the Replace option at the bottom.

#In the pop-up screen that appears, tap on the desired photos that you want to make a collage.

The selected picture will now be copied to the collage.

#You can repeat this step to select and replace additional photos for your collage.

#If the template has text, you can edit them and write your own title by clicking on the text and selecting Edit.

If you want to change the font of the text, select the text section from the template and select Font.

#You can then select the font you want to apply to the collage.

Canva also allows you to change the background of your template by clicking on it and selecting a color from the bottom.

#When you do this, you can choose from the colors available on the canvas, a color pulled from a photo, or another default color to apply to the highlighted area s color.

Additionally, you can change the spacing between items in your collage by clicking anywhere on the design and selecting Spacing from the bottom toolbar .

After selecting this option, adjust the grid space by dragging the slider left/right.

#You can make other modifications to your collage by adding animation, transparency, and other effects.
After you have made all the required changes, click the Share icon in the upper right corner.

In the pop-up screen that appears, select Download to save the collage to your iPhone.

The above is the detailed content of How to Make a Photo Collage on iPhone: 4 Ways Explained. For more information, please follow other related articles on the PHP Chinese website!

Hot AI Tools

Undresser.AI Undress
AI-powered app for creating realistic nude photos

AI Clothes Remover
Online AI tool for removing clothes from photos.

Undress AI Tool
Undress images for free

Clothoff.io
AI clothes remover

Video Face Swap
Swap faces in any video effortlessly with our completely free AI face swap tool!

Hot Article
Hot Tools

VSCode Windows 64-bit Download
A free and powerful IDE editor launched by Microsoft

DVWA
Damn Vulnerable Web App (DVWA) is a PHP/MySQL web application that is very vulnerable. Its main goals are to be an aid for security professionals to test their skills and tools in a legal environment, to help web developers better understand the process of securing web applications, and to help teachers/students teach/learn in a classroom environment Web application security. The goal of DVWA is to practice some of the most common web vulnerabilities through a simple and straightforward interface, with varying degrees of difficulty. Please note that this software

Atom editor mac version download
The most popular open source editor

Notepad++7.3.1
Easy-to-use and free code editor

mPDF
mPDF is a PHP library that can generate PDF files from UTF-8 encoded HTML. The original author, Ian Back, wrote mPDF to output PDF files "on the fly" from his website and handle different languages. It is slower than original scripts like HTML2FPDF and produces larger files when using Unicode fonts, but supports CSS styles etc. and has a lot of enhancements. Supports almost all languages, including RTL (Arabic and Hebrew) and CJK (Chinese, Japanese and Korean). Supports nested block-level elements (such as P, DIV),

