

 Backend DevelopmentPython TutorialHow to use ttkbootstrap to create a beautiful interface for Python GUI?
How to use ttkbootstrap to create a beautiful interface for Python GUI?

These two pictures are screenshots of the display renderings provided on the official website:


Theme Switch
Simple theme switching, since there are few components on the current window, the effect is not obvious, but it will look good when there are many components in the layout.

import ttkbootstrap as ttk
from ttkbootstrap.constants import *
root = ttk.Window()
style = ttk.Style()
theme_names = style.theme_names()#以列表的形式返回多个主题名
theme_selection = ttk.Frame(root, padding=(10, 10, 10, 0))
theme_selection.pack(fill=X, expand=YES)
lbl = ttk.Label(theme_selection, text="选择主题:")
theme_cbo = ttk.Combobox(
master=theme_selection,
text=style.theme.name,
values=theme_names,
)
theme_cbo.pack(padx=10, side=RIGHT)
theme_cbo.current(theme_names.index(style.theme.name))
lbl.pack(side=RIGHT)
def change_theme(event):
theme_cbo_value = theme_cbo.get()
style.theme_use(theme_cbo_value)
theme_selected.configure(text=theme_cbo_value)
theme_cbo.selection_clear()
theme_cbo.bind('<<ComboboxSelected>>', change_theme)
theme_selected = ttk.Label(
master=theme_selection,
text="litera",
font="-size 24 -weight bold"
)
theme_selected.pack(side=LEFT)
root.mainloop()Some simple introduction to the use of ttkbootstrap
First of all, some brief introduction to its instantiation and creation of application windows.
import ttkbootstrap as ttk
#实例化创建应用程序窗口
root = ttk.Window(
        title="窗口名字",        #设置窗口的标题
        themename="litera",     #设置主题
        size=(1066,600),        #窗口的大小
        position=(100,100),     #窗口所在的位置
        minsize=(0,0),          #窗口的最小宽高
        maxsize=(1920,1080),    #窗口的最大宽高
        resizable=None,         #设置窗口是否可以更改大小
        alpha=1.0,              #设置窗口的透明度(0.0完全透明)
        )
# root.place_window_center()    #让显现出的窗口居中
# root.resizable(False,False)   #让窗口不可更改大小
# root.wm_attributes('-topmost', 1)#让窗口位置其它窗口之上
root.mainloop()
Tag

import ttkbootstrap as ttk
from ttkbootstrap.constants import *
root = ttk.Window()
ttk.Label(root,text="标签1",bootstyle=INFO).pack(side=ttk.LEFT, padx=5, pady=10)
ttk.Label(root,text="标签2",boot).pack(side=ttk.LEFT, padx=5, pady=10)
ttk.Label(root,text="标签3",boot).pack(side=ttk.LEFT, padx=5, pady=10)
ttk.Label(root, text="标签4", bootstyle=WARNING, font=("微软雅黑", 15), background='#94a2a4').pack(side=LEFT, padx=5, pady=10)
root.mainloop()
'''
# bootstyle colors
PRIMARY = 'primary'
SECONDARY = 'secondary'
SUCCESS = 'success'
DANGER = 'danger'
WARNING = 'warning'
INFO = 'info'
LIGHT = 'light'
DARK = 'dark'

# bootstyle types
OUTLINE = 'outline'
LINK = 'link'
TOGGLE = 'toggle'
INVERSE = 'inverse'
STRIPED = 'striped'
TOOLBUTTON = 'toolbutton'
ROUND = 'round'
SQUARE = 'square'
'''
Button
Button style:

import ttkbootstrap as ttk
from ttkbootstrap.constants import *
root = ttk.Window()
ttk.Button(root, text="Button 1", bootstyle=SUCCESS).pack(side=LEFT, padx=5, pady=10)
ttk.Button(root, text="Button 2", bootstyle=(INFO, OUTLINE)).pack(side=LEFT, padx=5, pady=10)
ttk.Button(root, text="Button 3", bootstyle=(PRIMARY, "outline-toolbutton")).pack(side=LEFT, padx=5, pady=10)
ttk.Button(root, text="Button 4", boot).pack(side=LEFT, padx=5, pady=10)
ttk.Button(root, text="Button 5", boot).pack(side=LEFT, padx=5, pady=10)
ttk.Button(root, text="Button 6", state="disabled").pack(side=LEFT, padx=5, pady=10) #在禁用状态下创建按钮
root.mainloop()
Button click:

import ttkbootstrap as ttk
from ttkbootstrap.constants import *
root = ttk.Window()
#为按钮添加点击事件
#法一
def button1():
    print("Button1点击了一下!")
ttk.Button(root,text="Button1", bootstyle=(PRIMARY, "outline-toolbutton"),command=button1).pack(side=LEFT, padx=5, pady=10)
#法二
def button2(event): #这里要加一个参数,不然会报错
    print("Button2点击了一下!")
    button_text = event.widget["text"] #得到按钮上的文本
    print(button_text)
b = ttk.Button(root,text="Button2", bootstyle=(PRIMARY, "outline-toolbutton"))
b.pack(side=LEFT, padx=5, pady=10)
b.bind("<Button-1>", button2) #<Button-1>鼠标左键
root.mainloop()
Input box

import ttkbootstrap as ttk
from ttkbootstrap.constants import *
root = ttk.Window()
e1 = ttk.Entry(root,show=None)
e1.insert('0',"默认插入内容")
e1.grid(row=5, column=1, sticky=ttk.W, padx=10,pady=10)
e2 = ttk.Entry(root,show="*",width=50,bootstyle=PRIMARY)
e2.grid(row=10, column=1, sticky=ttk.W, padx=10, pady=10)
e3_content = ttk.StringVar()
e3 = ttk.Entry(root,bootstyle='success', textvariable=e3_content).grid(row=15, column=1, sticky=ttk.W, padx=10, pady=10)
def get_entry_contetn():
    print("e1: ",e1.get())
    print("e2: ",e2.get())
    print("e3: ",e3_content.get())
ttk.Button(root,text="get_entry_contetn", bootstyle=(PRIMARY, "outline-toolbutton"),command=get_entry_contetn).grid(row=20, column=1, sticky=ttk.W, padx=10, pady=10)
root.mainloop()
Text Box

import ttkbootstrap as ttk
from ttkbootstrap.constants import *
root = ttk.Window()
text = ttk.Text(root,)
text.pack(padx=10,pady=10,fill=BOTH)
text.insert('insert','text-content 1') #插入内容
text.delete("0.0",'end') #删除内容
text.insert('insert','text-content 2\npy')
text.see(ttk.END) #光标跟随着插入的内容移动
root.mainloop()
Date input

import ttkbootstrap as ttk
from ttkbootstrap.constants import *
root = ttk.Window()
de1 = ttk.DateEntry()
de1.grid(row=6, column=1, sticky=ttk.W,padx=10, pady=10)
print(de1.entry.get())

de2 = ttk.DateEntry(boot,dateformat=r"%Y") #r"%Y-%m-%d"
de2.grid(row=6, column=2, sticky=ttk.W,padx=10, pady=10)
def get_dataentry():
    print(de2.entry.get())
ttk.Button(root,text="get_dataentry", bootstyle=(PRIMARY, "outline-toolbutton"),command=get_dataentry).grid(row=20, column=1, sticky=ttk.W, padx=10, pady=10)
root.mainloop()
Radio button

import ttkbootstrap as ttk
root = ttk.Window()
variable_value = ttk.StringVar()
variable_value_dist = {
    "0":"男",
    "1":"女",
    "2":"未知"
}
ttk.Radiobutton(root, text='男', variable=variable_value, value=0).pack(side=ttk.LEFT, padx=5)
ttk.Radiobutton(root, text='女', variable=variable_value, value=1).pack(side=ttk.LEFT, padx=5)
ttk.Radiobutton(root, text='未知', variable=variable_value, value=2).pack(side=ttk.LEFT, padx=5)
def ensure():
    print(variable_value_dist[variable_value.get()])
ttk.Button(text="确定", command=ensure).pack(side=ttk.LEFT, padx=5)
root.mainloop()
Multi-select button

import ttkbootstrap as ttk
root = ttk.Window()
variable_content = [
    [ttk.StringVar(),"111"],
    [ttk.StringVar(),"222"],
    [ttk.StringVar(),"333"],
    [ttk.StringVar(),"666"]
]
ttk.Checkbutton(root, text="111", variable=variable_content[0][0]).pack(side=ttk.LEFT, padx=5)
ttk.Checkbutton(root, text="222", variable=variable_content[1][0], boot).pack(side=ttk.LEFT, padx=5)
ttk.Checkbutton(root, text="333", variable=variable_content[2][0], boot).pack(side=ttk.LEFT, padx=5)
ttk.Checkbutton(root, text="666", variable=variable_content[3][0]).pack(side=ttk.LEFT, padx=5)
def ensure():
    print([v for i, v in variable_content if i.get()])
ttk.Button(text="确定",command=ensure).pack(side=ttk.LEFT, padx=5)
root.mainloop()
Combo box

import ttkbootstrap as ttk
from ttkbootstrap.constants import *
root = ttk.Window()
cbo = ttk.Combobox(
master=root,
bootstyle = DANGER,
font = ("微软雅黑",12),
values=['content 1', 'content 2', 'content 3'],
)
cbo.current(1) #首先展示values里面索引的对应的值
cbo.pack()
# cbo.set('set other')
def ensure(event):
print(cbo.get())
cbo.bind('<<ComboboxSelected>>', ensure)
root.mainloop()Frame and Labelframe

import ttkbootstrap as ttk
from ttkbootstrap.constants import *
root = ttk.Window()
f = ttk.Frame(bootstyle=SUCCESS)
f.place(x=10,y=10,width=600,height=200)

lf = ttk.Labelframe(text="提示",bootstyle=PRIMARY,width=100,height=60)
lf.place(x=10,y=210,width=300,height=100)
ttk.Label(lf,text="标签").pack()
ttk.Button(lf,text="按钮").pack()
root.mainloop()
Meter

import psutil,time,threading
import ttkbootstrap as ttk
from ttkbootstrap.constants import *
root = ttk.Window()
ttk.Meter(
        master=root,
        bootstyle=DEFAULT,
        metertype="full",#将仪表显示为一个完整的圆形或半圆形(semi)
        wedgesize=5, #设置弧周围的指示器楔形长度,如果大于 0,则此楔形设置为以当前仪表值为中心的指示器
        amounttotal=50, #仪表的最大值,默认100
        amountused=10, #仪表的当前值
        metersize=200,#仪表大小
        showtext=True, #指示是否在仪表上显示左、中、右文本标签
        interactive=True, #是否可以手动调节数字的大小
        textleft='左边', #插入到中心文本左侧的短字符串
        textright='右边',
        textfont="-size 30", #中间数字大小
        subtext="文本",
        subtextstyle=DEFAULT,
        subtextfont="-size 20",#文本大小
        ).pack(side=ttk.LEFT, padx=5)
def _():
        meter = ttk.Meter(
                metersize=180,
                padding=50,
                amountused=0,
                metertype="semi",
                subtext="当前网速(kB/s)",
                subtext,
                interactive=False,
                bootstyle='primary',
                )
        meter.pack(side=ttk.LEFT, padx=5)
        while True:
                meter.configure(amountused=round(getNet(),2))
def getNet():
    recv_before = psutil.net_io_counters().bytes_recv
    time.sleep(1)
    recv_now = psutil.net_io_counters().bytes_recv
    recv = (recv_now - recv_before)/1024
    return recv

t = threading.Thread(target=_)
t.setDaemon(True)
t.start()
root.mainloop()
Progress bar

import time,threading
import ttkbootstrap as ttk
from ttkbootstrap.constants import *
root = ttk.Window(size=(500,380))
def _():
    f = ttk.Frame(root).pack(fill=BOTH, expand=YES)
    p1 = ttk.Progressbar(f, bootstyle=PRIMARY)
    p1.place(x=20, y=20, width=380, height=40)
    p1.start() #间隔默认为50毫秒(20步/秒)
    p2 = ttk.Progressbar(f, bootstyle=INFO,orient=VERTICAL)
    p2.place(x=200, y=100, width=40, height=200)
    p2.step(10) #步长
    while True:
        for i in range(0,50,5):
            p2.step(i) #以步长i增长
            # p2.stop()#停止
            time.sleep(1)
t = threading.Thread(target=_)
t.setDaemon(True)
t.start()
root.mainloop()
Scale

import threading,time
import ttkbootstrap as ttk
from ttkbootstrap.constants import *
root = ttk.Window()
ttk.Scale(
    master=root,
    orient=HORIZONTAL,
    value=75,
    from_=0,
    to=100
).pack(fill=X, pady=5, expand=YES)
ttk.Scale(master=root,orient=HORIZONTAL,bootstyle=WARNING,value=75,from_=100,to=0).pack(fill=X, pady=5, expand=YES)
def scale():
    s2 = ttk.Scale(
        master=root,
        bootstyle=SUCCESS,
        orient=VERTICAL,
        value=0,
        from_=100,
        to=0
    )
    s2.pack(fill=X, pady=5, expand=YES)
    for i in range(101):
        s2.configure(value=i)
        time.sleep(0.1)
        # print(s2.get())
t = threading.Thread(target=scale)
t.setDaemon(True)
t.start()
root.mainloop()
Water ruler

import ttkbootstrap as ttk
from ttkbootstrap.constants import *
root = ttk.Window()
fg1 = ttk.Floodgauge(
    master=None,
    cursor=None,
    font=None,
    length=None,
    maximum=100,
    mode=DETERMINATE,
    orient=HORIZONTAL,
    bootstyle=PRIMARY,
    takefocus=False,
    text=None,
    value=0,
    mask=None,
)
fg1.pack(side=ttk.LEFT, padx=5)
fg1.start()
fg2 = ttk.Floodgauge(
    master=root,
    boot,
    font=("微软雅黑",12), #文本字体
    length=100,  #水尺长度
    maximum=10, #增加到10
    mode=INDETERMINATE, #来回不确定
    orient=VERTICAL, #放置垂直方向
    text="文本", #文本
)
fg2.pack(side=ttk.LEFT, padx=5)
fg2.start()
fg3 = ttk.Floodgauge(
    root,
    bootstyle=INFO,
    length=300,
    maximum=200,
    font=("微软雅黑", 18, 'bold'),
    mask='loading...{}%',
)
fg3.pack(side=ttk.LEFT, padx=5)
fg3.start()
# fg3.stop()
# fg3.configure(mask='...{}%')
fg3.configure(value=25) #初始值
fg3.step(50) #将上面25该值增加50步
root.mainloop()
Scroll bar
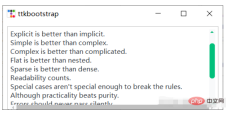
import ttkbootstrap as ttk
from ttkbootstrap.constants import *
root = ttk.Window(size=(500,200))
f = ttk.Frame(root).pack(fill=BOTH, expand=YES)
text_content = '''
The Zen of Python, by Tim Peters

Beautiful is better than ugly.
Explicit is better than implicit.
Simple is better than complex.
Complex is better than complicated.
Flat is better than nested.
Sparse is better than dense.
Readability counts.
Special cases aren't special enough to break the rules.
Although practicality beats purity.
Errors should never pass silently.
Unless explicitly silenced.
In the face of ambiguity, refuse the temptation to guess.
There should be one-- and preferably only one --obvious way to do it.
Although that way may not be obvious at first unless you're Dutch.
Now is better than never.
Although never is often better than *right* now.
If the implementation is hard to explain, it's a bad idea.
If the implementation is easy to explain, it may be a good idea.
Namespaces are one honking great idea -- let's do more of those!
'''
# t = ttk.Text(f)
# t.insert("0.0",text_content)
# t.place(x=10,y=10,width=480,height=200)
# sl_x = ttk.Scrollbar(t,orient=HORIZONTAL) #使滚动条水平放置
# #放到窗口的底部, 填充X轴竖直方向
# sl_x.pack(side=ttk.BOTTOM, fill=ttk.X)
# sl_y = ttk.Scrollbar(t,boot) #滚动条默认垂直放置
# #放到窗口的右侧, 填充Y轴竖直方向
# sl_y.pack(side=ttk.RIGHT, fill=ttk.Y)
# #两个控件相关联
# sl_x.config(command=t.xview)
# t.config(yscrollcommand=sl_x.set)
# sl_y.config(command=t.yview)
# t.config(yscrollcommand=sl_y.set)

##滚动文本框
from ttkbootstrap.scrolled import ScrolledText
st = ScrolledText(f, padding=5, height=10, autohide=True)
st.pack(fill=BOTH, expand=YES)
st.insert(END, text_content)

root.mainloop()
Message prompt Box
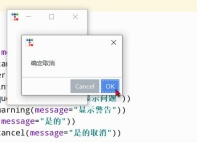
import ttkbootstrap as ttk
from ttkbootstrap.dialogs import Messagebox
root = ttk.Window()
print("ok: ",Messagebox.ok(
    message="要在消息框中显示的消息",
    title="消息框的标题",
    alert=False, #指定是否响铃,默认False
))
print("okcancel: ",Messagebox.okcancel(message="确定取消"))
print("retrycancel: ",Messagebox.retrycancel(message="重试取消"))
print("retrycancel: ",Messagebox.show_error(message="显示错误"))
print("retrycancel: ",Messagebox.show_info(message="显示信息"))
print("retrycancel: ",Messagebox.show_question(message="显示问题"))
print("retrycancel: ",Messagebox.show_warning(message="显示警告"))
print("retrycancel: ",Messagebox.yesno(message="是的"))
print("retrycancel: ",Messagebox.yesnocancel(message="是的取消"))
root.mainloop()
Query box

import ttkbootstrap as ttk
from ttkbootstrap.dialogs import Querybox
root = ttk.Window()
print("获取日期:",Querybox.get_date())
print("获取float型:",Querybox.get_float(
    prompt="请输入内容:",
    title="获取float型: ",
    initialvalue=666.666, #设置初始值
    # minvalue=None,
    # maxvalue=None
))
print("获取字体:",Querybox.get_font())
print("获取整数:",Querybox.get_integer())
print("获取字符串:",Querybox.get_string())
root.mainloop()
Subwindow

import ttkbootstrap as ttk
root = ttk.Window()
root.wm_attributes('-topmost', 1)#让主窗口置顶
def my():
    ttk.Style("solar")
    #print(ttk.Style().theme_names())#可设置主题风格['cyborg', 'journal', 'darkly', 'flatly', 'solar', 'minty', 'litera', 'united', 'pulse', 'cosmo', 'lumen', 'yeti', 'superhero']
    mytoplevel = ttk.Toplevel(root,alpha=0.5)##里面的参数和Window()父窗口一致
ttk.Button(text="my_Toplevel ",command=my).pack()
root.mainloop()
Menu
Newly added, I always felt like something was missing before, but I just remembered it today, hahaha! ! !

import ttkbootstrap as ttk
from ttkbootstrap.dialogs import Messagebox
root = ttk.Window()
# 在窗口上创建一个菜单栏(最上方的菜单栏横条)
menubar = ttk.Menu(root)
def dianji(): #定义一个点击事件方法
    Messagebox.show_info(title='走走走!', message='该功能还未开放!')   #消息提示框窗口
# 定义一个竖条
filemenu = ttk.Menu(menubar)
# 在菜单单元中添加一个菜单项File
menubar.add_cascade(label='设置', menu=filemenu)
# 在设置菜单项添加命令选项
filemenu.add_command(label='更多', command=dianji)
# 添加一条分割线
filemenu.add_separator()
# 定义一个子菜单条
submenu = ttk.Menu(filemenu)  # 和上面定义菜单一样,不过此处是在设置上创建一个空的菜单
submenu.add_command(label="背景")  # 给submenu添加功能选项
submenu.add_command(label="字体")
submenu.add_command(label="大小")
# 添加一个展开下拉菜单,并把上面的子菜单嵌入给它
filemenu.add_cascade(label='个性化', menu=submenu, underline=0)
# 同样的在File中加入Exit小菜单,此处对应命令为window.quit
filemenu.add_command(label='退出', command=root.quit)
# 在顶部再添加多个菜单项
otherfunction = ttk.Menu(menubar)
menubar.add_cascade(label='选择', menu=otherfunction)
menubar.add_cascade(label='查看', menu=otherfunction)
otherfunction.add_command(label='该功能未开放!')
#帮助
def baidu():
    Messagebox.okcancel(title='baidu.com', message='走走走,自己去百度!')
help = ttk.Menu(menubar, tearoff=0)
menubar.add_cascade(label='帮助', menu=help)
help.add_command(label='help', command=baidu)
# 将菜单配置给窗口
root.config(menu=menubar)

root.mainloop()
Panel

import ttkbootstrap as ttk
from ttkbootstrap.constants import *
root = ttk.Window()
f = ttk.Frame(root)
f.pack(pady=5, fill=X, side=TOP)
nb = ttk.Notebook(f)
nb.pack(
    side=LEFT,
    padx=(10, 0),
    expand=YES,
    fill=BOTH
)
nb_text = "This is a notebook tab.\nYou can put any widget you want here."
nb.add(ttk.Label(nb, text=nb_text), text="Tab 1", sticky=NW)
nb.add(
    child=ttk.Label(nb, text="notebook tab 2."),
    text="Tab 2",
    sticky=NW
)
f2 = ttk.Frame(nb)
ttk.Button(f2,text="notebook button").pack(side=ttk.LEFT, padx=5, pady=10)
nb.add(f2, text='Tab 3')
root.mainloop()
Tree View

import ttkbootstrap as ttk
from ttkbootstrap.constants import *
root = ttk.Window()
tv = ttk.Treeview(
        master=root,
        columns=[0, 1],
        show=HEADINGS,
        height=5
    )
table_data = [
    (1,'one'),
    (2, 'two'),
    (3, 'three'),
    (4, 'four'),
    (5, 'five')
]
for row in table_data:
    tv.insert('', END, values=row)
# print(tv.get_children())#('I001', 'I002', 'I003', 'I004', 'I005')
tv.selection_set('I002')
tv.heading(0, text='ID')
tv.heading(1, text='NAME')
tv.column(0, width=60)
tv.column(1, width=300, anchor=CENTER)
tv.pack(side=LEFT, anchor=NE, fill=X)
root.mainloop()
加载gif动图
左边是官网上提供的方法,右边是一个自己定义的方法。

from pathlib import Path
from itertools import cycle
import ttkbootstrap as ttk
from ttkbootstrap.constants import *
from PIL import Image, ImageTk, ImageSequence
class AnimatedGif(ttk.Frame):
    def __init__(self, master):
        super().__init__(master, width=400, height=300)

        # open the GIF and create a cycle iterator
        file_path = Path(__file__).parent / "guanwang.gif"
        with Image.open(file_path) as im:
            # create a sequence
            sequence = ImageSequence.Iterator(im)
            images = [ImageTk.PhotoImage(s) for s in sequence]
            self.image_cycle = cycle(images)

            # length of each frame
            self.framerate = im.info["duration"]

        self.img_container = ttk.Label(self, image=next(self.image_cycle))
        self.img_container.pack(fill="both", expand="yes")
        self.after(self.framerate, self.next_frame)

    def next_frame(self):
        """Update the image for each frame"""
        self.img_container.configure(image=next(self.image_cycle))
        self.after(self.framerate, self.next_frame)

def loadingGif(app):
    numIdx = 12  # gif的帧数
    file_path = Path(__file__).parent / "TestGif.gif"
    frames = [ttk.PhotoImage(file=file_path, format='gif -index %i' % (i)) for i in range(numIdx)]
    def run(rate):
        frame = frames[rate]
        rate += 1
        gif_label.configure(image=frame)  # 显示当前帧的图片
        gif_label.after(100, run, rate % numIdx)  # 0.1秒(100毫秒)之后继续执行函数(run)
    gif_label = ttk.Label(app)
    gif_label.pack(side=LEFT,padx=20,fill=BOTH, expand=YES)
    run(0)
if __name__ == "__main__":
    app = ttk.Window("Animated GIF", themename="litera")
    gif = AnimatedGif(app)
    gif.pack(side=LEFT,padx=20,fill=BOTH, expand=YES)
    loadingGif(app)
    app.mainloop()
打开本地文件
import ttkbootstrap as ttk
from ttkbootstrap.constants import *
from tkinter.filedialog import askopenfilename
root = ttk.Window()
def open_file():
    path = askopenfilename()
    # print(path)
    if not path:
        return
ttk.Button(root, text="打开文件", command=open_file).pack(fill=X, padx=10, pady=10)
root.mainloop()
打开浏览器
import ttkbootstrap as ttk
from ttkbootstrap.constants import *
import webbrowser
root = ttk.Window()
def open_url(event):
    webbrowser.open("http://www.baidu.com", new=0)  # 启动web浏览器访问给定的URL
label = ttk.Label(root,text="https://www.baidu.com/",bootstyle=PRIMARY)
label.pack(fill=BOTH)
label.bind("<Button-1>", open_url)
root.mainloop()
The above is the detailed content of How to use ttkbootstrap to create a beautiful interface for Python GUI?. For more information, please follow other related articles on the PHP Chinese website!

 Python vs. C : Understanding the Key DifferencesApr 21, 2025 am 12:18 AM
Python and C each have their own advantages, and the choice should be based on project requirements. 1) Python is suitable for rapid development and data processing due to its concise syntax and dynamic typing. 2)C is suitable for high performance and system programming due to its static typing and manual memory management.
 Python vs. C : Which Language to Choose for Your Project?Apr 21, 2025 am 12:17 AM
Choosing Python or C depends on project requirements: 1) If you need rapid development, data processing and prototype design, choose Python; 2) If you need high performance, low latency and close hardware control, choose C.
 Reaching Your Python Goals: The Power of 2 Hours DailyApr 20, 2025 am 12:21 AM
By investing 2 hours of Python learning every day, you can effectively improve your programming skills. 1. Learn new knowledge: read documents or watch tutorials. 2. Practice: Write code and complete exercises. 3. Review: Consolidate the content you have learned. 4. Project practice: Apply what you have learned in actual projects. Such a structured learning plan can help you systematically master Python and achieve career goals.
 Maximizing 2 Hours: Effective Python Learning StrategiesApr 20, 2025 am 12:20 AM
Methods to learn Python efficiently within two hours include: 1. Review the basic knowledge and ensure that you are familiar with Python installation and basic syntax; 2. Understand the core concepts of Python, such as variables, lists, functions, etc.; 3. Master basic and advanced usage by using examples; 4. Learn common errors and debugging techniques; 5. Apply performance optimization and best practices, such as using list comprehensions and following the PEP8 style guide.
 Choosing Between Python and C : The Right Language for YouApr 20, 2025 am 12:20 AM
Python is suitable for beginners and data science, and C is suitable for system programming and game development. 1. Python is simple and easy to use, suitable for data science and web development. 2.C provides high performance and control, suitable for game development and system programming. The choice should be based on project needs and personal interests.
 Python vs. C : A Comparative Analysis of Programming LanguagesApr 20, 2025 am 12:14 AM
Python is more suitable for data science and rapid development, while C is more suitable for high performance and system programming. 1. Python syntax is concise and easy to learn, suitable for data processing and scientific computing. 2.C has complex syntax but excellent performance and is often used in game development and system programming.
 2 Hours a Day: The Potential of Python LearningApr 20, 2025 am 12:14 AM
It is feasible to invest two hours a day to learn Python. 1. Learn new knowledge: Learn new concepts in one hour, such as lists and dictionaries. 2. Practice and exercises: Use one hour to perform programming exercises, such as writing small programs. Through reasonable planning and perseverance, you can master the core concepts of Python in a short time.
 Python vs. C : Learning Curves and Ease of UseApr 19, 2025 am 12:20 AM
Python is easier to learn and use, while C is more powerful but complex. 1. Python syntax is concise and suitable for beginners. Dynamic typing and automatic memory management make it easy to use, but may cause runtime errors. 2.C provides low-level control and advanced features, suitable for high-performance applications, but has a high learning threshold and requires manual memory and type safety management.


Hot AI Tools

Undresser.AI Undress
AI-powered app for creating realistic nude photos

AI Clothes Remover
Online AI tool for removing clothes from photos.

Undress AI Tool
Undress images for free

Clothoff.io
AI clothes remover

Video Face Swap
Swap faces in any video effortlessly with our completely free AI face swap tool!

Hot Article
Hot Tools

mPDF
mPDF is a PHP library that can generate PDF files from UTF-8 encoded HTML. The original author, Ian Back, wrote mPDF to output PDF files "on the fly" from his website and handle different languages. It is slower than original scripts like HTML2FPDF and produces larger files when using Unicode fonts, but supports CSS styles etc. and has a lot of enhancements. Supports almost all languages, including RTL (Arabic and Hebrew) and CJK (Chinese, Japanese and Korean). Supports nested block-level elements (such as P, DIV),

SecLists
SecLists is the ultimate security tester's companion. It is a collection of various types of lists that are frequently used during security assessments, all in one place. SecLists helps make security testing more efficient and productive by conveniently providing all the lists a security tester might need. List types include usernames, passwords, URLs, fuzzing payloads, sensitive data patterns, web shells, and more. The tester can simply pull this repository onto a new test machine and he will have access to every type of list he needs.

VSCode Windows 64-bit Download
A free and powerful IDE editor launched by Microsoft

Dreamweaver CS6
Visual web development tools

MantisBT
Mantis is an easy-to-deploy web-based defect tracking tool designed to aid in product defect tracking. It requires PHP, MySQL and a web server. Check out our demo and hosting services.

