


Windows 11 is here, and many users are eager to test it out. However, it seems that some of them are encountering various problems when trying to install the operating system.
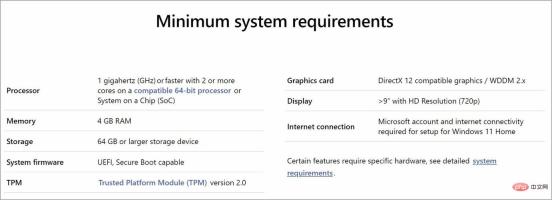
The process should be simple, all you need is Windows 11 installation media and a PC that meets the hardware requirements.
However, sometimes various problems arise and in this tutorial, we will show you how to solve them without thinking that it is time to uninstall Windows 11.
But first, let's see what happens to determine what you're up against. Just take a closer look below.
What are the most common Windows 11 installation problems?
- Installation failedNo error code
- Windows 11 installationISO failed
- Windows 11 installation failed 0xc1900101 (Users with low disk space on their devices are more likely to encounter error 0xc1900101 in Windows 11).
- InstallerInstallation failed
- Windows 11 installation failedsafe_os stage (Safe OS installation errors can be resolved by adjusting the RAM capacity or upgrading the BIOS ).
- Setup failed to verifyProduct Key
- Windows 11Has been unable to install
- Access BIOS/UEFI on your PC. This process varies for each manufacturer, but generally means pressing the
- F (function) key on your keyboard before booting the operating system.
 Now go to the
 - Security section. Find the
- TPM option and enable it. Finally, just save all recent changes. Normally, you can press
- F10 to save and exit. BIOS is a software tool installed in the ROM chip on the motherboard.


2. Enable Secure Boot option
- Click the Start button and select Settings.
- Select Update and Security.
- Click the Recovery option in the left pane and select the Restart Now button.
- When you see the boot options, select Troubleshoot.
- Click Advanced Options.
- Select the UEFI Firmware Settings option.
- After your PC enters the BIOS, click Security and select the Secure Boot option.
- Next, toggle the Secure Boot option to On to enable it, then accept the changes when prompted.
- Press the F10 key on your keyboard to save changes and exit BIOS.
- Wait for the PC to restart before trying to install Windows 11.


3. Bypass TPM 2.0 and Secure Boot
- Press the Windows R key to startRun, type regedit and press Enter or click OK.
- Navigate to the following registry path:
<strong>HKEY_LOCAL_MACHINE\SYSTEM\Setup</strong>
- Right click on the empty space on the right , select New and select Key, then name it LabConfig.
- Click on the new LabConfig key, right-click on a blank area to create two DWORD (32-bit) value options and name them BypassTPMCheck and BypassSecureBootCheck.
- Double-click the new items one by one, select Decimal Base and set 1 in the Numeric Data field, and click OK.
- Close Registry Editor and then restart your PC. Try installing Windows 11 again.


If you want more details, you can also learn how to bypass TPM 2.0 checks when installing Windows 11. However, after enabling these settings in the BIOS, the installation errors should disappear.
Keep in mind that some motherboards do not have a TPM chip, so you may need to purchase a TPM chip for your PC to fix it.
4. Remove GPU Driver
- Click the Start button, type device manager and select the application from the results.
- Expand the Display Adapters section, right-click on the graphics driver and select Uninstall Device.
- The system will then install the new driver.


The above is the detailed content of Windows 11 installation failed? This is how to solve this problem. For more information, please follow other related articles on the PHP Chinese website!

Hot AI Tools

Undresser.AI Undress
AI-powered app for creating realistic nude photos

AI Clothes Remover
Online AI tool for removing clothes from photos.

Undress AI Tool
Undress images for free

Clothoff.io
AI clothes remover

Video Face Swap
Swap faces in any video effortlessly with our completely free AI face swap tool!

Hot Article
Hot Tools

Notepad++7.3.1
Easy-to-use and free code editor

Dreamweaver Mac version
Visual web development tools

ZendStudio 13.5.1 Mac
Powerful PHP integrated development environment

SAP NetWeaver Server Adapter for Eclipse
Integrate Eclipse with SAP NetWeaver application server.

DVWA
Damn Vulnerable Web App (DVWA) is a PHP/MySQL web application that is very vulnerable. Its main goals are to be an aid for security professionals to test their skills and tools in a legal environment, to help web developers better understand the process of securing web applications, and to help teachers/students teach/learn in a classroom environment Web application security. The goal of DVWA is to practice some of the most common web vulnerabilities through a simple and straightforward interface, with varying degrees of difficulty. Please note that this software

