Home >Common Problem >How to edit junk email options in Outlook
How to edit junk email options in Outlook
- 王林forward
- 2023-04-14 11:58:093419browse
Microsft Outlook has become a staple of our official email setup. It's everywhere and people seem to have integrated it into their lives. Today, emails in companies are mostly sent through the Outlook application. This also leads to many situations where hackers will try to access confidential company documents and marketers will try to gain attention for their products or services. Outlook users need to know these tips. Our Outlook mailboxes can be exposed to regular attacks from multiple sources. Fortunately, Outlook has some great features that can help alleviate this situation. You can set different options for spam messages you receive in Outlook.
Access Junk Email Options on Outlook
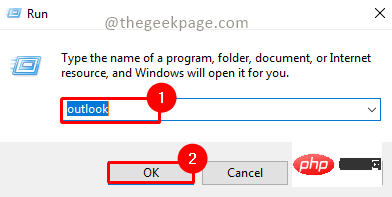
Step 1: Press the Windows R button and type Outlook and click OK .
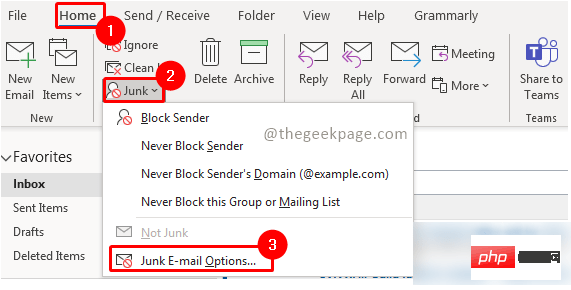
Step 2: Go to Homepage, click on Spam, then select Spam options.
Step 3: Go to the Options tab to see the different options available for managing spam.
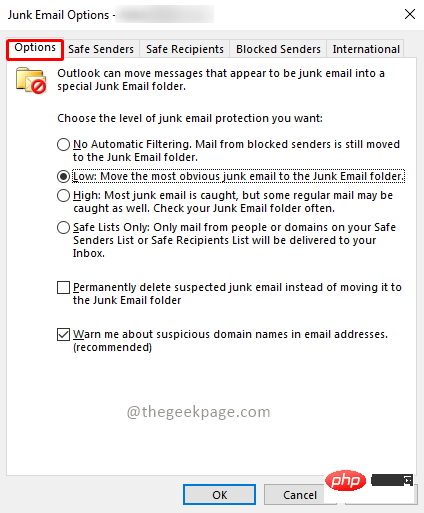
Step 4: Provide multiple features so that users can customize it according to their needs.
Explanation of different features in Options tab in Spam options
No automatic filtering: This feature ensures that only blocked email IDs do not flow into your Inbox, instead flows into the spam folder. Other messages flowing into your inbox will not have any filters, so all emails will get through.
Low: View only the most obvious messages in the spam folder. Spam can still leak into your inbox.
High: This feature ensures that most emails will be caught in the spam folder. However, the disadvantage of this is that some ordinary emails may also be captured. Using this feature means you will have to check your junk folder frequently to make sure you don't miss any regular email updates. Some emails may need to be moved from the spam folder to the inbox.
Safe List: This feature ensures the highest level of protection against spam. By allowing only emails from the safe senders list or the safe recipients list.
"Options" OptionsThere are 2 checkboxes in the card. If you select the first checkbox, it will delete all suspected spam messages instead of moving them to the Spam folder. It is recommended that users use this checkbox with caution. The second checkbox needs to be clicked. They will ensure that you are notified of any suspicious emails with irregular domain addresses. This will also disable links from suspicious phishing emails. This will help protect your computer and Outlook account from malicious attacks.
Safe Senders Tab
The Safe Senders tab helps you add all the safe email addresses that you know and from which you can receive emails regularly.
Step 1: Click the "Safe Senders" tab.
Step 2: Click to add.
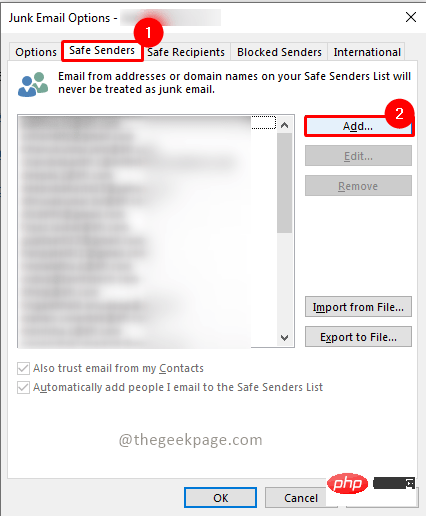
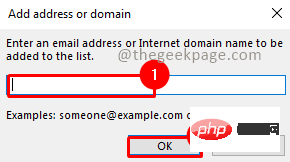
Step 3: Under the Add an address or domain box, enter your email address and click OK.
Safe Recipients Tab
The Safe Recipients tab allows you to add all the emails you are aware of and that you will regularly The person to send the email to. Outlook will not treat any email from these addresses as spam.
Step 1: Click the "Safe Recipients" tab.
Step 2: Click to add.
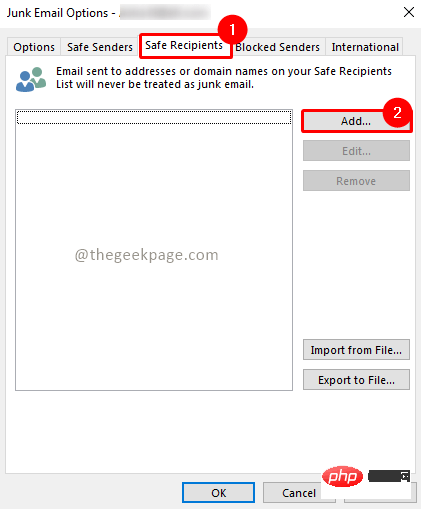
Step 3: Under the Add an address or domain box, enter your email address and click OK.

Blocked Senders Tab
The Blocked Senders tab allows you to add any suspicious addresses or ones you think are spam Any email. Any emails from these email addresses will automatically be moved to spam.
Step 1: Click on the Blocked Senders tab.
Step 2: Click to add.
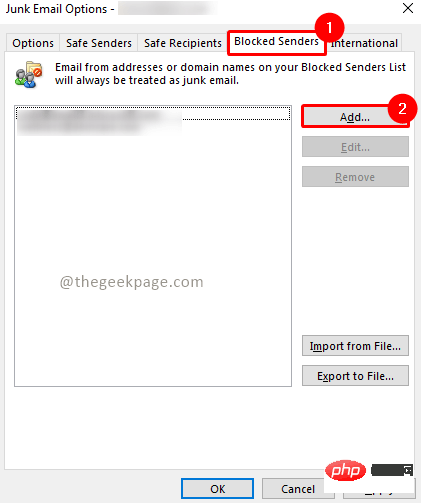
Step 3: Under the Add an address or domain box, enter your email address and click OK.

International Tab
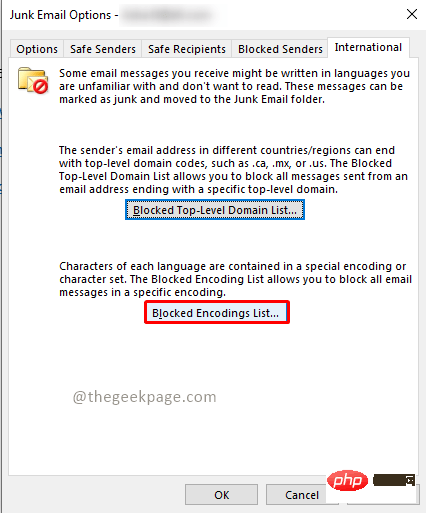
The International tab allows you to block emails from certain domains and even certain languages. This feature is useful when you receive some emails in a language you may not understand.
Step 1: Click on the International tab.
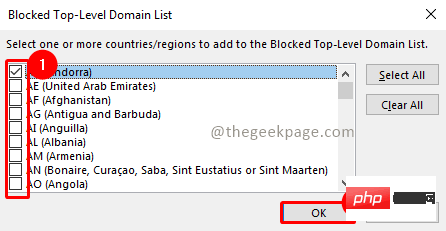
Step 2: Click Blocked top-level domains list.
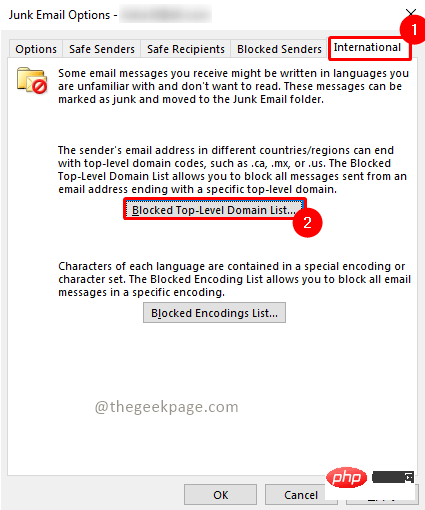
Step 3: Select any countries you want to block them by checking the corresponding box.
Note: You can also select all.
Step 4: Click OK to save changes.
Step 5: Click on the Blocked encoding list.
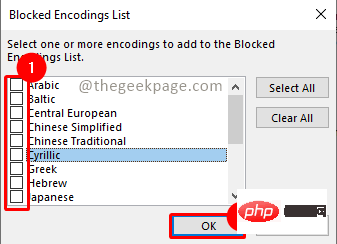
#Step 6: Select the languages you want to block by checking the corresponding boxes.
Step 7: Click OK to save changes.
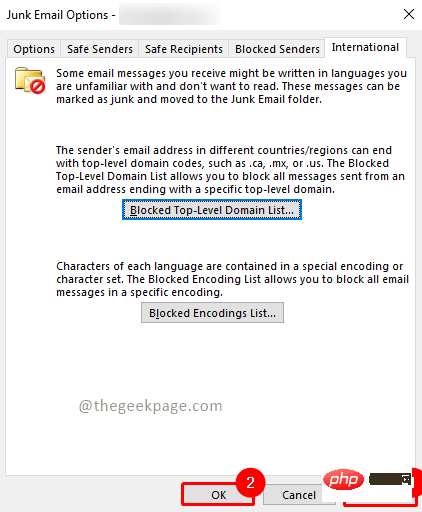
Step 8: Click Apply to apply all changes you made to the Junk Email folder options.
Step 9: Click "OK" to close the window.
The above is the detailed content of How to edit junk email options in Outlook. For more information, please follow other related articles on the PHP Chinese website!

