Home >Web Front-end >JS Tutorial >This article will take you to understand the module system in node
This article will take you to understand the module system in node
- 青灯夜游forward
- 2023-01-14 19:09:482722browse
This article will help you learn node and understand the module system in node in a simple and easy way. I hope it will be helpful to you!

I wrote an article two years ago to introduce the module system: Understanding the concept of front-end modules: CommonJs and ES6Module. The knowledge in this article is aimed at beginners and is relatively simple. I would also like to correct several errors in the article:
- [Module] and [Module System] are two different things. A module is a unit in software, and a module system is a set of syntax or tools. The module system allows developers to define and use modules in projects.
- The abbreviation of ECMAScript Module is ESM, or ESModule, not ES6Module.
The basic knowledge about the module system is almost covered in the previous article, so this article will focus on the internal principles of the module system and a more complete introductionThe difference between different module systems, the content that appeared in the previous article will not be repeated here. [Related tutorial recommendations: nodejs video tutorial, Programming teaching]
Module system
Not all programming languages There is a built-in module system. For a long time after JavaScript was born, there was no module system.
In the browser environment, you can only use the <script> tag to introduce unused code files. This method shares a global scope, which can be said to be full of problems; in addition, the front-end is changing with each passing day. development, this method no longer meets current needs. Before the official module system appeared, the front-end community created its own third-party module system. The most commonly used ones are: asynchronous module definition AMD, universal module definition UMD, etc. Of course, the most popular ones are The most famous one is CommonJS.
Because Node.js is a JavaScript running environment, it can directly access the underlying file system. So developers adopted it and implemented a module system in accordance with CommonJS specifications.
At first, CommonJS could only be used on the Node.js platform. With the emergence of module packaging tools such as Browserify and Webpack, CommonJS can finally run on the browser side.
It was not until the release of the ECMAScript6 specification in 2015 that there was a formal standard for the module system. The module system built according to this standard is called ECMAScript modulereferred to as [ESM], and thus ESM is The Node.js environment and browser environment began to be unified. Of course, ECMAScript6 only provides syntax and semantics. As for the implementation, it is up to the browser service vendors and Node developers to work hard. That’s why we have the babel artifact that is the envy of other programming languages. Implementing a module system is not an easy task. Node.js also has relatively stable support in version 13.2. ESM.
But no matter what, ESM is the "son" of JavaScript, and there is nothing wrong with learning it!
The basic idea of the module system
In the era of slash-and-burn farming, JavaScript was used to develop applications, and script files could only be introduced through script tags. One of the more serious problems is the lack of a namespace mechanism, which means that each script shares the same scope. There is a better solution to this problem in the community: Revevaling module
const myModule = (() => {
    const _privateFn = () => {}
    const _privateAttr = 1
    return {
        publicFn: () => {},
        publicAttr: 2
    }
})()

console.log(myModule)
console.log(myModule.publicFn, myModule._privateFn)
The running results are as follows:

This mode is very Simple, use IIFE to create a private scope, and use return to expose the variables. Internal variables (such as _privateFn, _privateAttr) cannot be accessed from the outside scope.
[revealing module] uses these features to hide private information and export APIs that should be published to the outside world. The subsequent module system is also developed based on this idea.
CommonJS
Based on the above idea, develop a module loader.
First write a function that loads module content, wrap this function in a private scope, and then evaluate it through eval() to run the function:
function loadModule (filename, module, require) {
  const wrappedSrc =
    `(function (module, exports, require) {
      ${fs.readFileSync(filename, 'utf8)}
    }(module, module.exports, require)`
  eval(wrappedSrc)
}
and [revealing module 】Same, the source code of the module is wrapped in the function. The difference is that a series of variables (module, module.exports, require) are also passed to the function.
It is worth noting that the module content is read through [readFileSync]. Generally speaking, you should not use the synchronized version when calling APIs involving the file system. But this time is different, because loading modules through the CommonJs system itself should be implemented as a synchronous operation to ensure that multiple modules can be introduced in the correct dependency order.
接着模拟require()函数,主要功能是加载模块。
function require(moduleName) {
  const id = require.resolve(moduleName)
  if (require.cache[id]) {
    return require.cache[id].exports
  }
  // 模块的元数据
  const module = {
    exports: {},
    id
  }
  // 更新缓存
  require.cache[id] = module

  // 载入模块
  loadModule(id, module, require)

  // 返回导出的变量
  return module.exports
}
require.cache = {}
require.resolve = (moduleName) => {
  // 根据moduleName解析出完整的模块id
}
(1)函数接收到moduleName后,首先解析出模块的完整路径,赋值给id。
(2)如果cache[id]为true,说明该模块已经被加载过了,直接返回缓存结果
(3)否则,就配置一套环境,用于首次加载。具体来说,创建module对象,包含exports(也就是导出内容),id(作用如上)
(4)将首次加载的module缓存起来
(5)通过loadModule从模块的源文件中读取源代码
(6)最后return module.exports返回想要导出的内容。
require是同步的
在模拟require函数的时候,有一个很重要的细节:require函数必须是同步的。它的作用仅仅是直接将模块内容返回而已,并没有用到回调机制。Node.js中的require也是如此。所以针对module.exports的赋值操作,也必须是同步的,如果用异步就会出问题:
// 出问题
setTimeout(() => {
    module.exports = function () {}
}, 1000)
require是同步函数这一点对定义模块的方式有着非常重要的影响,因为它迫使我们在定义模块时只能使用同步的代码,以至于Node.js都为此,提供了大多数异步API的同步版本。
早期的Node.js有异步版本的require函数,但很快就移除了,因为这会让函数的功能变得十分复杂。
ESM
ESM是ECMAScript2015规范的一部分,该规范给JavaScript语言指定了一套官方的模块系统,以适应各种执行环境。
在Node.js中使用ESM
Node.js默认会把.js后缀的文件,都当成是采用CommonJS语法所写的。如果直接在.js文件中采用ESM语法,解释器会报错。
有三种方法可以在让Node.js解释器转为ESM语法:
1、把文件后缀名改为.mjs;
2、给最近的package.json文件添加type字段,值为“module”;
3、字符串作为参数传入--eval,或通过STDIN管道传输到node,带有标志--input-type=module
比如:
node --input-type=module --eval "import { sep } from 'node:path';
console.log(sep);"
不同类型模块引用
ESM可以被解析并缓存为URL(这也意味着特殊字符必须是百分比编码)。支持file:、node:和data:等的URL协议
file:URL
如果用于解析模块的import说明符具有不同的查询或片段,则会多次加载模块
// 被认为是两个不同的模块
import './foo.mjs?query=1';
import './foo.mjs?query=2';
data:URL
支持使用MIME类型导入:
-
text/javascript用于ES模块 -
application/json用于JSON -
application/wasm用于Wasm
import 'data:text/javascript,console.log("hello!");';
import _ from 'data:application/json,"world!"' assert { type: 'json' };
data:URL仅解析内置模块的裸说明符和绝对说明符。解析相对说明符不起作用,因为data:不是特殊协议,没有相对解析的概念。
导入断言
这个属性为模块导入语句添加了内联语法,以便在模块说明符旁边传入更多信息。
import fooData from './foo.json' assert { type: 'json' };

const { default: barData } = await import('./bar.json', { assert: { type: 'json' } });
目前只支持JSON模块,而且assert { type: 'json' }语法是具有强制性的。
导入Wash模块
在--experimental-wasm-modules标志下支持导入WebAssembly模块,允许将任何.wasm文件作为普通模块导入,同时也支持它们的模块导入。
// index.mjs
import * as M from './module.wasm';
console.log(M)
使用如下命令执行:
node --experimental-wasm-modules index.mjs
顶层await
await关键字可以用在ESM中的顶层。
// a.mjs
export const five = await Promise.resolve(5)

// b.mjs
import { five } from './a.mjs'
console.log(five) // 5
异步引用
前面说过,import语句对模块依赖的解决是静态的,因此有两项著名的限制:
- 模块标识符不能等到运行的时候再去构造;
- 模块引入语句,必须写在文件的顶端,而且不能套在控制流语句里;
然而,对于某些情况来说,这两项限制无疑是过于严格。就比如说有一个还算是比较常见的需求:延迟加载:
在遇到一个体积很大的模块时,只想在真正需要用到模块里的某个功能时,再去加载这个庞大的模块。
为此,ESM提供了异步引入机制。这种引入操作,可以在程序运行的时候,通过import()运算符实现。从语法上看,相当于一个函数,接收模块标识符作为参数,并返回一个Promise,待Promise resolve后就能得到解析后的模块对象。
ESM的加载过程
用一个循环依赖的例子来说明ESM的加载过程:
// index.js
import * as foo from './foo.js';
import * as bar from './bar.js';
console.log(foo);
console.log(bar);

// foo.js
import * as Bar from './bar.js'
export let loaded = false;
export const bar = Bar;
loaded = true;

// bar.js
import * as Foo from './foo.js';
export let loaded = false;
export const foo = Foo;
loaded = true
先看看运行结果:

It can be observed through loaded that both modules foo and bar can log the complete module information loaded. But CommonJS is different. There must be a module that cannot print out what it looks like after being fully loaded.
Let’s go deep into the loading process and see why such a result occurs.
The loading process can be divided into three phases:
- The first phase: parsing
- The second phase: declaration
- The third phase: Execution
Parsing phase:
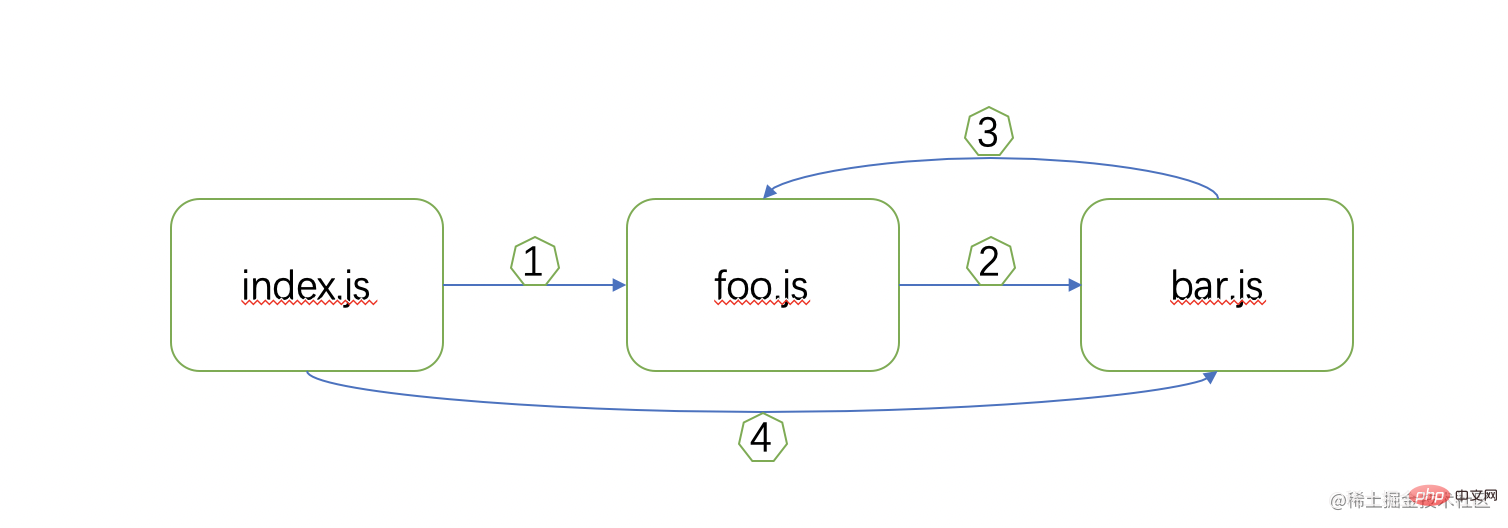
The interpreter starts from the entry file (that is, index.js), parses the dependencies between modules, and displays them in the form of a diagram , this graph is also called a dependency graph.
At this stage, we only focus on the import statements, and load the source code corresponding to the module that these statements want to introduce. And obtain the final dependency graph through in-depth analysis. Take the above example to illustrate:
1. Starting from index.js, find the import * as foo from './foo.js' statement, and then go to the foo.js file.
2. Continue parsing from the foo.js file and find the import * as Bar from './bar.js' statement, thus going to bar.js.
3. Continue parsing from bar.js and find that the import * as Foo from './foo.js' statement forms a circular dependency, but since the interpreter is already processing the foo.js module, So it will not enter it again, and then continue to parse the bar module.
4. After parsing the bar module, we found that there is no import statement, so we return to foo.js and continue parsing. The import statement was not found again all the way, and index.js was returned.
5. Found import * as bar from './bar.js' in index.js, but since bar.js has already been parsed, skip it and continue execution.
Finally, the dependency graph is fully displayed through the depth-first method:

Declaration phase:
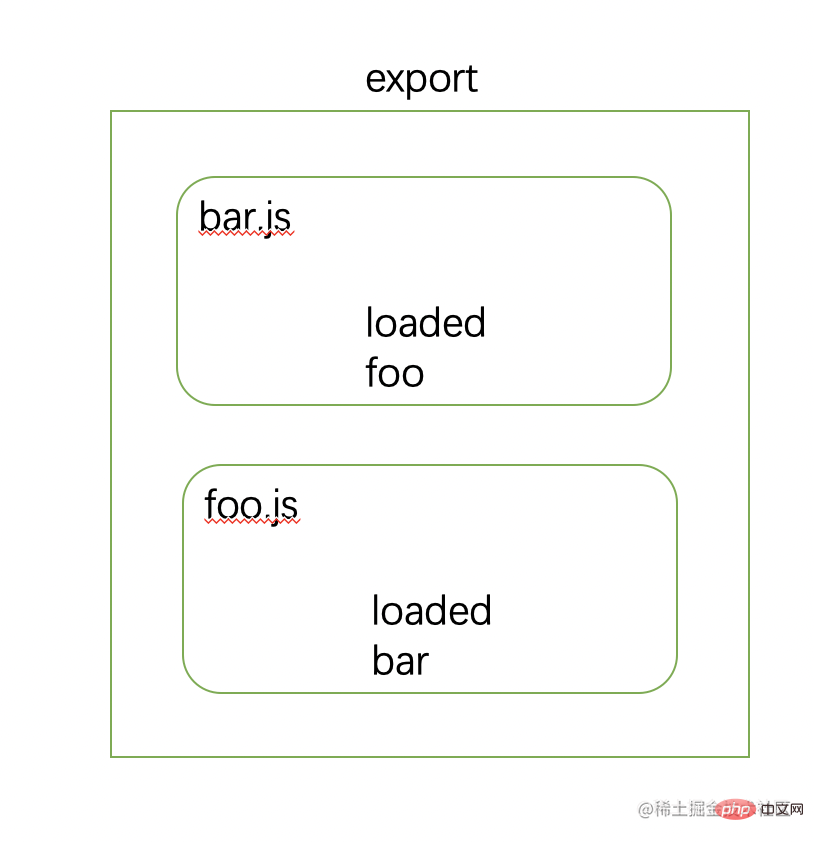
The interpreter starts from Starting from the obtained dependency graph, declare each module in order from bottom to top. Specifically, every time a module is reached, all properties to be exported by the module are searched and the identifiers of the exported values are declared in memory. Please note that only declarations are made at this stage and no assignment operations are performed.
1. The interpreter starts from the bar.js module and declares the identifiers of loaded and foo.
2. Trace back up to the foo.js module and declare the loaded and bar identifiers.
3. The index.js module is reached, but this module has no export statement, so no identifier is declared.

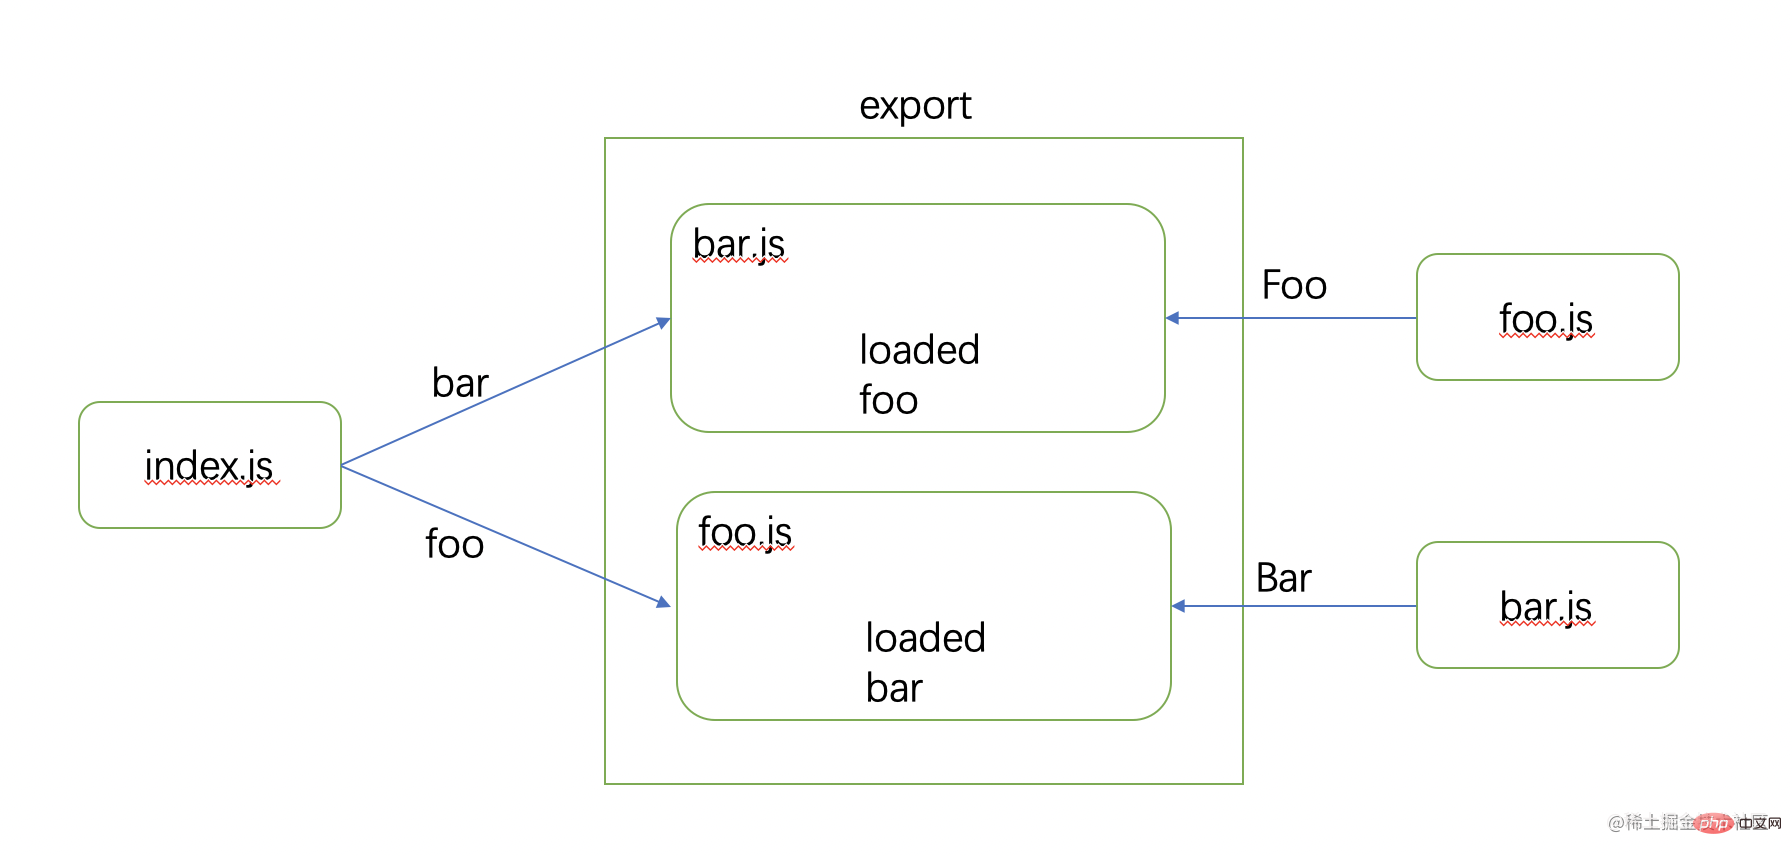
#After declaring all export identifiers, walk through the dependency graph again to connect the relationship between import and export.

It can be seen that a const-like binding relationship is established between the module introduced by import and the value exported by export. The importer's side is Can only read but not write. Moreover, the bar module read in index.js and the bar module read in foo.js are essentially the same instance.
So this is why the complete parsing results are output in the results of this example.
This is fundamentally different from the method used by the CommonJS system. If a module imports a CommonJS module, the system will copy the entire exports object of the latter and copy its contents to the current module. In this case, if the imported module modifies its own copy variable, then the user cannot see the new value.
Execution phase:
In this phase, the engine will execute the module code. The dependency graph is still accessed in bottom-up order and the accessed files are executed one by one. Execution starts from the bar.js file, to foo.js, and finally to index.js. In this process, the value of the identifier in the export table is gradually improved.
This process does not seem to be much different from CommonJS, but there are actually significant differences. Since CommonJS is dynamic, it parses the dependency graph while executing related files. So as long as you see a require statement, you can be sure that when the program comes to this statement, all the previous codes have been executed. Therefore, the require statement does not necessarily have to appear at the beginning of the file, but can appear anywhere, and module identifiers can also be constructed from variables.
But ESM is different. In ESM, the above three stages are separated from each other. It must first completely construct the dependency graph before it can execute the code. Therefore, the operations of introducing modules and exporting modules, They must be static and cannot wait until the code is executed.
The difference between ESM and CommonJS
In addition to the several differences mentioned above, there are some differences worth noting:
Mandatory file extension
When using the import keyword to parse relative or absolute specifiers in ESM, the file extension must be provided, and the directory index must also be fully specified ('./path/index .js'). The CommonJS require function allows this extension to be omitted.
严格模式
ESM是默认运行于严格模式之下,而且该严格模式是不能禁用。所以不能使用未声明的变量,也不能使用那些仅仅在非严格模式下才能使用的特性(例如with)。
ESM不支持CommonJS提供的某些引用
CommonJS中提供了一些全局变量,这些变量不能在ESM下使用,如果试图使用这些变量会导致ReferenceError错误。包括
requireexportsmodule.exports__filename__dirname
其中__filename指的是当前这个模块文件的绝对路径,__dirname则是该文件所在文件夹的绝对路径。这连个变量在构建当前文件的相对路径时很有帮助,所以ESM提供了一些方法去实现两个变量的功能。
在ESM中,可以使用import.meta对象来获取一个引用,这个引用指的是当前文件的URL。具体来说,就是通过import.meta.url来获取当前模块的文件路径,这个路径的格式类似file:///path/to/current_module.js。根据这条路径,构造出__filename和__dirname所表达的绝对路径:
import { fileURLToPath } from 'url'
import { dirname } from 'path'
const __filename = fileURLToPath(import.meta.url)
const __dirname = dirname(__filename)
而且还能模拟CommonJS中require()函数
import { createRequire } from 'module'
const require = createRequire(import.meta.url)
this指向
在ESM的全局作用域中,this是未定义(undefined),但是在CommonJS模块系统中,它是一个指向exports的引用:
// ESM
console.log(this) // undefined

// CommonJS
console.log(this === exports) // true
ESM加载CommonJS
上面提到过在ESM中可以模拟CommonJS的require()函数,以此来加载CommonJS的模块。除此之外,还可以使用标准的import语法引入CommonJS模块,不过这种引入方式只能把默认导出的东西给引进来:
import packageMain from 'commonjs-package' // 完全可以
import { method } from 'commonjs-package' // 出错
而CommonJS模块的require总是将它引用的文件视为CommonJS。不支持使用require加载ES模块,因为ES模块具有异步执行。但可以使用import()从CommonJS模块中加载ES模块。
导出双重模块
虽然ESM已经推出了7年,node.js也已经稳定支持了,我们开发组件库的时候可以只支持ESM。但为了兼容旧项目,对CommonJS的支持也是必不可少的。有两种广泛使用的方法可以使得组件库同时支持两个模块系统的导出。
使用ES模块封装器
在CommonJS中编写包或将ES模块源代码转换为CommonJS,并创建定义命名导出的ES模块封装文件。使用条件导出,import使用ES模块封装器,require使用CommonJS入口点。举个例子,example模块中
// package.json
{
    "type": "module",
    "exports": {
        "import": "./wrapper.mjs",
        "require": "./index.cjs"
    }
}
使用显示扩展名.cjs和.mjs,因为只用.js的话,要么是被默认为CommonJS,要么"type": "module"会导致这些文件都被视为ES模块。
// ./index.cjs
export.name = 'name';

// ./wrapper.mjs
import cjsModule from './index.cjs'
export const name = cjsModule.name;
在这个例子中:
// 使用ESM引入
import { name } from 'example'

// 使用CommonJS引入
const { name } = require('example')
这两种方式引入的name都是相同的单例。
隔离状态
package.json文件可以直接定义单独的CommonJS和ES模块入口点:
// package.json
{
    "type": "module",
    "exports": {
        "import": "./index.mjs",
        "require": "./index.cjs"
    }
}
如果包的CommonJS和ESM版本是等效的,则可以做到这一点,例如因为一个是另一个的转译输出;并且包的状态管理被仔细隔离(或包是无状态的)
状态是一个问题的原因是因为包的CommonJS和ESM版本都可能在应用程序中使用;例如,用户的引用程序代码可以importESM版本,而依赖项require CommonJS版本。如果发生这种情况,包的两个副本将被加载到内存中,因此将出现两个不同的状态。这可能会导致难以解决的错误。
除了编写无状态包(例如,如果JavaScript的Math是一个包,它将是无状态的,因为它的所有方法都是静态的),还有一些方法可以隔离状态,以便在可能加载的CommonJS和ESM之间共享它包的实例:
- 如果可能,在实例化对象中包含所有状态。比如JavaScript的Date,需要实例化包含状态;如果是包,会这样使用:
import Date from 'date';
const someDate = new Date();
// someDate 包含状态;Date 不包含
new关键字不是必需的;包的函数可以返回新的对象,或修改传入的对象,以保持包外部的状态。
- 在包的CommonJS和ESM版本之间共享的一个或过个CommonJS文件中隔离状态。比如CommonJS和ESM入口点分别是index.cjs和index.mjs:
// index.cjs
const state = require('./state.cjs')
module.exports.state = state;

// index.mjs
import state from './state.cjs'
export {
    state
}
即使example在应用程序中通过require和import使用example的每个引用都包含相同的状态;并且任一模块系统修改状态将适用二者皆是。
最后
如果本文对你有帮助,就点个赞支持下吧,你的「赞」是我持续进行创作的动力。
This article quotes the following information:
- node.js official document
- Node.js Design Patterns
For more node-related knowledge, please visit : nodejs tutorial!
The above is the detailed content of This article will take you to understand the module system in node. For more information, please follow other related articles on the PHP Chinese website!
Related articles
See more- An article explaining in detail how to uninstall Nodejs (step sharing)
- This article will take you to understand the http module in Node.js
- Node practical learning: Browser preview all pictures of the project
- Let's talk about how to operate MySQL in Node project
- Let's talk about how to use async functions in Node.js
- Node learning how to minimize heap allocation and prevent memory leaks

