Home >Web Front-end >Vue.js >In-depth discussion of how vite parses .env files
In-depth discussion of how vite parses .env files
- 青灯夜游forward
- 2023-01-24 05:30:023750browse

When using the vue framework to develop front-end projects, we will deploy multiple environments when deploying. Often the interface domain names called by the development, testing and online environments are different. How can we make the distinction? That is using environment variables and patterns.
In a vue3 project built with vite, you can create a .env.[mode] file in the root directory to define one or more modes, and the variables defined in this file are the environment variables of this mode. After defining the environment variables, you can read the environment variables through import.meta.env.[variable name]. [Related recommendations: vuejs video tutorial, web front-end development]
Then we have to think about two questions: First, how does vite read the .env file? Defined configuration; second, how vite mounts the environment variables configured in the .env file to the import.meta.env environment variable. We can understand it by studying the relevant source code in today's vite. Welcome to read this article and learn. If there are any mistakes, please feel free to correct them.
1. How to read the configuration defined in the .env file
1.1 What is the focus of the problem?
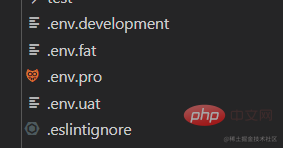
First let’s take a look at how vite reads the configuration defined in the .env file. As shown in the figure below, there are four mode files .env.development, .env.fat, .env.uat, and .env.pro in the project root directory. The development mode corresponds to the default development environment for local development, and fat The mode corresponds to the development environment for self-testing, the uat mode corresponds to the pre-release environment for test team testing, and the pro mode corresponds to the production environment, also called an online environment, for customer use.
So how can we let vite know that we want to use files in related modes? When running the vite or vite build command, you can set the environment mode through --mode or -m (See the document for details), as shown in the following figure:
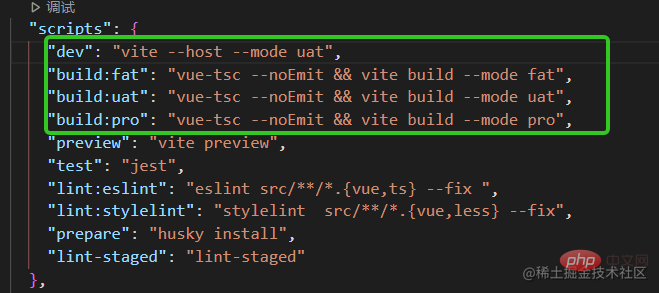
This reminds us that if we want to understand how vite reads the mode file that defines environment variables, we need to start with the vite command or the vite build command. Next, we will start with the vite command.
1.2 Where is the command of vite defined?
Look at vite’s package.json file (path: vite/packages/vite/package.json):
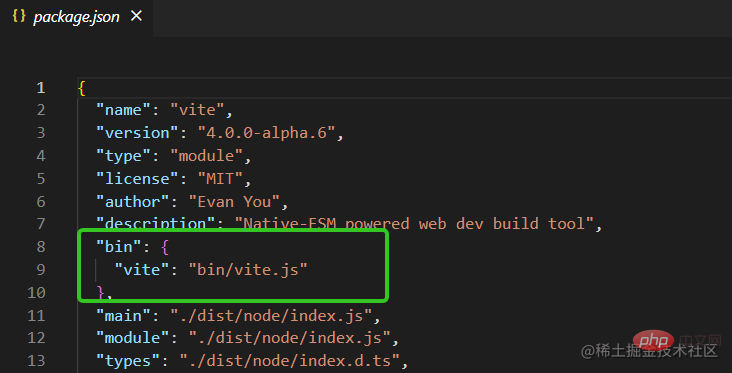
When When we use the vite command, we will execute the vite.js file in the bin directory. Take a look at this file (path: vite/packages/vite/bin/vite.js):
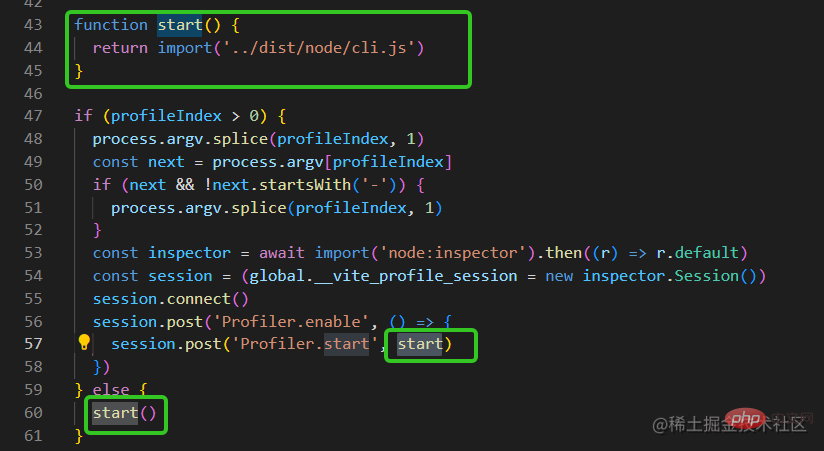
You can see that the key to this code is to execute the start method, and the start method imports the packaged cli.js file. So which original file corresponds to this packaged file? Vite uses rollup when packaging, so let’s take a look at the rollup configuration file (path: vite/packages/vite/rollup.config.ts):
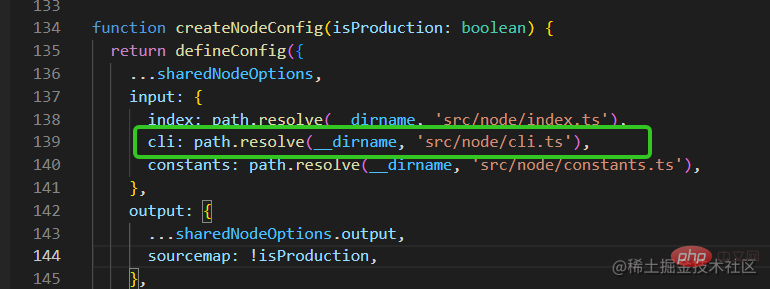
The code above It can be seen that the definition of vite related commands is in the file /src/node/cli.ts.
1.3 How are vite commands defined?
1.3.1 Vite uses cac to define commands
Let’s take a look at how vite’s commands are defined (path: vite/packages/ vite/src/node/cli.ts):
import { cac } from 'cac'
const cli = cac('vite')
cli
.option('-m, --mode <mode>', `[string] set env mode`)
cli
.command('[root]', 'start dev server') // default command
.alias('serve') // the command is called 'serve' in Vite's API
.option('--port <port>', `[number] specify port`)
.action(async (root: string, options: ServerOptions & GlobalCLIOptions) => {
const { createServer } = await import('./server')
try {
const server = await createServer({
root,
base: options.base,
mode: options.mode,
configFile: options.config,
logLevel: options.logLevel,
clearScreen: options.clearScreen,
optimizeDeps: { force: options.force },
server: cleanOptions(options),
})
})As shown in the above code, vite mainly uses the cac command line tool library to define commands. Please explain the cac used here. Related API:
cac(name?): used to create a cac instance, the name parameter is optional.
option(name, description, config): used to set configuration items.
command(name, description, config?): Declare the cli command. You can set independent configuration items and its configured execution actions for the command.
command.alias(name): Give the cli command an alias.
action(callback): Specifies the action performed by the command.
可以看出,当运行vite命令的时候会执行createServer方法,我们这里要注意参数mode就是我们运行命令时通过--mode 或者 -m指定的参数,下面来研究createServer方法。
1.3.2 createServer
看一下createServer方法(路径:createServervite/packages/vite/src/node/server/index.ts):
import { resolveConfig } from '../config'
export async function createServer(
inlineConfig: InlineConfig = {},
): Promise<ViteDevServer> {
const config = await resolveConfig(inlineConfig, 'serve')
}可以看到createServer方法调用的是resolveConfig方法,下面看一下resolveConfig方法。
1.3.3 resolveConfig
resolveConfig方法的代码如下(路径;vite/packages/vite/src/node/config.ts):
import { loadEnv, resolveEnvPrefix } from './env'
export async function resolveConfig(
  inlineConfig: InlineConfig,
  command: 'build' | 'serve',
  defaultMode = 'development',
  defaultNodeEnv = 'development',
): Promise<ResolvedConfig> {
  const envDir = config.envDir
    ? normalizePath(path.resolve(resolvedRoot, config.envDir))
    : resolvedRoot
  const userEnv =
    inlineConfig.envFile !== false &&
    loadEnv(mode, envDir, resolveEnvPrefix(config))
  const resolvedConfig: ResolvedConfig = {
    command,
    mode,
    env: {
      ...userEnv,
      BASE_URL,
      MODE: mode,
      DEV: !isProduction,
      PROD: isProduction,
    },
  }
  const resolved: ResolvedConfig = {
    ...config,
    ...resolvedConfig,
  }
  return resolved
}
可以看到resolveConfig的主要工作:
首先确定.env文件的路径
然后调用loadEnv方法加载解析.env文件,将结果赋值给userEnv
最后返回整个解析后的配置
我们看到这里的关键代码是loadEnv(mode, envDir, resolveEnvPrefix(config))下面我就重点看一下loadEnv方法。
1.3.4 loadEnv
loadEnv方法是vite中一个比较核心的方法,也作为vite对外提供的一个JavaScript API,用于加载 envDir 中的 .env 文件。
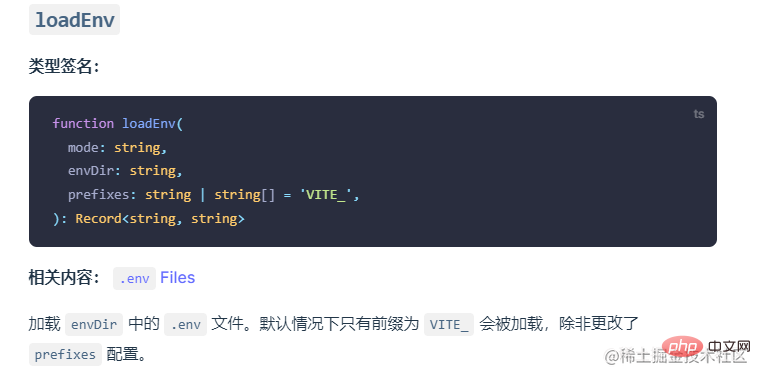
我们看一下loadEnv方法(路径:vite/packages/vite/src/node/env.ts):
import { parse } from 'dotenv'
import { arraify, lookupFile } from './utils'
export function loadEnv(
mode: string,
envDir: string,
prefixes: string | string[] = 'VITE_',
): Record<string, string> {
prefixes = arraify(prefixes)
const env: Record<string, string> = {}
const envFiles = [
/** default file */ `.env`,
/** local file */ `.env.local`,
/** mode file */ `.env.${mode}`,
/** mode local file */ `.env.${mode}.local`,
]
const parsed = Object.fromEntries(
envFiles.flatMap((file) => {
const path = lookupFile(envDir, [file], {
pathOnly: true,
rootDir: envDir,
})
if (!path) return []
return Object.entries(parse(fs.readFileSync(path)))
}),
)
// only keys that start with prefix are exposed to client
for (const [key, value] of Object.entries(parsed)) {
if (prefixes.some((prefix) => key.startsWith(prefix))) {
env[key] = value
} else if (
key === 'NODE_ENV' &&
process.env.VITE_USER_NODE_ENV === undefined
) {
// NODE_ENV override in .env file
process.env.VITE_USER_NODE_ENV = value
}
}
return env
}如上代码所示理解loadEnv方法注意以下几个方面:
该方法接收三个参数,分别是模式、.env文件的路径还有环境变量的前缀。
使用递归方法lookupFile找到.env文件的路径,使用fs.readFileSync读取文件。
使用dotenv提供的方法解析.env文件内容。
关于dotenv可以学习川哥的文章,也可以看看笔者的源码共读语雀笔记。至此,我们了解了vite是如何读取.env文件中定义的环境变量了。下面我们研究第二个问题vite如何将.env中配置的环境变量挂载到import.meta.env环境变量上。
2.如何将变量挂载到import.meta.env环境变量上
2.1 vite的环境变量和import.meta
Vite 在一个特殊的 import.meta.env 对象上暴露环境变量,有一些在所有情况下都可以使用的内建变量:
import.meta.env.MODE: {string} 应用运行的模式。
import.meta.env.BASE_URL: {string} 部署应用时的基本 URL。他由base 配置项决定。
import.meta.env.PROD: {boolean} 应用是否运行在生产环境。
import.meta.env.DEV: {boolean} 应用是否运行在开发环境 (永远与 import.meta.env.PROD相反)。
import.meta.env.SSR: {boolean} 应用是否运行在 server 上。
详见环境变量。这里我们要解释一下import.meta。它是一个给JavaScript模块暴露特定上下文的元数据属性的对象。它包含了这个模块的信息,比如说这个模块的URL。详见import.meta 的MDN文档。需要注意不可以在模块的外部使用import.meta,如下图所示:

2.2 resolveConfig
在上文中我们已经研究了resolveConfig的代码,我们再来看以下此方法中的另一段代码(路径:vite/packages/vite/src/node/config.ts):
import {resolvePlugins,} from './plugins'

export async function resolveConfig(
  inlineConfig: InlineConfig,
  command: 'build' | 'serve',
  defaultMode = 'development',
  defaultNodeEnv = 'development',
): Promise<ResolvedConfig> {
  (resolved.plugins as Plugin[]) = await resolvePlugins(
    resolved,
    prePlugins,
    normalPlugins,
    postPlugins,
  )
}
这里调用了resolvePlugins,接收resolved对象,此对象中含有开发者所指定的模式以及.env文件中的环境变量。我们接着看一下resolvePlugins方法。
2.3 resolvePlugins
节选resolvePlugins方法如下(路径:vite/packages/vite/src/node/plugins/index.ts):
import { definePlugin } from './define'

export async function resolvePlugins(
  config: ResolvedConfig,
  prePlugins: Plugin[],
  normalPlugins: Plugin[],
  postPlugins: Plugin[],
): Promise<Plugin[]> {
  return [
    //...
    definePlugin(config),
    //...
  ].filter(Boolean) as Plugin[]
}
resolvePlugins负责解析插件,这里面调用了definePlugin方法,我们看一下。
2.4 definePlugin
definePlugin的代码如下(路径:vite/packages/vite/src/node/plugins/define.ts):
const importMetaKeys: Record<string, string> = {}
const importMetaFallbackKeys: Record<string, string> = {}
if (isBuild) {
const env: Record<string, any> = {
...config.env,
SSR: !!config.build.ssr,
}
for (const key in env) {
importMetaKeys[`import.meta.env.${key}`] = JSON.stringify(env[key])
}
Object.assign(importMetaFallbackKeys, {
'import.meta.env.': `({}).`,
'import.meta.env': JSON.stringify(config.env),
'import.meta.hot': `false`,
})
}这段代码的关键部分在于第8-10行的for循环,将.env文件中定义的环境变量挂在到了import.meta.env上。至此,如何也了解了vite是如何将环境变量挂在到import.meta.env环境变量上。
总结
通过阅读vite的源码,我们了解到vite处理.env文件时涉及到的两个关键问题:第一,vite如何读取.env文件中定义的配置;第二,vite如何将.env文件中配置的环境变量挂载到import.meta.env环境变量上。
对于第一问题,我们了解到vite使用cac定义命令,当执行vite命令并通过--mode或者-m选项指定模式的时候,vite会拿到mode, 然后vite会去项目目录下查找对应.env.[模式]的文件并读取其内容,然后通过dotenv的parse方法解析文件内容,将定义的环境变量整合到resolved中。
对于第二个问题,我们了解到vite的resolveConfig方法中会执行插件解析的方法resolvePlugins,而此方法又会调用definePlugin方法,在definePlugin方法中会完成将.env文件中定义的变量挂载到import.meta.env环境变量上。
The above is the detailed content of In-depth discussion of how vite parses .env files. For more information, please follow other related articles on the PHP Chinese website!
Related articles
See more- Vite Learning's Deep Analysis 'Dependency Scanning'
- Let's talk about how to use the vite plug-in to automate the skeleton screen
- You Yuxi responded: Is Vite really 10 times slower than Turbopack?
- This article will give you a detailed explanation of component programming in Vue
- Let's talk in depth about reactive() in vue3
- Detailed explanation of the two major responsive tools of Vue3: ref and reactive

