Home >Web Front-end >Vue.js >Detailed explanation of Vue3 Suspense: what is it? What can you do? How to use?
Detailed explanation of Vue3 Suspense: what is it? What can you do? How to use?
- 青灯夜游forward
- 2022-07-29 10:41:353338browse
This article will give you an in-depth understanding of Vue3 Suspense. Let’s talk about what Suspense is, what it can do, and how to use it. I hope it will be helpful to everyone!

Suspense It’s not what you think. Yes, it helps us deal with asynchronous components, but it does much more than that. (Learning video sharing: vue video tutorial)
Suspense Allows us to coordinate the loading status of the entire application, including all deeply nested components. Rather than being like a popcorn user interface, with loading everywhere and components suddenly rushing into place

With Suspense, we can have a single, organized system, loading everything at once.

Also, Suspense also gives us fine-grained control, so we can implement something in between if needed.
In this article, we'll learn a lot about Suspense - what it is, what it does, and how to use it.
First, we’ll take a closer look at these popcorn interfaces. Then, take a look at how to use Suspense to solve these problems. Afterwards, try getting more granular control by nesting Suspense throughout your application. Finally, let's briefly look at how we can use placeholders to enrich our user interface.
Popcorn UI--Before Suspense
Example address: https://codesandbox.io/s/uncoordinated-loading-before-suspense-srh8ll?file= /src/App.vue
Without Suspense, each component must handle its loading status individually.

This can lead to some pretty bad user experiences, with multiple loading buttons and content popping up on the screen like you're making popcorn.
Although, we can create abstract components to handle these loading states, it is much more difficult than using Suspense. Having a single point to manage loading state is much easier to maintain than each component doing its own thing.
In the example, we use the BeforeSuspense component to simulate a component that handles the loading state internally. Name it BeforeSuspense because once we implement Suspense, we will refactor it into the WithSuspense component.
BeforeSuspense.vue
<template>
<div class="async-component" :class="!loading && 'loaded'">
<Spinner v-if="loading" />
<slot />
</div>
</template>
<script setup>
import { ref } from 'vue'
import Spinner from './Spinner.vue'
const loading = ref(true)
const { time } = defineProps({
time: {
type: Number,
default: 2000
}
})
setTimeout(() => (loading.value = false), time)
</script>
Initially set loading to true, so the Spinner component is displayed. Then, when setTimeout completes, set loading to false, hide Spinner and make the component's background green.
In this component, there is also a slot, so that other components can be nested in the BeforeSuspense component:
<template>
    <button @click="reload">Reload page</button>
    <BeforeSuspense time="3000">
      <BeforeSuspense time="2000" />
      <BeforeSuspense time="1000">
        <BeforeSuspense time="500" />
        <BeforeSuspense time="4000" />
      </BeforeSuspense>
    </BeforeSuspense>
</template>
Nothing too Fancy stuff. Just some nested components with different time values passed to them.
Next, let’s take a look at how to improve this popcorn user interface by using the Suspense component.
Suspense
Example address: https://codesandbox.io/s/coordinated-loading-with-suspense-b6dcbi?file=/src/App.vue
Now, we use Suspense to handle this mess and turn it into a better user experience.
However, first we need to quickly understand what Suspense is
Suspense basics
The following is the basic structure of the Suspense part
<Suspense>
  <!-- Async component here -->

  <template #fallback>
      <!-- Sync loading state component here -->
  </template>
</Suspense>
To use Suspense, put the asynchronous component into the default slot and the fallback loading state into the fallback slot.
An async component is one of two things:
- A component with an
async setupfunction that returns a Promise, or inscript setupUsing top-levelawait - Using
defineAsyncComponentAsynchronously loaded components
Either way, we end up You will get a Promise that is initially unresolved and then eventually resolved.
When the Promise is not resolved, the Suspense component will display the contents of the fallback slot. Then, when the Promise is resolved, it exposes the async component in the default slot.
注意: 这里没有错误处理路基。起初我以为有,但这是对悬念的一个常见误解。如果想知道是什么导致了错误。可以使用onErrorCaptured钩子来捕捉错误,但这是一个独立于Suspense的功能。
现在我们对Suspense有了一些了解,让我们回到我们的演示应用程序。
管理异步依赖关系
为了让Suspense管理我们的加载状态,首先需要将BeforeSuspense组件转换成一个异步组件
我们将它命名为 WithSuspense,内容如下:
<template>
  <div class="async-component loaded">
    <!-- 这里不需要一个 Spiner 了,因为加载是在根部处理的 -->
    <slot />
  </div>
</template>

<script setup>
const { time } = defineProps({
  time: {
    type: Number,
    required: true
  }
})
// 加入一个延迟,以模拟加载数据
await new Promise(resolve => {
  setTimeout(() => {
    resolve()
  }, time)
})
</script>
我们已经完全删除了加载状态的Spinner,因为这个组件不再有加载状态了。
因为这是一个异步组件,setup 函数直到它完成加载才会返回。该组件只有在 setup 函数完成后才会被加载。因此,与BeforeSuspense组件不同,WithSuspense组件内容在加载完毕之前不会被渲染。
这对任何异步组件来说都是如此,不管它是如何被使用的。在setup函数返回(如果是同步的)或解析(如果是异步的)之前,它不会渲染任何东西。
有了WithSuspense组件,我们仍然需要重构我们的App组件,以便在Suspense组件中使用这个组件。
<template>
  <button @click="reload">Reload page</button>
  <Suspense>
    <WithSuspense :time="2000">
      <WithSuspense :time="1500" />
      <WithSuspense :time="1200">
        <WithSuspense :time="1000" />
        <WithSuspense :time="5000" />
      </WithSuspense>
    </WithSuspense>

    <template #fallback>
      <Spinner />
    </template>
  </Suspense>
</template>
结构和之前一样,但这次是在 Suspense 组件的默认槽中。我们还加入了 fallback 槽,在加载时渲染我们的Spinner组件。
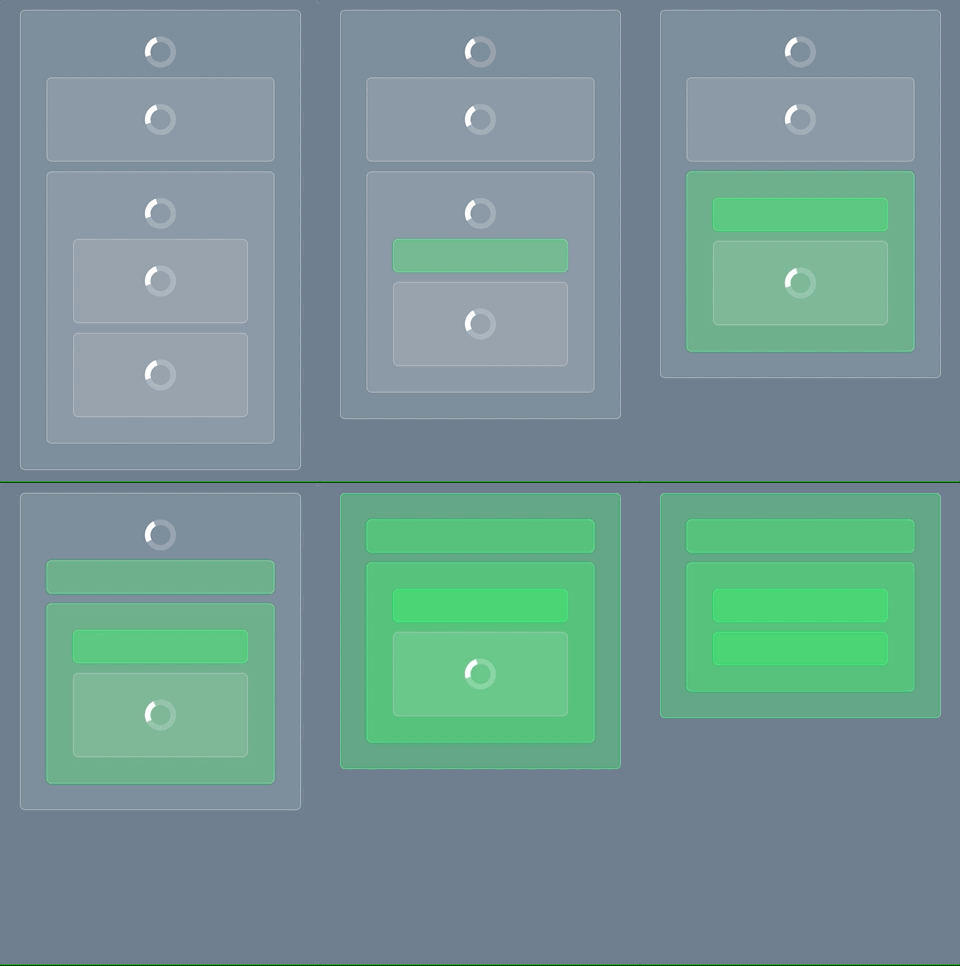
在演示中,你会看到它显示加载按钮,直到所有的组件都加载完毕。只有在那时,它才会显示现在完全加载的组件树。
异步瀑布
如果你仔细注意,你会注意到这些组件并不像你想象的那样是并联加载的。
总的加载时间不是基于最慢的组件(5秒)。相反,这个时间要长得多。这是因为Vue只有在父异步组件完全解析后才会开始加载子组件。
你可以通过把日志放到WithSuspense组件中来测试这一点。一个在安装开始跟踪安装,一个在我们调用解决之前。
最初使用BeforeSuspense组件的例子中,整个组件树被挂载,无需等待,所有的 "异步 "操作都是并行启动的。这意味着Suspense有可能通过引入这种异步瀑布而影响性能。所以请记住这一点。
嵌套 Suspense 以隔离子树
事例地址:https://codesandbox.io/s/nesting-suspense-wt0q7k?file=/src/App.vue
这里有一个深度嵌套的组件,它需要整整5秒来加载,阻塞了整个UI,尽管大多数组件加载完成的时间要早得多。
但对我们来说有一个解决方案
通过进一步嵌套第二个Suspense组件,我们可以在等待这个组件完成加载时显示应用程序的其他部分。
<template>
  <button @click="reload">Reload page</button>
  <Suspense>
    <WithSuspense :time="2000">
      <WithSuspense :time="1500" />
      <WithSuspense :time="1200">
        <WithSuspense :time="1000" />

                <!-- Nest a second Suspense component -->
        <Suspense>
          <WithSuspense :time="5000" />
          <template #fallback>
            <Spinner />
          </template>
        </Suspense>
      </WithSuspense>
    </WithSuspense>

    <template #fallback>
      <Spinner />
    </template>
  </Suspense>
</template>
将其包裹在第二个Suspense组件中,使其与应用程序的其他部分隔离。Suspense组件本身是一个同步组件,所以当它的父级组件被加载时,它就会被加载。
然后它将显示它自己的 fallback 内容,直到5秒结束。

通过这样做,我们可以隔离应用程序中加载较慢的部分,减少我们的首次交互时间。在某些情况下,这可能是必要的,特别是当你需要避免异步瀑布时。
从功能的角度来看,这也是有意义的。你的应用程序的每个功能或 "部分"都可以被包裹在它自己的Suspense组件中,所以每个功能的加载都是一个单一的逻辑单元。
当然,如果你用 "Suspense" 包装每一个组成部分,我们就会回到我们开始的地方。我们可以选择以任何最合理的方式来批处理我们的加载状态。
使用占位符的 Suspense
事例地址: https://codesandbox.io/s/placeholders-and-suspense-k5uzw0?
与其使用单一的 spinner,占位符组件往往可以提供更好的体验。

这种方式向用户展示将要展示的内容,并让他们在界面渲染前有一种期待的感觉。这是 spinner 无法做到的。
可以说--它们很时髦,看起来很酷。因此,我们重构代码,使用占位符方式:
<template>
  <button @click="reload">Reload page</button>
  <Suspense>
    <WithSuspense :time="2000">
      <WithSuspense :time="1500" />
      <WithSuspense :time="1200">
        <WithSuspense :time="1000" />

        <Suspense>
          <WithSuspense :time="5000" />
          <template #fallback>
            <Placeholder />
          </template>
        </Suspense>
      </WithSuspense>
    </WithSuspense>
    <template #fallback>
      <!-- 这里,复制实际数据的形状  -->
      <Placeholder>
        <Placeholder />
        <Placeholder>
          <Placeholder />
          <Placeholder />
        </Placeholder>
      </Placeholder>
    </template>
  </Suspense>
</template>
我们安排了这些Placeholder组件,并对它们进行了风格化处理,使它们看起来与WithSuspense组件完全一样。这提供了一个在加载和装载状态之间的无缝过渡。
在演示中,Placeholder组件在背景上给我们提供了一个CSS动画,以创造一个脉动的效果:
.fast-gradient {
  background: linear-gradient(
    to right,
    rgba(255, 255, 255, 0.1),
    rgba(255, 255, 255, 0.4)
  );
  background-size: 200% 200%;
  animation: gradient 2s ease-in-out infinite;
}

@keyframes gradient {
  0% {
    background-position: 0% 50%;
  }
  50% {
    background-position: 100% 50%;
  }
  100% {
    background-position: 0% 50%;
  }
}
总结
爆米花的加载状态是非常明显的,会伤害用户体验。
幸运的是,Suspense 是一个很棒的新特性,它为我们在Vue应用程序中协调加载状态提供了很多选择。
然而,在写这篇文章的时候,Suspense仍然被认为是实验性的,所以要谨慎行事。关于它的状态的最新信息,请参考文档。
The above is the detailed content of Detailed explanation of Vue3 Suspense: what is it? What can you do? How to use?. For more information, please follow other related articles on the PHP Chinese website!
Related articles
See more- Why is vue3 fast? In what aspects does the efficiency of vue3 mainly improve?
- Learn about watchEffect in Vue3 in one article and talk about its application scenarios!
- Let's take a look at the popular trends in the front-end through 9 Vue3 component libraries!
- Let's talk about the new features in Vue3 style (summary)
- What is the difference between Vue3 and Vue2? Compare it all!
- Understand Vue3+Vite3 source code in seconds, as long as you know these 20 libraries!

