Home >Web Front-end >Front-end Q&A >Why does react use synthetic events?
Why does react use synthetic events?
- 青灯夜游Original
- 2022-07-14 19:19:413272browse
React uses synthetic events for three main purposes: 1. To achieve browser compatibility and achieve better cross-platform; the synthetic events provided by React can be used to smooth out the differences between different browser event objects and combine different Platform events simulate synthetic events. 2. Avoid garbage collection; the React event object will not be released, but will be stored in an array. When the event is triggered, it will be popped out of the array to avoid frequent creation and destruction (garbage collection). 3. Facilitate unified event management and transaction mechanism.

#The operating environment of this tutorial: Windows7 system, react18 version, Dell G3 computer.
1. What is a synthetic event
React synthetic event (SyntheticEvent) is an event object that React simulates all the capabilities of native DOM events, that is Cross-browser wrapper for native browser events. It defines synthetic events according to the W3C specification, is compatible with all browsers, and has the same interface as browser native events.
In React, all events are synthetic and not native DOM events, but DOM events can be obtained through the e.nativeEvent property. For example:
const button = <button>react 按钮</button>
const handleClick = (e) => console.log(e.nativeEvent); //原生事件对象
When learning a new knowledge, you must know why this technology appears.
So why does React use synthetic events? It has three main purposes:
-
Enable browser compatibility and achieve better cross-platform
React uses a top-level event proxy mechanism to ensure that risk Bubble consistency, can be implemented across browsers. The synthetic events provided by React are used to smooth out the differences between different browser event objects and simulate synthetic events from different platform events.
-
Avoid garbage collection
Event objects may be frequently created and recycled, so React introduces an event pool to obtain or release event objects in the event pool. That is, the React event object will not be released, but will be stored in an array. When the event is triggered, it will be popped out of the array to avoid frequent creation and destruction (garbage collection).
Convenience for unified event management and transaction mechanism
本文不介绍源码啦,对具体实现的源码有兴趣的朋友可以查阅:《React SyntheticEvent》 。
https://github.com/facebook/react/blob/75ab53b9e1de662121e68dabb010655943d28d11/packages/events/SyntheticEvent.js#L62
2. Native event review
JavaScript event models are mainly divided into three types: original event model (DOM0), DOM2 event model, and IE event model.
1.DOM0 event model
is also called the original event model. In this model, events do not propagate, that is, there is no concept of event flow. Event binding listening functions are relatively simple, and there are two ways:
//HTML代码种直接绑定:
<button></button>

//通过JS代码指定属性值:
var btn = document.getElementById('.test');
btn.onclick = fun;
//移除监听函数:
btn.onclick = null;
Advantages: Strong compatibility supports all browsers
Disadvantages: There is no separation between logic and display; listening functions for the same event can only Bind one, and later registered events of the same type will overwrite previously registered events.
2.DOM2 event model
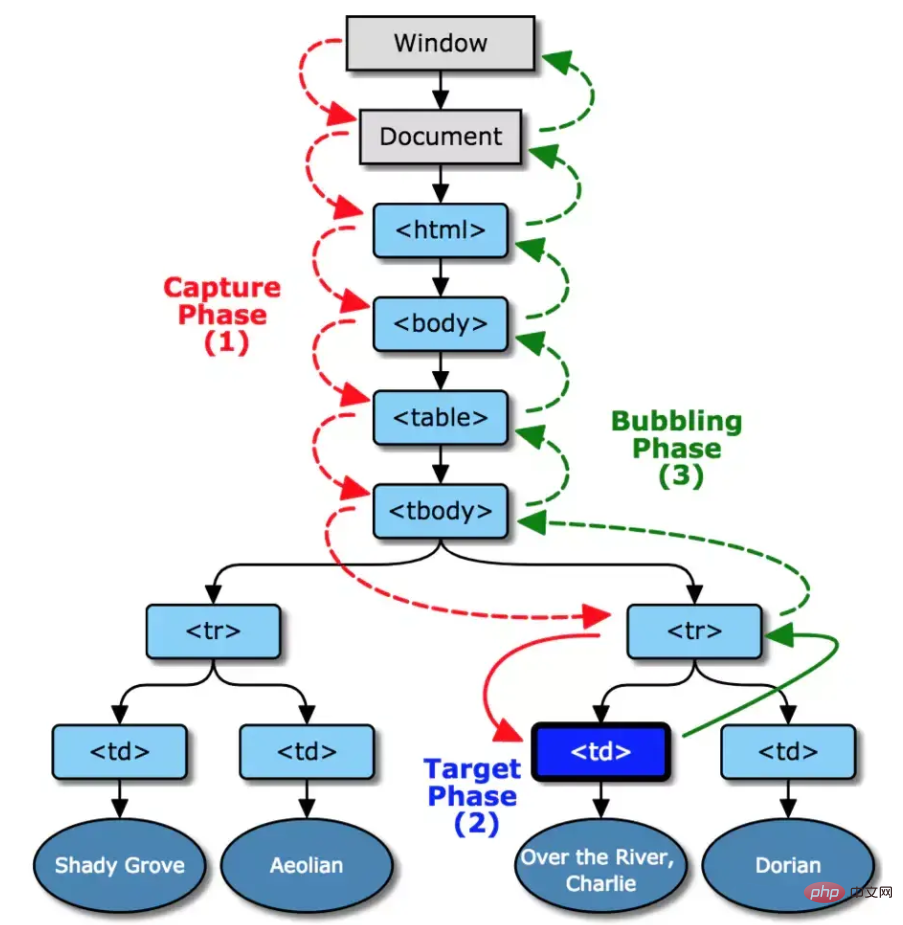
The standard model formulated by W3C, modern browsers (browsers except IE6-8) support this model. In this event model, there are three processes for an event:
Event capturing phase (capturing phase). The event propagates from the document all the way down to the target element, and checks whether the passing nodes are bound to the event listening function, and executes it if so.
Event processing phase (target phase). When the event reaches the target element, the listening function of the target element is triggered.
Event bubbling phase (bubbling phase). The event bubbles from the target element to the document, and checks whether the passing nodes are bound to the event listening function, and executes it if so.
//事件绑定监听函数的方式如下:
addEventListener(eventType, handler, useCapture)

//事件移除监听函数的方式如下:
removeEventListener(eventType, handler, useCapture)
3.IE event model
The IE event model has two processes:
Event processing phase (target phase). When the event reaches the target element, the listening function of the target element is triggered.
Event bubbling phase (bubbling phase). The event bubbles from the target element to the document, and checks whether the passing nodes are bound to the event listening function, and executes it if so.
//事件绑定监听函数的方式如下:
attachEvent(eventType, handler)

//事件移除监听函数的方式如下:
detachEvent(eventType, handler)
4. Event flow

As shown in the figure above, the so-called event flow includes three stages: event capture and target stage and events bubbling up. Event capture is from the outside to the inside, corresponding to the red arrow marked window -> document -> html... -> target in the figure. The target stage is the stage where the event actually occurs and is processed. Event bubbling is from the inside to the outside. , corresponding to target -> … -> html -> document -> window in the figure.
-
Event capture
When an element triggers an event (such as onclick), the top-level object document will emit an event stream, and as the nodes of the DOM tree move toward The target element node flows until it reaches the target element where the event actually occurred. During this process, the corresponding listening function of the event will not be triggered.
-
Event target
When the target element is reached, the corresponding processing function of the event of the target element is executed. If no listening function is bound, it will not be executed.
-
Event bubbling
从目标元素开始,往顶层元素传播。途中如果有节点绑定了相应的事件处理函数,这些函数都会被触发一次。如果想阻止事件起泡,可以使用
e.stopPropagation()或者e.cancelBubble=true(IE)来阻止事件的冒泡传播。 -
事件委托/事件代理
简单理解就是将一个响应事件委托到另一个元素。 当子节点被点击时,click 事件向上冒泡,父节点捕获到事件后,我们判断是否为所需的节点,然后进行处理。其优点在于减少内存消耗和动态绑定事件。
三、React合成事件原理
React合成事件的工作原理大致可以分为两个阶段:
事件绑定
事件触发
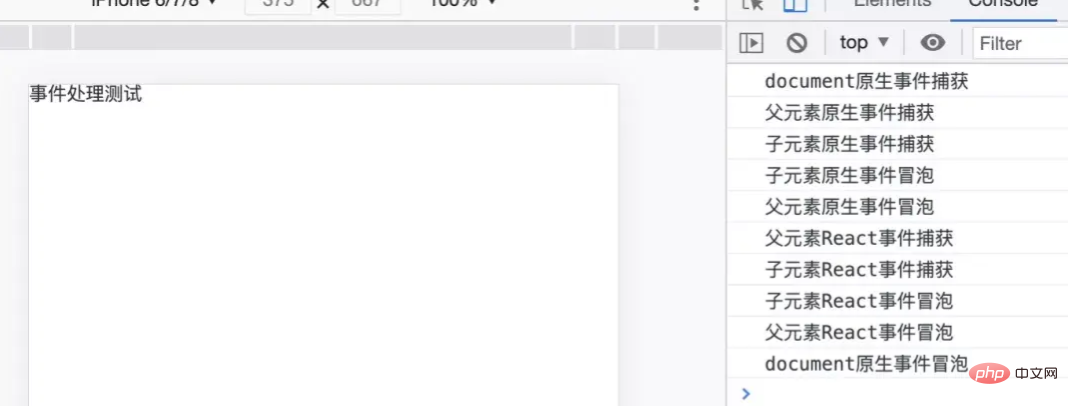
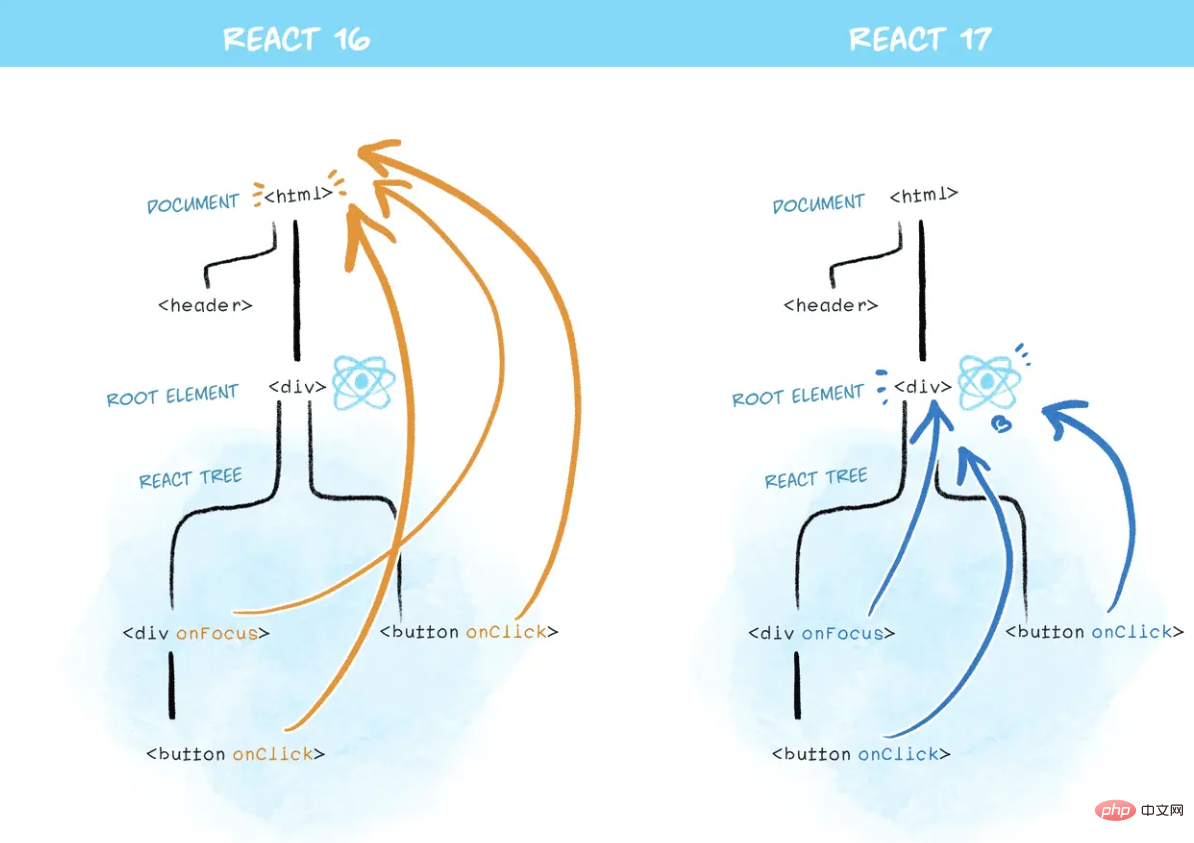
在React17之前,React是把事件委托在document上的,React17及以后版本不再把事件委托在document上,而是委托在挂载的容器上了,本文以16.x版本的React为例来探寻React的合成事件。当真实的dom触发事件时,此时构造React合成事件对象,按照冒泡或者捕获的路径去收集真正的事件处理函数,在此过程中会先处理原生事件,然后当冒泡到document对象后,再处理React事件。举个栗子:
import React from 'react';
import './App.less';

class Test extends React.Component {
  parentRef: React.RefObject<any>;

  childRef: React.RefObject<any>;

  constructor(props) {
    super(props);
    this.parentRef = React.createRef();
    this.childRef = React.createRef();
  }

  componentDidMount() {
    document.addEventListener(
      'click',
      () => {
        console.log(`document原生事件捕获`);
      },
      true,
    );
    document.addEventListener('click', () => {
      console.log(`document原生事件冒泡`);
    });
    this.parentRef.current.addEventListener(
      'click',
      () => {
        console.log(`父元素原生事件捕获`);
      },
      true,
    );
    this.parentRef.current.addEventListener('click', () => {
      console.log(`父元素原生事件冒泡`);
    });
    this.childRef.current.addEventListener(
      'click',
      () => {
        console.log(`子元素原生事件捕获`);
      },
      true,
    );
    this.childRef.current.addEventListener('click', () => {
      console.log(`子元素原生事件冒泡`);
    });
  }

  handleParentBubble = () => {
    console.log(`父元素React事件冒泡`);
  };

  handleChildBubble = () => {
    console.log(`子元素React事件冒泡`);
  };

  handleParentCapture = () => {
    console.log(`父元素React事件捕获`);
  };

  handleChileCapture = () => {
    console.log(`子元素React事件捕获`);
  };

  render() {
    return (
      <p>
        </p>
<p>
          事件处理测试
        </p>

    );
  }
}

export default Test;</any></any>
上面案例打印的结果为:

注:React17中上述案例的执行会有所区别,会先执行所有捕获事件后,再执行所有冒泡事件。
1、事件绑定
通过上述案例,我们知道了React合成事件和原生事件执行的过程,两者其实是通过一个叫事件插件(EventPlugin)的模块产生关联的,每个插件只处理对应的合成事件,比如onClick事件对应SimpleEventPlugin插件,这样React在一开始会把这些插件加载进来,通过插件初始化一些全局对象,比如其中有一个对象是registrationNameDependencies,它定义了合成事件与原生事件的对应关系如下:
{
    onClick: ['click'],
    onClickCapture: ['click'],
    onChange: ['blur', 'change', 'click', 'focus', 'input', 'keydown', 'keyup', 'selectionchange'],
    ...
}
registrationNameModule对象指定了React事件到对应插件plugin的映射:
{
    onClick: SimpleEventPlugin,
    onClickCapture: SimpleEventPlugin,
    onChange: ChangeEventPlugin,
    ...
}
plugins对象就是上述插件的列表。在某个节点渲染过程中,合成事件比如onClick是作为它的prop的,如果判断该prop为事件类型,根据合成事件类型找到对应依赖的原生事件注册绑定到顶层document上,dispatchEvent为统一的事件处理函数。
2、事件触发
当任意事件触发都会执行dispatchEvent函数,比如上述事例中,当用户点击Child的p时会遍历这个元素的所有父元素,依次对每一级元素进行事件的收集处理,构造合成事件对象(SyntheticEvent–也就是通常我们说的React中自定义函数的默认参数event,原生的事件对象对应它的一个属性),然后由此形成了一条「链」,这条链会将合成事件依次存入eventQueue中,而后会遍历eventQueue模拟一遍捕获和冒泡阶段,然后通过runEventsInBatch方法依次触发调用每一项的监听事件,在此过程中会根据事件类型判断属于冒泡阶段还是捕获阶段触发,比如onClick是在冒泡阶段触发,onClickCapture是在捕获阶段触发,在事件处理完成后进行释放。SyntheticEvent对象属性如下:
boolean bubbles
boolean cancelable
DOMEventTarget currentTarget
boolean defaultPrevented
number eventPhase
boolean isTrusted
DOMEvent nativeEvent // 原生事件对象
void preventDefault()
boolean isDefaultPrevented()
void stopPropagation()
boolean isPropagationStopped()
void persist()
DOMEventTarget target
number timeStamp
string type
dispatchEvent伪代码如下:
dispatchEvent = (event) => {
    const path = []; // 合成事件链
    let current = event.target; // 触发事件源
    while (current) {
      path.push(current);
      current = current.parentNode; // 逐级往上进行收集
    }
    // 模拟捕获和冒泡阶段
    // path = [target, p, body, html, ...]
    for (let i = path.length - 1; i >= 0; i--) {
      const targetHandler = path[i].onClickCapture;
      targetHandler && targetHandler();
    }
    for (let i = 0; i <p><strong>3、更改事件委托(React v17.0)</strong></p><p>自React发布以来, 一直自动进行事件委托。当 document 上触发 DOM 事件时,React 会找出调用的组件,然后 React 事件会在组件中向上 “冒泡”。但实际上,原生事件已经冒泡出了 document 级别,React 在其中安装了事件处理器。</p><p>但是,这就是逐步升级的困难所在。</p><p>在 React 17 中,React 将不再向 document 附加事件处理器。而会将事件处理器附加到渲染 React 树的根 DOM 容器中:</p><pre class="brush:php;toolbar:false">const rootNode = document.getElementById('root');
ReactDOM.render(<app></app>, rootNode);
在 React 16 或更早版本中,React 会对大多数事件执行 document.addEventListener()。React 17 将会在底层调用 rootNode.addEventListener()

四、注意
由于事件对象可能会频繁创建和回收在React16.x中,合成事件SyntheticEvent采用了事件池,合成事件会被放进事件池中统一管理,这样能够减少内存开销。React通过合成事件,模拟捕获和冒泡阶段,从而达到不同浏览器兼容的目的。另外,React不建议将原生事件和合成事件一起使用,这样很容易造成使用混乱。
Due to changes in event delegation in version 17, nesting of old and new versions of React trees is now more secure. Note that for this to work, both versions must be 17 or higher, which is why upgrading to React 17 and above is highly recommended.
[Related recommendations: Redis video tutorial]
The above is the detailed content of Why does react use synthetic events?. For more information, please follow other related articles on the PHP Chinese website!

