
 TopicsexcelPractical Excel skills sharing: several practical operations of the 'Column Sorting Tool'
Practical Excel skills sharing: several practical operations of the 'Column Sorting Tool'

In the previous article "Practical Excel Tips Sharing: Implementing the Filtering Function after Merging Cells", we learned about the method of implementing the filtering function after merging cells. Today we talk about data sorting and share the practical operations of several sorting tools. I hope it will be helpful to everyone!

Suddenly my imagination opened up and I discovered that the column sorting tool is not just for dividing one column of data into two or three columns. It also has several other uses:
1. The data is divided into multiple columns
2. Quickly input date data
3. Extract a certain segment of data in the data
①The extracted data is displayed in Original position
②The extracted data is displayed in the designated column
The following will tell you the actual operation methods of these uses.
1. Data is divided into multiple columns
#In daily work, data entry is sometimes very casual, and the format is often inconsistent. For example, the name and model of the materials to be received are entered as "A-234", "A 234", etc. As shown in the figure below, in the daily material requisition registration form, product names and specifications are entered into cells in column F, and the format is not uniform.

# During later data statistics, we need to sort the data in column F to separate the name and model. How to proceed?
Separating the name and model means adding a column of data, so you need to add an empty column first. Place the mouse on column number G. When the mouse turns into a downward arrow, click to select the data in column G.
Right-click in column G and click Insert.
You can see that a column is inserted after column F.
Select the data area that needs to be divided into columns.
Click the "Column" button under the "Data" tab.
In the pop-up dialog box, we can see that the data columns can be divided in two ways: "delimiter" and "fixed width".

The data in our table is separated by spaces and "-", so check "Delimiter" and click Next after setting it.
In the new dialog box, we can see that there are many kinds of delimiters. We only need to check "space" here. The "Tab key" is checked by default, which indicates the position occupied by the characters. Just keep the default settings.
Since some of the data in the table above are separated by a single space, and some are separated by multiple spaces, you must check "Consecutive delimiters are treated as a single Process", you can see the data preview below, and the data separated by spaces has been separated.
In the data preview, you can see that the data separated by "-" has not been divided into columns, so you need to check "Others" and enter "-" after it. ". Since some data are separated by multiple "-"s, you need to check "Consecutive delimiters are treated as a single process". At this point you can see that in the data preview below, all data is separated. After setting up, click Next.
#In the new dialog box, you can set and change the data format. We will explain this later. Just click Finish here.
#At this point you can see that the data has been divided into two columns, and the data in the second column is displayed in column G by default.
2. Quickly enter date data
When we enter date data in the form, most people manually enter "-" or "/" to separate the year, month and day data, which makes it very slow to enter numbers and symbols at the same time.
You must have never imagined that the fastest way to enter a date is to use data separation!
As shown in the figure below, we first directly enter the 8-digit number of the year, month and day. (Note: 8 digits refer to 4 digits for the year, 2 digits for the month, and 2 digits for the day. For example, February should be entered as 02, and 5th should be entered as 05.)
Select the date area. Click the "Sort to Columns" button under the "Home" tab, click Next twice in the pop-up dialog box, and the dialog box shown below will pop up.
In the dialog box, our class can see that there are multiple formats to choose from. Here we only need to check "Date" in the dialog box and select the "YMD" format in the drop-down menu, which is the year, month and day format commonly used in Chinese. If you want to use the English mode, you can select the "MDY" mode, which is the month, day, and year mode.
After setting, click Finish to see the final result.
3. Extract a certain section of the data
① Extract the data and display it in the original Bit
In previous operations, when we needed to extract the required characters from a long string of characters, we would use functions. Here we will teach you how to use columns to achieve it. As shown in the figure below, it is the data exported by the Human Resources Department in the attendance system.
We only want to keep the dates in the data, select the data area, and click the "Column" button under the "Home" tab, because the data here are all aligned Yes, we can directly check "Fixed Width" to divide. Of course, if you want to use "delimiter", you can also use it. I have already mentioned it before, so I won't go into details here. After setting up, click Next.
In the new dialog box, drag the mouse directly in the blank area of the data preview below, and a dividing line will appear. Drag as many dividing lines as you need. Just place the dividing line where you need to separate. After setting up, click Next.
In the new dialog box, select the data you do not need later.
Check "Do not import this column" above.
After setting, click Finish to see the results.
At this point we can see that the extracted date is displayed directly in its original position, and the original data has been replaced.
② Extract the data and display it in the specified column
In our daily work, the most commonly used character extraction should be to extract the date of birth from the ID number. Bar. Below is the entered ID number.
In the previous operation, the date extracted from the attendance system was directly displayed in the original cell, and the original data was replaced. Here we need to extract the year, month and day, retain the original data, and display the extracted data in column H. The first few steps here are the same as above. Select the data, click "Column", select "Fixed Width", and pull out two dividing lines. After setting up, click Next.
Select the first part of the data and check "Do not import this column".
Select the last part of the data and check "Do not import this column".

Select the data in the middle and click the arrow to the right of "Target Area".
At this time, the column wizard automatically shrinks back, and the H2-H11 area is selected in the table.
After setting the area, click the arrow on the right side of the column wizard.
#The column wizard will automatically stretch out, select the "Column Data Format" as date "YMD", and click Finish.
The final results we see are as follows:
Related learning recommendations: excel tutorial
The above is the detailed content of Practical Excel skills sharing: several practical operations of the 'Column Sorting Tool'. For more information, please follow other related articles on the PHP Chinese website!

 MEDIAN formula in Excel - practical examplesApr 11, 2025 pm 12:08 PM
This tutorial explains how to calculate the median of numerical data in Excel using the MEDIAN function. The median, a key measure of central tendency, identifies the middle value in a dataset, offering a more robust representation of central tenden
 Google Spreadsheet COUNTIF function with formula examplesApr 11, 2025 pm 12:03 PM
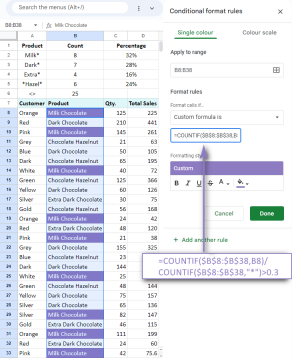
Master Google Sheets COUNTIF: A Comprehensive Guide This guide explores the versatile COUNTIF function in Google Sheets, demonstrating its applications beyond simple cell counting. We'll cover various scenarios, from exact and partial matches to han
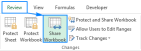 Excel shared workbook: How to share Excel file for multiple usersApr 11, 2025 am 11:58 AM
This tutorial provides a comprehensive guide to sharing Excel workbooks, covering various methods, access control, and conflict resolution. Modern Excel versions (2010, 2013, 2016, and later) simplify collaborative editing, eliminating the need to m
 How to convert Excel to JPG - save .xls or .xlsx as image fileApr 11, 2025 am 11:31 AM
This tutorial explores various methods for converting .xls files to .jpg images, encompassing both built-in Windows tools and free online converters. Need to create a presentation, share spreadsheet data securely, or design a document? Converting yo
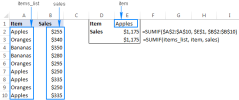 Excel names and named ranges: how to define and use in formulasApr 11, 2025 am 11:13 AM
This tutorial clarifies the function of Excel names and demonstrates how to define names for cells, ranges, constants, or formulas. It also covers editing, filtering, and deleting defined names. Excel names, while incredibly useful, are often overlo
 Standard deviation Excel: functions and formula examplesApr 11, 2025 am 11:01 AM
This tutorial clarifies the distinction between standard deviation and standard error of the mean, guiding you on the optimal Excel functions for standard deviation calculations. In descriptive statistics, the mean and standard deviation are intrinsi
 Square root in Excel: SQRT function and other waysApr 11, 2025 am 10:34 AM
This Excel tutorial demonstrates how to calculate square roots and nth roots. Finding the square root is a common mathematical operation, and Excel offers several methods. Methods for Calculating Square Roots in Excel: Using the SQRT Function: The
 Google Sheets basics: Learn how to work with Google SpreadsheetsApr 11, 2025 am 10:23 AM
Unlock the Power of Google Sheets: A Beginner's Guide This tutorial introduces the fundamentals of Google Sheets, a powerful and versatile alternative to MS Excel. Learn how to effortlessly manage spreadsheets, leverage key features, and collaborate


Hot AI Tools

Undresser.AI Undress
AI-powered app for creating realistic nude photos

AI Clothes Remover
Online AI tool for removing clothes from photos.

Undress AI Tool
Undress images for free

Clothoff.io
AI clothes remover

Video Face Swap
Swap faces in any video effortlessly with our completely free AI face swap tool!

Hot Article
Hot Tools

VSCode Windows 64-bit Download
A free and powerful IDE editor launched by Microsoft

DVWA
Damn Vulnerable Web App (DVWA) is a PHP/MySQL web application that is very vulnerable. Its main goals are to be an aid for security professionals to test their skills and tools in a legal environment, to help web developers better understand the process of securing web applications, and to help teachers/students teach/learn in a classroom environment Web application security. The goal of DVWA is to practice some of the most common web vulnerabilities through a simple and straightforward interface, with varying degrees of difficulty. Please note that this software

PhpStorm Mac version
The latest (2018.2.1) professional PHP integrated development tool

SublimeText3 English version
Recommended: Win version, supports code prompts!

Atom editor mac version download
The most popular open source editor

