Home >Development Tools >git >Summary of Git remote warehouse (Github) knowledge points
Summary of Git remote warehouse (Github) knowledge points
- WBOYWBOYWBOYWBOYWBOYWBOYWBOYWBOYWBOYWBOYWBOYWBOYWBforward
- 2022-05-10 18:23:363407browse
This article brings you relevant knowledge about Git, which mainly introduces the relevant content about remote warehouses. Git does not have a central server like SVN. Let’s take a look at using Github. As some questions about remote warehouses, I hope it will be helpful to everyone.

Recommended study: "Git Learning Tutorial"
Git Remote Warehouse (Github)
Git does not have a central server like SVN.
The Git commands we currently use are all executed locally, if you want to share your code or collaborate with other developers through Git. You then need to put the data on a server that other developers can connect to.
This example uses Github as the remote warehouse. You can read our Github concise tutorial first.
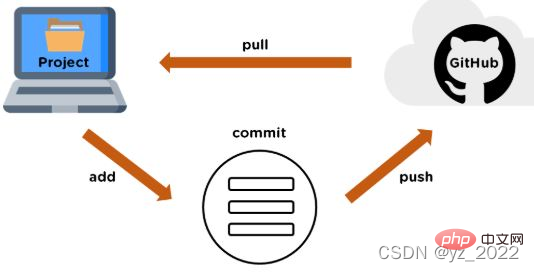
Remote warehouse command
1. View the current remote library
2. Add a remote warehouse
Run git remote add to add a new one Remote Git repository, and specify a convenient abbreviation: 
3. $ git fetch
This command will access the remote repository and pull all the data you don't have yet. Once the execution is complete, you will have references to all branches in that remote repository, which can be merged or viewed at any time. 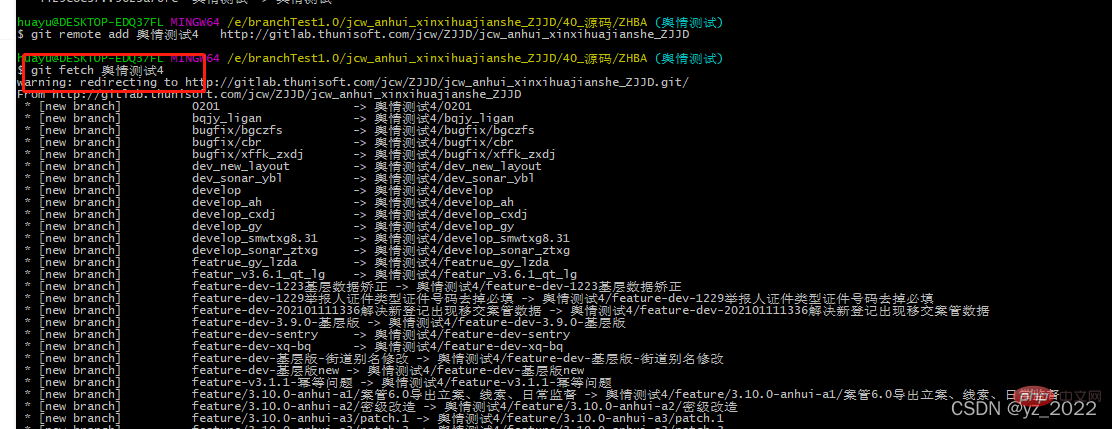
All branches under origin are copied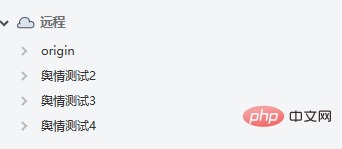
The git fetch command will only download the data to your local warehouse - it will not automatically merge or Modify your current work. You must manually incorporate it into your job when ready.
The git pull command will automatically fetch and merge the remote branch into the current branch
By default, the git clone command will automatically set the local master branch to track the master branch of the cloned remote warehouse (or a default branch with another name) . Running git pull will usually grab the data from the originally cloned server and automatically try to merge into the current branch.
3. git push to the remote warehouse 
This command can only take effect if you have write permissions on the clone server and no one has pushed before. When you clone at the same time as someone else, and they push to upstream first and then you push to upstream, your push will be rejected without question. You have to grab their work and merge it into yours before you can push it.
4. View a remote repository
If you want to view more information about a remote repository, you can use the git remote show command. 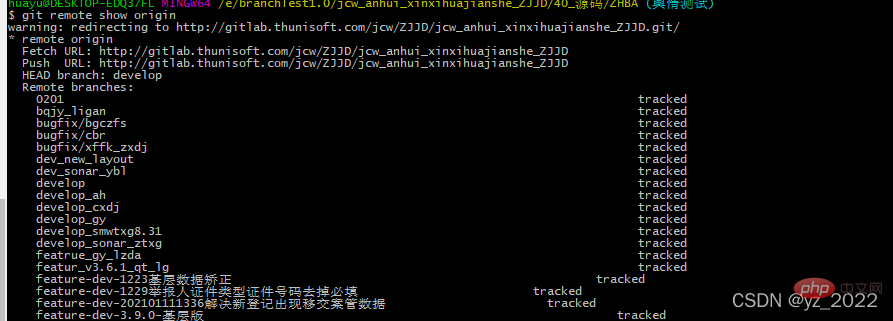
5. Renaming of remote warehouse
git remote rename to modify the abbreviation of a remote warehouse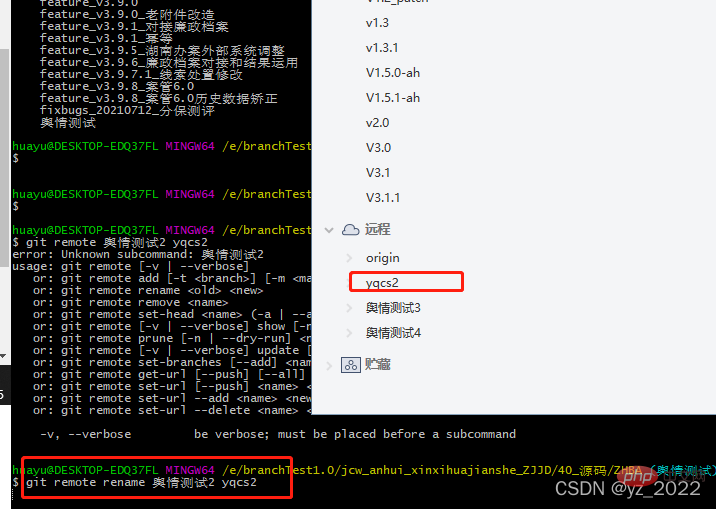
6. Removal of remote warehouse
git remote remove or git remote rm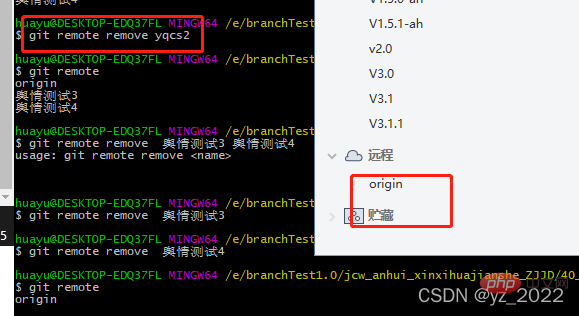
7. Tag: You can tag a commit in the warehouse history to show its importance. It is more representative that people will use this function to mark release nodes
1) List tags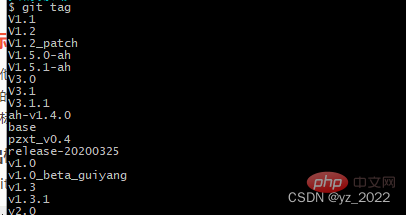
2) git tag -l/list wildcard method to list tags
3) Lightweight tag (lightweight): It is just a reference to a specific commit, essentially storing the commit checksum in a file - no other information is saved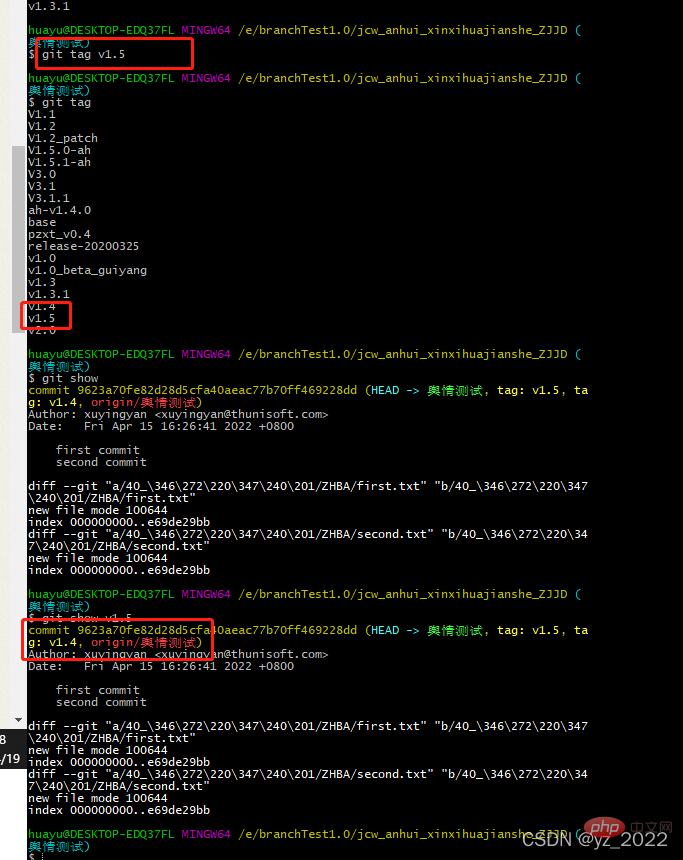
4) Annotated tag: a complete object stored in the Git database. They can be verified and contain the name, email address, date and time of the tagger, and a tag information. 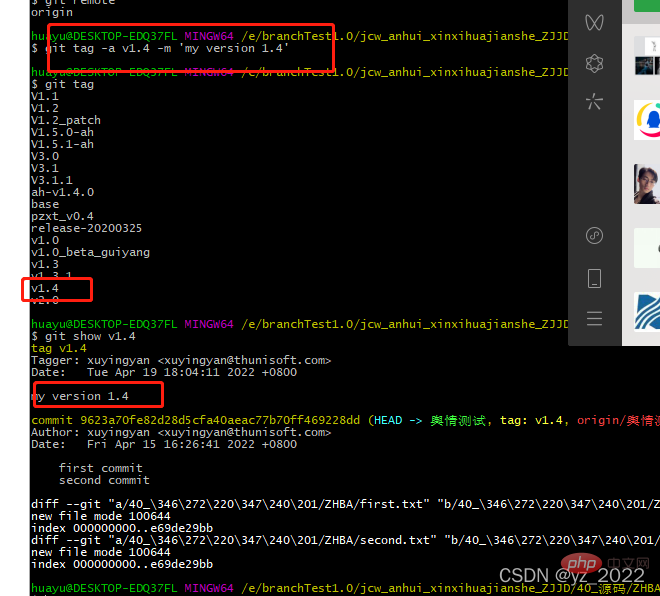
5) Later tagging: Tag historical projects 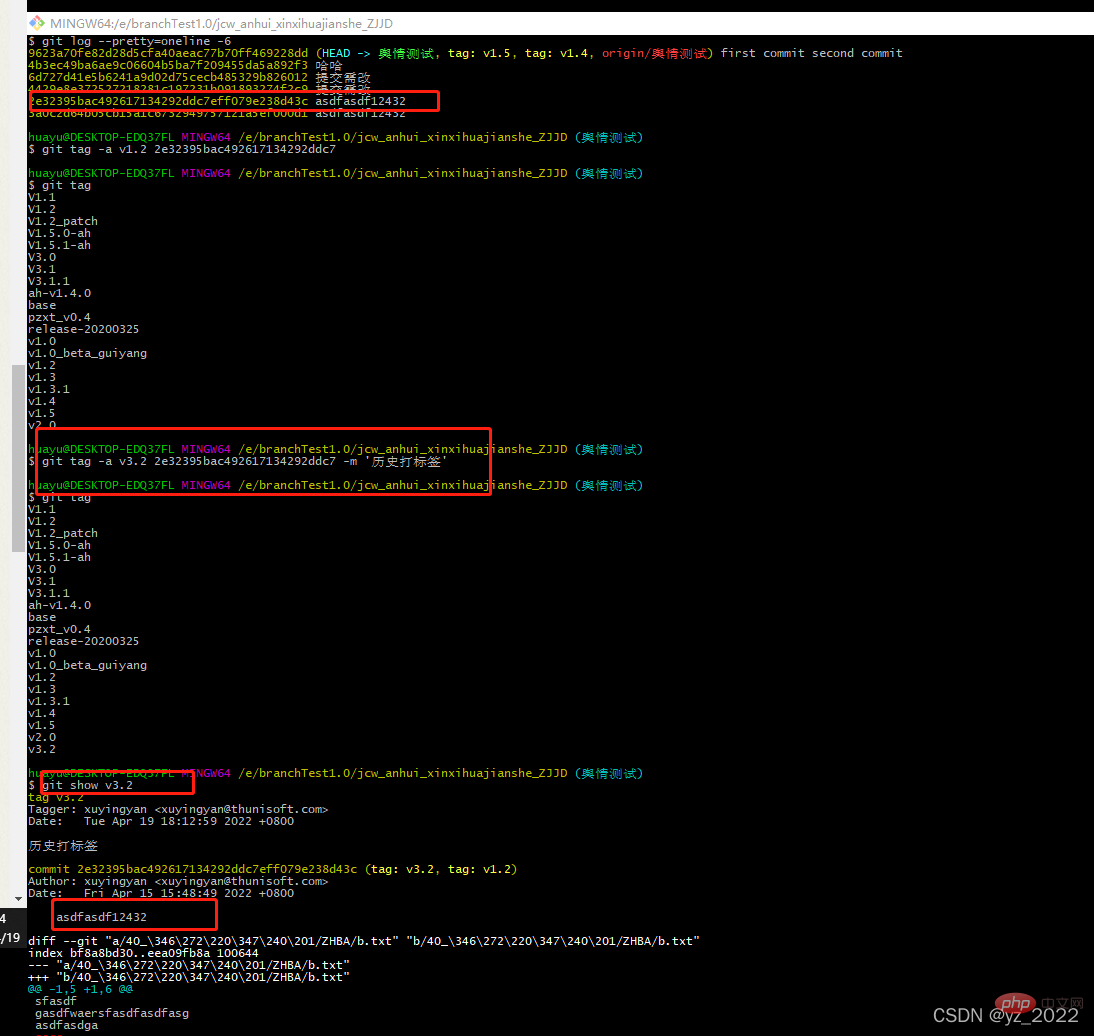
6) Shared tags: The git push command will not transfer the tags to the remote warehouse server and can be run git push origin. 
git push origin --tags:将会把所有不在远程仓库服务器上的标签全部传送到那里。 
7) To delete the tag on your local repository
git tag -d
Note that the above command will not remove this from any remote repository tag, you must use git push :refs/tags/ to update your remote repository: 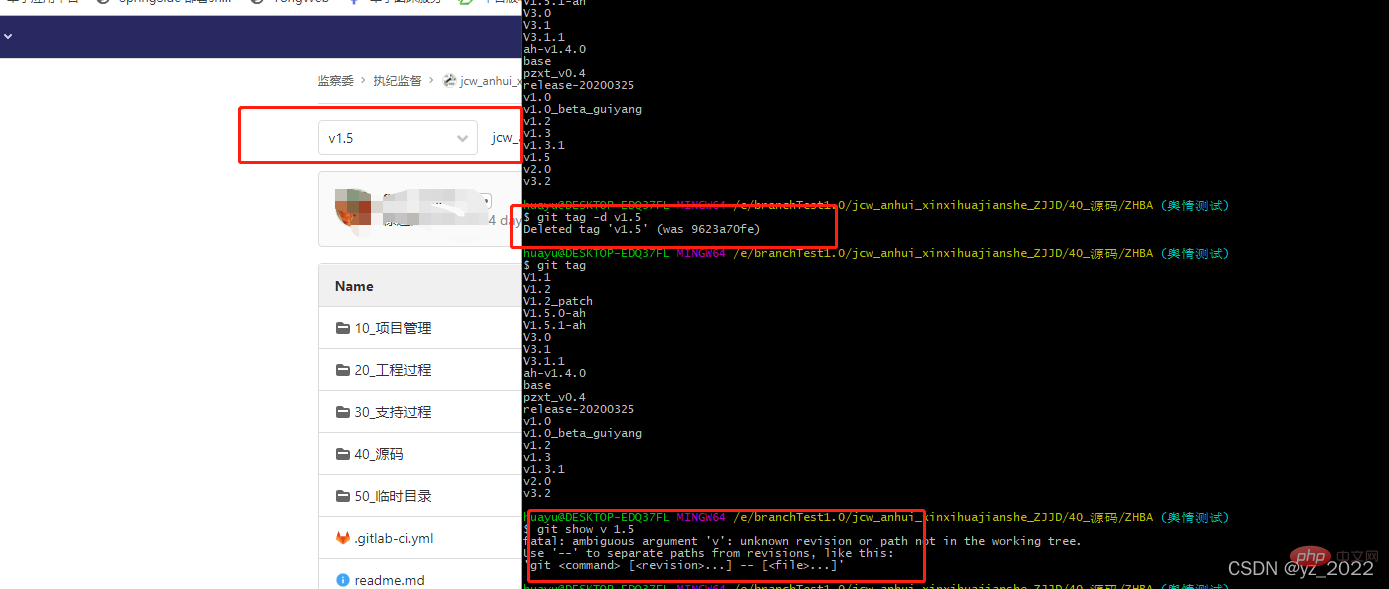
Note that the above command will not remove this tag from any remote repository
Required The first variant is git push :refs/tags/:
$ git push origin :refs/tags/v1.4-lw
The meaning of the above operation is to change the A null value is pushed to the remote tagname, thereby efficiently deleting it.
The second more intuitive way to delete remote tags is:
$ git push origin --delete
8. git branch management
Note: git branch, lists all current branches, before the branch The * character: It represents the branch currently checked out
1) git branch testing creates a testing branch
2) git checkout testing switches branches and views the current branch. You can point HEAD to the current branch
[ git checkout -b Create and switch branches ] 
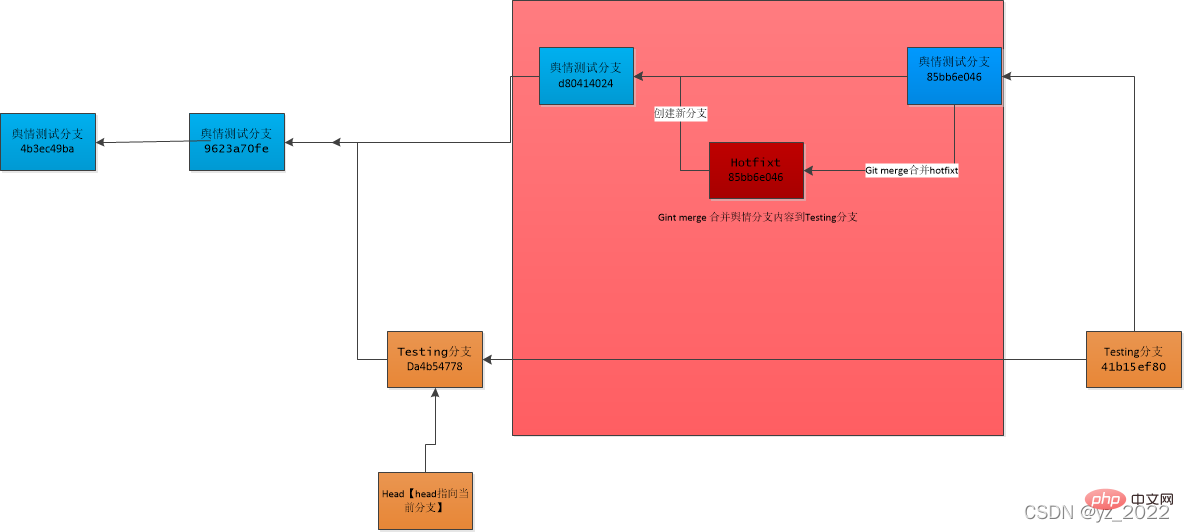
3) Public opinion test test branches are submitted separately, and the head pointer will move forward
The benchmarks of both branches are 9623a70fe, and each branch will be submitted separately. The pointer changes

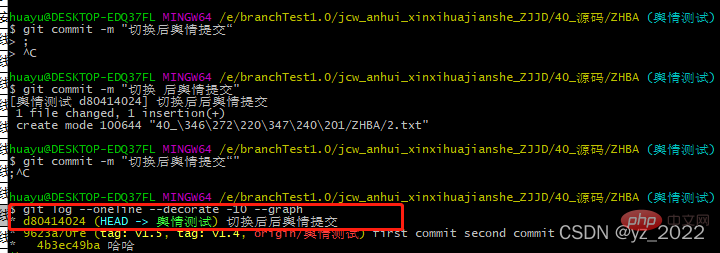
Run git log --oneline --decorate --graph --all , it will output your submission history, the pointing of each branch and The branch status of the project. 
Fork situation: 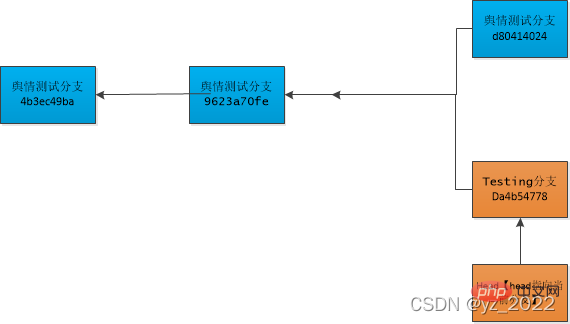
Branch merge git merge [The public opinion branch will not be modified, the hotfix branch will generate new submissions] – Three-party merger
hotfix is based on public opinion testing Pull the branch, generate a commit in hotfix, check that the commit id of the hotfix branch is 85bb*, switch back to the public opinion branch, execute git merge, and find that the commit id of the public opinion branch is also advanced to 85bb*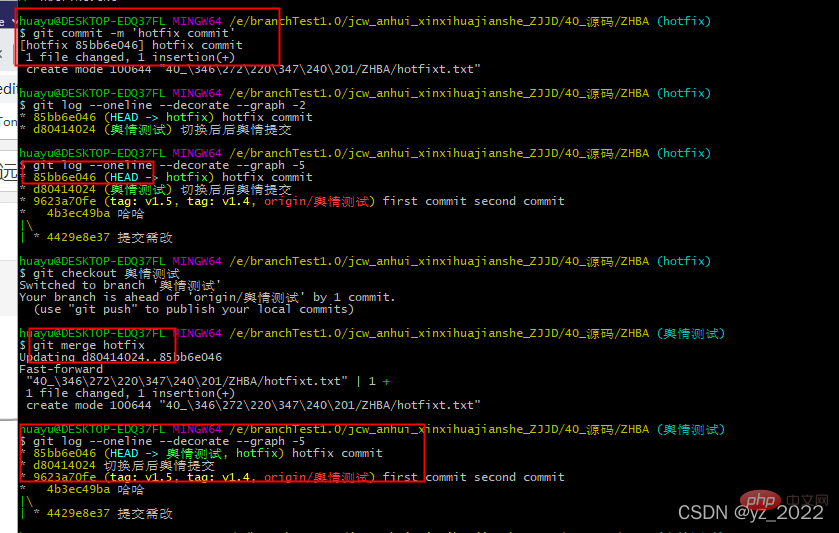 # generated by the hotfix branch. ## Illustration of changes in the public opinion branch and hotfix branch:
 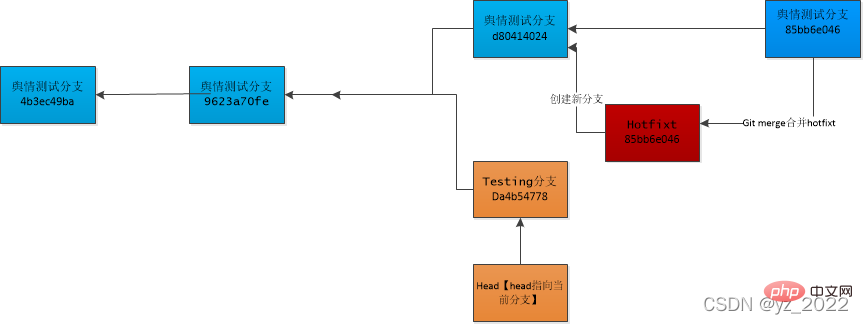 Branch merge git merge [New submissions are generated in the public opinion branch/Testing branch]
Test is pulled based on the public opinion test branch, and the Test branch/public opinion The branches are modified to generate commits respectively. After the public opinion branch merges the contents of the hotfix branch, it is switched to the Test branch. When the test branch merges with the public opinion branch, it is found that the Testing branch directly generates a new commit id41b1*, and the corresponding d804 and 85 in the public opinion branch are No, the IDs will not be merged. At this moment, the new ID corresponds to two parent IDs, namely Da4 for testing and 85b
for the public opinion branch 1) git checkbox Testing
2) git merge public opinion branch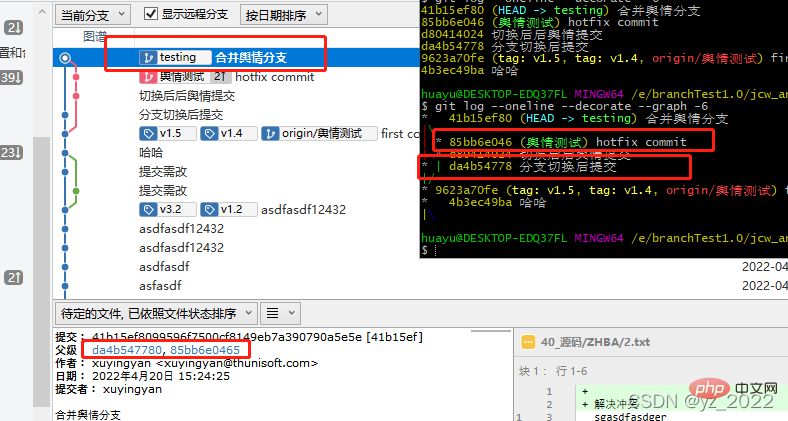
4)git branch -v 查看每个分支的最后一次提交
5)git branch --merged/–no-merged 过滤这个列表中已经合并或尚未合并到当前分支的分支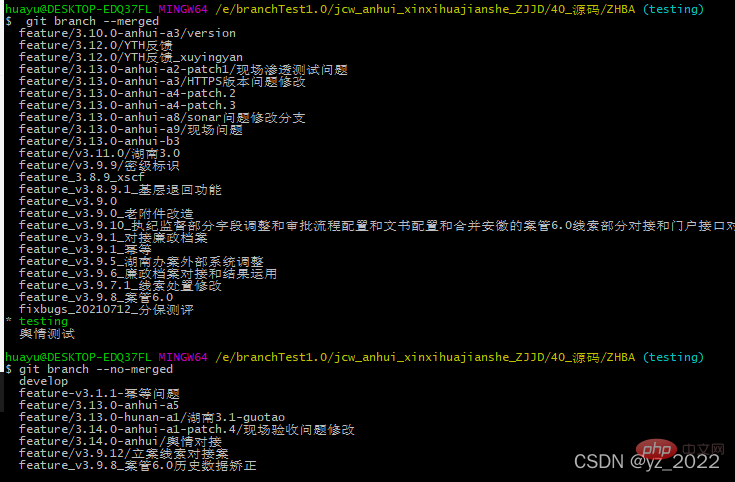
6)git branch -d
包含了还未合并的工作,尝试使用 git branch -d 命令删除它时会失败,除非用-D
9、远程分支
1) git ls-remote 来显式地获得远程引用的完整列表
通过 git remote show 获得远程分支的更多信息
2)origin/master和master区别
master : 它代表本地的某个分支名。
origin master 代表着两个概念,前面的 origin 代表远程名,后面的 master 代表远程分支名
origin/master 本地分支,是从远程拉取后,在本地建立的一份拷贝【是用来和远程分支对应的,一般不可见】
 举几个例子可能会更加清晰地说明问题:
① 执行 git fetch origin master 时,它的意思是从名为 origin 的远程上拉取名为 master 的分支到本地分支
 origin/master 中。既然是拉取代码,当然需要同时指定远程名与分支名,所以分开写。
 ②执行 git merge origin/master 时,它的意思是合并名为 origin/master的分支到当前所在分支。既然是分支的合并,当然就与远程名没有直接的关系,所以没有出现远程名。需要指定的是被合并的分支。
 ③执行 git push origin master 时, 推送本地的 master 分支到远程origin,
④ 一次性拉取多个分支的代码:git fetch origin master dev1 dev2
 ⑤ 一次性合并多个分支的代码:git merge origin/master 分支1 分支2 分支3
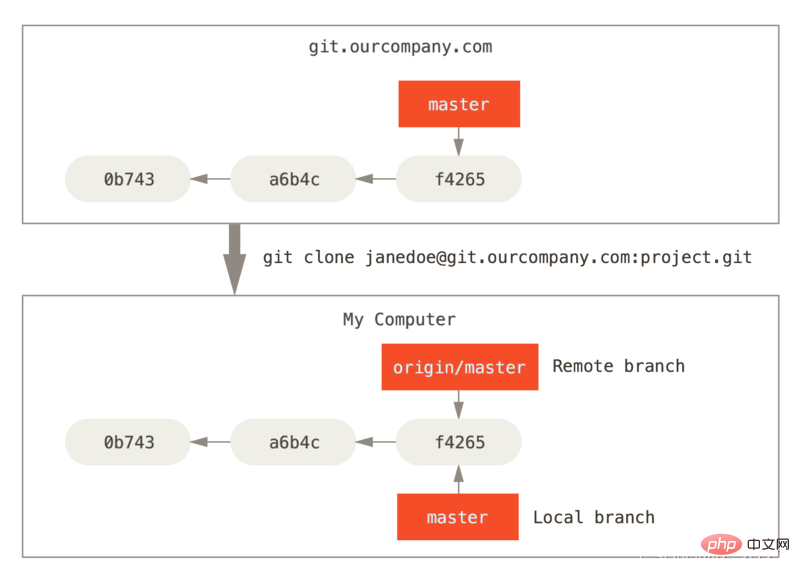
2)如果远程仓库有人提交内容,那么远程仓库就会向前移动,而本地origin/master如果不拉取,将还保持不动,如果希望本地同远程保持一致,可以通过git fetch拉取远程仓库数据,
git fetch
3) git push origin 分支名
推送本地的 舆情测试 分支,将其作为远程仓库的 舆情测试 分支
如果并不想让远程仓库 上的分支叫做 舆情测试 ,可以运行 git push origin 舆情测试 :test0421 来将本地的 舆情测试 分支推送到远程仓库上的 test0421 分支。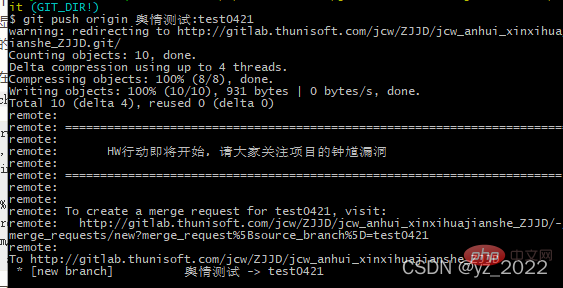

4)checkout 的操作
通过 git checkout test0421 会把分支切换到test0421分支上
这个操作会处于‘detached Head’ 状态,在这种状态下不会修改origin/test0421上的数据,可以修改并提交做一些实验性的操作,但是切换回test0421分支后,再次从test0421切换回origin/test0421时,之前的改变不会同步,因为origin/test0421 是用户只读的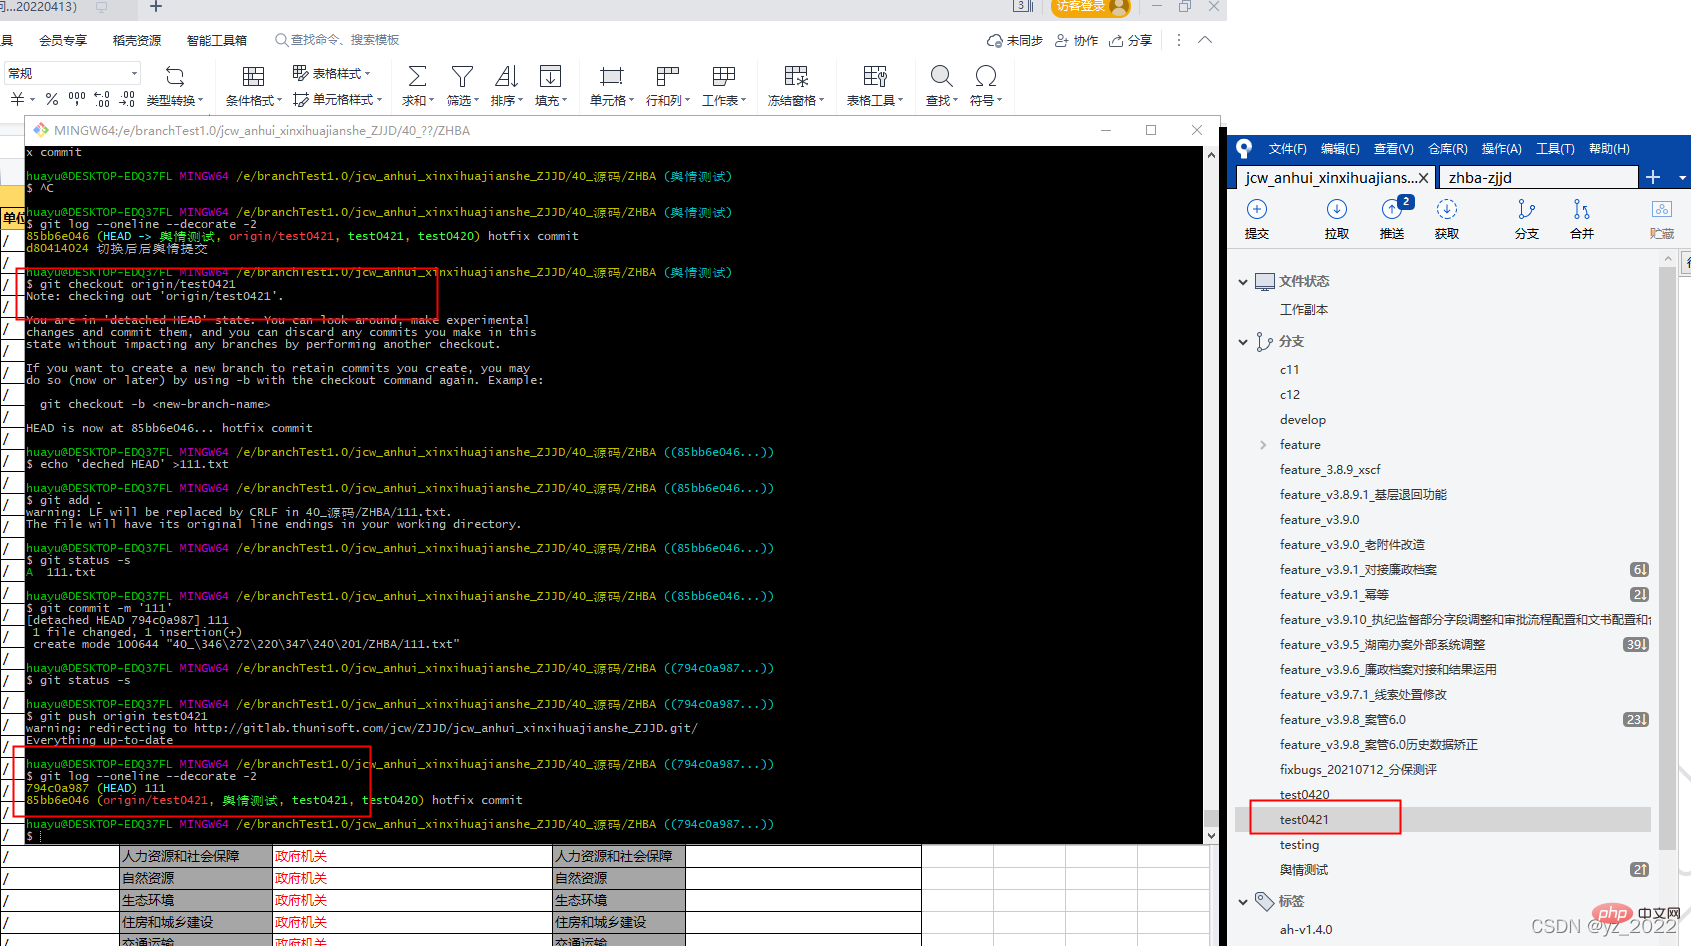
5)git push origin --delete 分支名 删除远程仓库分支【本地仓库还有数据】
6)rebase变基:使用 rebase 命令将提交到某一分支上的所有修改都移至另一分支上,就好像“重新播放”一样。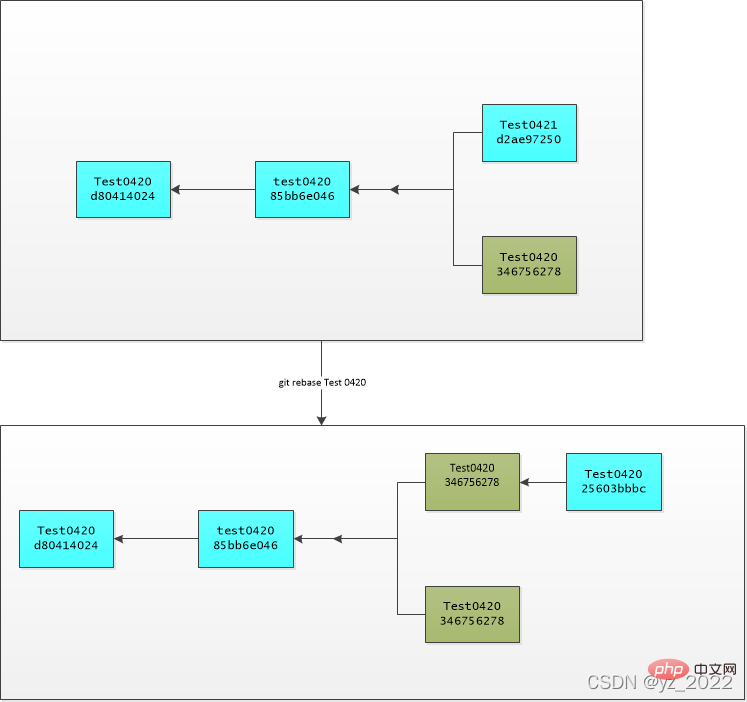
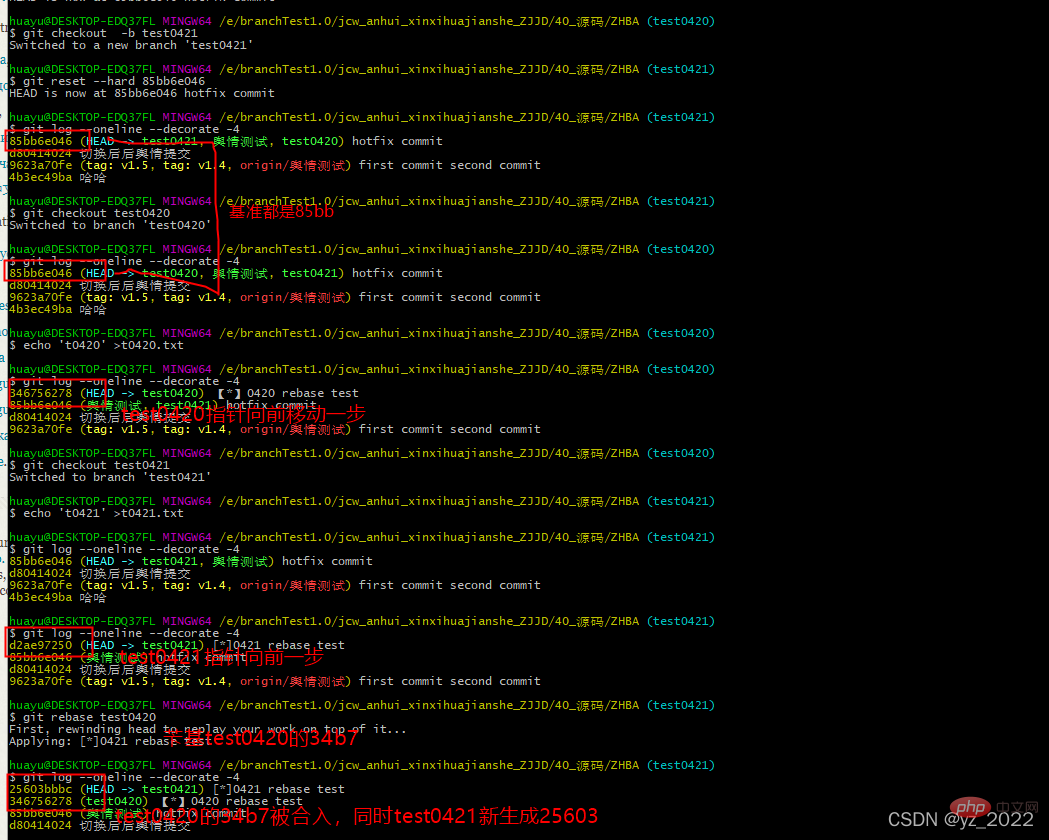
首先找到这两个分支(即当前分支 Test0421、变基操作的目标基底分支 Test0420) 的最近共同祖先 85bb,然后对比当前分支相对于该祖先的历次提交,提取相应的修改并存为临时文件, 然后将当前分支指向目标基底 3467, 最后以此将之前另存为临时文件的修改依序应用
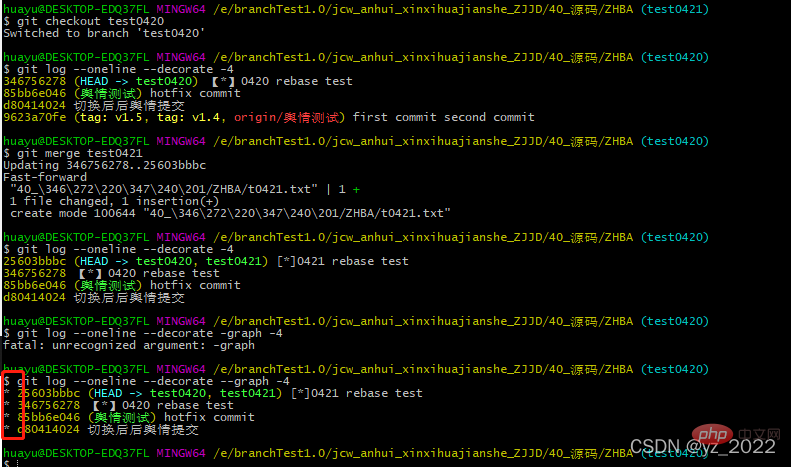
Test0420 使用git merge 合并Test0421内容,结果两个分支完全一致,可以发现提交记录没有出现分拆,而是保持在一条直线上【可以比较前面get merge环节中结果出现分叉】
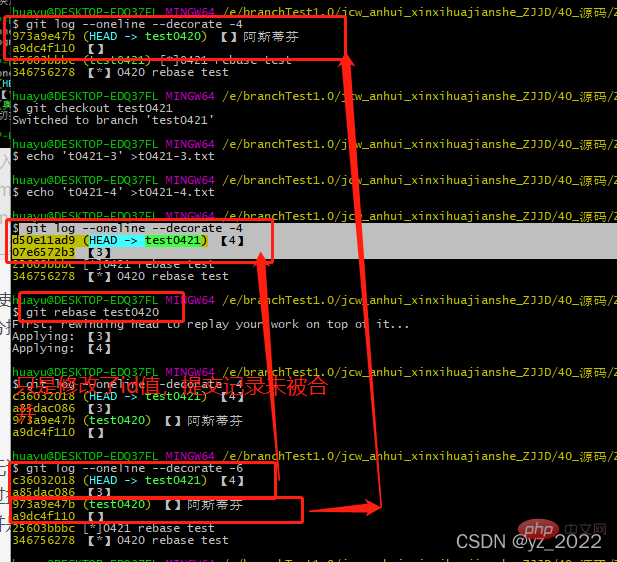
rebase时一系列提交按照原有次序依次应用,只是当前分支的提交id值改变
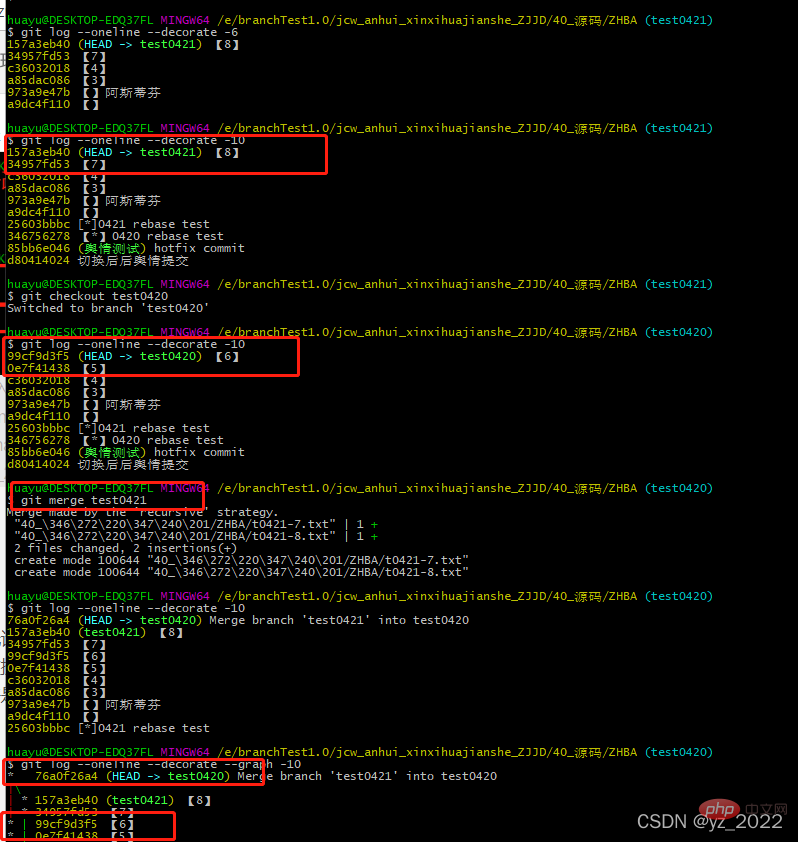
merge时多次提交合并成一次,生成新的提交id
总结:无论是通过变基,还是通过三方合并,整合的最终结果所指向的快照始终是一样的,只不过提交历史不同罢了。 变基是将一系列提交按照原有次序依次应用到另一分支上,而合并是把最终结果合在一起。
推荐学习:《Git学习教程》
The above is the detailed content of Summary of Git remote warehouse (Github) knowledge points. For more information, please follow other related articles on the PHP Chinese website!
Related articles
See more- How Angular combines Git Commit for version processing
- Anti-theft chaining is added, and the Gitee picture bed is hung!
- Quick check! Comprehensive list of commonly used Git commands [Summary recommendations]
- Detailed explanation of Git basics: git recovery of deleted files (detailed explanation with examples)
- Detailed examples of git init and git clone to obtain git warehouse

