Home >Web Front-end >Front-end Q&A >What are the two modes of vue routing?
What are the two modes of vue routing?
- 青灯夜游Original
- 2022-01-10 16:57:4416288browse
Two modes of vue routing: 1. Hash mode, the principle is the onhashchange event, which can be monitored on the window object; 2. History mode, the "history.pushState" API can be used to complete the URL Jump.

The operating environment of this tutorial: windows7 system, vue2.9.6 version, DELL G3 computer.
Separation of front and back ends ===> Using Ajax, asynchronous data request interaction can be made without refreshing the browser.
Single page application (There is only one html file, all the content of the entire website is in this html, processed through js)Not only in Page interaction is non-refreshing, even page jump is non-refreshing. In order to implement a single-page application ==> Separate front-end and front-end routing. (Update the view but do not re-request the page)
Front-end routing is actually very simple to implement, that is, matches different url paths, parses them, loads different components, and then dynamically Render out the area html content .
hash mode
#The subsequent hash value changes and will not cause the browser to send a request to the server, If the browser does not make a request, it will not refresh the page. Every time the hash value changes, the hashchange event will be triggered. Through this event, we can know what changes have occurred in the hash value. Then we canListenhashchange to implement the operation of updating part of the page content:
The principle behind the hash mode isonhashchangeEvent, you can listen to this event on the window object:
window.onhashchange = function(event){

    console.log(event.oldURL, event.newURL);
    let hash = location.hash.slice(1);
    document.body.style.color = hash;

}
The above code can change the page font color by changing the hash.

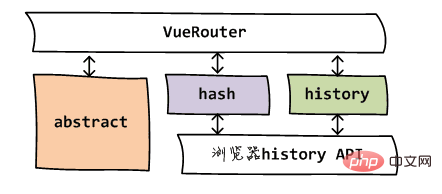
After you select the mode type, the program will create different history objects (hash:HashHistory or history:HTML5History or abstract:AbstractHistory) according to the mode type you select.
switch (mode) {
  case 'history':
    this.history = new HTML5History(this, options.base)
    break
  case 'hash':
    this.history = new HashHistory(this, options.base, this.fallback)
    break
  case 'abstract':
    this.history = new AbstractHistory(this, options.base)
    break
  default:
    if (process.env.NODE_ENV !== 'production') {
      assert(false, `invalid mode: ${mode}`)
    }
}
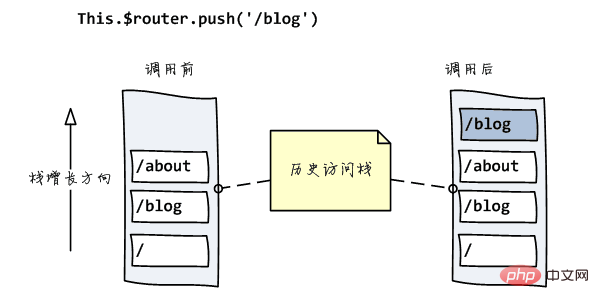
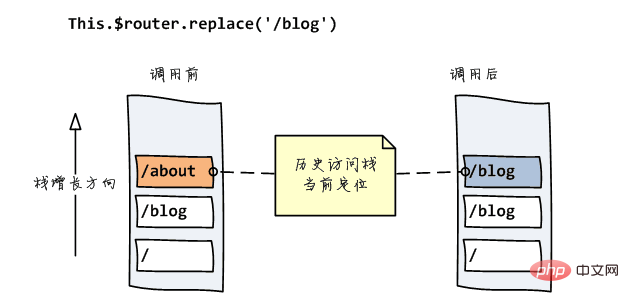
HashHistory has two methods: <span class="hljs-selector-tag">HashHistory<span class="hljs-selector-class">.push() to add a new route to the top of the browser access history stack and <span class="hljs-selector-tag">HashHistory<span class="hljs-selector-class">.replace() to replace Remove the route at the top of the current stack</span></span></span></span>


forward and backward can be used. In this way, although the browser does not request the server, the page status and URL are associated one by one.
history modeDue to the release of the HTML5 standard, there are two more APIs,pushState() and replaceState(). Through these two APIs (1) the url address can be changed without sending a request , (2) not only can the history stack be read, but also the browser history stack can be processed Revise.
pushState and replaceState. These two methods receive three parameters: stateObj, title, url
window.history.pushState(stateObject, title, URL)
window.history.replaceState(stateObject, title, URL)
Switch historical stateIncludes three methods:
back, forward, and go, which correspond to the browser's forward, backward, and jump go operations. Some students said that the (Google) browser only has forward and backward, and there is no jump. Well, if you press and hold the mouse on the forward and backward buttons, the history of all current windows will appear, so you can jump (perhaps it is more appropriate to call it jump):
history.go(-2);//Back Twice
- ##history.
go (2);//Forward twice
- history.
back(); //Back
hsitory.forward(); //前进
区别:
- 前面的hashchange,你只能改变#后面的url片段。而pushState设置的新URL可以是与当前URL同源的任意URL。
- history模式则会将URL修改得就和正常请求后端的URL一样,如后端没有配置对应/user/id的路由处理,则会返回404错误
当用户刷新页面之类的操作时,浏览器会给服务器发送请求,所以这个实现需要服务器的支持,需要把所有路由都重定向到根页面。
history模式怕啥
不怕前进,不怕后退,就怕刷新,(如果后端没有准备的话),因为刷新是实实在在地去请求服务器的。
在history模式下,你可以自由的修改path。history模式最终的路由都体现在url的pathname中,这部分是会传到服务器端的,因此需要服务端对每一个可能的path值都作相应的映射。
当刷新时,如果服务器中没有相应的响应或者资源,会分分钟刷出一个404来。
router挂在到根组件
new Vue({
  router
})此时的router会被挂载到 Vue 的根组件this.$options选项中。在 option 上面存在 router 则代表是根组件。
$router与$route的区别
1. $route从当前router跳转对象里面可以获取name、path、query、params等(b988a8fd72e5e0e42afffd18f951b277传的参数由 this.$route.query或者 this.$route.params 接收)
2. $router为VueRouter实例。想要导航到不同URL,则使用$router.push方法;返回上一个history也是使用$router.go方法
【相关推荐:vue.js教程】
The above is the detailed content of What are the two modes of vue routing?. For more information, please follow other related articles on the PHP Chinese website!
Related articles
See more- How to control the hiding and display of elements in vue
- Take you to have an in-depth understanding of v-model in vue2 and see how to make components support this syntax
- Recommend 20 recent 'hot” Vue projects (worth collecting)
- How to mount a Vue instance? Let's talk about the process of instance mounting
- What is the difference between vue-resource and vuex
- What are the performance optimization methods for vue?

