Home >Backend Development >PHP Problem >How to build a php environment in winxp
How to build a php environment in winxp
- 藏色散人Original
- 2021-12-17 09:53:412276browse
How to build a php environment in winxp: 1. Install Apache and modify the httpd.conf configuration file; 2. Install MySql; 3. Download and install PHP and set the php.ini configuration file; 4. Restart the apache service That’s it.

The operating environment of this article: Windows xp system, php version 5.4.15, Dell G3 computer.
How to set up a php environment in winxp?
Build Apache MySql PHP environment under windowsXP
1. Install Apache
1. Download the httpd-2.4.4-win32-ssl_0.9.8.zip package, Unzip it to the directory you want to put it in, and modify the conf/httpd.conf configuration file.
The configuration file modifications are as follows (here it is installed under the F drive and the htdocs directory is mentioned outside the apache directory):
ServerRoot "f:/LAMP/Apache24"
ServerName localhost
DocumentRoot "f:/LAMP/htdocs"
de52f1b310add5a6f5197392947f6d4c
ScriptAlias /cgi-bin/ "f:/LAMP/Apache24/cgi-bin/"
b69b0e3864db0166ddf9dd44f2a37297
2. Install the apache service
win Open R and run, enter cmd to open the command line panel, switch the path to the bin subdirectory under the apahce installation directory, and use the command: httpd.exe -k install
========== This is a long way to go. Some, you can skip it ========
Install the apache service with a customized service name: httpd.exe -k install -n "MyServiceName"
Use The configuration file with a custom name installs the apache service with a custom service name: httpd.exe -k install -n "MyServiceName" -f "c:/files/my.conf"
Use httpd.exe - The service name installed by the k install command is Apache2.4 and the configuration file used is conf/httpd.conf.
The command to delete the apache service: httpd.exe -k uninstall or httpd.exe -k uninstall -n "MyServiceName"
============================================ =
3. Start the apache service
Method 1. You can start, stop or restart the apache service through ApacheMoniter.exe included in the apache installation package.
Method 2: You can also open and run through the Windows service manager, win R, enter services.msc to open the service manager, and find the apache service through the service name. At this time, you can start, stop or restart the apache service. .
Method 3. Of course, you can also use the command line to switch to the bin directory according to the aforementioned method:
You can test the configuration file before starting the apache service. :httpd.exe[ -n "MyServiceName"] -t
Start: httpd.exe -k start[ -n "MyServiceName"]
Stop: httpd.exe -k stop[ -n "MyServiceName"] or httpd.exe -k shutdown[ -n "MyServiceName"]
Restart: httpd.exe -k restart[ -n "MyServiceName"]
2. Install MySql
Download the mysql-installer-community-5.6.11.0.msi package and double-click to install it. If there is no .Net FrameWork 4.0 environment, you will be prompted Install.
3. Install PHP
1. Download the php-5.4.15-Win32-VC9-x86.zip package, unzip it and put it in the directory you want to put, and put php.ini- development was renamed php.ini.
2. Modify the apache configuration file:
Add after "#LoadModule vhost_alias_module modules/mod_vhost_alias.so"
LoadModule php5_module "f:/LAMP/PHP/php5apache2_4.dll"
PHPIniDir "f:/LAMP/PHP"
AddType application/x-httpd-php .php .html .htm
Find "DirectoryIndex index.html" and add " index.php", that is: DirectoryIndex index.html index.php
3. Restart the apache service and the installation is complete!
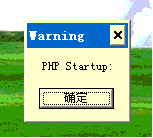
==============Warning pops up every time you start PHP: Solution to PHP Startup==============
The situation is as shown in the screenshot:

Solution:
Open php.ini, find extension_dir = "ext", remove the previous comment, and Change the value to an absolute path such as "f:/LAMP/PHP/ext" [relative paths will not work, this is verified].
Recommended learning: "PHP Video Tutorial"
The above is the detailed content of How to build a php environment in winxp. For more information, please follow other related articles on the PHP Chinese website!

