
 Web Front-endJS Tutorialavalon js implements drag sorting of multiple images imitating google plus with source code download_javascript skills
Source code download: http://xiazai.jb51.net/201509/yuanma/drag_sort1(jb51.net).rar
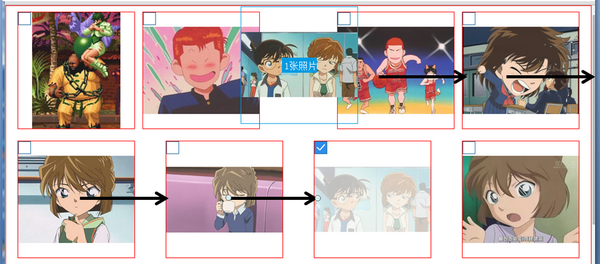
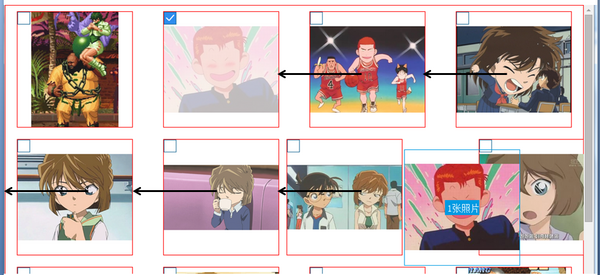
The effect is shown below:
google plus
Drag responsive effect:

Requirements
1. Aligned layout on both sides, that is, the spacing between the pictures is the same, but the distance between the left and right pictures and the border is not necessarily equal to the spacing between the pictures, compatible with ie7, 8, firefox, chrome.
2. The size of the browser changes. When it is larger than a certain size, each row will automatically add or reduce pictures, and automatically adjust the spacing between pictures to meet the alignment layout on both sides. At this time, the size of each picture is fixed (here is 200*200px); and if it is smaller than At a certain size, the number of pictures in each row is fixed (the minimum number of columns here is 3), and the pictures are always stretched or scaled in equal proportions.
3. You can still drag and sort under different browser sizes.
4. For pictures, drag the pictures in the agent to always maintain equal proportions and be centered horizontally and vertically.
5. When dragged to the corresponding position, the pictures to the left and right of the position will be offset to a certain extent. If it is on the far left or right, only the first or last picture of the row is offset.
6. Supports dragging and sorting of multiple pictures.
Achievement
Layout and css
 <div id='wrap'>
  <ul class='justify'>
   <li>
    <a href="javascript:;" class="no_selected"></a>
    <div class='photo_mask'></div>
    <div>
     <div class="dummy"></div>
     <p><img  src="/static/imghwm/default1.png"  data-src="http://files.jb51.net/file_images/article/201509/2015092410334112.png?x-oss-process=image/resize,p_40"  class="lazy"  alt="avalon js implements drag sorting of multiple images imitating google plus with source code download_javascript skills" ><i></i></p>
    </div>
   </li>
   <li class='justify_fix'></li>
  </ul>
 </div>
inline-block+flex-box+text-align:justify
This needs to be compatible with lower version browsers, so the list li layout uses inline-block. And the layout is aligned on both sides
-Low version: inline-block `text-align:justify`
-Modern: inline-block `flex-box`
For details, please refer to this simulation of flexbox justify-content’s space-between
The `align-content:space-around` of flex-box is not used here because it is not compatible with lower version browsers through `text-align:justify`.
`text-align:justify` cannot allow the leftmost and rightmost text to automatically adjust the distance from the box edge. Even if you add padidng in the outer box, such as:
li{
 margin:0 1%;
 ...
}
#wrap{
 padding:0 1%;
}
It seems that the distance between the leftmost and rightmost boxes and the box boundary is the same as the distance between li, which is 2%. In fact, the padding set by the outer box will never change, and the margin between li is the minimum value of the spacing between them. If the spacing between all li's is 1%, then there is still extra space on a line, and these li's will divide the space evenly, and the spacing between them will be greater than 1%.
Specific implementation
li{
 list-style-type: none;
 display:inline-block;
 *display: inline;
 zoom:1;
 max-width: 200px;
 max-height: 200px;
 width: 28%;
 border:1px solid red;
 position: relative;
 overflow: hidden;
 margin:10px 2%;
}
li[class='justify_fix']{
 border:none;
}
.justify {
 display: flex;
 align-items: flex-start;
 flex-flow: row wrap;
 justify-content: space-between;
 text-align: justify;
 text-justify: inter-ideograph;
 *zoom: 1;
 -moz-text-align-last: justify;
 -webkit-text-align-last: justify;
 text-align-last: justify;
}
@media (-webkit-min-device-pixel-ratio:0) {
 .justify:after {
  content: "";
  display: inline-block;
  width: 100%;
 }
}
You need to add `max-width` and `max-height` here. You can see later that the cells are filled with percentages, and the maximum size needs to be limited outside.
Responsive image, centered horizontally and vertically
For details, please refer to this css image responsive vertical and horizontal centering
Select picture
In Google Plus, hold down ctrl and click on the picture to complete multiple selections. Here, click on the "box" (`` here).
After clicking, the index of the current picture is passed to the array that saves the index of the selected picture (selected_index here). If the index does not exist, add it; if it already exists, delete it. The "box" adjusts its style based on whether the index exists in the array.
<div id='wrap' ms-controller='photo_sort'>
  <ul class='justify'>
   <li ms-repeat='photo_list'>
    <a href="javascript:;" class="no_selected" ms-class-selected_icon='selected_index.indexOf($index)>-1' ms-click='select($index)'></a>
    ...
   </li>
   <li class='justify_fix'></li>
  </ul>
 </div>

var photo_sort=avalon.define({
 selected_index:[],//选中图片的index列表,
 ...
 select:function(i){
  var selected_index=photo_sort.selected_index;
  if(selected_index.indexOf(i)==-1)//选中图片的index列表不存在,添加
   photo_sort.selected_index.ensure(i);
  else
   photo_sort.selected_index.remove(i);
 }
});
mousedown
A mask layer is used here, and the mousedown event is bound to it.
<a href="javascript:;" class="no_selected" ms-class-selected_icon='selected_index.indexOf($index)>-1' ms-click='select($index)'></a>
<div class='photo_mask' ms-mousedown='start_drag($event,$index)'></div>
  var photo_sort=avalon.define({
   $id:'photo_sort',
   photo_list:[],//图片列表
   selected_index:[],//选中图片的index列表
   drag_flag:false,
   sort_array:[],//范围列表,
   cell_size:0,//每个单元格尺寸,这里宽高比为1
   target_index:-1,//最终目标位置的index
   col_num:0,//列数
   x_index:-1,//当前拖动位置的x方向index
   ...
  });
start_drag:function(e,index){
 if(photo_sort.selected_index.size()){//有选中的图片
  photo_sort.target_index=index;//避免用户没有拖动图片,但点击了图片,设置默认目标即当前点击图片
  photo_sort.cell_size=this.clientWidth;
  var xx=e.clientX-photo_sort.cell_size/2,yy=e.clientY-photo_sort.cell_size/2;//点下图片,设置代理位置以点击点为中心
  $('drag_proxy').style.top=yy+avalon(window).scrollTop()+'px';
  $('drag_proxy').style.left=xx+'px';
  $('drag_proxy').style.width=photo_sort.cell_size+'px';
  $('drag_proxy').style.height=photo_sort.cell_size+'px';
  drag_proxy.select_num=photo_sort.selected_index.length;//设置代理中选择图片的数量
  if(drag_proxy.select_num>0){
   var drag_img=photo_sort.photo_list[photo_sort.selected_index[drag_proxy.select_num-1]];
   drag_proxy.src=drag_img.src;//将选中的图片中最后一张作为代理对象的"封面"
   photo_sort.drag_flag=true;
   $('drag_proxy').style.display='block';
  }
  //cell_gap:图片间间距,first_gap:第一张图片和外部div间间距
  var wrap_width=avalon($('wrap')).width(),wrap_offset=$('wrap').offsetLeft,first_left=$('wrap_photo0').offsetLeft,
  second_left=$('wrap_photo1').offsetLeft,first_gap=first_left-wrap_offset,cell_gap=second_left-first_left;
  photo_sort.col_num=Math.round((wrap_width-2*first_gap+(cell_gap-photo_sort.cell_size))/cell_gap);
  for(var i=0;i<photo_sort.col_num;i++)//把一行图片里的每张图片中心坐标x方向的值作为分割点,添加到范围列表
   photo_sort.sort_array.push(first_gap+cell_gap*i+photo_sort.cell_size/2);
  var target=this.parentNode;
  avalon.bind(document,'mouseup',function(e){
   onMouseUp(target);
  });
  if(isIE)
   target.setCapture();//让ie下拖动顺滑
  e.stopPropagation();
  e.preventDefault();
 }
}
Click the mouse and the mask of the selected picture will appear. Here is to add `.photo_maskon`
<div class='photo_mask' ms-class-photo_maskon='drag_flag&&selected_index.indexOf($index)>-1'
ms-mousedown='start_drag($event,$index)'></div>
mousemove
drag_move:function(e){
 if(photo_sort.drag_flag){
  var xx=e.clientX,yy=e.clientY,offset=avalon($('wrap')).offset();
  var offsetX=xx-offset.left,offsetY=yy-offset.top;
  photo_sort.sort_array.push(offsetX);//把当前鼠标位置添加的范围列表
  photo_sort.sort_array.sort(function(a,b){//对范围列表排序
   return parseInt(a)-parseInt(b);//转为数值类型,否则会出现'1234'<'333'
  });
  //从已排序的范围列表中找出当前鼠标位置的index,即目标位置水平方向的index
  var x_index=photo_sort.sort_array.indexOf(offsetX),y_index=Math.floor(offsetY/(photo_sort.cell_size+20)),
  size=photo_sort.photo_list.size();
  photo_sort.x_index=x_index;
  photo_sort.target_index=photo_sort.col_num*y_index+x_index;//目标在所有图片中的index
  if(photo_sort.target_index>size)//目标位置越界
   photo_sort.target_index=size;
  photo_sort.sort_array.remove(offsetX);//移除当前位置
  $('drag_proxy').style.top=avalon(window).scrollTop()+yy-photo_sort.cell_size/2+'px';
  $('drag_proxy').style.left=xx-photo_sort.cell_size/2+'px';
 }
 e.stopPropagation();
}
A few notes
- Determination of the current dragged position
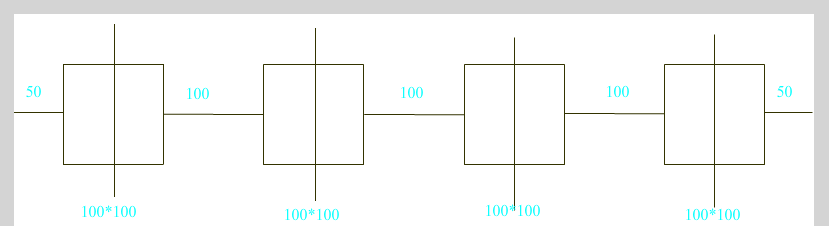
The vertical line of each cell in the picture divides the cell into two sides in the horizontal direction. Each vertical line divides a line into 5 parts. When judging, look at which part of the 5 parts the current `e.clientX` of the mouse is.
- Sorting is used here when judging. Specifically, save the x coordinate of each vertical line and the x coordinate of the current mouse position to an array (`sort_array` here), sort them, and then use `indexOf` to see the position of the x coordinate of the current mouse position in the array. You can get the current drag target position.
If there is no need to sort, the code will look like this
var target;
if(x>50+50){
 if(x>3*100+3*100+50+50){//最后一部分
  target=4;
 }else{
  target=(x-50-50)/(50+100+50);
 }
}else
 target=0;
- Later delete the x coordinate of the current mouse position, leaving the position vacant for the x coordinate of the next mousemove event.
- Regarding the offset of the pictures to the left and right of the currently dragged target position, it is nothing more than adding the corresponding class to the pictures to the left and right of the target position.
.prev{
 right: 40px;
}
.next{
 left: 40px;
}
 <div id='wrap' ms-controller='photo_sort'>
  <ul class='justify' ms-mousemove='drag_move($event)'>
   <li ms-repeat='photo_list' ms-attr-id='wrap_photo{{$index}}' ms-class-prev='$index==target_index-1'
   ms-class-next='$index==target_index'>
   ...
   </li>
   <li class='justify_fix'></li>
  </ul>
 </div>
这里需要注意,当代理拖动到最左边或最右边时,由于布局是`inline-block`,此时目标位置所在行的上一行(如果有)的最后一个单元格或下一行(如果有)的第一个单元格也会发生偏移。
解决方法是设置变量`x_index`,表示单元格在x方向的index.在添加偏移class的时候,增加判定条件
<li ms-repeat='photo_list' ms-attr-id='wrap_photo{{$index}}' ms-class-prev='$index==target_index-1&&x_index>0'
ms-class-next='$index==target_index&&x_index<col_num'>
...
</li>
mouseup
function onMouseUp(target){
   if(photo_sort.drag_flag){
    for(var i=0,len=photo_sort.selected_index.size();i<len;i++){//遍历选中图片
     var item_index=photo_sort.selected_index[i],data=photo_sort.photo_list,
     target_index=photo_sort.target_index,temp;
     if(item_index<target_index){//目标位置在选中图片之后
      temp=data[item_index].src;
      for(var j=item_index;j<target_index;j++)
       data[j].src=data[j+1].src;
      data[target_index-1].src=temp;
     }else{//目标位置在选中图片之前
      temp=data[item_index].src;
      for(var j=item_index;j>target_index;j--)
       data[j].src=data[j-1].src;
      data[target_index].src=temp;
     }
    }
    photo_sort.target_index=-1;//各种重置,初始化
    photo_sort.sort_array=[];
    photo_sort.col_num=0;
    photo_sort.x_index=-1;
    photo_sort.selected_index=[];
    $('drag_proxy').style.display='none';
    photo_sort.drag_flag=false;
    avalon.unbind(document,'mouseup');
    if(isIE)
     target.releaseCapture();
   }
  }
这里主要就是对图片列表的重排。
- 目标位置在选中图片之前
先把原始图片保存在`temp`,然后把从目标位置图片到原始图片前一位置的图片,依次后移一个位置,最后把`temp`放到目标位置。
- 目标位置在选中图片之后
和上面差不多,只不过这里是把从目标位置图片到原始图片后一位置的图片,依次前移一个位置。
注意
不能像`data[j]=data[j+1]`这样赋值,因为avalon不支持单个转换,如果想更新,需要将整个子VM重新赋以一个新的对象。也就是定义一个arr,然后从头开始向里面添加model,最后`photo_sort.photo_list.clear()`删除所有图片,`photo_sort.photo_list=arr`重新赋值,更新视图。
后记
事实上,google plus在细节上还做了
- 框选图片
- 如果有滚动条,且拖动位置快要超出当前界面,滚动条会自动上移或下移。
这两个本屌就不做了,原理也是很简单的。

 From Websites to Apps: The Diverse Applications of JavaScriptApr 22, 2025 am 12:02 AM
JavaScript is widely used in websites, mobile applications, desktop applications and server-side programming. 1) In website development, JavaScript operates DOM together with HTML and CSS to achieve dynamic effects and supports frameworks such as jQuery and React. 2) Through ReactNative and Ionic, JavaScript is used to develop cross-platform mobile applications. 3) The Electron framework enables JavaScript to build desktop applications. 4) Node.js allows JavaScript to run on the server side and supports high concurrent requests.
 Python vs. JavaScript: Use Cases and Applications ComparedApr 21, 2025 am 12:01 AM
Python is more suitable for data science and automation, while JavaScript is more suitable for front-end and full-stack development. 1. Python performs well in data science and machine learning, using libraries such as NumPy and Pandas for data processing and modeling. 2. Python is concise and efficient in automation and scripting. 3. JavaScript is indispensable in front-end development and is used to build dynamic web pages and single-page applications. 4. JavaScript plays a role in back-end development through Node.js and supports full-stack development.
 The Role of C/C in JavaScript Interpreters and CompilersApr 20, 2025 am 12:01 AM
C and C play a vital role in the JavaScript engine, mainly used to implement interpreters and JIT compilers. 1) C is used to parse JavaScript source code and generate an abstract syntax tree. 2) C is responsible for generating and executing bytecode. 3) C implements the JIT compiler, optimizes and compiles hot-spot code at runtime, and significantly improves the execution efficiency of JavaScript.
 JavaScript in Action: Real-World Examples and ProjectsApr 19, 2025 am 12:13 AM
JavaScript's application in the real world includes front-end and back-end development. 1) Display front-end applications by building a TODO list application, involving DOM operations and event processing. 2) Build RESTfulAPI through Node.js and Express to demonstrate back-end applications.
 JavaScript and the Web: Core Functionality and Use CasesApr 18, 2025 am 12:19 AM
The main uses of JavaScript in web development include client interaction, form verification and asynchronous communication. 1) Dynamic content update and user interaction through DOM operations; 2) Client verification is carried out before the user submits data to improve the user experience; 3) Refreshless communication with the server is achieved through AJAX technology.
 Understanding the JavaScript Engine: Implementation DetailsApr 17, 2025 am 12:05 AM
Understanding how JavaScript engine works internally is important to developers because it helps write more efficient code and understand performance bottlenecks and optimization strategies. 1) The engine's workflow includes three stages: parsing, compiling and execution; 2) During the execution process, the engine will perform dynamic optimization, such as inline cache and hidden classes; 3) Best practices include avoiding global variables, optimizing loops, using const and lets, and avoiding excessive use of closures.
 Python vs. JavaScript: The Learning Curve and Ease of UseApr 16, 2025 am 12:12 AM
Python is more suitable for beginners, with a smooth learning curve and concise syntax; JavaScript is suitable for front-end development, with a steep learning curve and flexible syntax. 1. Python syntax is intuitive and suitable for data science and back-end development. 2. JavaScript is flexible and widely used in front-end and server-side programming.
 Python vs. JavaScript: Community, Libraries, and ResourcesApr 15, 2025 am 12:16 AM
Python and JavaScript have their own advantages and disadvantages in terms of community, libraries and resources. 1) The Python community is friendly and suitable for beginners, but the front-end development resources are not as rich as JavaScript. 2) Python is powerful in data science and machine learning libraries, while JavaScript is better in front-end development libraries and frameworks. 3) Both have rich learning resources, but Python is suitable for starting with official documents, while JavaScript is better with MDNWebDocs. The choice should be based on project needs and personal interests.


Hot AI Tools

Undresser.AI Undress
AI-powered app for creating realistic nude photos

AI Clothes Remover
Online AI tool for removing clothes from photos.

Undress AI Tool
Undress images for free

Clothoff.io
AI clothes remover

Video Face Swap
Swap faces in any video effortlessly with our completely free AI face swap tool!

Hot Article
Hot Tools

SecLists
SecLists is the ultimate security tester's companion. It is a collection of various types of lists that are frequently used during security assessments, all in one place. SecLists helps make security testing more efficient and productive by conveniently providing all the lists a security tester might need. List types include usernames, passwords, URLs, fuzzing payloads, sensitive data patterns, web shells, and more. The tester can simply pull this repository onto a new test machine and he will have access to every type of list he needs.

WebStorm Mac version
Useful JavaScript development tools

Atom editor mac version download
The most popular open source editor

EditPlus Chinese cracked version
Small size, syntax highlighting, does not support code prompt function

DVWA
Damn Vulnerable Web App (DVWA) is a PHP/MySQL web application that is very vulnerable. Its main goals are to be an aid for security professionals to test their skills and tools in a legal environment, to help web developers better understand the process of securing web applications, and to help teachers/students teach/learn in a classroom environment Web application security. The goal of DVWA is to practice some of the most common web vulnerabilities through a simple and straightforward interface, with varying degrees of difficulty. Please note that this software

