Home >Web Front-end >Bootstrap Tutorial >A brief discussion on how to directly enter table row data in Bootstrap (2)
A brief discussion on how to directly enter table row data in Bootstrap (2)
- 青灯夜游forward
- 2021-06-11 10:53:572183browse
This article will introduce to you how to use dataTable to directly enter table row data in the Bootstrap development framework. It has certain reference value. Friends in need can refer to it. I hope it will be helpful to everyone.

In "How to directly enter table row data in Bootstrap (1)", we introduced the use of the Jquery DataTable plug-in in the Web page for comparison Direct data entry operation. This kind of processing can provide users with a better data entry experience. This article continues the content of the previous article and continues to introduce this direct entry processing operation, which mainly involves the initialization of controls and the binding of data sources. Content, with a deeper understanding of this process, I found that the content I can control is richer, and I can better achieve various desired effects.
[Related recommendations: "bootstrap Tutorial"]
1. Interface analysis of direct data entry
Introduced before When the data is directly entered and processed, the interface effect is as follows.
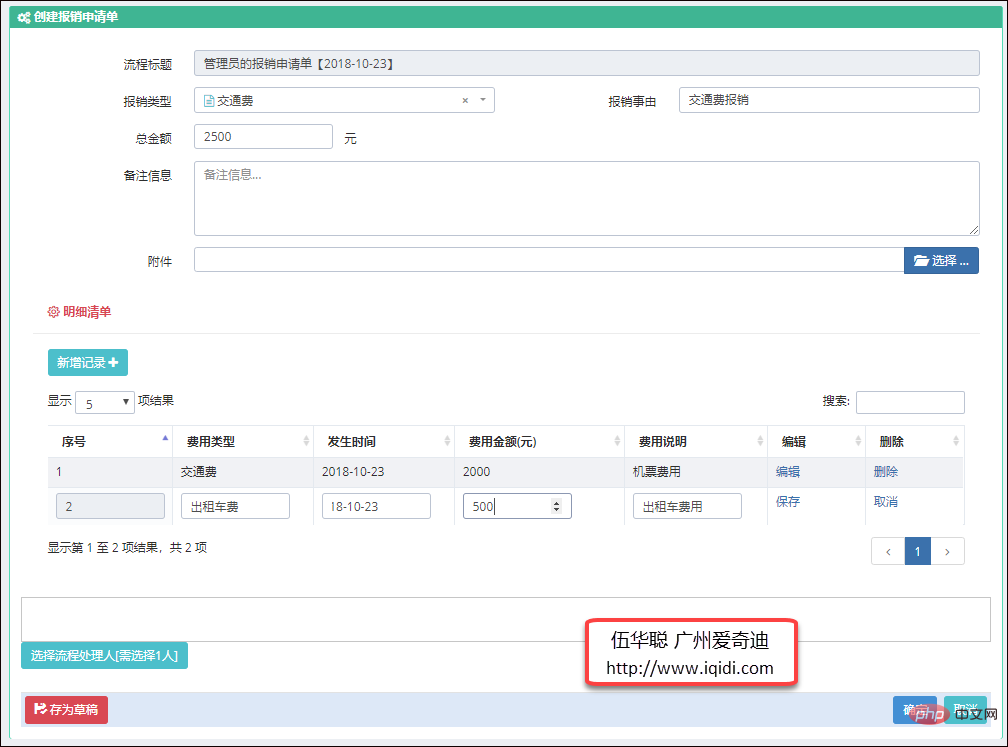
When the above interface processes detailed data, you can directly use the new record, enter the data directly in the input box, and then save it. After saving, the data becomes read-only. , if you need to modify it, you can also click the edit button to modify it.
These detailed data only exist in JS objects and have not been saved to the backend database. We can obtain all the added data for submission during the final save (as shown in the OK button on the interface above). That’s it.
The above detailed data entry only provides some basic input controls for input without excessive customization. When used, we find that some data require drop-down lists, and some If we need to use date selection, etc., then we need to consider deeper control display issues.
If we want to achieve richer effect processing, even including linkage processing between some controls, then how should we operate?
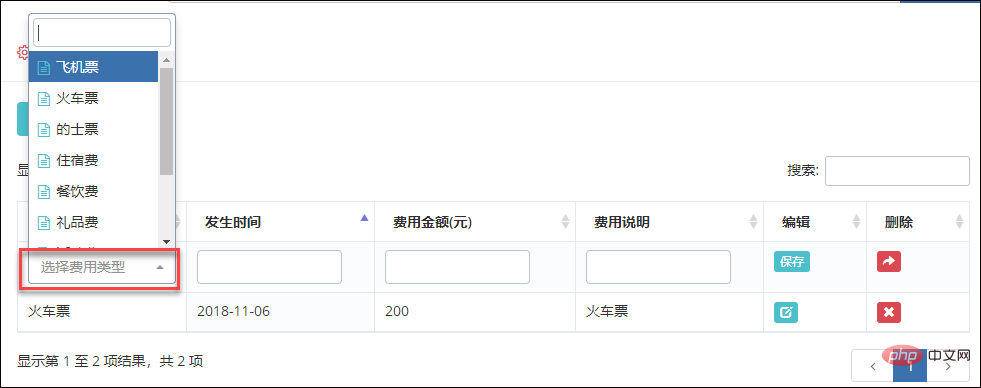
Drop-down list, dynamic data interface display
Date input box display
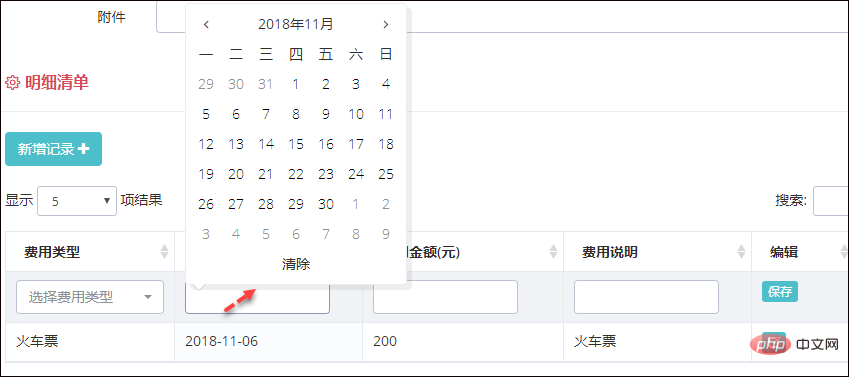
Some of the above are For our regular input methods, for some relatively diverse operations, we try our best to provide users with convenience and provide drop-down controls for users to choose. After all, selection is more convenient and standardized than input.
For example, in a complex interface, you can use the pop-up layer for query selection
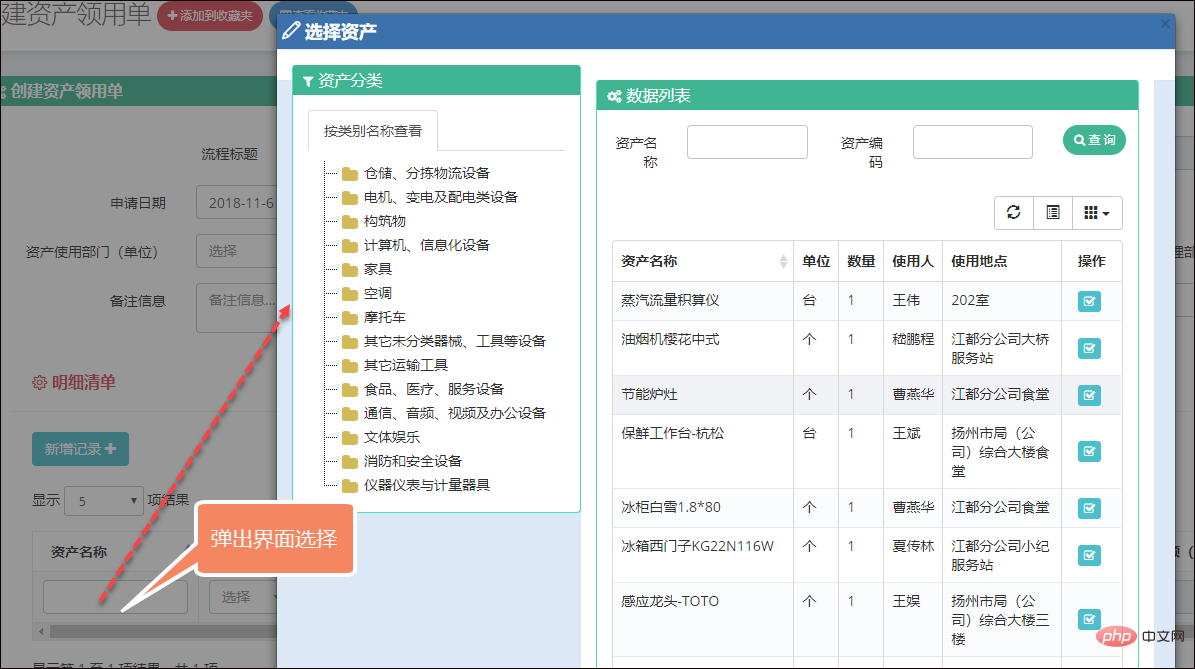
The effect of data linkage between departments and users is as follows.
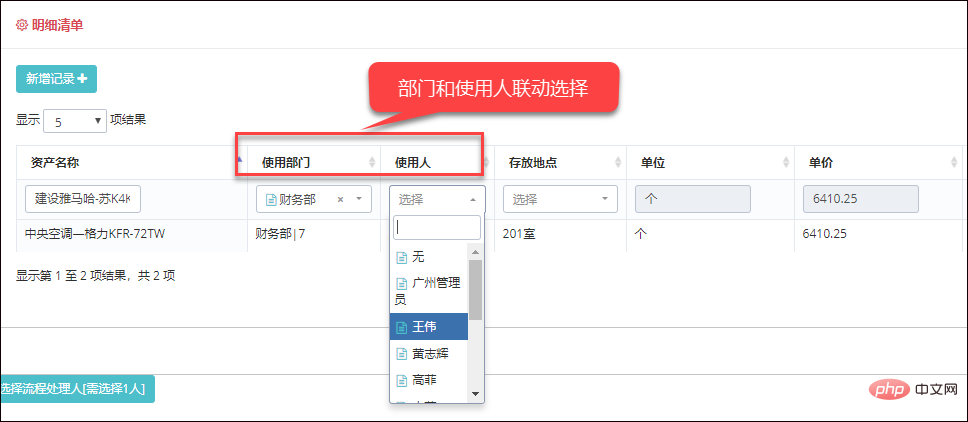
The above effects can meet the convenience of our regular data selection and entry, thereby facilitating customers to directly enter data for processing.
2. Initialization of controls for direct data entry
We can understand from the above that to add a new set of records, we need to dynamically build some HTML controls, and then Just initialize it, such as the interface effect of this drop-down list.

Its implementation is mainly to process HTML controls when editing or adding new ones, as shown in the following code.
//编辑行
function editRow(oTable, nRow) {
var aData = oTable.fnGetData(nRow);
var jqTds = $('>td', nRow);
var i = 0;
var feeType = aData[0];
jqTds[i].innerHTML = '<select id="txtFeeType" class="form-control input-small" value="' + aData[0] + '"></select>';
i++; jqTds[i].innerHTML = '<input id="txtOccurTime" class="form-control input-small" value="' + aData[1] + '">';
i++; jqTds[i].innerHTML = '<input id="txtFeeAmount" type="number" class="form-control input-small" value="' + aData[2] + '">';
i++; jqTds[i].innerHTML = '<input id="txtFeeDescription" type="text" class="form-control input-small" value="' + aData[3] + '">';
i++; jqTds[i].innerHTML = '<a class="btn btn-xs green edit" href="" title="保存">保存</a>';
i++; jqTds[i].innerHTML = '<a class="btn btn-xs red cancel" href="" title="取消"><span class="glyphicon glyphicon-share-alt "></span></a>';
//绑定数据字典,并更新值
BindDictItem("txtFeeType", "费用类型", function () {
$("#txtFeeType").val(feeType).trigger("change");
});
//初始化日期控件
        $("#txtOccurTime").datepicker({
            language: 'zh-CN', //语言
            autoclose: true, //选择后自动关闭
            clearBtn: true,//清除按钮
            format: "yyyy-mm-dd"//日期格式
        });
}We can use the select2 plug-in in the drop-down list, and bind the dictionary type of the database through the universal JS function of BindDictItem, and assign values to the control by recording the values of the corresponding columns.
$("#txtFeeType").val(feeType).trigger("change");Since each control has a corresponding ID, it is very convenient when we use them. For example, to initialize the date plug-in, we can use the DateTime Picker plug-in for processing.
//初始化日期控件
$("#txtOccurTime").datepicker({
language: 'zh-CN', //语言
autoclose: true, //选择后自动关闭
clearBtn: true,//清除按钮
format: "yyyy-mm-dd"//日期格式
});Finally achieved the date selection effect.

The operation process of using the pop-up layer for query selection is also very simple.
jqTds[i].innerHTML = '<input id="txtAssetName" type="text" class="form-control input-small" onclick="SelectAssets(this)" value="' + aData[i] + '">';//资产名称
That is, add an onclick function to this control. When selecting click input, a layer will pop up for processing. This independent general layer uses a separate view and can be referenced in the page to improve reusability.
@RenderPage("~/Views/Asset/SelectAsset.cshtml")By processing the returned results in the page, the main interface content control can be updated.
//选择结果
function SelectResult() {
    var dict = {};
    addAssetKeyList.forEach(function (key, index, array) {
        var display = addAssetDisplayList[index];
        dict[key] = display;
    });

    //转换选择为JSON字符串
    var json = JSON.stringify(dict);
    $("#selectAsset").modal("hide");

    //留给调用的界面实现这个函数,实现数据的返回出来
    ProcAssetJson = json;
    OnSelectAsset(json);
}
After selection, the control content and associated data can be dynamically updated.
//选择资产后调用
        function OnSelectAsset(json) {
            ProcAssetJson = json;//存储到ProcAssetJson,方便下次打开界面初始化数据
            if (json != '') {
                var dict = JSON.parse(json);
                if (dict != null) {
                    for (var key in dict) {
                        var display = dict[key];
                        assetInput.val(display);

                        //更新数据
                        $.getJSON("/Asset/FindByCode?code=" + key, function (info) {
                            if (info != null) {
                                $("#txtAssetCode").val(info.Code);
                                //$("#txtKeepAddr").val(info.KeepAddr);
                                $("#txtUnit").val(info.Unit);
                                $("#txtPrice").val(info.Price);
                                $("#txtTotalQty").val(info.Qty);
                                $("#txtTotalAmount").val(info.OriginValue);
                            }
                        });
                    };
                }
            }
        }
The following is the pop-up interface layer and provides an interface for users to select content

对于部门和用户之间的数据联动的处理,也是通过Select2控件的联动更新处理实现的。以下是Select2联动处理脚本,可以实现多个控件之间的联动操作
//部门编号后,用户列表编号
$("#txtLyDept").on("change", function (e) {
    var deptNameId = $("#txtLyDept").val();
    if (deptNameId != null) {
        var id = deptNameId.substring(deptNameId.lastIndexOf("|") + 1);
        BindSelect("txtUsePerson", "/User/GetUserDictJson2?deptId=" + id, '', function () {
            $("#txtUsePerson").val(userid).trigger("change");
        });

        //存储位置
        BindSelect("txtKeepAddr", "/StoreAddress/GetDictJson?deptId=" + id, '', function () {
            $("#txtKeepAddr").val(keepAddr).trigger("change");
        });
    }
});
界面效果如下所示。

由于我们在控件的ID上约定了以txt开头,那么我们通过这个约定规则动态获取控件的值也是很方便的,这样为我们保存控件的数据提供很好的便捷处理。
//保存行数据,切换到普通模式
var inputLength = 10;//输入的字段数
function saveRow(oTable, nRow) {
//var jqInputs = $('input', nRow);
var jqInputs = $("[id^='txt']", nRow);//id以txt开始([id^='txt']), id以txt结束([id$='txt'])
//更新行中每个input的值
for (var i = 0; i < inputLength; i++) {
oTable.fnUpdate(jqInputs[i].value, nRow, i, false);
iLen = i;
}
oTable.fnUpdate('<a class="btn btn-xs green edit" href="" title="编辑"><span class="glyphicon glyphicon-edit"></span></a>', nRow, inputLength, false);
oTable.fnUpdate('<a class="btn btn-xs red delete" href="" title="删除"><span class="glyphicon glyphicon-remove"></span></a>', nRow, inputLength + 1, false);
oTable.fnDraw();
}我们如果需要保存数据到数据库里面,那么就需要先构建好对应的JS数据对象,然后调用ajax进行数据的提交处理。构建JS数据对象如下代码所示(根据自己所需定制数据内容)。
//获取表格的数据,并返回对象列表
            function GetData() {
                var list = [];
                var trs = table.fnGetNodes();
                for (var i = 0; i < trs.length; i++) {
                    var data = table.fnGetData(trs[i]);//获取指定行的数据

                    //构建对象
                    var obj = {
                        AssetName: data[0],
                        AssetCode: data[1],
                        LyDept: data[2],
                        UsePerson: data[3],
                        KeepAddr: data[4],
                        Unit: data[5],
                        Price: data[6],
                        TotalQty: data[7],
                        TotalAmount: data[8],
                        Note: data[9]
                    };
                    list.push(obj);
                }
                return list;
};更多编程相关知识,请访问:编程入门!!
The above is the detailed content of A brief discussion on how to directly enter table row data in Bootstrap (2). For more information, please follow other related articles on the PHP Chinese website!
Related articles
See more- How bootstrapValidator validates maximum and minimum limits
- A brief discussion on how to dynamically set row and column colors in bootstrapTable
- A brief discussion of pop-up boxes and prompt boxes in Bootstrap (code example)
- A brief discussion on using bootstrap-datepicker plug-in to implement date entry processing function
- A brief discussion on how to handle tree list conditions and query conditions in Bootstrap
- A brief discussion on how to directly enter table row data in Bootstrap (1)

