
Home >Web Front-end >uni-app >uni-app introductory tutorial: data binding, style binding and event processing
uni-app introductory tutorial: data binding, style binding and event processing

- coldplay.xixiforward
- 2021-01-07 10:01:083629browse

Recommended (free): uni-app development tutorial
Article Directory
- Preface
- 1. Template syntax and data binding
- 1. Declare and render variables
- 2. Conditional rendering
- 2. Class and style binding
- 1.class syntax
- 2.style syntax
- 3. Case - dynamic menu switching
- 3. Events and event binding
- 1.uni-app event
- 2.Event binding
- 3.Event parameter passing
- Summary
Preface
The content of this article mainly includes three parts: declaring and rendering variables, including conditional rendering; defining styles through class and style and dynamic binding; event binding, including event parameter passing. All three parts have dynamic binding characteristics.
1. Template syntax and data binding
1. Declare and render variables
Before using variables, you need to Declare first, usually in the data block. For example, the title variable defined in index.vue in the hello uniapp project is as follows:
data() {
    return {
        title: 'Hello'
    }},
You can define more than one in the data block of the script language block variables, and use {<!-- -->{}} to call the variable in the view of the template language block, and can bind multiple types of variables, including basic data types, arrays, etc.
First test the basic data call, index.vue is as follows:
<template>
	<view class="content">
		<image class="logo" src="/static/logo.png"></image>
		<view class="text-area">
			<text class="title">{{title}}</text>
		</view>
		<view class="red">
			hello-{{name}}		</view>
	</view></template><script>
	export default {
		data() {
			return {
				title: 'Hello',
				name: 'Corley'
			}
		},
		onLoad() {
			console.log('index onload')
		},
		onShow() {
			console.log('index onshow')
		},
		onHide() {
			console.log('index onhide')
		},
		methods: {

		}
	}</script><style>
	.content {
		display: flex;
		flex-direction: column;
		align-items: center;
		justify-content: center;
	}

	.logo {
		height: 200rpx;
		width: 200rpx;
		margin-top: 200rpx;
		margin-left: auto;
		margin-right: auto;
		margin-bottom: 50rpx;
	}

	.text-area {
		display: flex;
		justify-content: center;
	}

	.title {
		font-size: 36rpx;
		color: #8f8f94;
	}</style>
Display: 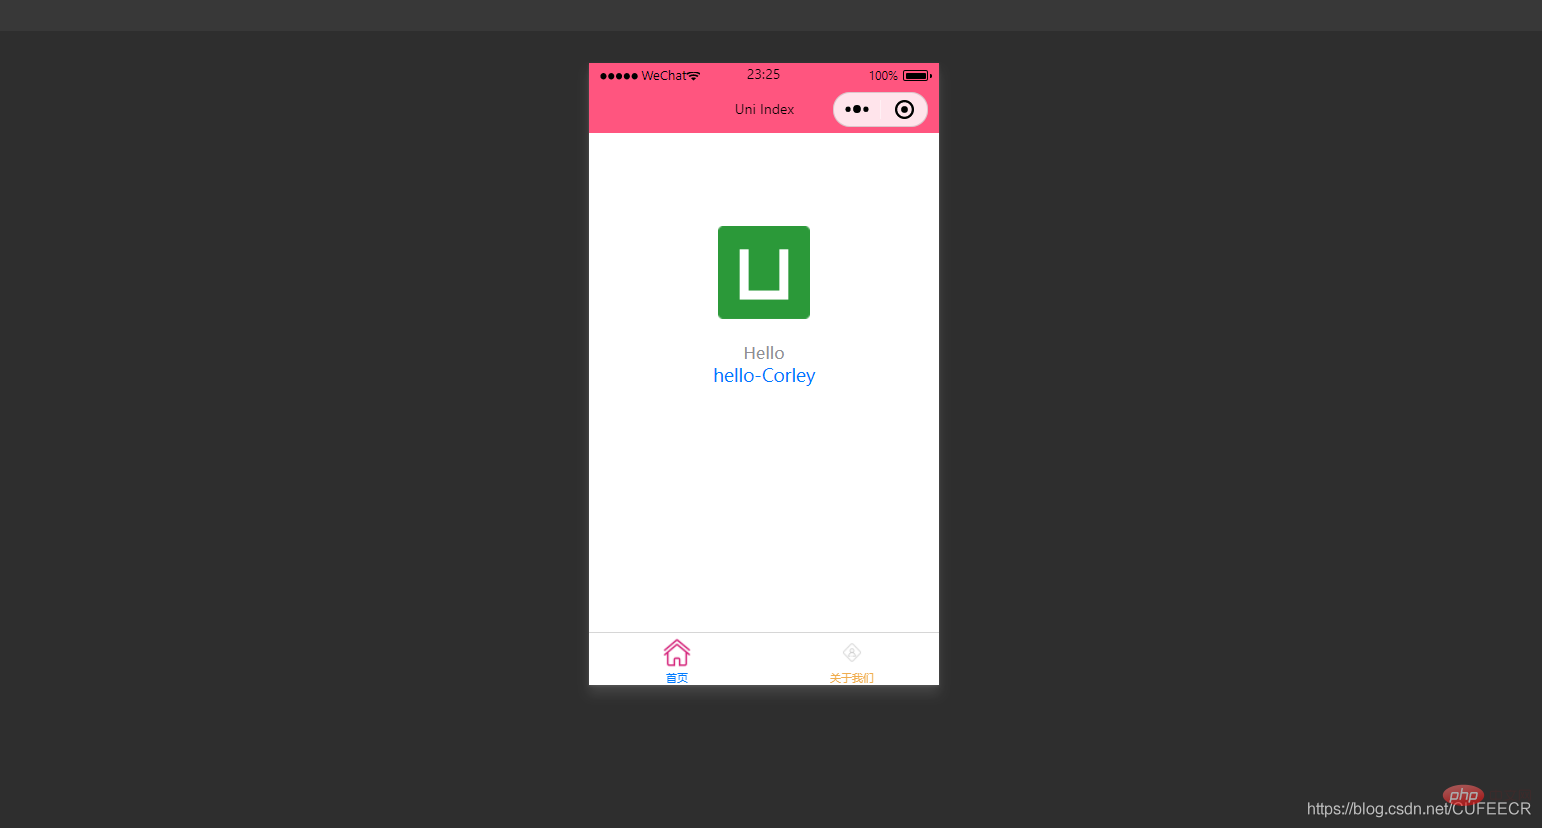
You can see that the defined title and name variables are rendered. in view.
It should be noted that the declared variables are all responsive, that is, the result rendered in the view is bound to the variable itself, and will change synchronously, index. vue is as follows:
<template>
	<view class="content">
		<image class="logo" src="/static/logo.png"></image>
		<view class="text-area">
			<text class="title">{{title}}</text>
		</view>
		<view class="red">
			hello-{{name}}-{{age}}		</view>
	</view></template><script>
	var _self;
	export default {
		data() {
			return {
				title: 'Hello',
				name: 'Corley',
				age: 18
			}
		},
		onLoad() {
			_self = this;
			setTimeout(function(){
				_self.age = 20
			}, 3000);
		},
		onShow() {
			console.log('index onshow')
		},
		onHide() {
			console.log('index onhide')
		},
		methods: {

		}
	}</script><style>
	.content {
		display: flex;
		flex-direction: column;
		align-items: center;
		justify-content: center;
	}

	.logo {
		height: 200rpx;
		width: 200rpx;
		margin-top: 200rpx;
		margin-left: auto;
		margin-right: auto;
		margin-bottom: 50rpx;
	}

	.text-area {
		display: flex;
		justify-content: center;
	}

	.title {
		font-size: 36rpx;
		color: #8f8f94;
	}</style>
Display: 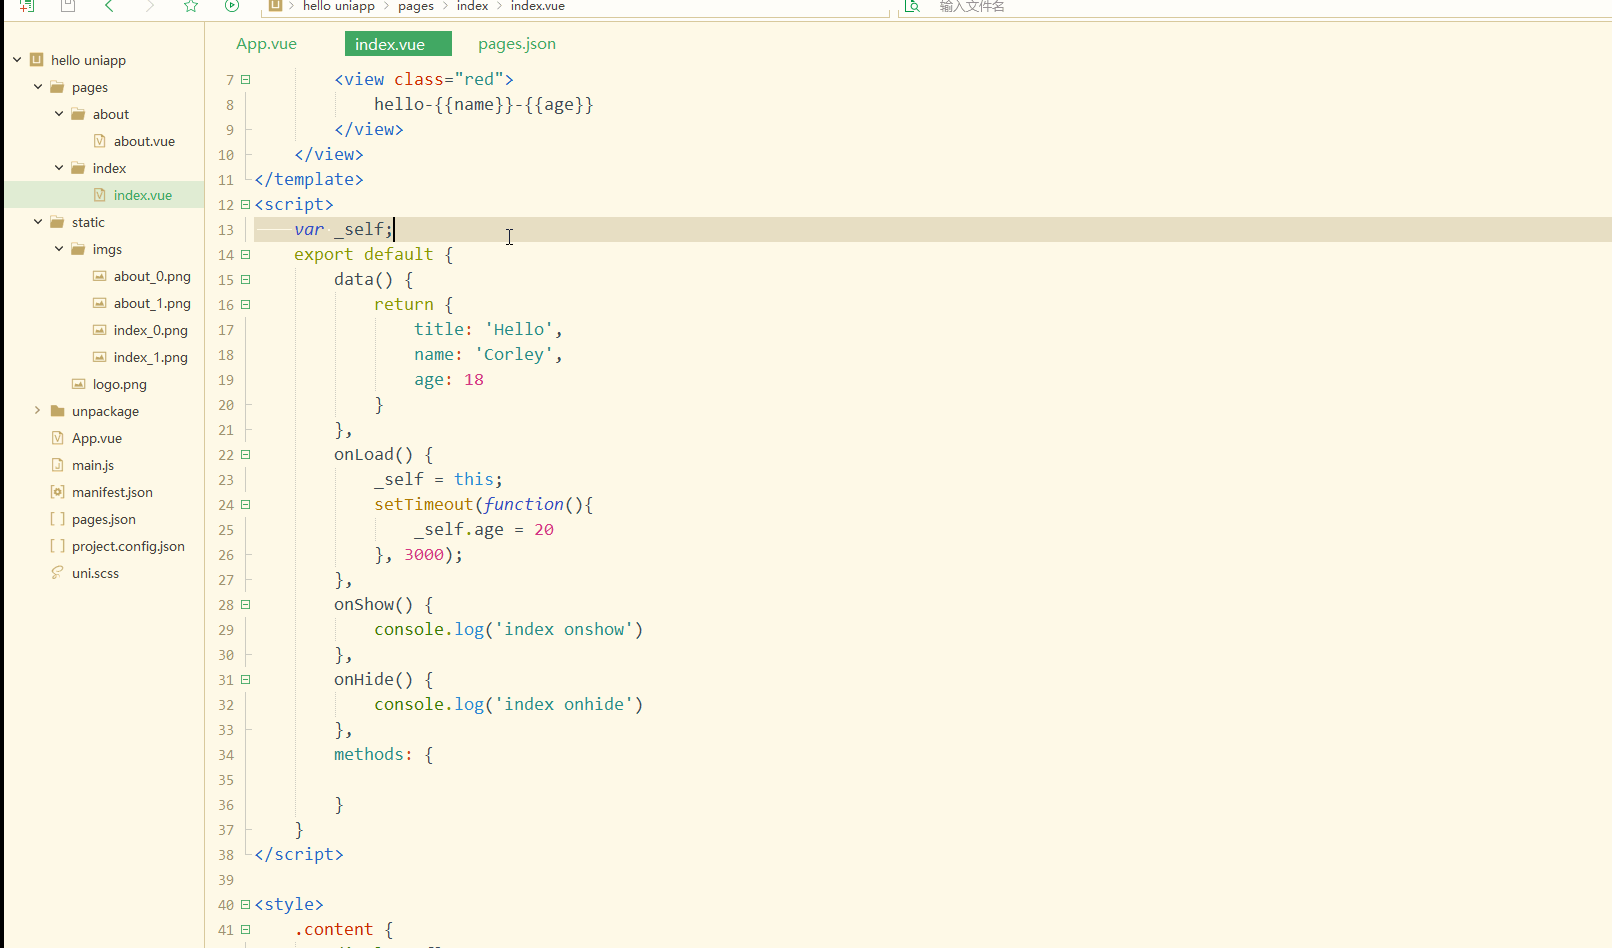
You can see that after entering the onLoad stage, the rendered age variable also changes and becomes 20.
You can also perform data binding on the array, and you can get the individual elements of the array and its attributes, as follows:
<template>
	<view class="content">
		<image class="logo" src="/static/logo.png"></image>
		<view class="text-area">
			<text class="title">{{title}}</text>
		</view>
		<view class="red">
			{{students[0]}}<br>
			{{students[0].name}}		</view>
	</view></template><script>
	var _self;
	export default {
		data() {
			return {
				title: 'Hello',
				name: 'Corley',
				age: 18,
				students: [{
						name: "张三",
						age: 18
					},
					{
						name: "李四",
						age: 20
					}
				]
			}
		},
		onLoad() {
			_self = this;
			setTimeout(function() {
				_self.age = 20
			}, 3000);
		},
		onShow() {
			console.log('index onshow')
		},
		onHide() {
			console.log('index onhide')
		},
		methods: {

		}
	}</script><style>
	.content {
		display: flex;
		flex-direction: column;
		align-items: center;
		justify-content: center;
	}

	.logo {
		height: 200rpx;
		width: 200rpx;
		margin-top: 200rpx;
		margin-left: auto;
		margin-right: auto;
		margin-bottom: 50rpx;
	}

	.text-area {
		display: flex;
		justify-content: center;
	}

	.title {
		font-size: 36rpx;
		color: #8f8f94;
	}</style>
Display: 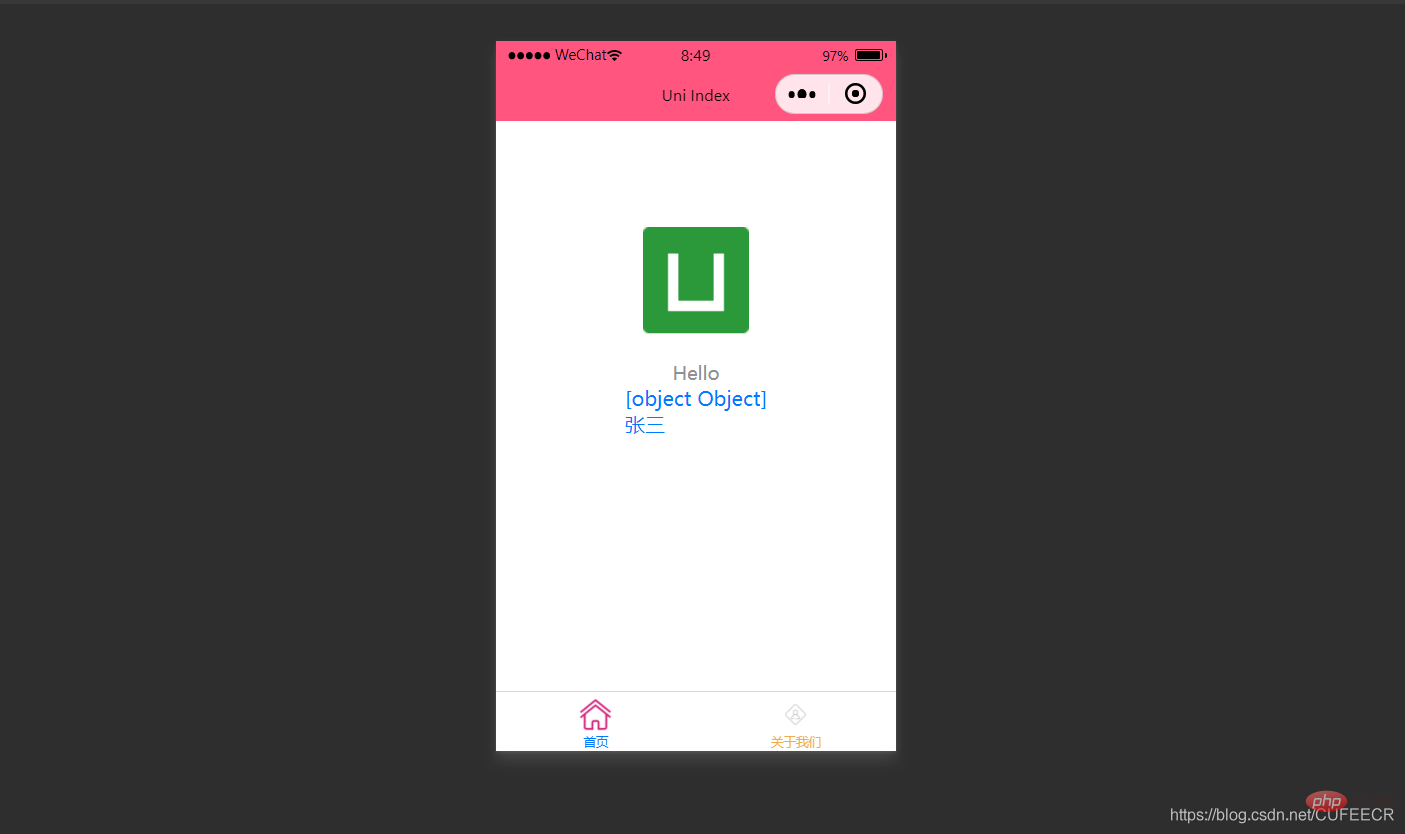
Also Use a loop to traverse the array, that is, use v-for to traverse.
index.vue is as follows:
<template>
	<view class="content">
		<image class="logo" src="/static/logo.png"></image>
		<view class="text-area">
			<text class="title">{{title}}</text>
		</view>
		<view v-for="(item, index) in students">
			{{index}} - {{item.name}} : {{item.age}}		</view>
	</view></template><script>
	var _self;
	export default {
		data() {
			return {
				title: 'Hello',
				name: 'Corley',
				age: 18,
				students: [{
						name: "张三",
						age: 18
					},
					{
						name: "李四",
						age: 20
					}
				]
			}
		},
		onLoad() {
			_self = this;
			setTimeout(function() {
				_self.age = 20
			}, 3000);
		},
		onShow() {
			console.log('index onshow')
		},
		onHide() {
			console.log('index onhide')
		},
		methods: {

		}
	}</script><style>
	.content {
		display: flex;
		flex-direction: column;
		align-items: center;
		justify-content: center;
	}

	.logo {
		height: 200rpx;
		width: 200rpx;
		margin-top: 200rpx;
		margin-left: auto;
		margin-right: auto;
		margin-bottom: 50rpx;
	}

	.text-area {
		display: flex;
		justify-content: center;
	}

	.title {
		font-size: 36rpx;
		color: #8f8f94;
	}</style>
Display: 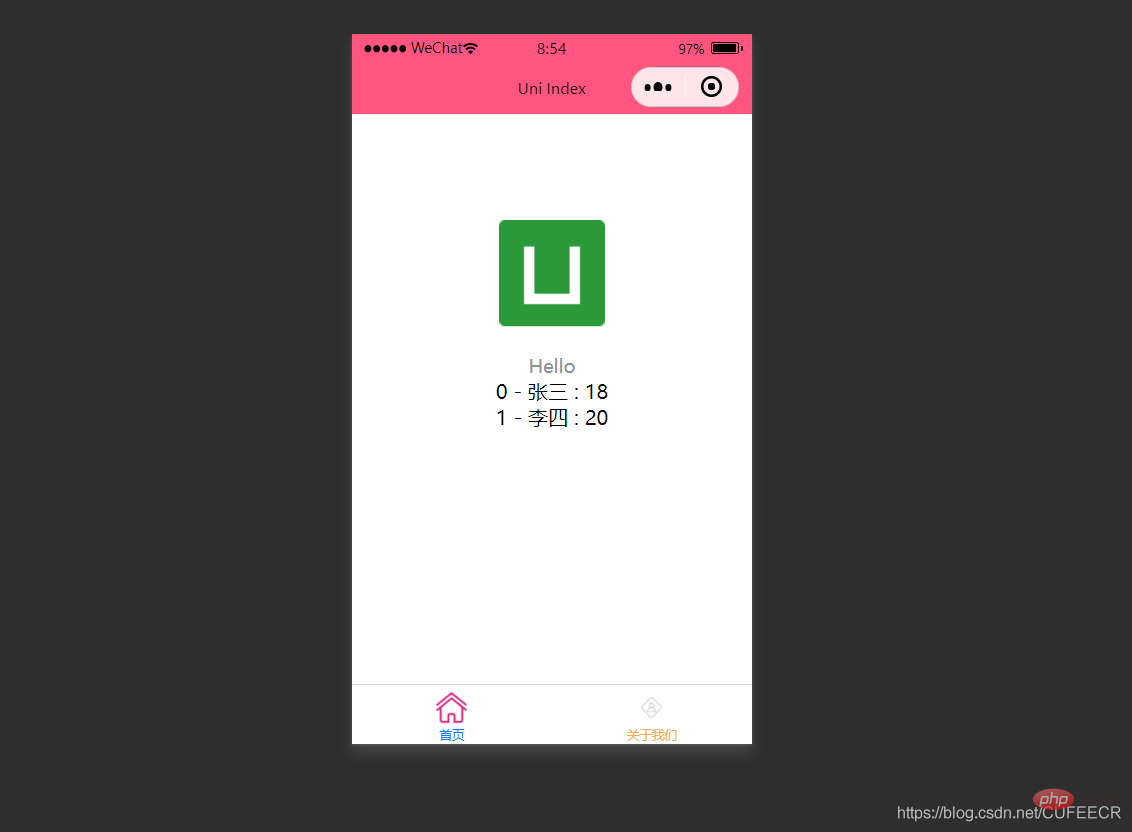
Obviously, all elements in the array have been traversed at this time.
2. Conditional rendering
Conditional rendering refers to rendering an element only when a certain condition is met, using v-if.
is as follows:
<template>
	<view class="content">
		<image class="logo" src="/static/logo.png"></image>
		<view class="text-area">
			<text class="title">{{title}}</text>
		</view>
		<view v-if="show1">
			show1...		</view>
		<view v-if="show2">
			show2...		</view>
	</view></template><script>
	var _self;
	export default {
		data() {
			return {
				title: 'Hello',
				name: 'Corley',
				age: 18,
				show1: true,
				show2: false
			}
		},
		onLoad() {
			_self = this;
			setTimeout(function() {
				_self.age = 20
			}, 3000);
		},
		onShow() {
			console.log('index onshow')
		},
		onHide() {
			console.log('index onhide')
		},
		methods: {

		}
	}</script><style>
	.content {
		display: flex;
		flex-direction: column;
		align-items: center;
		justify-content: center;
	}

	.logo {
		height: 200rpx;
		width: 200rpx;
		margin-top: 200rpx;
		margin-left: auto;
		margin-right: auto;
		margin-bottom: 50rpx;
	}

	.text-area {
		display: flex;
		justify-content: center;
	}

	.title {
		font-size: 36rpx;
		color: #8f8f94;
	}</style>
Display: 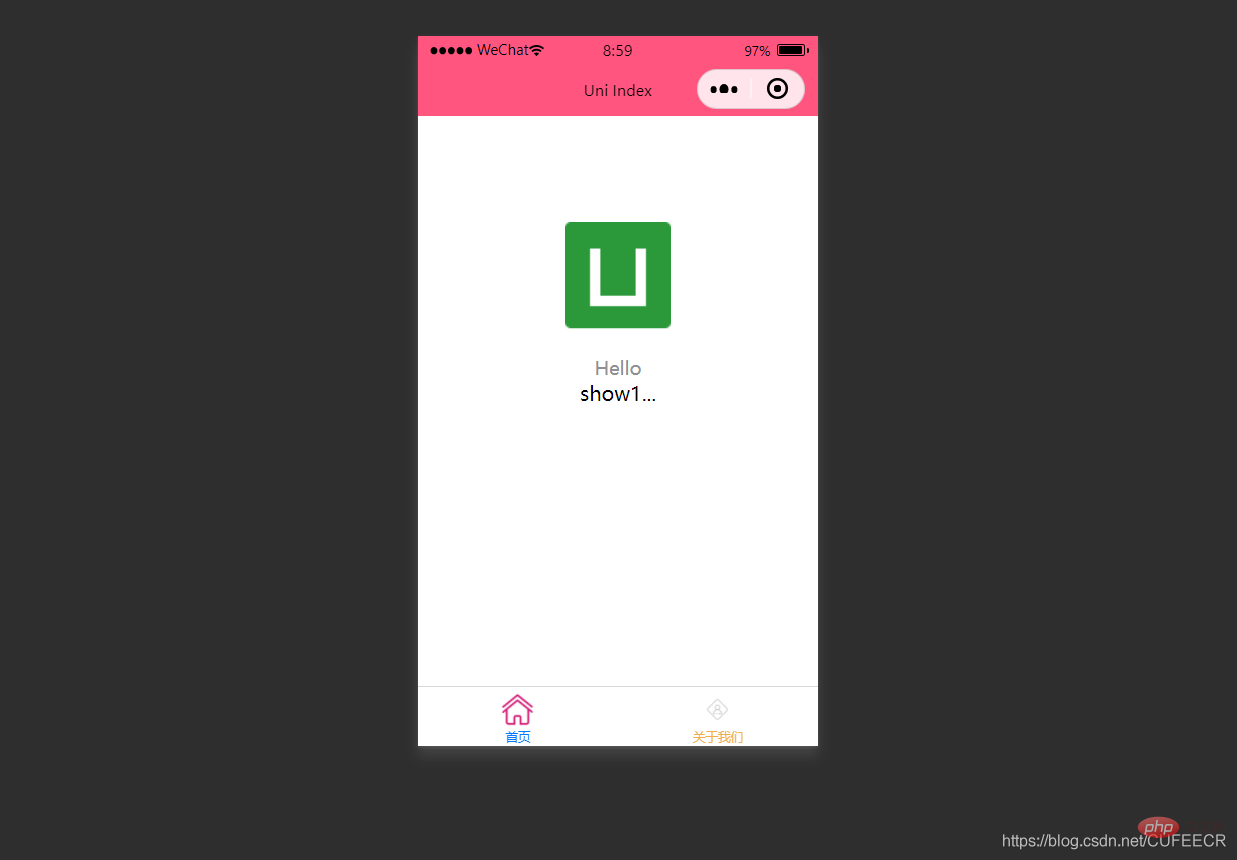
At this time, it is judged whether to render based on the value passed in v-if.
:hidden attribute is used to define whether to hide an element, as follows:
<template>
	<view class="content">
		<image class="logo" src="/static/logo.png"></image>
		<view class="text-area">
			<text class="title">{{title}}</text>
		</view>
		<view :hidden="show1">
			show1...		</view>
		<view :hidden="show2">
			show2...		</view>
	</view></template><script>
	var _self;
	export default {
		data() {
			return {
				title: 'Hello',
				name: 'Corley',
				age: 18,
				show1: true,
				show2: false
			}
		},
		onLoad() {
			_self = this;
			setTimeout(function() {
				_self.age = 20
			}, 3000);
		},
		onShow() {
			console.log('index onshow')
		},
		onHide() {
			console.log('index onhide')
		},
		methods: {

		}
	}</script><style>
	.content {
		display: flex;
		flex-direction: column;
		align-items: center;
		justify-content: center;
	}

	.logo {
		height: 200rpx;
		width: 200rpx;
		margin-top: 200rpx;
		margin-left: auto;
		margin-right: auto;
		margin-bottom: 50rpx;
	}

	.text-area {
		display: flex;
		justify-content: center;
	}

	.title {
		font-size: 36rpx;
		color: #8f8f94;
	}</style>
Display: 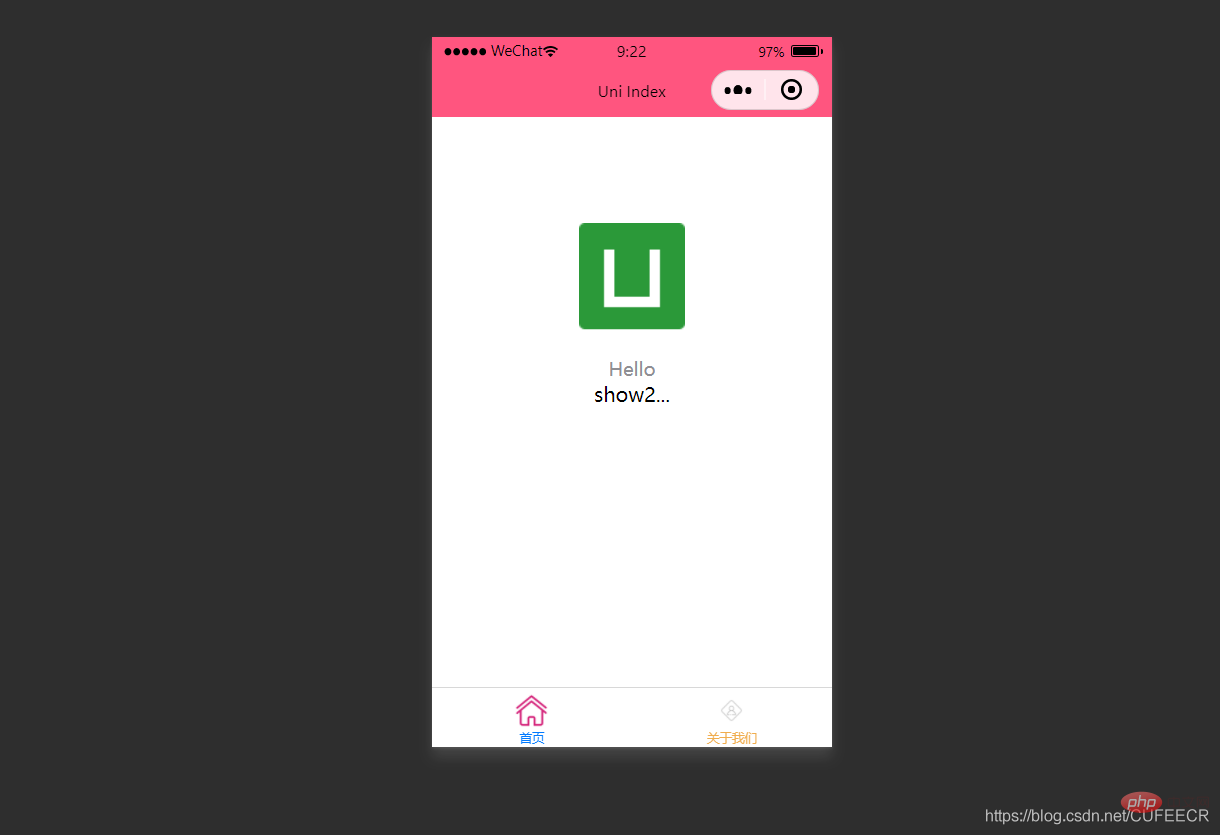
can be seen , v-if and :hidden have opposite effects, but there are still certain differences in principle: v-if is determined based on conditions Whether to render , :hidden will be rendered but is determined according to conditions whether to display , you can choose according to specific needs.
2. Class and style binding
As mentioned before, you can directly define the style through the style attribute in a tag of the template language block, or you can Define the style through the selector in the style language block, and then use it in the template language block.
In order to save performance, the expressions of Class and Style can be hard-coded into uni-app through compiler, and conditional judgment can be used to determine whether to display a certain style.
1.class syntax
class supports the following syntax methods:
<!-- 1 --><view class="static" v-bind:class="{ active: isActive, 'text-danger': hasError }">111</view><!-- 2 --><view class="static" v-bind:class="[isActive ? activeClass : '', errorClass]">222</view><!-- 3 --><view class="static" v-bind:class="[{ active: isActive }, errorClass]">333</view><!-- 4 --><view :class="{ active: isActive }">444</view><!-- 5 --><view class="static" :class="[activeClass, errorClass]">555</view>
Among them, the first three are complete forms, and the last two are abbreviations Form; isActive ? activeClass: '' is the ternary operator.
index.vue is as follows:
<template>
<view class="content">
<image class="logo" src="/static/logo.png"></image>
<view class="text-area">
<text class="title">{{title}}</text>
</view>
<view :class="{'red' : isRed}">
class bind 2... </view>
<view :class="[isBlue ? 'blue' : 'red']">
class bind 3... </view>
</view></template><script>
export default {
data() {
return {
title: 'Hello',
name: 'Corley',
age: 18,
isRed: true,
isBlue: true
}
},
onLoad() {
},
onShow() {
console.log('index onshow')
},
onHide() {
console.log('index onhide')
},
methods: {
}
}</script><style>
.content {
display: flex;
flex-direction: column;
align-items: center;
justify-content: center;
}
.logo {
height: 200rpx;
width: 200rpx;
margin-top: 200rpx;
margin-left: auto;
margin-right: auto;
margin-bottom: 50rpx;
}
.text-area {
display: flex;
justify-content: center;
}
.title {
font-size: 36rpx;
color: #8f8f94;
}
.blue {
color: #007AFF;
}</style>
Display: 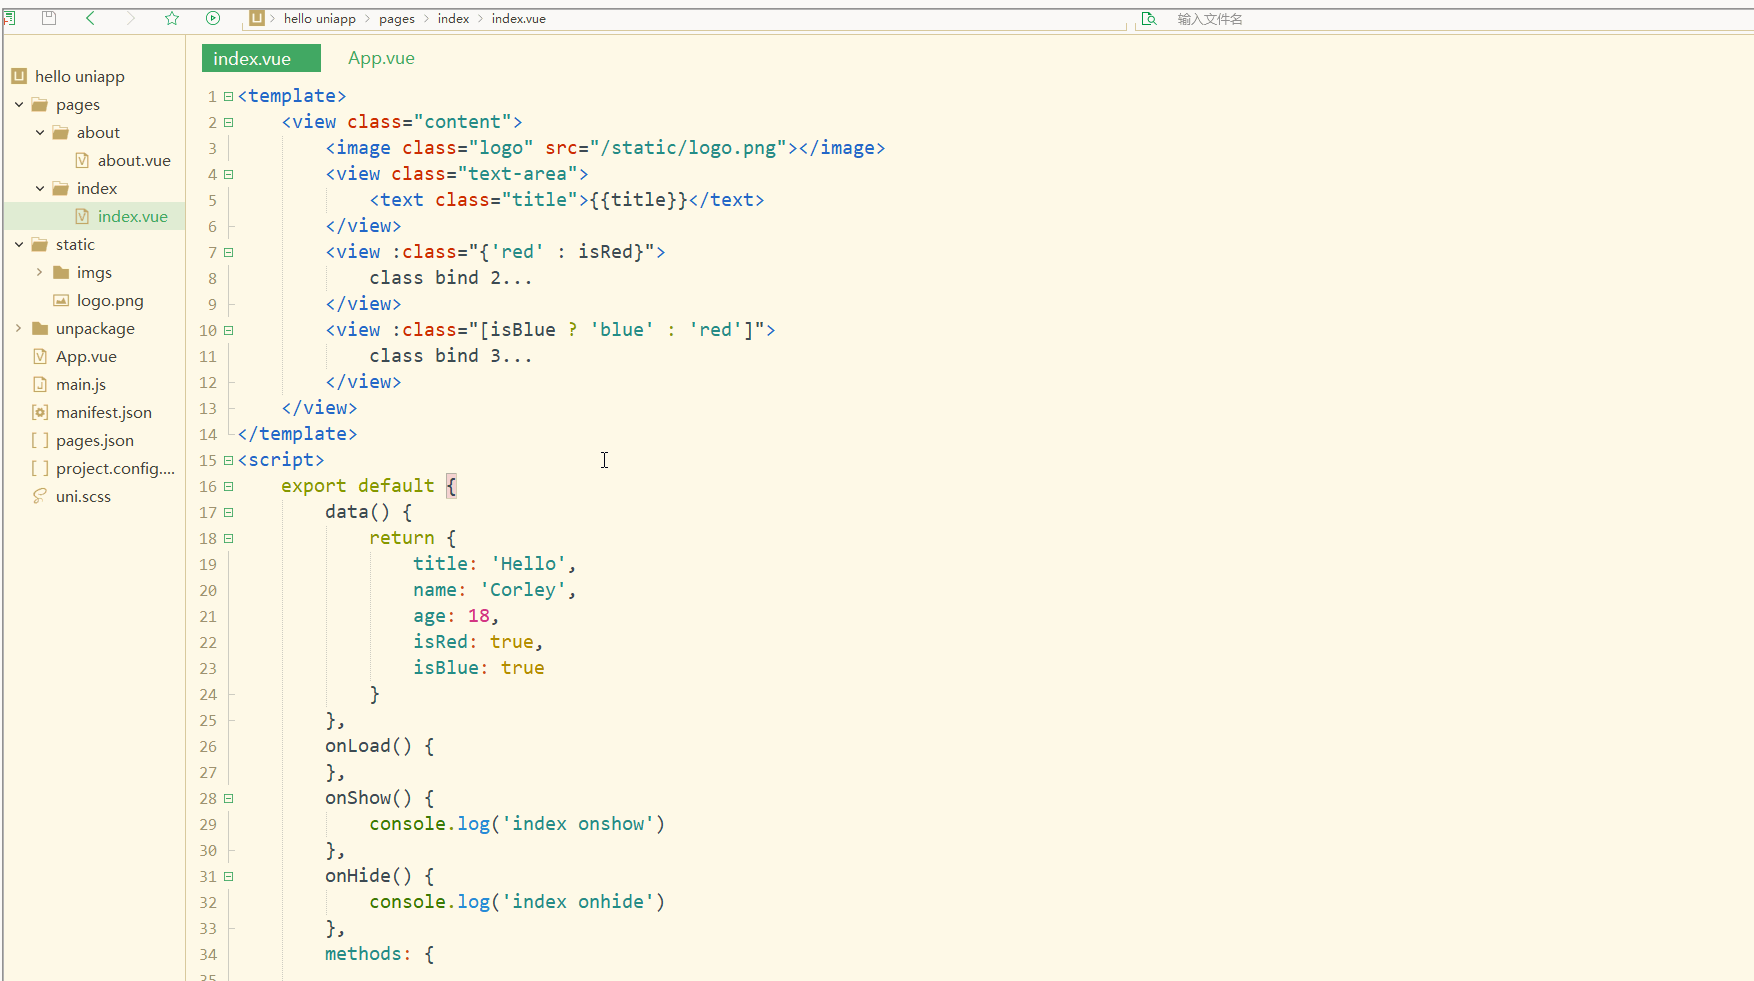
You can see that after compilation and selection, the wxml displayed in the WeChat developer tools Is the rendered class value.
2.style syntax
style supports the following syntax:
<!-- 1 --><view v-bind:style="{ color: activeColor, fontSize: fontSize + 'px' }">111</view><!-- 2 --><view v-bind:style="[{ color: activeColor, fontSize: fontSize + 'px' }]">222</view><!-- 3 --><view :style="{ color: activeColor, fontSize: fontSize + 'px' }">333</view><!-- 4 --><view :style="[{ color: activeColor, fontSize: fontSize + 'px' }]">444</view>
Among them, the first two are complete forms, and the last two are abbreviated forms .
index.vue is as follows:
<template>
<view class="content">
<image class="logo" src="/static/logo.png"></image>
<view class="text-area">
<text class="title">{{title}}</text>
</view>
<view style="font-size: 10px;">
style static... </view>
<view :style="{fontSize: fontSize+'px'}">
class dynamic... </view>
</view></template><script>
var _self;
export default {
data() {
return {
title: 'Hello',
name: 'Corley',
age: 18,
fontSize: 20
}
},
onLoad() {
_self = this;
setTimeout(function(){
_self.fontSize = 30;
}, 3000)
},
onShow() {
console.log('index onshow')
},
onHide() {
console.log('index onhide')
},
methods: {
}
}</script><style>
.content {
display: flex;
flex-direction: column;
align-items: center;
justify-content: center;
}
.logo {
height: 200rpx;
width: 200rpx;
margin-top: 200rpx;
margin-left: auto;
margin-right: auto;
margin-bottom: 50rpx;
}
.text-area {
display: flex;
justify-content: center;
}
.title {
font-size: 36rpx;
color: #8f8f94;
}
.blue {
color: #007AFF;
}</style>
Display: 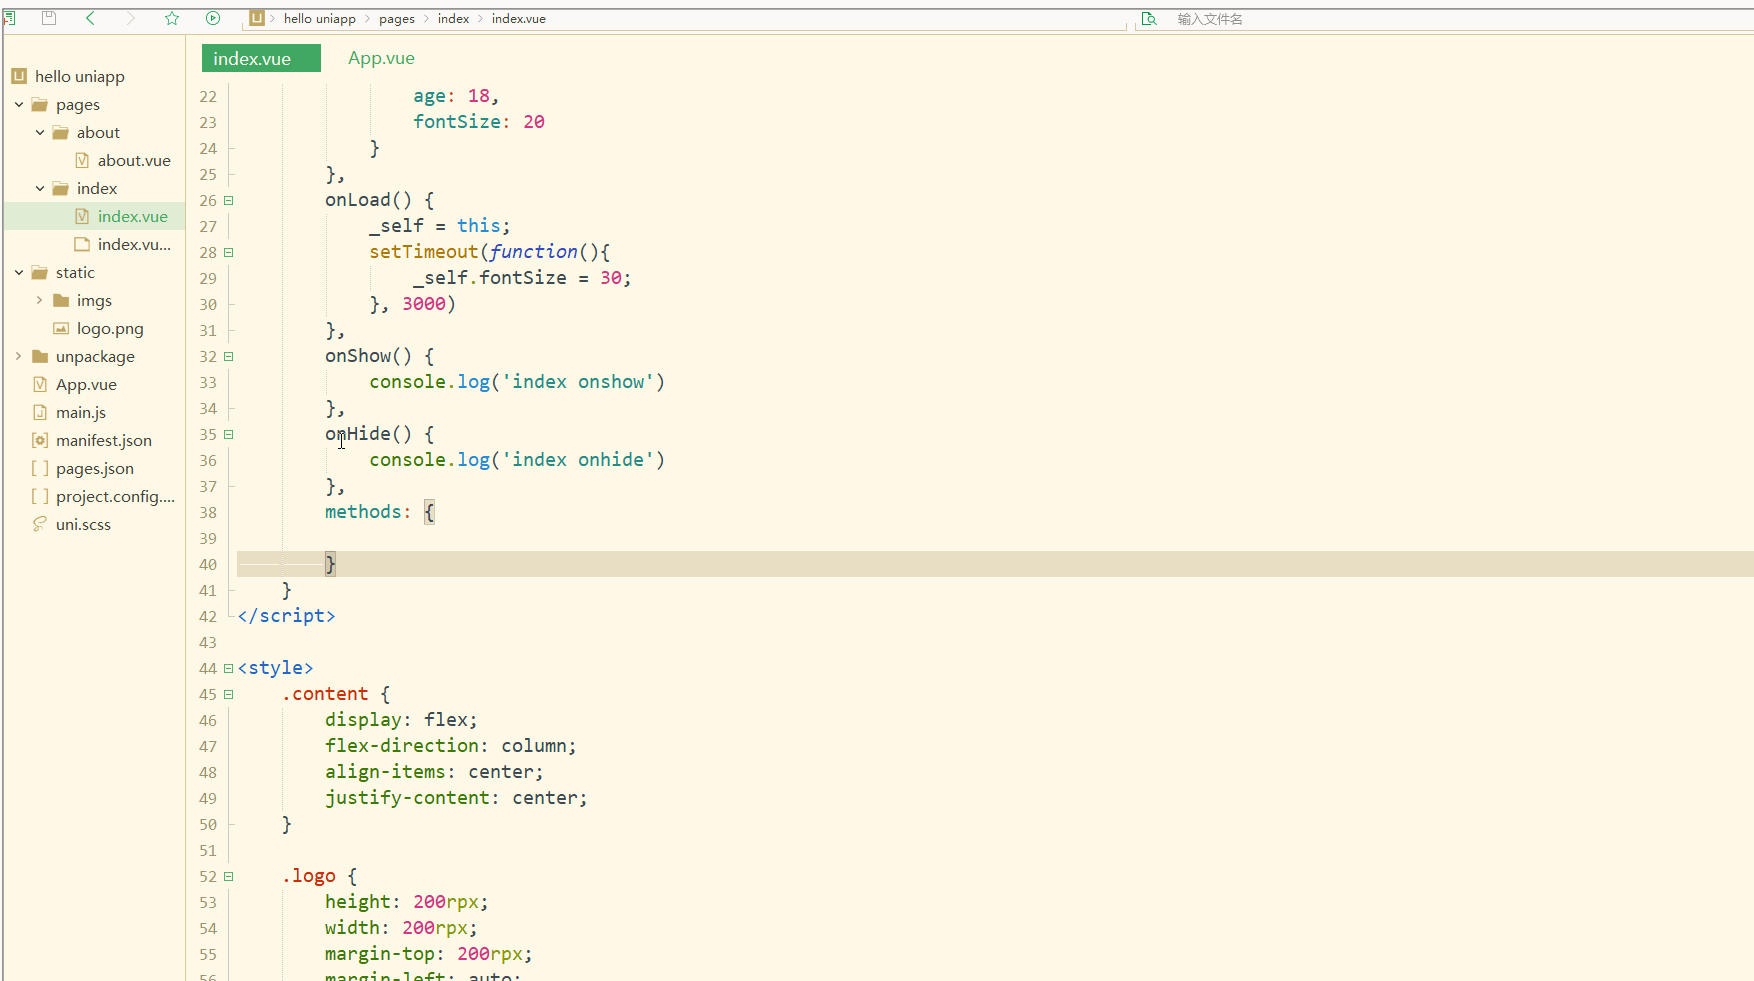
Obviously, styles can change dynamically.
需要注意,uni-app不支持 Vue官方文档中Class 与 Style 绑定 中的 classObject 和 styleObject 语法,但是可以用 computed 方法生成 class 或者 style 字符串,插入到页面中,如下:
<template>
	<view>
		<!-- 支持 -->
		<view class="container" :class="computedClassStr"></view>
		<view class="container" :class="{active: isActive}"></view>
		<!-- 不支持 -->
		<view class="container" :class="computedClassObject"></view>
	</view>    </template>
3.案例–动态菜单切换
本案例实现动态切换导航栏。
先展示横向排列的导航栏,index.vue如下:
<template>
	<view>
		<view v-for="(item, index) in menus" class="menu">
			{{item}}		</view>
	</view></template><script>
	var _self;
	export default {
		data() {
			return {
				menus: [
					'新闻', '汽车', '读书'
				]
			}
		},
		onLoad() {

		},
		onShow() {
			console.log('index onshow')
		},
		onHide() {
			console.log('index onhide')
		},
		methods: {

		}
	}</script><style>
	.menu {
		padding: 10px;
		float: left;
		margin: 5px;
		line-height: 36px;
	}</style>
显示: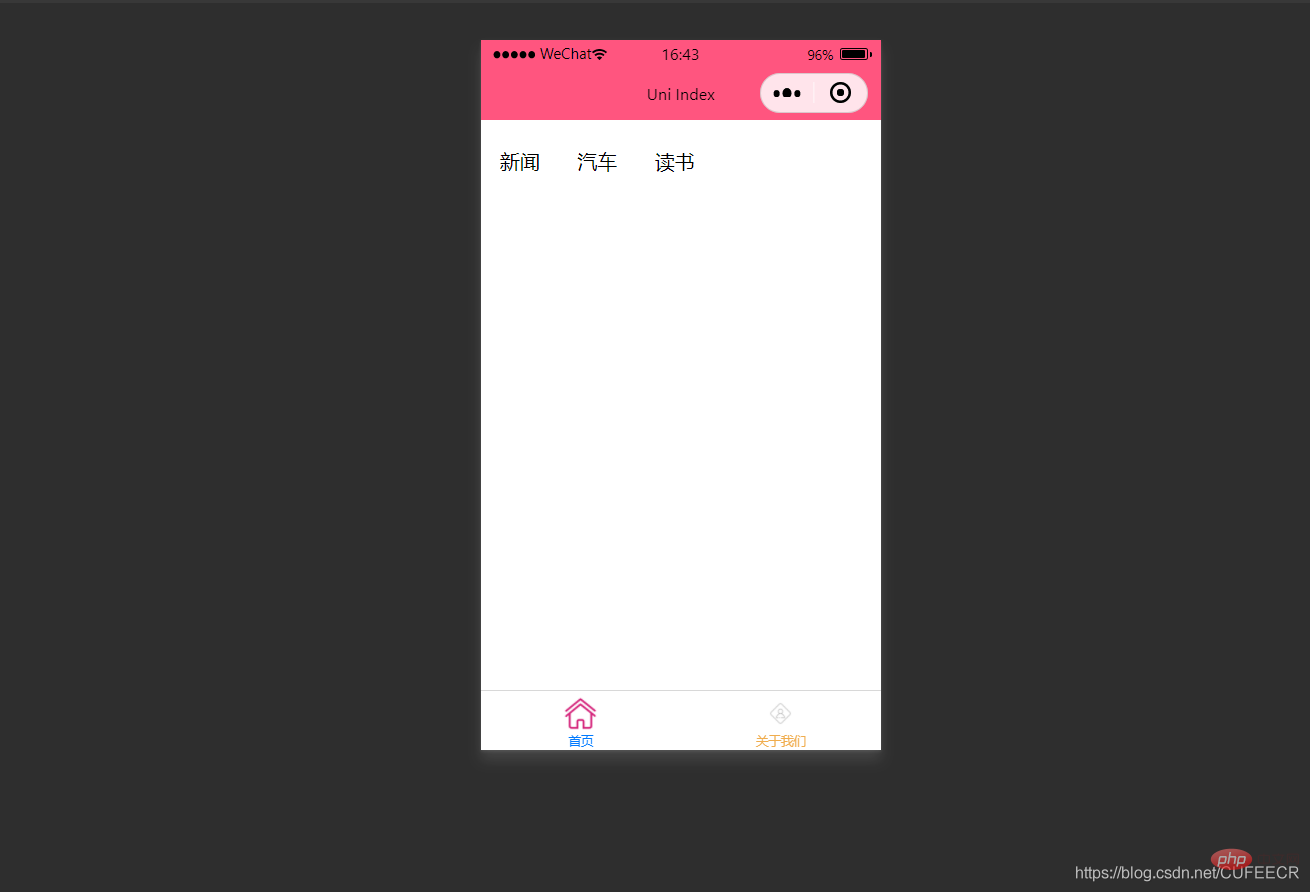
此时已经可以将导航栏横向展示了。
再实现当前的导航栏显示不一样的颜色,如下:
<template>
<view>
<view v-for="(item, index) in menus" class="menu" :class="[activeIndex==index?'menuActive':'']">
{{item}} </view>
</view></template><script>
var _self;
export default {
data() {
return {
menus: [
'新闻', '汽车', '读书'
],
activeIndex: 0
}
},
onLoad() {
},
onShow() {
console.log('index onshow')
},
onHide() {
console.log('index onhide')
},
methods: {
}
}</script><style>
.menu {
padding: 10px;
float: left;
margin: 5px;
line-height: 36px;
}
.menuActive {
color: #FF0000 !important;
}</style>
显示: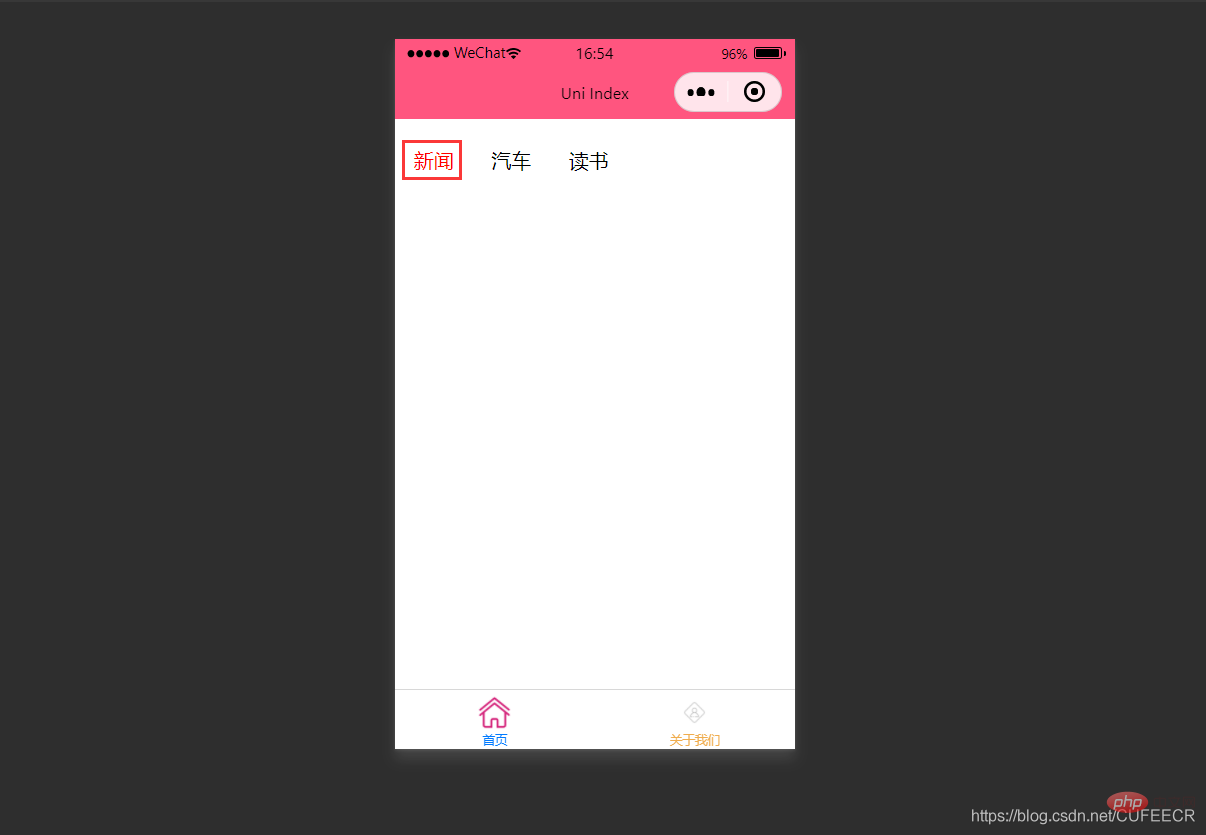
此时,第1个导航栏变为红色。
进一步实现点击时,颜色动态变化,如下:
<template>
<view>
<view v-for="(item, index) in menus" class="menu" :class="[activeIndex==index?'menuActive':'']" @click="menuClick" :id="index">
{{item}} </view>
</view></template><script>
var _self;
export default {
data() {
return {
menus: [
'新闻', '汽车', '读书'
],
activeIndex: 0
}
},
onLoad() {
_self = this
},
onShow() {
console.log('index onshow')
},
onHide() {
console.log('index onhide')
},
methods: {
menuClick: function(e){
var aid = e.target.id;
console.log(aid);
_self.activeIndex = aid;
}
}
}</script><style>
.menu {
padding: 10px;
float: left;
margin: 5px;
line-height: 36px;
}
.menuActive {
color: #FF0000 !important;
}</style>
使用了事件来达到动态切换的效果。
显示: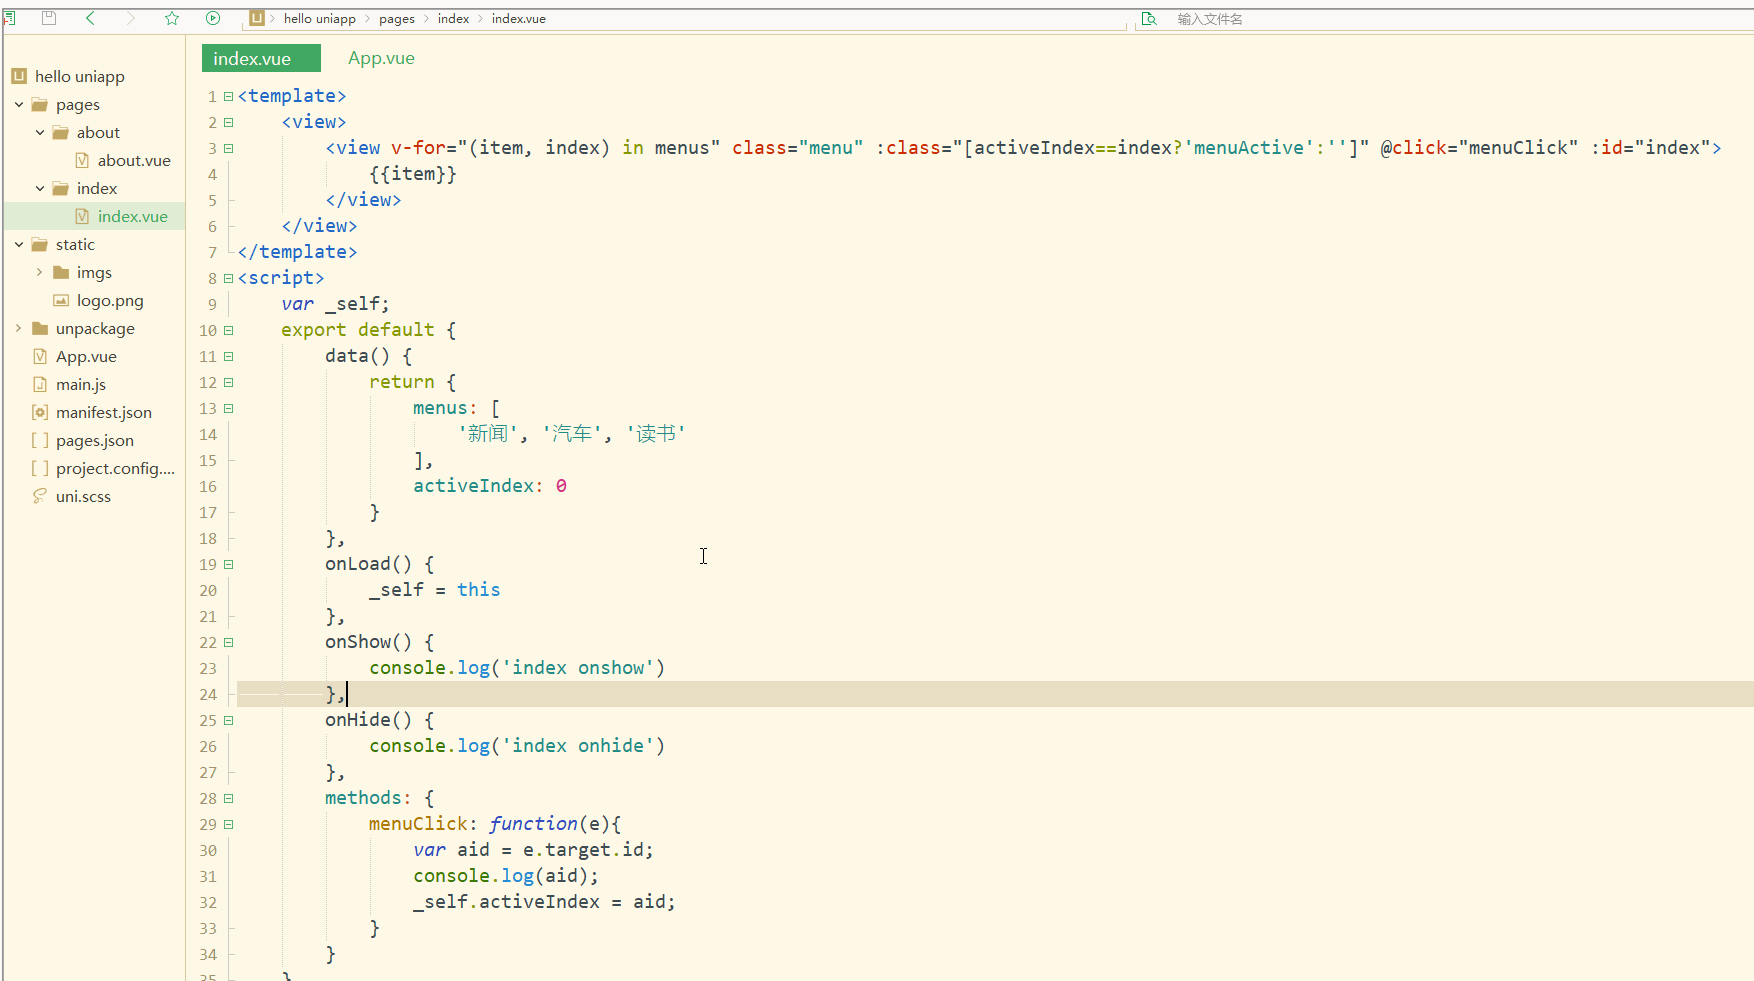
可以看到,点击不同的导航栏实现了颜色同步变化的效果。
三、事件和事件绑定
1.uni-app事件
事件映射表定义了WEB事件和uni-app事件之间的对应关系,具体如下:
| Web事件 | uni-app事件 | 说明 |
|---|---|---|
| click | ‘tap’ | 被点击 |
| touchstart | ‘touchstart’ | 手指开始在元素上触摸时 |
| touchmove | ‘touchmove’ | 移动 |
| touchcancel | ‘touchcancel’ | 取消 |
| touchend | ‘touchend’ | 结束 |
| tap | ‘tap’ | 单机 |
| longtap | ‘longtap’ | 长按 |
| input | ‘input’ | 输入 |
| change | ‘change’ | 改变 |
| submit | ‘submit’ | 表单提交 |
| blur | ‘blur’ | 失焦 |
| focus | ‘focus’ | 聚焦 |
| reset | ‘reset’ | 表单重置 |
| confirm | ‘confirm’ | 确认 |
| columnchange | ‘columnchange’ | 字段变化 |
| linechange | ‘linechange’ | 行比那花 |
| error | ‘error’ | 错误 |
| scrolltoupper | ‘scrolltoupper’ | 滚动到顶部 |
| scrolltolower | ‘scrolltolower’ | 滚动到底部 |
| scroll | ‘scroll’ | 滚动 |
说明:
(1)在 input 和 textarea 中 change 事件会被转为 blur 事件;
(2)列表中没有的原生事件也可以使用,例如map组件的regionchange 事件直接在组件上添加@regionchange修饰即可,同时这个事件也非常特殊,它的 event type 有 begin 和 end 两个,导致我们无法在handleProxy 中区分到底是什么事件,所以在监听此类事件的时候同时监听事件名和事件类型,即<map @regionchange="functionName" @end="functionName" @begin="functionName"><map>;
(3)由于平台的差异,bind 和 catch 事件同时绑定时,只会触发 bind,catch 不会被触发,使用时需要注意。
(4)件修饰符:
- 使用stop会阻止冒泡,但是同时绑定了一个非冒泡事件,会导致该元素上的 catchEventName 失效;
- prevent 可以直接结束事件,因为uni-app里没有什么默认事件,比如 submit 并不会跳转页面;
- self 没有可以判断的标识;
- once 也不能做,因为uni-app没有 removeEventListener, 虽然可以直接在 handleProxy 中处理,但是并不优雅;
(5)按键修饰符:
uni-app运行在手机端,没有键盘事件,所以不支持按键修饰符。
2.事件绑定
使用@对元素进行事件绑定,当事件被触发时,会导致相应的操作。
index.vue如下:
<template>
	<view>
		<view class="demo" @click="clickTest" @longtap="longtap"></view>
	</view></template><script>
	var _self;
	export default {
		data() {
			return {
			}
		},
		onLoad() {
			_self = this
		},
		onShow() {
			console.log('index onshow')
		},
		onHide() {
			console.log('index onhide')
		},
		methods: {
			clickTest : function(e){
				console.log("click")
			},
			longtap : function(e){
				console.log("longtap")
			},
		}
	}</script><style>
	.demo {
		width: 600rpx;
		height: 600rpx;
		background: #DD524D;
	}</style>
显示: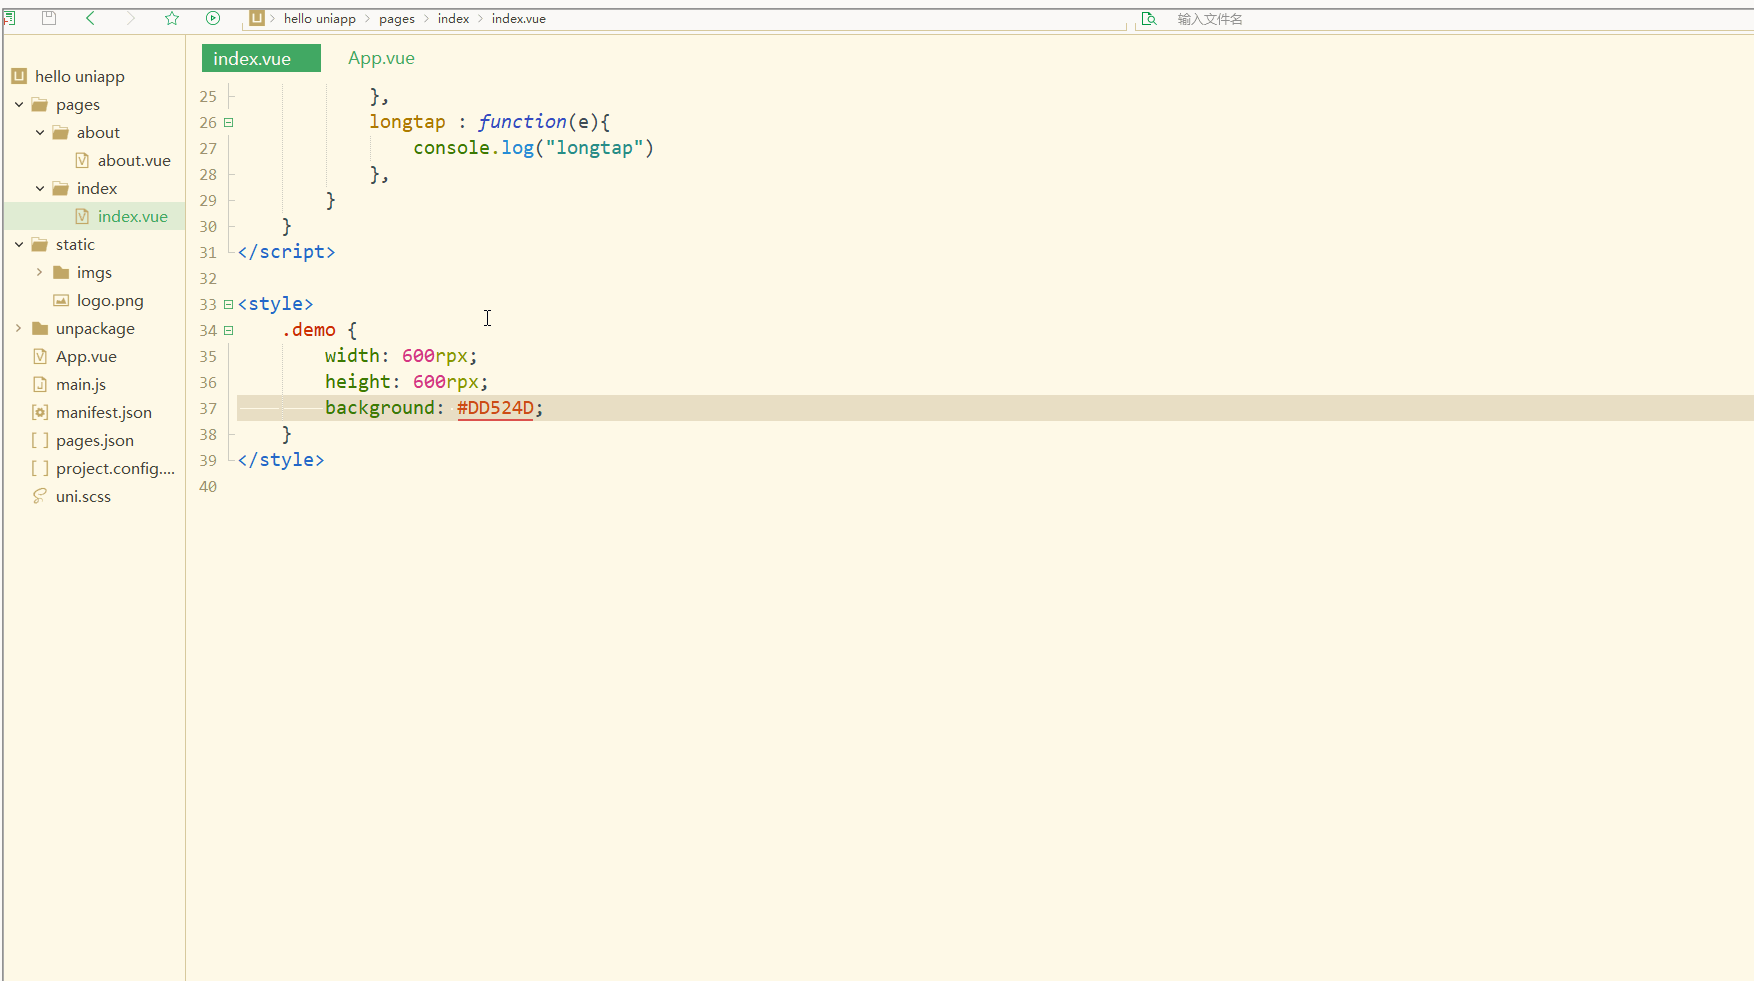
可以看到,在进行点击和长按时,会触发不同的事件、执行不同的操作。
可以在小程序中观察对应事件对象,并利用此对象获取更多信息。
3.事件传参
在触发事件时,还可以传入动态参数。
如下:
<template>
	<view>
		<view v-for="(item, index) in students" class="persons" @click="menuClick" v-bind:id="index">{{index}} - {{item.name}}</view>
	</view></template><script>
	var _self;
	export default {
		data() {
			return {
				students: [{
						name: "张三",
						age: 18
					},
					{
						name: "李四",
						age: 20
					}
				]
			}
		},
		onLoad() {
			_self = this
		},
		onShow() {
			console.log('index onshow')
		},
		onHide() {
			console.log('index onhide')
		},
		methods: {
			menuClick: function(e) {
				console.log(e);
				console.log(e.target.id);
			},
		}
	}</script><style>
	.demo {
		width: 600rpx;
		height: 600rpx;
		background: #DD524D;
	}</style>
显示: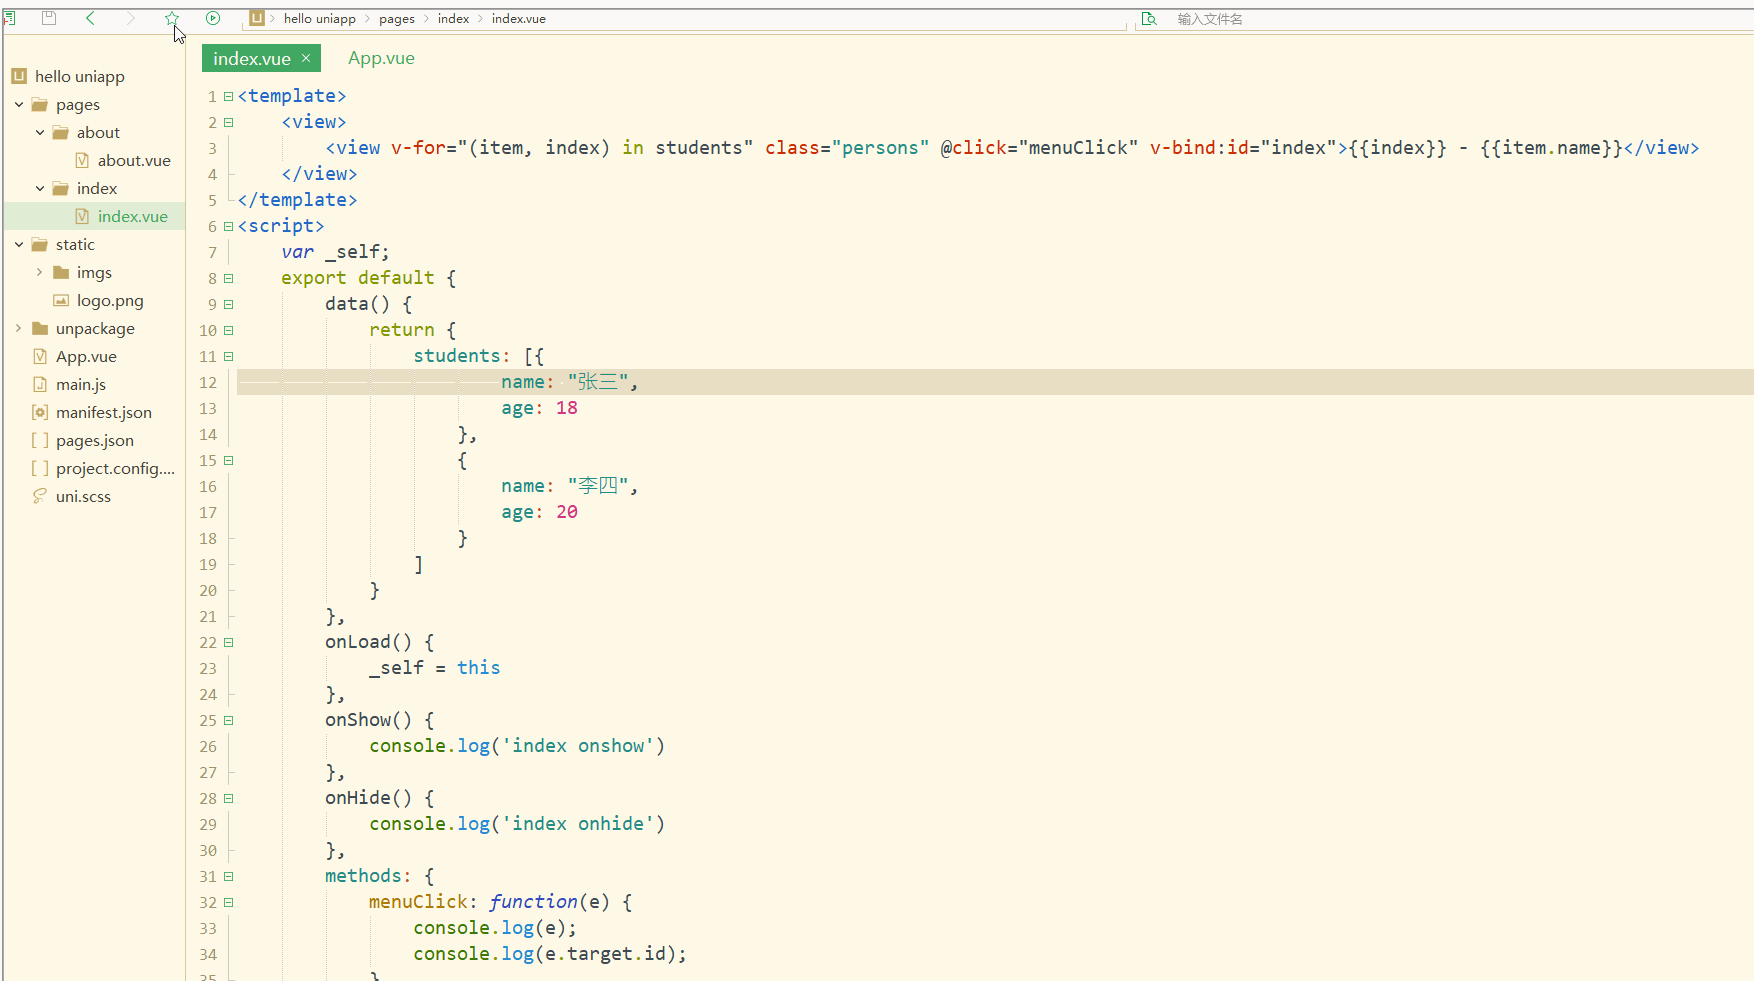
可以看到,在进行点击时,控制台打印出了事件对象和e.target.id的值。
再如:
<template>
	<view>
		<view class="demo" id="outid" @click="clickTest" @longtap="longtap">
			<view id="inid" style="width: 400rpx;height: 400rpx;background: #007AFF;"></view>
		</view>
	</view></template><script>
	var _self;
	export default {
		data() {
			return {
			}
		},
		onLoad() {
			_self = this
		},
		onShow() {
			console.log('index onshow')
		},
		onHide() {
			console.log('index onhide')
		},
		methods: {
			clickTest : function(e){
				console.log(e.currentTarget.id)
				console.log(e.target.id)
			},
			longtap : function(e){
				console.log("longtap")
			},
		}
	}</script><style>
	.demo {
		width: 600rpx;
		height: 600rpx;
		background: #DD524D;
	}</style>
显示: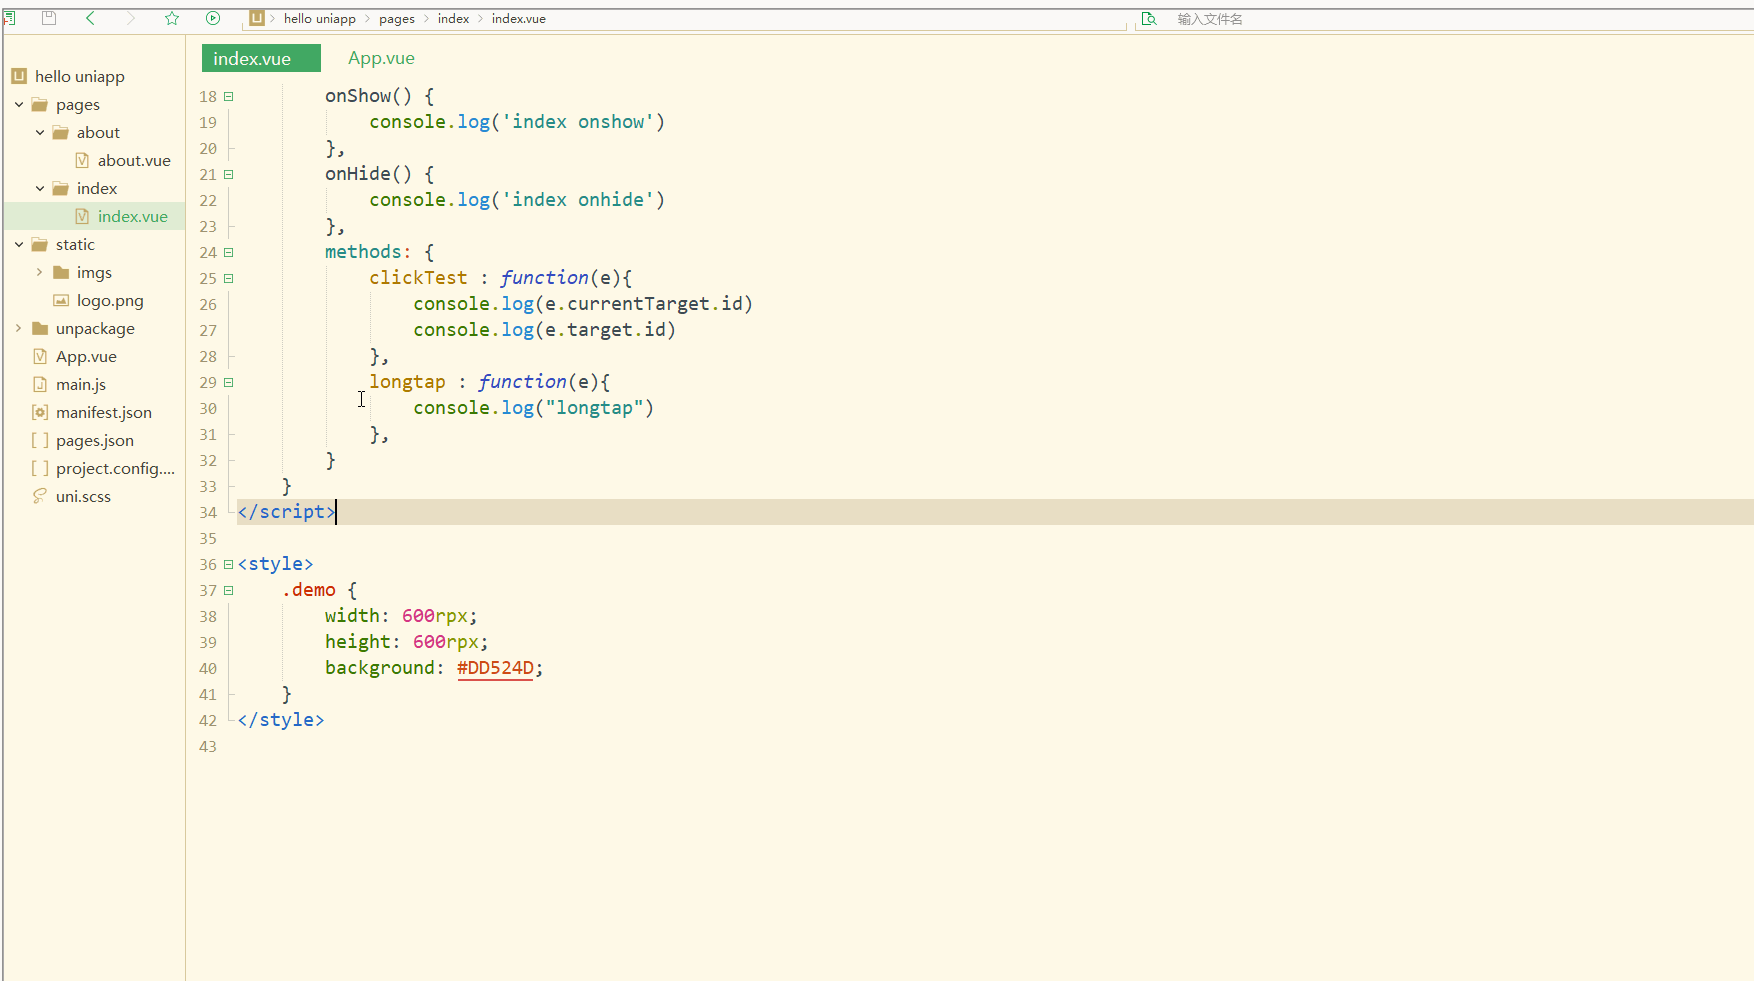
可以看到,在点击外部红色区域时,打印的两个id值相同;
而在点击内部蓝色区域时,e.target变为内部的view元素,所以打印出的也是inid,所以在使用属性传参时尽量使用e.currentTarget。
总结
在uni-app中,不论是对于数据(变量),还是对于以class或style定义的样式,亦或定义的事件,都可以进行动态绑定、同步变化,这些特性有利于更高效地开发出所需功能,大大降低了开发成本。
The above is the detailed content of uni-app introductory tutorial: data binding, style binding and event processing. For more information, please follow other related articles on the PHP Chinese website!