Home >Web Front-end >JS Tutorial >Detailed explanation of JavaScript's mechanism for Web push notifications
Detailed explanation of JavaScript's mechanism for Web push notifications
- coldplay.xixiforward
- 2020-12-15 17:15:514164browse
javascriptThe column introduces the mechanism of Web push notifications
Recommended (free): javascript
Push notifications are very common on mobile devices. On the web side, despite high developer demand for its functionality, push notifications were introduced to the web relatively late for some reasons.
Introduction
Web push notifications allow users to choose whether to receive update messages when a web application needs to be updated. The purpose is to re-attract the attention of the user base. The update information is usually interesting and interesting to the user. Important, real-time content.
The reason for using Service Workers in this case is that they work in the background. This is useful for push notifications as it means their code will only be executed when the user interacts with the notification itself.
Push and notification
Push and notification have their own API
- Push — It is called when the server provides information to the Service Worker.
- Notifications — This is the action of a Service Worker or script in a web application that displays information to the user.
Push(Push)
implementationPush Generally three steps:
- UI — Add the necessary client logic to subscribe to pushed users. This is the JavaScript logic required by the web application UI so that users can register themselves to push messages.
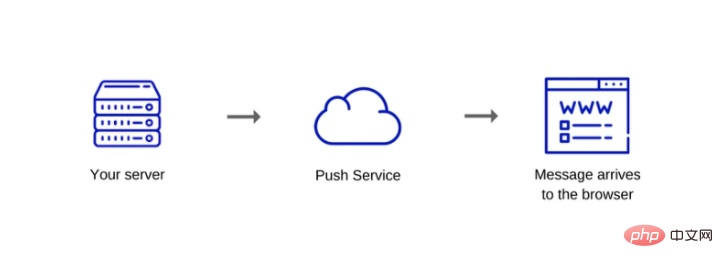
- Send Push Notification — Implement an API call on the server that triggers a push message to the user's device.
- Accept Push Messages — Handle push messages when they arrive at the browser.
The more detailed process is discussed next.
Browser support detection
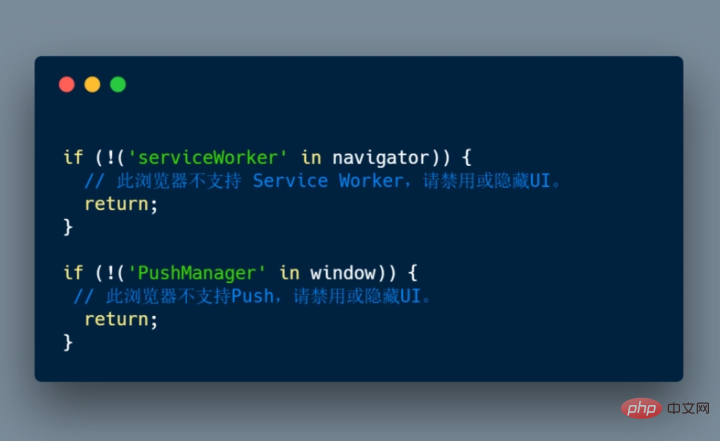
First of all, we need to check whether the current browser supports push messages. We can judge whether push messages are supported through two simple checks:
- Check
navigatorserviceWorker on the object - Check
windowPushManager
The code is as follows:
Register Service Worker
If the browser supports this function, the next step is to register Service Worker.
How to register a Service Worker is explained in the previous article How JavaScript Works: The Life Cycle and Usage Scenarios of Service Worker.
Request permission
After the Service Worker is registered, we can start subscribing to the user. To do this, we need the user's permission to send push messages to the user.
The API to obtain permissions is relatively simple, but the disadvantage is that the API has changed from callbacks to returning Promise. This introduces a problem: we don't know which version of the API the current browser implements, so both versions must be implemented and processed at the same time, as follows:
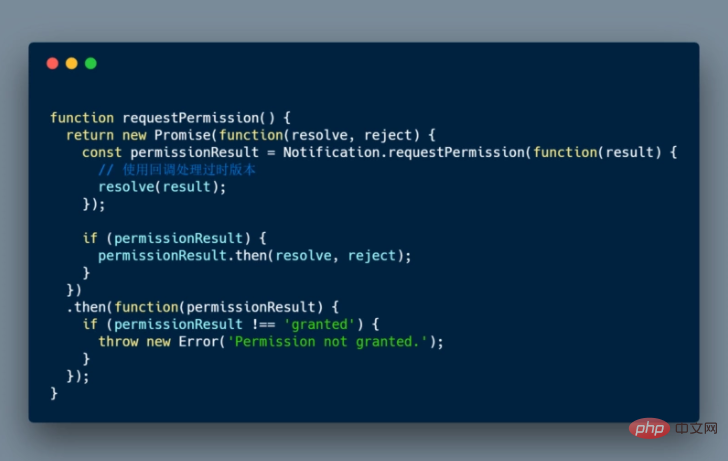
callNotification.requestpermission() The following prompt will be displayed in the browser:

Once the permission is granted, closed or blocked, we will receive the corresponding one String: granted, default, or denied.
Remember that if the user clicks the Block button, your web application will not be able to request the user's permission again until they manually "dismiss" it by changing the permission status Permissions for your application, this option is hidden in the settings panel.
Subscribe users using PushManager
Once you have registered a Service Worker and obtained permission, you can subscribe users by calling registration.pushManager.subscribe() when registering the Service Worker .
The entire code snippet can be as follows (including registering Service Worker):
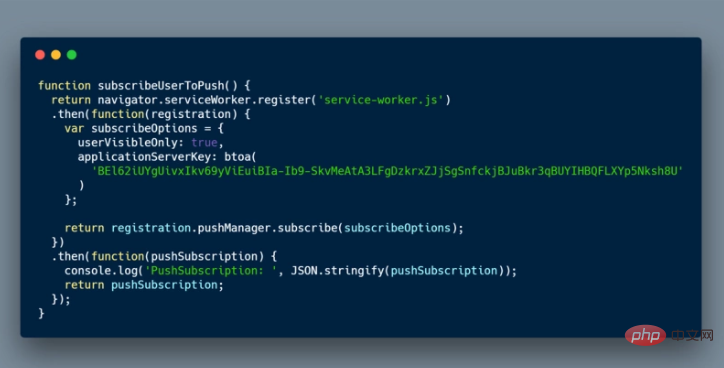
##registration.pushManager.subscribe(options) Accepts a options Object containing required and optional parameters:
- userVisibleOnly: Boolean value indicating that the returned push subscription will only be used for messages visible to the user.
-
applicationServerKey: The public key used by the push server to send messages to the client application. This value is part of the signing key pair generated by the application server, using Elliptic Curve Digital Signatures (ECDSA) implemented on the P-256 curve. Can be
DOMStringorArrayBuffer.
Your server needs to generate a pair of application server keys - these keys are also called VAPID keys, and they are server-specific. They are a pair of public and private keys. The private key is stored secretly on your terminal, while the public key is exchanged with the client. These keys allow the push service to know which application server is subscribed to a certain user and ensure that the server that triggered the push message for that user is the same server.
You only need to create a private/public key pair for your application once, one way is to visit https://web-push-codelab.glit... .
When subscribing to a user, the browser passes the applicationServerKey (public key) to the push service, which means the push service can bind the application's public key to the user's PushSubscription .
The process is roughly like this:
- After loading the web application, pass the server key by calling the
subscribe()method. - The browser makes a network request to a push service, which generates an endpoint, associates the endpoint with the key, and returns the endpoint to the browser.
- The browser will add this endpoint to the
PushSubscriptionobject obtained by returning thepromiseof subscribe().
After that, whenever you want to push a message, you need to create an Authorization header, which contains information signed with the application server's private key. When the push service receives a request to send a push message, it will verify the message headers by looking up the public key that has been linked to that specific endpoint (step two).
PushSubscription Object
PushSubscription The object contains all the information needed to send a push message to the user's device, as follows:
{
  "endpoint": "https://domain.pushservice.com/some-id",
  "keys": {
    "p256dh":
"BIPUL12DLfytvTajnryr3PJdAgXS3HGMlLqndGcJGabyhHheJYlNGCeXl1dn18gSJ1WArAPIxr4gK0_dQds4yiI=",
    "auth":"FPssMOQPmLmXWmdSTdbKVw=="
  }
}- endpoint: The URL of the push service, to trigger push messages and post requests.
- keys: This object contains the values used to encrypt message data sent via push messages.
Once the user is subscribed and you have the PushSubscription object, you need to send it to the server. On the server, you save a subscription to the database and from now on use it to send push messages to this user.

Send push messages
When you want to send push messages to users, the first thing you need is a push service. Tell the server through API calls what data you need to send now, who to send the message to, and any standards on how to send the message. Typically, this API call is done on the server.
Push service
The push service receives the request, verifies the request and sends the push message to the corresponding browser.
Please note that the push service is not managed by you - it is a third-party service. Your server is the server that communicates with the push service through the API. An example of a push service is Google's FCM.
The push service handles all the heavy lifting. For example, if the browser is offline, the push service queues the message before sending the corresponding message, waiting for the browser to come online again.
Each browser can use any push service they want, this is beyond the developer's control. However, all push services have the same API, so this does not cause implementation difficulties.
In order to obtain the URL that handles the push message request, the stored value of the endpoint in the PushSubscription object needs to be checked.
Push Service API
The Push Service API provides a way to send messages to users. API is a web protocol, which is an IETF standard that defines how to make API calls to push services.
Data sent using push messages must be encrypted. This way, you can prevent the push service from viewing the data being sent. This is important because the browser decides which push service to use (it may be using one that is untrusted and not secure enough).
For each push message, you can also give the following instructions:
- TTL — 定义消息在删除和未发送之前应排队多长时间。
- 优先级 — 定义每个消息的优先级,推送服务只发送高优先级的消息,确保用户因为一些突发情况关机或者断电等。
- 主题 — 为推送消息提供一个主题名称,该名称将用相同的主题替换挂起的消息,这样,一旦设备处于活动状态,用户就不会收到过时的信息。
浏览器中的推送事件
一旦按照上面的解释将消息发送到推送服务,该消息将处于挂起状态,直到发生以下情况之一:
- 设备上线
- 消息由于 TTL 而在队列上过期
当推送服务传递消息时,浏览器将接收它,解密它,并在的 Service Worker 中分派一个 push 事件。这里最重要的是,即使 Web 页面没有打开,浏览器也可以执行你的 Service Worker。流程如下:
- 推送消息到达浏览器,浏览器解密它
- 浏览器唤醒 Service Worker
-
push事件被分发给 Service Worker
设置推送事件监听器的代码应该与用 JavaScript 编写的任何其他事件监听器类似:
self.addEventListener('push', function(event) {
  if (event.data) {
    console.log('This push event has data: ', event.data.text());
  } else {
    console.log('This push event has no data.');
  }
});
需要了解 Service Worker 的一点是,你没有 Service Worker 代码运行时长的控制权。浏览器决定何时将其唤醒以及何时终止它。
在 Service Worker 中,event.waitUntil(promise),告诉浏览器在该promse 未完成之前工作将一直进行中,如果它希望完成该工作,它不应该终止 Sercice Worker。
以下是一个处理 push 事件的例子:
self.addEventListener('push', function(event) {
  var promise = self.registration.showNotification('Push notification!');

  event.waitUntil(promise);
});
调用 self.registration.showNotification() 将向用户显示一个通知,并返回一个 promise,该 promise 在显示通知后将执行 resolve 方法。
showNotification(title, options) 方法可以根据需要进行可视化调整,title 参数是一个字符串,而参数 options 是一个对象,内容如下:
{
"//": "Visual Options",
"body": "<String>",
"icon": "<URL String>",
"image": "<URL String>",
"badge": "<URL String>",
"vibrate": "<Array of Integers>",
"sound": "<URL String>",
"dir": "<String of 'auto' | 'ltr' | 'rtl'>",
"//": "Behavioural Options",
"tag": "<String>",
"data": "<Anything>",
"requireInteraction": "<boolean>",
"renotify": "<Boolean>",
"silent": "<Boolean>",
"//": "Both Visual & Behavioural Options",
"actions": "<Array of Strings>",
"//": "Information Option. No visual affect.",
"timestamp": "<Long>"
}可以了解更多的细节,每个选项在这里做什么- https://developer.mozilla.org...
当有紧急、重要和时间敏感的信息需要与用户分享时,推送通知是吸引用户注意力的好方法。
例如,我们在 SessionStack 计划利用推送通知让我们的用户知道他们的产品何时出现崩溃、问题或异常。这将让我们的用户立即知道发生了什么错误。然后,他们可以将问题作为视频回放,并利用我们的库收集的数据(如DOM更改、用户交互、网络请求、未处理的异常和调试消息)查看发生在最终用户身上的所有事情。
The above is the detailed content of Detailed explanation of JavaScript's mechanism for Web push notifications. For more information, please follow other related articles on the PHP Chinese website!
Related articles
See more- An in-depth analysis of the Bootstrap list group component
- Detailed explanation of JavaScript function currying
- Complete example of JS password generation and strength detection (with demo source code download)
- Angularjs integrates WeChat UI (weui)
- How to quickly switch between Traditional Chinese and Simplified Chinese with JavaScript and the trick for websites to support switching between Simplified and Traditional Chinese_javascript skills

